It is a special range of pads, they are 0.2mm thick and 40% compressible - specifically made for heatsinks. I did post the spec sheet. The range is Soft-PGS (EYGS✽✽✽✽ZL✽✽) for example EYGS0909ZLX2.
I bought the EYGS0404ZLMP, but it has one single hole in the centre rather than 4 holes on the corners.
http://uk.farnell.com/webapp/wcs/st...estType=Base&partNumber=2723038&storeId=10151
You can also look at Digikey, RSComponents, Mouser etc Not sure about ebay and Amazon.
-
Please look in THROTTLESTOP" LIMIT" button and tell me exactly which throttling appears.
EDP OTHER is different than CURRENT or EDP CURRENT.
They are triggered by different flags.
Please let me know. -
Just received my 17R5 from HIDEvolution. After a crappy experience with a Thinkpad P71 (direct from Lenovo) that you can read about here: http://forum.notebookreview.com/threads/new-p71-owner-mini-review-and-rant.806025/
I bought this as a mobile workstation, not a huge gamer. My primary workloads are SQL database work and ArcGIS. ArcGIS especially benefits more from frequency than core count.
I am pretty amazed with the quality of the system. I got the 8950HK with a 1070.Had them do the full liquid metal and thermal pad upgrade. Huge shoutout to @Ted@HIDevolution for all the help and update during the build...not to mention responding to my first email on a Saturday evening.
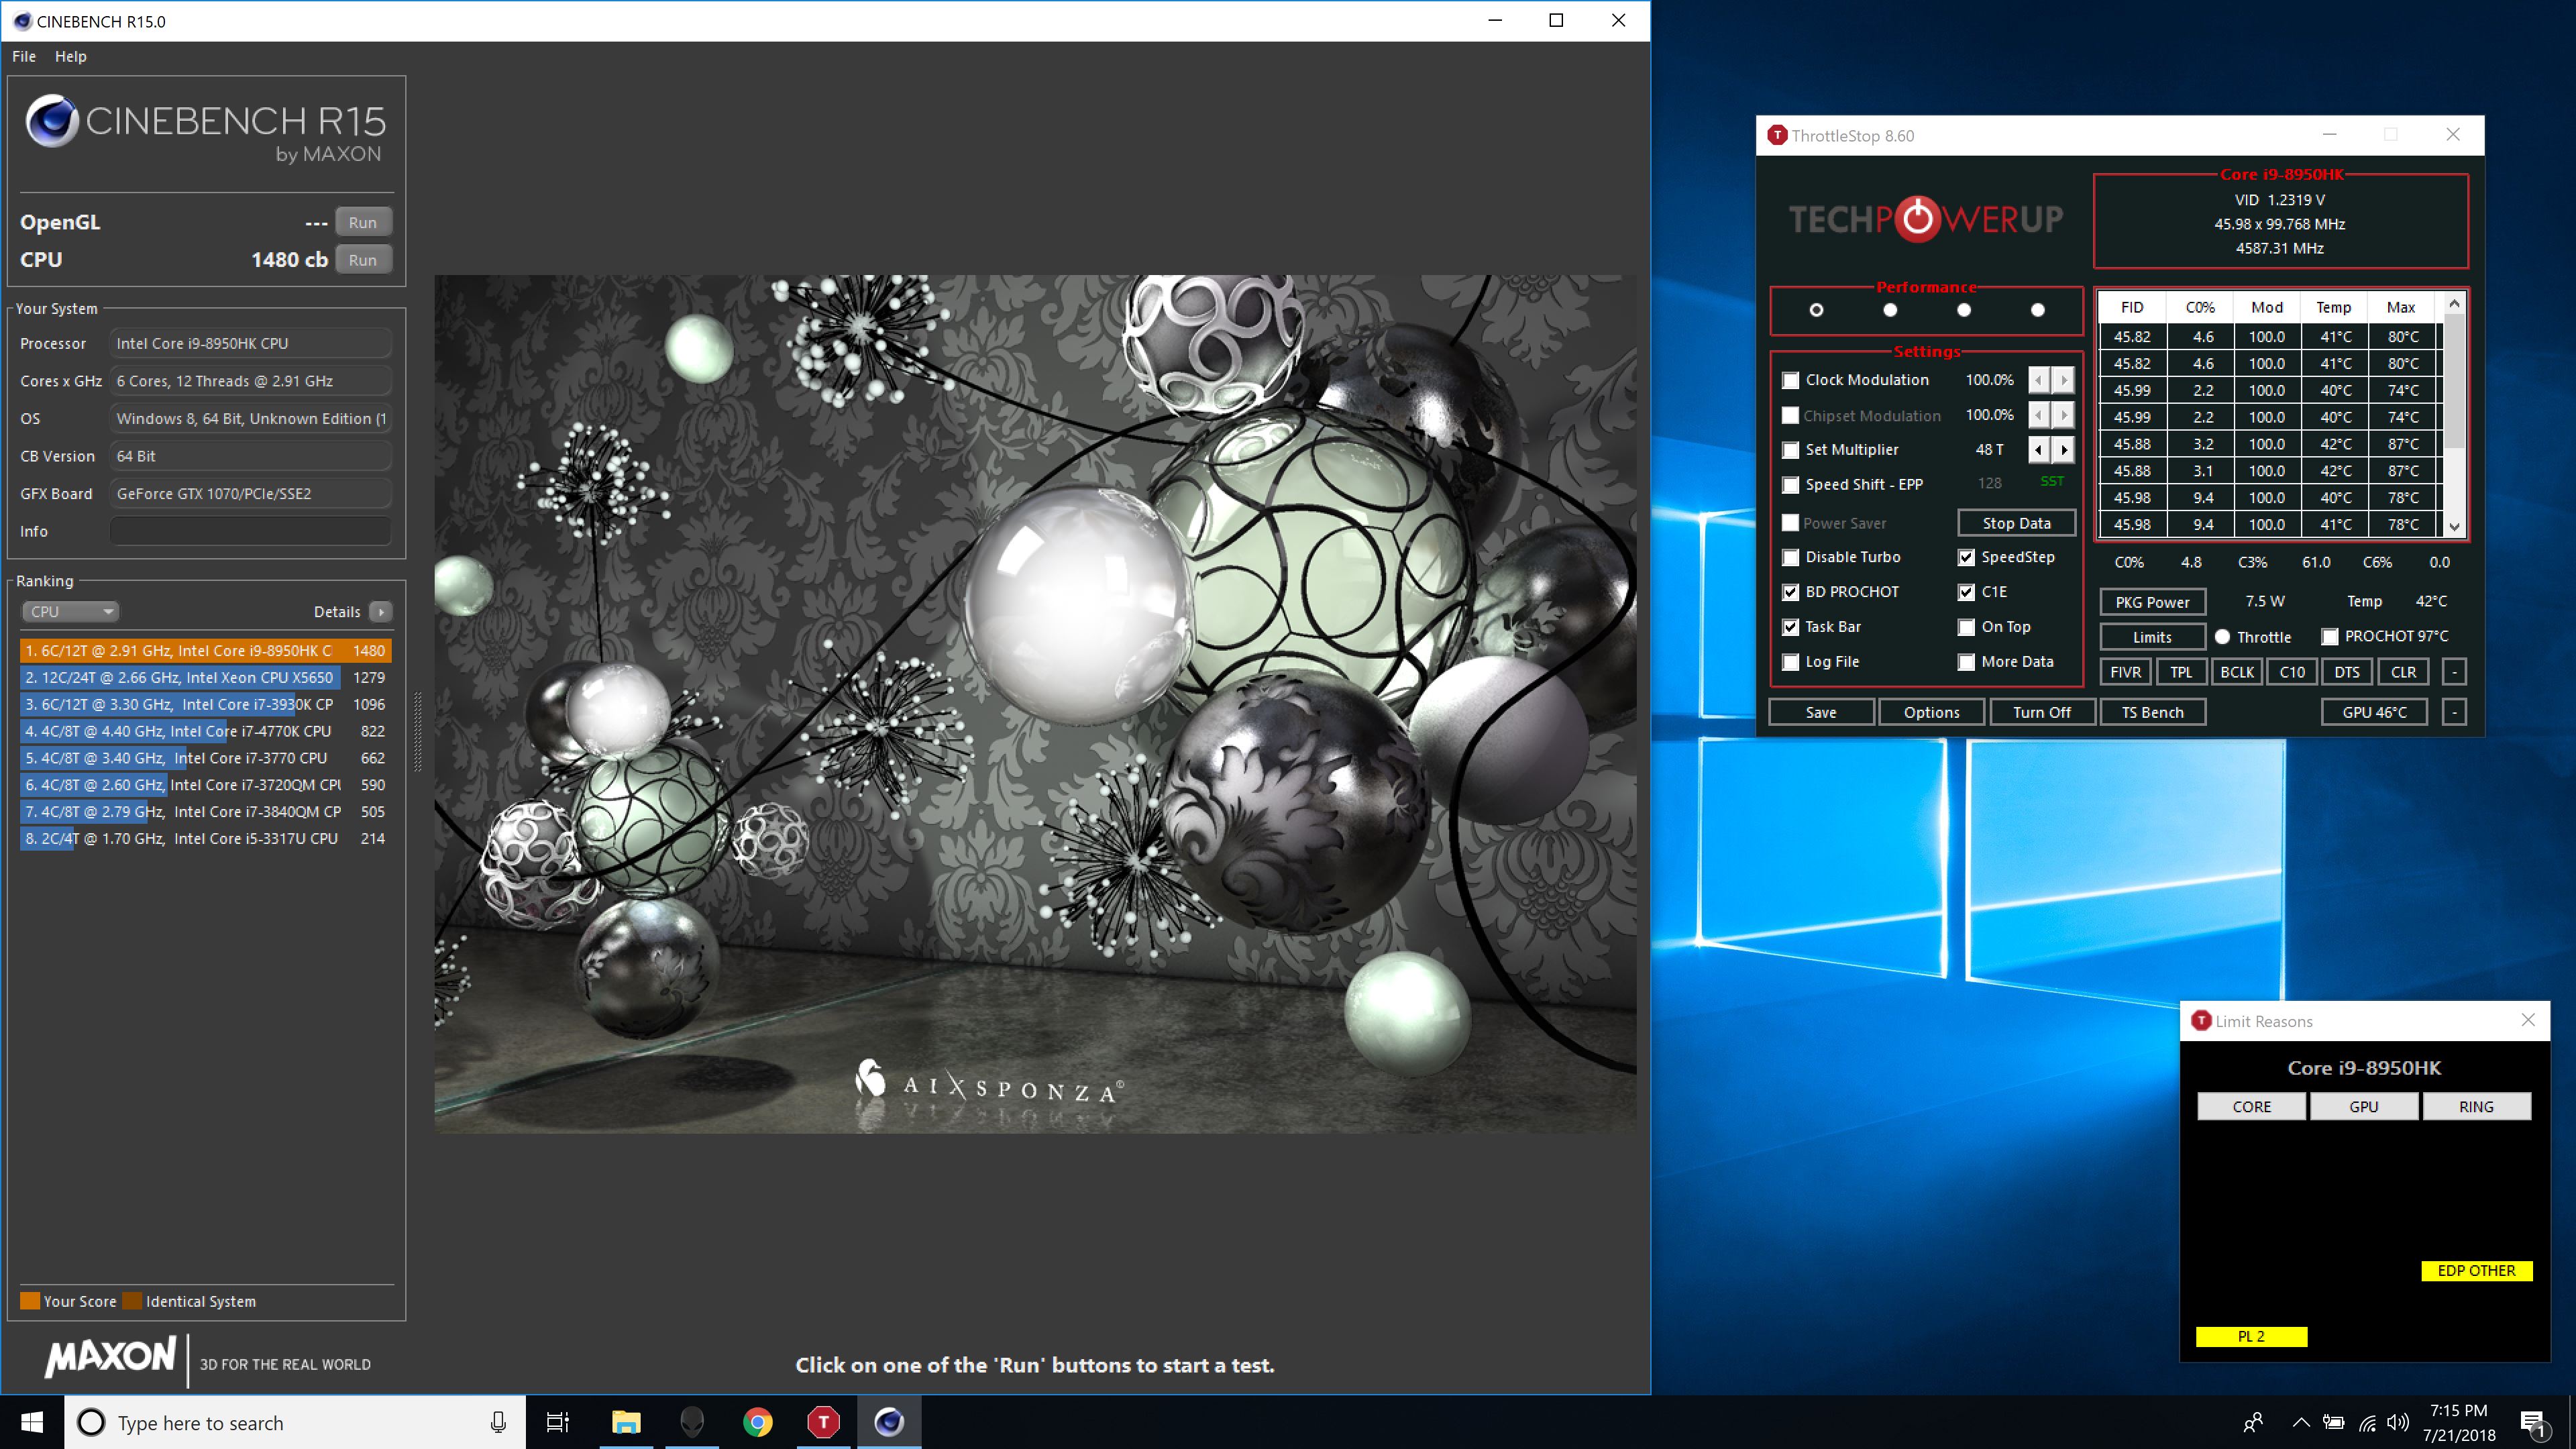
So far I can get around 1480 in Cinebench R15 with a 4.6Ghz all-core OC using Throttlestop. I am undervolting CPU, cache and system agent by -169.9 and the iGPU by -100.6 Temps aren't a problem...my hottest core during that run was 87, coolest was 74. The issue seems to be the 110watt TDP. I see the fields in BIOS where it should be editable but they're greyed out. Is this a BIOS version specific thing or are they just locked in stone?Attached Files:
-
-
Hey all. I kind of need some help with my Alien. 10 Days ago, I did a repaste with Kyronaut (posted on this thread), however the core differential issue is back again. I suspect it could be because of poor thermal application that cause air bubbles to form between the heatsink and CPU.
I think I may have screwed the heatsink down too tight which causes that. Does anyone have tips on how tight to screw down the heatsink? Also, I don't want to go to the extent of using LM Paste since, Dell Singapore is kinda pretty stringent on warranty and they can void it if I use LM. I also had bad experience with LM when I had my Alienware 18 in 201,5, it "dried up" (or alloyed with the heatsinks after approximately 3-4 months of initial application).
My current plan is to use IC Graphite Thermal Pad since, if I am gonna screw the heatsink down pretty tight, any thermal compound will just gunk out of the contacts.
-JasperFalkentyne likes this. -
I have another issue here:
The macro keyboard backlit does not work even though the buttons work. My issue is similar to what is described here https://www.dell.com/community/Alienware-Laptops/No-backlight-on-left-macro-keys/td-p/6084192
So, I have tried all the steps described here: https://www.dell.com/support/articl.../alienware-command-center-quick-guide?lang=en I tried: 1) reinstalling latest bios 1.2.1 2) Complete power off (pressing the power button for 30sec without battery or plugged in) 3) uninstalling-reinstalling Alienware command center. When I set a colour for the macro keyboard and press save it says saved. But when I check the colour in command center, it shows the macro keyboard as blank (without any colour) and of course no colour on the macro keyboard. 4) Alienware command center on my R5 has not alienfx tester in the installation folder 5) dimming or turning off lights work for the rest of the keyboard but NOT the macro keyboard which has no backlit. -
1) The mainboard and heatsink assembly should not be flexed or warped. However it is bolted down onto an uneven surface which flexes it and the heatsinks.
2) I and other people have noticed that the factory fitted thermal pads surrounding the CPU/GPU are too thick and push the heatsink up and way from CPU/GPU. They need to be removed/changed. -
In the last OS install I avoided any Dell specific applications and no ACC. My keyboard and other lights are the colour they were set at originally and I have no means by which to change them. The colour was a light green. Recently I have noticed the left hand side macro keys have now turned cyan as has the alien head power switch. I have no idea who or what made this change. I suspect the colour codes are held in an NVRAM and controlled only by ACC which knows where and how to access this memory. But since it is not even installed I suspect something else may have screwed this memory somehow or has reset the macro keys to cyan because that is the default colour.
-
Yeah, TS reasons might help to pinpoint the limit reasons.
From the data that Aristotelhs2060 provided:
In hwinfo log file (with prime95 small ffts, PL1/PL2 =110w, -100mV UV, ~ 1.06v in load at 3.8Ghz, cpu package power: ~103w avr) the following flags were triggered:
-IA: Electrical Design Point/Other (ICCmax,PL4,SVID,DDR RAPL),
- IA: Package-Level RAPL/PBM PL2,PL3 was intermittently triggered,
- Ring: Max VR Voltage, ICCmax, PL4,
-GT: Max VR Voltage, ICCmax, PL4,
In XTU the current limit throttling is intermittently triggered (in the video he provided, can't remember what test it was or the settings).
In CB r15 with 110w PL1/PL2, -100mv UV, ~1.14V in load at 4.29Ghz, CPU package power: ~97w avr, the following flags were triggered in hwinfo log file:
-IA: Package-Level RAPL/PBM PL2,PL3 was triggered two times during the run (refresh rate appears to be ~2sec),
-RING: Max VR Voltage, ICCmax, PL4 was triggered two times (same time as ia PL2, PL3).Vistar Shook likes this. -
thermal grizzly thermal pads (minus pad 8) are more like thick paste formed into pads. They are somewhat fragile and difficult to cut, but 'mutate', without much resistance, to fit the application rather nicely. Faint contact point formed imprints give you a good idea whether you are accomplishing what you set out to do.Last edited: Jul 22, 2018Vistar Shook likes this.
-
Not sure, mind defining "flexed or warped" further?
As for the thermal pads, a repad is necessary with Fuji Poly is needed? Seems like it.
I will try to teardown the system again maybe some day. Right now my core Differential issue is back really quickly, getting 10 C between the coolest and hottest core. GPU seems to be doing fine no doubt. -
They, without question, are far superior, in terms of thermal conductivity, but you better have your spacing requirements exact... and at least in MY opinion, not THAT critical... a good LM CPU job is by far, the most beneficial upgrade... but not a DIY for the novice (or faint of heart).Last edited: Jul 22, 2018
-
Once you bolt the heatsink onto the motherboard you should not flex it. You must pick it up really gently from the heaviest and sturdiest part, which is the heatsinks, and not try to handle it from the actual PCB.
When you then try to position it over the chassis you may notice that it does not fit properly and you need to force it down. You fasten the fans with two screws each and then look at the other side of the motherboard, the battery / touchpad side, does it rest nicely on the screw sockets underneath it or does it need pressure to make contact? Mine needs pressure as it is sitting "up" about 2-3mm, which means the whole chassis is warped, or the motherboard/heatsinks are warped, or a combination.
The motherboard attaches to the keyboard and here is a photo to see how flexible the keyboard is. On the back side of this keyboard sits a metal frame, it can bee seen on the background and you see how warped it is too, as it is also thin and flexible metal. In the end you have a very weak structure onto which to mount the motherboard and heatsinks and expect it to be perfectly level.
-
When you guys use phobya paste, you're spreading it right? Because you should.
-
Could someone tell me what could be the reason that only two cores ( #4-#5) perfectly cool but all other cores over heating, I'm really confused.
![[IMG]](images/storyImages/272550fda48d04c3a690a7a7d4732943.jpg)
Sent from my Phone using Tapatalk -
Your average temps do not differ between the cores. As for the maximum temps, this more or less happens to everyone (especially with a thermal paste).
-
Look at the temps I'm getting under load. Average temps don't really tell anything as you get really low temps on idle anyways.
Sent from my Phone using Tapatalk -
That's why you should reset the timer when you start a game.
-
I disagree. 9c average core differential is a lot. His current temp difference is 18c. I can tell right away the heatsink is not balanced right.
-
I can tell straight away that the machine cannot handle the heat and so come the temp spikes. Use -100mv undervolt. This is the only solution. Regarding the lower power maximum due to thermal throttle these are high temps. Regarding the thermal paste use MX-4. It is better to check the temps only when under load (eg. during a benchmark like CB)
By the way, does anyone know if the macro keyboard is one piece with the rest of the keyboard or separate? Where can I find the part number for the US keyboard?Last edited: Jul 22, 2018 -
What was that load though - what were you doing at the time? You can have 100% CPU doing "inc eax" which produces no heat and 100% CPU doing floating point which produces terrible heat.
-
I was running CB I only get around 1100 score. Pretty low for the 8950hk.
Sent from my Phone using Tapatalk -
With stable undervolting I am getting 1380, 1386, 1380, 1388 - 43x 140mV 110W/110W - it also depends on room temps, it is 30C right now in my room. Every degree C counts.
So boot into OC1/2/3/custom, run XTU, make sure it says 110W/110W, undervolt 140mV, set the multipliers to 43x, close down XTU, run cinebench a few times, do not run any other applications. See what score you get. -
I did those settings & I'm getting these scores.
![[IMG]](images/storyImages/ade092cd75b218e926245700768795fa.jpg)
Sent from my Phone using Tapatalk -
Aristotelhs2060, when you unistall AWCC make sure to also delete in the regedit AlienwareCC service and OCC control service. You will find it in regedit under: Local machine/ software/dell. I just did it on my 15r4. Unistalled then reinstalled AWCC and OCcontrol and my performance have increased a lot. There seems to be a lot of bugs with the new AWCC. I believe it will fix you lightening issue.
-
Problem is, my laptop goes out pretty often so worried about LM seeping out to the board or losing efficiency even though I put thermal tape on chips for protection
I don’t seem to experience this issue.
I think I will try graphite thermal pad. If that doesn’t work either, I will consider LM. However I need tips since my Alien heads out on the go pretty often.
Also like I said, had a questionable experience with LM. Because when the gallium alloys to the copper, the compound dries up. I was using CLLU.
Now just tempted to go with TGC. -
Don't think you did because your speed clearly shows 4.7GHz. Set the multipliers to 42x or 43x (not 47x), undervolt 140mV. The idea is to complete the Cinebench run without any throttles.
-
If you have a AW17 R5 then I presume it is made in the same way as mine. Everything is bolted onto everything else but there is no torsional strength in any component except maybe the heatsink! And the last thing you want to do is flex the heatsink.JasperLee93 likes this.
-
Further investigation reveals that the multiple thermal pads present around CPU and GPU are causing imbalances. They need to be removed and replaced or ditched, all of them. This will be today's experiment.
") JasperLee93 likes this.
JasperLee93 likes this. -
huh flex the heatsink? what do you mean?
-
I took this even further. I made a fresh format on one drive and factory reset on default drive. Nothing works. Macro keyboard is probably faulty. Already called to have the macro keyboard replaced. They had to do all the steps before they agree with me that there is a problem with it.
-
After a little work dumping and poking around the BIOS it would seem that we are currently locked with PL1 and PL2 at a max of 110 watts. My unit has some thermal headroom for more OC, but I’m running into a power wall.
The option to manually configure the PL1/PL2 are greyed out in every BIOS version I’ve tried. I can successfully unlock/edit the BIOS to enable the manual controls (and a few other nice OC options Dell/AW chose to leave out) but can’t get past the BIOS security when trying to flash it back. Has anyone had any success with flashing Aptio V BIOS on recent Alienwares?Vistar Shook likes this. -
Thanks for all the replies! Really helpful.
I decided to take a look at the Paste. It could be my bad. The paste while still not dried up, it just gunked out and it looks like the stock thermal stamp. Also, notice the thermal compound left on the dies, look bubbly like they are boiling or something. What a disaster!
![[IMG]](images/storyImages/mmwfly.jpg)
So now doing it differently, I applied lesser compound (I probably applied too much) and, didn't screw the heatsink too tight like before. Will report back results.
I am not sure if I should do a repad since, fujipoly pads are really expensive, what's the benefit of repadding? -
from your picture, it's pretty obvious you have serious core temperature difference with the hottest being at the top of the CPU, and the lowest temperature at the bottom of the CPU. a CPU with good contact with the heatsink will cause the thermal paste to look a little "transparent" due to high contact pressure that pushed the paste away. your CPU top part has weak contact probably caused by thick pads on the VRM and chokes or weak CPU tension arm. your GPU looks alright though.JasperLee93 likes this.
-
When looking at your picture, the pad on the left of the heatsync is in completely the wrong spot... It should be below the heatsync (it actually matches the shape of the slight cutout there)Papusan, doofus99 and JasperLee93 like this.
-
I agree, I think screws 2 and 3 (below heatsync ) would benefit from not being screwed down tight ( top #1 screw should be super tight...) I was going to try that with my next repaste.JasperLee93 likes this.
-
I see...
Which pad? I just left it where it is. Didn't swap or change anythin.
Hmm...
Anyway I am gonna order TGC. So, hopefully it will help. Also, I hope it doesn't gunk out since, this laptop goes out pretty often. -
Hey everyone
I’m thinking about buying one of these with a 1440p 120hz with g sync and the eye tracking device, 1070 oc and an i7 8750h.
I have always been a desktop guy but since my old pc broke and the place where I’m living right now does not have much space, I opted for a laptop.
What are your experiences with the Alienware 17 r5? Is cooling far better than the r4? I would appreciate a lot if you guys gave me advise before buying it, specially if you have the exact same model I want to buy. -
Yes you must have. Above the CPU there are two rows of ICs that require thermal pads. The closest row look like chokes and the next row are ICs. The left most choke sits lower than the others and requires thicker pad.Papusan likes this.
-
The pad on the west side of your cpu heatsync should actually be on the south side of the heatsync in that empty space, it's supposed to cool the power distribution chips... Where is currently is in your pic8its doing nothing...
-
Not necessarily, it depends also on how the heatsink was pulled off the CPU. What you see after you pull it away is not necessarily what it looked like when it was fitted.
-
We are looking for an unlocked bios here really. How did you manage to unlock those options? Which options did you unlock? Do you have a screenshot?
I hope someone expert can help you on how to flash
In addition, did you unlock the latest bios 1.2.1? Can you see which locked settings have been changed compared to bios 1.6.1?Last edited: Jul 23, 2018 -
i've used that method to check for cpu heatsink pressure balance in my R4. that's the poor man's way of doing it instead of using fancy methods like pressure paper. obviously it's not as effective but it does the job. once the thermal paste is pushed out of the way, it can't magically move back in by itself. so this way of checking is definitely viable and it works perfectly in R4. i don't imagine R5 is any different.Vistar Shook likes this.
-
believe it or not, I didn't move the pads. It came like this already. But if I were to do a repad, can I follow the same one as iunlock's or, is there anyone with pad layout for R5?
I am not an overclocker though. Just making my laptop as cool as possible.
As of now, my core differential is 5 C which is okay. But doubt that would last long. Just ordered TGC. Now gotta get the pads and electrical tape. -
I agree you can draw conclusions but it all depends on how the heatsink was lifted off, how liquid the thermal paste is or how much it has dried up etc. You need to lift it off perfectly vertically with no twisting and lateral movements, no putting it down again to get wires out the way etc.
Here is photos of how my heatsink fits.
Original factory fitted heatsink. The thermal paste / stamps is quite dried up, especially the CPU looks "wet" but in fact it is dried up.
**********************************************************************************************************************************
*****************************************************************
*****************************************************************
*****************************************************************
This is the CPU imprint, the GPU is on the left. You can see the pressure mark on the right hand side and a smaller pressure mark on the left and not so much on the middle.
Either the 8950 or the heatsink is not level and my money is on the heatsink! How on earth can I possibly fix that... [/FONT]
Edit: By the way on the photo the GPU thermal stamp leftover also looks terribly uneven, however that was an artefact, the graphite pad looks great on it, unlike the CPU.Last edited: Jul 24, 2018Vistar Shook likes this. -
I was playing with 1.1.6 in AMIBCP so I can edit anything in the BIOS. The problem is that the BIOS is locked for flashing it back. The only foolproof way is a hardware programmer, but that'd require opening the chassis, finding the BIOS chip, attaching to it, etc. I am working with some folks with talent far beyond mine that are trying to find a way around the security. Fingers crossed!Vistar Shook, Alienman17 and raz8020 like this.
-
if that could be fix all the problems or most of them then also finger crossed
tomorrow i will get my new machine...i will also try to make a lot of messurements and post the results. If I have really bad temps then i`ll also make a repaste with LM and replace the pads.
@captn.ko you are also from germany right?
-
Yes fingers crossed! I hope it will be done without bios chip modification. Keep us posted please. Thanks and good luck
-
A warning to all: when you tighten the GPU heatsink tensioners, try, if you can and to your discretion, not to screw them in fully, because the heatsink is so large that these tensioners pull and warp the motherboard resulting in the motherboard rocking over its base. In other words, when you tighten the GPU tensioner arms you are not simply forcing the heatsink firmly over the GPU but rather you are pulling upwards and warping the whole motherboard! This is before you even sit it on its base.
*OFFICIAL* Alienware 17 R5 Owner's Lounge
Discussion in '2015+ Alienware 13 / 15 / 17' started by alexnvidia, Apr 11, 2018.