The first part of this guide is a summary of what parts are user upgradeable and possible upgrades for each part. The Disassembly immediately follows it")
- Optical Drive
- Can be replaced with a secondary Hard Drive. There is an excellent guide on this here: http://forum.notebookreview.com/ali...ll-secondary-hard-drive-your-m14x-w-pics.html
- Note: Only drives or bays with a 9.5mm height will fit!
- Note: There are currently no Slot Loading 9.5mm Blu-Ray Drives on the market. If one is released in the future, it should work in the M14x.
[*]Hard Drive
- Can be upgraded to the Hard Drive or Solid State Drive of choice, as long as it's SATA.
- Note: Only drives with a 9.5mm height will fit!
[*]RAM
- Any DDR3 Laptop RAM, 1333Mhz or greater should work in this machine. It is generally agreed that you get a better deal by upgrading the RAM yourself instead of paying Alienware's sky-high prices for "better" RAM.
- Top RAM choices are shown here:
[*]CPU
- The CPU can be upgraded, it is not soldered to the board. This machine supports Socket G2 Intel Sandy Bridge processors. Here is a list of *known* compatible Processors.
Intel Core i5-2410M Dual Core (3M Cache, 2.3Ghz, 2.9Ghz Turbo)
Intel Core i5-2520M Dual Core (3M Cache, 2.5Ghz, 3.2Ghz Turbo)
Intel Core i5-2540M Dual Core (3M Cache, 2.6Ghz, 3.3Ghz Turbo)
Intel Core i7-2620QM Dual Core (4M Cache, 2.7Ghz, 3.4Ghz Turbo)
Intel Core i7-2630QM Quad Core (6M Cache, 2.0Ghz, 2.9Ghz Turbo)
Intel Core i7-2720QM Quad Core (6M Cache, 2.2Ghz, 3.3Ghz Turbo)
Intel Core i7-2820QM Quad Core (8M Cache, 2.3Ghz, 3.4Ghz Turbo)
Intel Core i7-2920XM Extreme Quad Core (8M Cache, 2.5Ghz, 3.5Ghz Turbo)
[*]WiFi Card
- The WiFi card can be upgraded. Best upgrades are typically the Intel Advanced-N + WiMax 6250 and the Killer Wireless-N 1102.
- The more advanced counterparts, the Intel Ultimate-N 6300 and Killer Wireless-N 1103 can be installed, but since the M14x only has 2 antenna, the speed will be limited to 300Mbps. To install these cards, leave the middle connector empty.
- Note: Only "half height" cards like the ones shown will fit. Older "full height" cards will not.
-
-
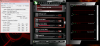
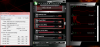
I realized quickly that when benching my M14x, my CPU was reaching temps up to 96C! Granted, this was with an overclocked GPU, but I was still hitting 90C with everything at stock!
The temps before :
![[IMG]](images/storyImages/tempsp.th.jpg)
Im creating this guide as a full color alternative to Dells service manuals. The dell service manuals do a pretty decent job but if this helps at least one person then Im happy I've tried to make it easy to understand so people will all different levels of expertise can follow along. I also designed this so you dont have to keep flipping the machine over, just one flip for the entire procedure. I havent tried taking apart the LCD display assembly yet, so this will only cover the base. That will be for a future guide since Im interested to see if the screen can be upgraded.
M14x Disassembly:
Necessary tools:
- Small Phillips head screwdriver
- Small guitar pick/cell phone repair tool/credit card or something similar (used to lift up or pry some pieces apart)
- Alcohol wipes/Arctic Silver cleaner
- Microfiber cloth
- Thermal Compound of choice. I chose Arctic Cooling MX-4 Compound since it is non-conductive.
I like to make sure I dont lose any screws in the process, so I usually use a piece of paper or cardboard with labels to place the screws, such as this:
![[IMG]](images/storyImages/26672849.th.jpg)
Before you begin:
- Make sure your laptop is fully shut down.
- Unplug the AC adapter from the laptop.
- Turn the laptop upside down, with the rear of the laptop facing toward you.
1) Removing the Base Cover
- Loosen the 2 captive screws on the bottom.
- Slide the cover toward you, then lift up.
![[IMG]](images/storyImages/52304244.th.jpg)
![[IMG]](images/storyImages/19913318.th.jpg)
2) Removing the Battery
- Loosen the 2 captive screws (circled in Green) that secure the battery in place.
- Unplug the cable connecting the battery to the mainboard.
- Lift up the tab to remove the battery.
![[IMG]](images/storyImages/77282485.th.jpg)
![[IMG]](images/storyImages/56916375.th.jpg)
3) Removing the Memory
- Loosen the 2 captive screws (circled in Red) that secure the memory door.
- The memory door opens from the left.
- Each stick of RAM is secured with 2 latches on each side of the stick. Push the latches outward to release the RAM, which will pop upwards at an angle.
- The RAM can then be pulled out. Repeat for the second stick.
![[IMG]](images/storyImages/33296938.th.jpg)
![[IMG]](images/storyImages/39626371.th.jpg)
4) Removing the Optical Drive
- Loosen the 4 captive screws (circled in Blue)securing the Optical Drive assembly.
- Release the ribbon cable from the motherboard. This can be tricky, I've read reports of one or two people breaking this clip, but don't worry, it's not that hard to release. Using a small screwdriver or similar object, position it under one side of the white clip, and using it as a lever, lift it up a little. Then do the same thing on the other side of the clip. The clip itself is not removable, so the clip won't lift up completely. The cable should release with little effort once the clip is raised.
- Lift up the tab to remove the optical drive.
![[IMG]](images/storyImages/45385732.th.jpg)
![[IMG]](images/storyImages/33125832.th.jpg)
![[IMG]](images/storyImages/62201572.th.jpg)
5) Removing the SSD (or HDD)
- Loosen the 2 captive screws and remove the one regular screw securing the drive in place.
- Lift up the tab to remove the drive out of it's bay.
- Unplug the SATA cable from the drive. It should come off fairly easily, but might be tight depending on your drive. Use a small tool/card to pry the cable off if it is dificult.
- If you are a robot, take a byte out of your SSD (Just checking who's paying attention).
![[IMG]](images/storyImages/57882650.th.jpg)
![[IMG]](images/storyImages/72157709.th.jpg)
![[IMG]](images/storyImages/72084486.th.jpg)
6) Removing the WiFi card
- Detach the 2 antenna from the WiFi card. They should pop right off. You can make note of what order the cables are attached but with a 2 antenna system, it shouldn't matter if you accidentally reverse the order when you reassemble it.
- Remove the screw securing the WiFi card in place. The WiFi card will pop up at an angle, in a similar fashion to the RAM.
- Slide out the WiFi card.
![[IMG]](images/storyImages/42065069.th.jpg)
7) Prepare to flip the chassis
- Remove the 12 screws that secure the Palmrest/Control Cover (this is the bezel around the keyboard, including the Alien power button)
- The 3 screws highlighted in Blue secure the Control Cover.
- The 9 screws highlighted in Green secure the Palmrest.
- The computer should look like the second photo below now. Flip the computer around, facing towards you. Open the monitor as far back as it will go.
![[IMG]](images/storyImages/27935994.th.jpg)
![[IMG]](images/storyImages/19044473.th.jpg)
8) Removing the Control Cover
- Starting at the bottom of the keyboard by the spacebar, pry up the cover. There are little tabs holding it in place and they should just snap apart. Just work your way slowly from bottom to top. There are no cables to worry about here.
![[IMG]](images/storyImages/38816846.th.jpg)
![[IMG]](images/storyImages/61778961.th.jpg)
![[IMG]](images/storyImages/19791546.th.jpg)
9) Removing the Keyboard
- Remove the 3 screws holding the keyboard in place.
- Lift the keyboard from the top to reveal 2 ribbon cables underneath. These are ZIF sockets similar to the out holding the Optical drive ribbon in place, but these are much easier to release. Pull up on the brown retention clip until it's upright. The cables should slide right out.
- The wide cable on the left controls the keyboard itself while the skinnier cable on the right powers the lights.
![[IMG]](images/storyImages/39727752.th.jpg)
![[IMG]](images/storyImages/78109852.th.jpg)
10) Removing the Palmrest
- Remove the 2 screws (circled in Green) securing the Palmrest to the Base.
- There are 4 cables that must be disconnected in order to remove the Palmrest.
- The Speaker cable (Shown in the Blue box) can be disconnected right away, it is the same type of connection that the battery cable uses. Just slide it out of the socket.
- The Power button cable (Shown in the Purple box) can also be disconnected right away. It's as easy as the keyboard cables. Lift the latch, slide out the cable.
- The other 2 cables are harder to get to, so we'll lift up the Palmrest a little. Using a guitar pick/credit card/cell phone repair tool, or something similar that won't damage the chassis, start to pry up the Palmrest. I found it's easiest to start on the right, about where the screw holding it in was.
- Slowly work your way up, releasing the little tabs holding the Palmrest in place. Do both sides first, then the top. The top is pretty easy, there are 3 pieces of plastic held in place where the LCD hinge is. Holding the Palmrest at the top corners you should be able to wiggle it free. Once the top is loose the other 2 cables can easily be removed.
- The LED power cable (shown in the Red box) powers the Caps Lock and WiFi LED's. It slides out like the speaker cable.
- Last is the Touchpad cable (Shown in the Yellow Box) Lift the latch and slide out, just like the keyboard cables.
- The final step is to completely remove the Palmrest. Lifting it from the top, pull it forward enough to release the tabs holding it in place along the bottom of the laptop.
Note: Also included a picture of the Palmrest underside for reference. It houses the trackpad assembly, front LED grilles, speakers, power button, and caps/wifi LEDs
![[IMG]](images/storyImages/22329874.th.jpg)
![[IMG]](images/storyImages/77031852.th.jpg)
![[IMG]](images/storyImages/10adw.th.jpg)
![[IMG]](images/storyImages/10bc.th.jpg)
11) Removing the Motherboard Part 1
- Remove the 6 screws (circled in Green) that secure the Motherboard to the base. Note that there are a few other screws, only the 6 shown need to be removed.
- Next, there are 5 cables which must be unplugged. The first is the subwoofer cable (Shown in the Yellow box). Slide this cable from it's socket.
- The SATA cable (Shown in the Red box) is removed by pulling the tab upwards.
- The Bluetooth cable (shown in the Blue box) appears to be very fragile. Gently pry this connector from the socket using your fingernails on the corners. I would refrain from pulling the cable itself if possible.
- Last are the Alienware LED cable and Display cable (shown in the Purple box). Pull upwards on the blue tab to remove the display cable. For the LED cable, gently slide it from the socket. Note that these 2 cables are taped down. Take note of how they are arranged. They must be side by side instead of stacked on top of each other when put back, so you don't create a bulge in the palmrest later on. For now, we're removing the motherboard, so peel them both off the board.
![[IMG]](images/storyImages/52386092.th.jpg)
![[IMG]](images/storyImages/96362497.th.jpg)
12) Removing the Motherboard Part 2
- Once all screws have been removed and all cables disconnected, the Motherboard can be removed.
- Lift the Motherboard up from the right side first, then slide it out from the left side. When replacing the board, insert the left side into the base first.
- The second picture shows a rubber spacer with is stuck onto the base and fan using double stick tape, presumably to ensure proper airflow. Note its position and don't forget to put it back info position later on!
![[IMG]](images/storyImages/12awj.th.jpg)
![[IMG]](images/storyImages/35450564.th.jpg)
![[IMG]](images/storyImages/49631151.th.jpg)
13) Removing the Heatsink and fan assembly
- Turn the motherboard upside-down to access the Heatsink and fan.
- Unplug the fan power cable from the motherboard
- Loosen the 7 captive screws (circled in Green) to undo the heatsink.
- Remove 3 screws (circled in Blue) to remove the fan. Note that the 3 screws securing the fan seemed tigher than the others, I had to use a different, smaller screwdriver to remove these.
- Once all screwed are removed/loosened, lift the heatsink and fan, wiggling if necessary to separate the thermal compound from the chips.
- Be careful not to lose any of the thermal pads attached to the GPU memory. They are the white pads on the RAM chips in the second photo below.
![[IMG]](images/storyImages/14anz.th.jpg)
![[IMG]](images/storyImages/14bji.th.jpg)
14) Installing new thermal compound.
- First we have to remove the stock thermal compound. Using a lint free cloth/Arctic Cleaner, remove as much of the compound as possible from the CPU, GPU, and heatsink. Dell has a habit of applying their compound very liberally and it may me caked on enough to come off in clumps. Using alcohol wipes/q-tips, remove any residue left over until it's clean.
- Use a clean microfiber cloth to go over it once more. The heatsinks should be nice and clean, and the chips should have a mirror finish to them. See 1st photo.
- Apply a small dot of thermal coumpond to the GPU and a small line, about the size of a grain of rice, to your CPU. I actually put a little too much on my CPU in the photo below, I ended up re-pasting it once more.
- Place the heatsink/fan over the motherboard so the screws match up with the holes. Let the pressure spread the thermal paste on it's own. Tighten each screw a little at a time, then each one again, then again, until all are secure.
- Don't forget the fan screws and power cable!
![[IMG]](images/storyImages/68604920.th.jpg)
![[IMG]](images/storyImages/16aqz.th.jpg)
15) Take a look at all the parts sprawled out across the table and have some refreshments!
![[IMG]](images/storyImages/34568779.th.jpg)
16) Reassemble in reverse order.
If I've missed anything at all in this guide, or if there are questions/comments, please contact me!
Note about temps: So far Ive had it together for not even 30 minutes and Im happy to say that temps are improving. I know MX-4 doesnt have the same curing requirements as the Arctic Silver Im hoping to get this below 90C with the GPU overclock. Same benchmark with the same GPU overclock now gives me a max GPU temp of 91C, down 5 degrees.. Will do more benches tomorrow.Last edited by a moderator: May 8, 2015CGSDR likes this. -
Excellent. Cheers
-
Thank you for this!
-
Should this be list on the sticky? Because since the search dont really work now, so it would be very hard to find it if it become unpopular.
-
awesome dude! i got halfway into it and gave up.... ill prob do this at some point!
Hmmm is 5 degrees really worth it?
Thanks! -
this would be very helpful
-
great thread man!! Thanks for sharing this
-
awesome stuff thanks man!
-
Added list of user upgradeable parts at the top with a list for each.
I listed the 2920XM as being compatible, but since it's not offered by Dell, I'm not 100% sure. I remember in the past certain models were BIOS locked from using the Extreme chips. Has anyone tested it?
Found a couple of articles that showed systems with the 2920XM installed, unknown if it unlocks the multipliers in BIOS though.
Also, visibility bump! -
Thank you sir!
I've been looking for a guide like this. I've been half afraid to take this apart, considering it would be the most expensive laptop that I've taken apart. Well, at least the most expensive that belongs to me. Very Helpful Guide! -
Wow thank you! Any mods want to sticky??
-
Good write up mate,
Just have a small question,
Under the battery (once taken out)
there's the slot for the wireless (card is in there) and next to that there's an empty slot, I know it cant be for the bluetooth as that's at the front of the laptop,
is this maybe for a PCI ssd? can anyone shed any light on this?
Cheers -
My guess is that it is for the Wireless HD transmitter. Although it does look like a full height PCI slot. Anyone have the HD transmitter and want to take a pic?
Thanks
-
I have the Killer Wifi intel thingo, i though that did the Intel Wireless Display?
Here's a picture i nicked from another thread i found here, it's that port next to the wireless card...Attached Files:
-
-
That pic is the same setup I have. The card pictured is the wifi card. The Wireless HD transmitter is a separate part, its not part of the wifi card.
-
where can u get laptop processor lol?
btw blu ray players
http://www.notebook-doctor.com/it-p...lienware_M14x-cP-31188_59707-pId-3288267.html
http://www.notebook-doctor.com/it-p...lienware_M14x-cP-31188_59707-pId-3288264.html
dunno which one is better tho -
Isn't those blu ray players tray loads? m14x uses a slot load for the dvd drive?
-
There are many places to buy processors, many users here have purchased then from eBay sellers. Newegg also sometimes sells mobile CPU's as well. Also CPU's (OEM only) are sold here in the Notebook Review Marketplace by users parting out or upgrading machines.
Neither of those Blu-Ray drives would be compatible, despite the title saying so. It would have to be slot loading, SATA interface, 9.5mm height.
Yep, the site is misinformed. -
sorry, i didn't read the desc in the site lol
-
Not your fault
The site is misleading.
I wish the drive existed, I'd rather carry around an external hard drive than an external optical drive -
Would it be more cost effective to purchase 8gb of ram and my own SSD, and replace it, or let AW do it? Also, while it looks simple enough, how would you rate the difficulty of swapping out HDD for SSD
-
You would save more if you do it yourself. the SSD from alienware is way to expensive. For me personally I'm not a computer tech savvy but I was able to do it. I would say a scale of 1-10 It would be 2. Just take your time of detaching the wires and you would be fine.
-
More importantly in both cases, you can get a better SSD as well as better RAM then Dell has to offer.
-
If anyone has any upgrade questions, please feel free to ask.
-
sticky this epic thread pls
-
Very good guide. Man that fan is a pain in the butt.
So there is only one fan and it is the CPU fan? Is there a system fan?
I was looking at replacing it with a low noise fan as I have a pretty good laptop cooler. Anyone tried this? -
The single fan within the M14x cools both the CPU and GPU, and is not user upgradeable, at least not without some serious modifications. A good lapop cooler should help though.
-
Hey there,
I wanted to install the Dell wireless 5620 3G mobile chip (goes in the empty slot next to the wireless card), but I need to install the other antennas for the new 3g chip which need to go behind the screen (in the guide you can see that these are the same as the black and white wires coming out of the WLAN chip already in the laptop, and that two lines are kept empty to leave space incase someone wants to install the other 3g chip for the other antennas). I was just wondering if you were able to take off the screen so I could stick the antennas to the case behind the screen like the others. I know that you only really need the control cover, but I have no idea what to do from there. This is also useful for anyone who wants to change their screens, covers or hinges.
If anyone reading this knows of another guide that shows this, or knows how to do it for the M14x, that'd be awesome :] -
I wanted to dismantle the screen but haven't had time yet. I'm away for Labor Day weekend but will do this sometime during the week
-
Nice, let me know when you do, cos this is all I could find : P
Removing the m14x Screen panel - YouTube -
Can anyone comment on the temp of a ssd in the m14x vs the 7200rpm? I put a 500gb hybrid drive in and its kinda warm. If a ssd is significantly cooler I will order one.
Just want to put this out there as well. The noise level of the fan is not as bad as what everyone makes it out to be. It is noticable but not terrible.
While Im at it I guess I can also say the heat management is great. I primarily play with the built in keyboard and track pad (too lazy to go sit at my desk and play on a real machine) and my hands dont get sweaty. With the exception of the harddrive on the right palm rest.
Great little machine! -
Thanks for a great guide!
-
Hello, does anybody know is it possible to replace 1366 screen to 1600 screen? Are they compatible?
-
Great post, a couple of questions.
I looked at the photos the resolution is a little low and I cannot zoom right in to see. Can you tell me how many thermal pads there were total in case if I need to replace them?
Also It looks like the heatsink assembly also touches what I assume are the VRMs (round/hexagonal sliver chips) around the CPU, can you confirm whether they are in contact with the heatsink too and whether they have thermal pads? Cheers. -
Hi, my results after IC 7 diamond repaste for both GPU and CPU:
Peak temps are about 6-10 celsius lower under load after repasting with IC 7 diamond
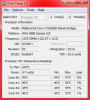
1. Temps DELL paste after 10 minutes idle no OC
2. Temps DELL paste after WEI GPU OC
3. Temps IC7 paste after 10 minutes idle no OC 1 hour after repasting
4. Temps IC7 paste 1 hour after repasting WEI Gpu OC
5. MSI full scan with IC 7
*** heatsink was not very dusty, cleaned of course a bit, but no chunks of dust found
ComputerMD82 thank you very much for the guide, +rep lol
After a few days I will upload temps after curing sets in.Attached Files:
-
-
-
Temps IC7 paste after 10 minutes idle no OC 30 min after repasting.PNG
- File size:
- 270.3 KB
- Views:
- 324
-
-

-
-
Did you have enough of one tube of thermal paste, i will probably do the same on my M14x, also would you do a small guide or howto?
-
LOL As this was the first time changing a paste I followed the guide on page one of this thread by ComputerMD82 . My advice from what I experienced would be that you should heat up the tube in warm water (80-90c) Yes, one tube is enough, but cant tell how much is still left inside cause the tube is not transparent.
I have put more on proc and GPU than I was supposed to (compared to MX5-like white stuff and so), but I have read that with IC7 you should put more, as the compound is VERY thick. I should have left the paste dry on the proc and Gpu for 20 minutes as described on IC7 website, but I skipped it. However, I am sure that I have put half the amount of toothpaste DELL used lol Cleaned the old paste with 96% alcohol from local drugstore (pharmacy) and woman-faces-cleaning wipes.
When I finally have put my laptop together, tried to power on and .. I got 3 beeps --> shutdown (believe me I was really small during the moment), restarted, again, 3 beeps, then laptop booted normal and the time and date was re-set.
In idle I do not see much difference (lower by 3-4 c) but under load I see 10-15c diff, especially for the processor. Played Crysis Warhead 2 hours max temp on one proc core was 81c, the rest were 78 or so. Before with Dell paste I saw 98, and that made me do repaste. The highest on graphics I got was 70 c, I run clocks at 730/1460/1050. Everyone in Amsterdam had winter jackets on tonight, so of course it is very warm in my room now from central heating, I believe 25c, I am changing into a reptile.
In unlocked Bios 05 I see that the processor is set to throttle at 85c default. I changed the value to 90c because whatever I do my proc does not go over 80-81c. So no throttling for me. Before repasting I could tell.
Graphics Really does not go over 70c.
Perfect stuff, just do it.
At the end of this reptile novel I confirm that it is 26c in my room (Puter is 1 meter from heat-pounding radiator) I watch vid on u-tube and type this mess on Google chrome.
My temps over last 15 minutes:
Enjoy
p.s. please note that this is about a week from repasting. The temps I posted a week or so ago were with window open, no central heating, but hoodie-warm evening outside.Attached Files:
-
-
rep+ thanks man!
-
I stripped my M14x down today and repasted the CPU and GPU with Titan nanopaste. My temps are now around 10-12C cooler under load.
The Dell paste job was shambolic. I haven't seen such a lack of care before. It is no wonder some people see such high temps on their M14x's. It is well worth the effort to replace the Dell thermal paste.
Kudos For putting together such a great guide. I don't think I would have attempted this job without the excellent walkthrough. -
Does anyone know where I can get a replacement keyboard for the m14x? I can't find any website selling it, or ebay user, but I need to get a new keyboard for it.
-
Thanks.
I was unable to screw those 2 screws for the battery. When I unscrew those. It was lose. Did you experience the same thing? -
if you really need a new keyboard call dell and they will hook you up it will cost a bit though
-
Those 2 captive screws for the battery is larger than others. I guess maybe that's the reason I am unable to screw it back
-
Getting my refurb m14x soon and replacing the hdd with and SSS and moving the hdd to the optical drive bay... Since I'm going in there anyway, anyone wanna say how long disassembly takes? I might just put some shin etsu while I'm in there. Never fully taken apart a laptop, is this one hard to do? (don't want to break it lols!)
-
It took me about 40 minutes to dis-assemble the M14x following the guide. This was the first notebook I have stripped down so it may take you less time.
I found that the guide was excellent. Just make sure you keep the screws separate from each stage and you'll have no trouble when it comes to rebuilding it.
Repasting the CPU and GPU is definitely worthwhile. I run about 10-12C cooler under load. The fan barely comes on now when surfing the web or typing up notes. My idle temp is now around 39-42C. -
Hmm I thinking really hard about repasting my cpu/gpu. But I haven't found the guts yet to do it. I already thought it was brave of me to put in a second hdd
And judging from this guide thats not even 25% of the work you have to do to get to the cpu/gpu!
What about assembly, any tricky parts there? Somehow disassembly seems easier. -
haha same deal here! assembly would be easier if i could SEE it and see all the pieces coming back together as well... but i think now that i've read over and looked at the pictures over and over that I could attempt it, closely following the guide and NEATLY arranging all my screws in order as I go... this video helps for those that want to follow along (and keeps a nice, brisk pace - but not TOO fast)... Alienware M14x R1 disassembly for GPU + CPU teardown / review - YouTube
if he made a re-assemble video i would be SET and not worry as much... sigh this is why building desktops is so much easier... you don't have to go through layers of crap and make sure it's all snug (bulges = easy to create if you don't wrap/place something correctly in a laptop - i know because i had a bulge in my m11x forever and never realized what it was for a long time LOLS)
but honestly... for those of us that want to get the most bang for our buck... 10 c is a big deal (and a lot quieter via fan)... and protects our hardware...
is it relatively easy to figure out which pieces go where when re-assembling (cables/plug-ins)? think i'm going to attempt this tomorrow when i get my laptop, regardless of how hot it runs default (save a couple degrees = yay) -
I downloaded furmark and prime95 to test the cpu and gpu temps. The GPU reached a stable 65 degrees after about 1 minutes and stayed there for a few minutes. When testing prime95 the CPU temps jumped to 80-85 degrees almost instantly, but when the fans really kicked in the temps dropped to 77-79 max.
Is this a reliable test tot check the if the heat management system is doing its work? I only tested for a few minutes with each test, but nothing changed after the fans kicked in. These temperatures seem to be reasonable. Or do these temperatures tell me nothing at all?
The reason I ask is I don't want to risk damaging my machine by taking it apart and repaste it if it isn't necessary. -
i hear it's a good idea to try both gpu and cpu intensive tasks for a bit together cause they both use the same heatsink/fan... but not sure for how long
Alienware M14x Disassembly/Teardown and Upgrade Guide!
Discussion in 'Alienware 14 and M14x' started by ComputerMD82, Jul 28, 2011.
![[IMG]](http://imageshack.us/photo/my-images/109/tempsp.jpg/)
![[IMG]](http://imageshack.us/photo/my-images/580/26672849.jpg/)
![[IMG]](http://imageshack.us/photo/my-images/818/52304244.jpg/)
![[IMG]](http://imageshack.us/photo/my-images/814/19913318.jpg/)
![[IMG]](http://imageshack.us/photo/my-images/33/77282485.jpg/)
![[IMG]](http://imageshack.us/photo/my-images/837/56916375.jpg/)
![[IMG]](http://imageshack.us/photo/my-images/18/33296938.jpg/)
![[IMG]](http://imageshack.us/photo/my-images/37/39626371.jpg/)
![[IMG]](http://imageshack.us/photo/my-images/189/45385732.jpg/)
![[IMG]](http://imageshack.us/photo/my-images/838/33125832.jpg/)
![[IMG]](http://imageshack.us/photo/my-images/14/62201572.jpg/)
![[IMG]](http://imageshack.us/photo/my-images/846/57882650.jpg/)
![[IMG]](http://imageshack.us/photo/my-images/833/72157709.jpg/)
![[IMG]](http://imageshack.us/photo/my-images/819/72084486.jpg/)
![[IMG]](http://imageshack.us/photo/my-images/38/42065069.jpg/)
![[IMG]](http://imageshack.us/photo/my-images/812/27935994.jpg/)
![[IMG]](http://imageshack.us/photo/my-images/11/19044473.jpg/)
![[IMG]](http://imageshack.us/photo/my-images/835/38816846.jpg/)
![[IMG]](http://imageshack.us/photo/my-images/155/61778961.jpg/)
![[IMG]](http://imageshack.us/photo/my-images/204/19791546.jpg/)
![[IMG]](http://imageshack.us/photo/my-images/695/39727752.jpg/)
![[IMG]](http://imageshack.us/photo/my-images/88/78109852.jpg/)
![[IMG]](http://imageshack.us/photo/my-images/146/22329874.jpg/)
![[IMG]](http://imageshack.us/photo/my-images/69/77031852.jpg/)
![[IMG]](http://imageshack.us/photo/my-images/228/10adw.jpg/)
![[IMG]](http://imageshack.us/photo/my-images/200/10bc.jpg/)
![[IMG]](http://imageshack.us/photo/my-images/405/52386092.jpg/)
![[IMG]](http://imageshack.us/photo/my-images/811/96362497.jpg/)
![[IMG]](http://imageshack.us/photo/my-images/6/12awj.jpg/)
![[IMG]](http://imageshack.us/photo/my-images/5/35450564.jpg/)
![[IMG]](http://imageshack.us/photo/my-images/695/49631151.jpg/)
![[IMG]](http://imageshack.us/photo/my-images/707/14anz.jpg/)
![[IMG]](http://imageshack.us/photo/my-images/89/14bji.jpg/)
![[IMG]](http://imageshack.us/photo/my-images/233/68604920.jpg/)
![[IMG]](http://imageshack.us/photo/my-images/801/16aqz.jpg/)
![[IMG]](http://imageshack.us/photo/my-images/691/34568779.jpg/)