First guide of sorts that I have made, but here you go.
NOTE: I assume no responsibility for any damage you may do to your laptop attempting to perform this modification. This will void your warranty and is to be done at your own risk.
Inspired by the efforts of Quadzilla in installing an XBOX 360 controller wireless pc receiver into his Clevo W870, I have decided to undertake a similar project for my M17x. This will involve taking apart the USB receiver (one way trip here - you will have to disfigure the housing around the pcb so this is not reversible). I have not done any electrical work yet but know that the theory of it is sound.
I will first show the pictures I have of the 2 possible locations I found and the USB ports I would recommend utilizing.
This shows (in the red boxes) the 2 locations I found that can fit the PCB of the receiver UNDER that large magnesium plate that sits under the keyboard.


Here you can see how the PCB for the receiver fits on the M17x

This picture shows the USB ports I would plan to use for the modification as they have their leads exposed on the inside.

I will udpate this post as I progress with the modification. Pretty much all that is left to do though is to cut the wire down, mount in a firm way the PCB (I am choosing the location over the optical disk drive as it will result in a shorter cable and cleaner job) and solder the leads.
Feel free to ask questions or make suggestions as I go.
-
-
Not to sound like a jerk, but why? What are you trying to accomplish? Are you trying to setup a wireless deal so you can use an Xbox controller? Sounds like a neat project none the less... Good luck with it.
-
cool mod, me likes, will definitely follow the progress!
to answer the previous poster - to me it's an aesthetical issue + my adventurous nature")
knowing that i can make something like that work sounds awesome!
rep++ man!
EDIT : BTW, since you opened it, how is the dirt level inside ? is it accumulating it as fast as m1710/m1730 ? -
hey,
Looks cool, but wouldnt it be easier to use the bluetooth and ps3 controller?
But anyways. This will render your usb port useless (e.g. you wont be able to connect anything to the side of the port). A solution would be to buy a tiny usb hub:

(look for smart usb hub on ebay), e.g:
USB HUB
Then I would probably cut the connector so that only the hub is connected to the port, and then make the output of the hub go back to the port of the pc.
the problem will be finding the space for the usb hub, but more importantly, that hub is not powered, so you may end up having voltage drops on that usb port if you connect something power hungry (e.g. a hdd). Also, this approach will void your warranty. -
Interesting. I've always thought a gaming laptop should have one of these built in. I've currently got a wired USB version of the Xbox 360 controller for my laptop, but I'd prefer the wireless version as well.
How are you planning to route the button that synchronizes the receiver with the gaming peripherals on it to be accessible on the outside of the chassis? Is it possible to reuse a button on the chassis for it? -
i never had to use that button but that might be problematic if it's ever needed
-
The button is only needed if you sync the controller to another device and then want it back on the receiver. I will not be doing this.
My main reason for wanting to do the mod is that it will just simplify things
I am using the XBOX controller because it is FAR superior as far as aesthetics and the feel in my hand (just my opinion there). What I would be interested in with the bluetooth and PS3 accessories is getting that remote to work haha. Since NO ONE in the dang world of computers seems to have thought a bluetooth remote would be a good idea?! -
I thought you have to use the button if you add a new controller. Meaning let's say if you lose your controller or someone breaks it, and you have go out to the store and get a new controller you have to use that button to Sync with it, isn't that how it works?
-
That is also true. In that case I would take it apart once to access the button, then seal it all back up
-
Ok let me see if I understand this, Because I want to do this too if it works. But I sync the normal way with the device is plugged into the USB port the normal way, and then once it's synced then I can just hide it in the system and have it plugged into the USB port(making one of the usb ports unusable via normal way as it's in use) And as long as I don't lose my controller, or Reformat Windows (Losing the driver install and information) I can then use my controller with no problems?
I like the idea, but I can't get over the simple fact that I don't even use a controller for a third of my games, and it just sounds too risky/too much work to do for something I won't be using that often. -
It is not a project for everyone. I just do not like having to have that long cable and clumsy receiver
I am comfortable taking apart my laptop though and have done so many times. A similar (albeit less attractive) solution would be to simply tape the receiver to the back of your screen where you don't see it lol. Velcro would make it removeable
-
OK well let me know how it goes, and I might considering doing it if it works out for you.
Also I don't even know how to do that USB mod aspect, if you can provide a link or explain that to me I'd appreciate it, Thanks!
-
I will include pictures, but you will have to be comfortable doing some soldering yourself
-
I see. not a very clean solution then.
Well, since I got an actual Xbox 360 and also use the controllers on the desktop when needed, this wouldn't do it for me.
Any ideas on how one could wire the button to the touch keys (maybe the stealth mode key?) or something like that? Or maybe just wire out the button through one of the went holes? Or possibly to the battery compartment or beneath the lower plate where it can be accessed easily?
Come to think of it, if you only have one HDD, you could probably just stick the Wireless receiver inside the second HDD bay which would make the access of the button easier.
Indeed. Also, many PC games default to the Xbox 360 controller button layout and some even don't allow you to remap the buttons and functions. -
ha, I had to laugh at your bluetooth controller comment, and it too blows my mind nobody has bothered to make one for PC's, and I've yet to find an elegant solution to make the PS3 controller work wirelessly.
And, I too agree, the 360 controller is the better controller. I've thought about hacking the cord up and making it shorter... it's just so dang long! -
also, if you have the proper equipment (e.g. solder sucker) you can try and remove the pushbutton from the PCB and then place it anywhere in the laptop (with proper cable routing). Maybe you could place it so its easily pushable? Maybe inside the express card slot if you dont use the express card>
The real problem is really that everytime you want to resync the module receiver with the controller, the receiver will need to be on (no idea if the laptop needs to be in the os), thus you either will need to hard power it on somehow, or turn on the laptop, which is not such a great idea if its not assembled. -
I know for the 360 itself you can re-sync buy using the play and charge cable, but I haven't tried it with the PC adapter. You would of course need the a play and charge kit for your wireless controller even if it does work for the PC.
-
The 2nd hdd bay would be an ideal place, but I am using 2 hdd's
moving the button somewhere else will be very complicated and mapping it to the stealth mode button would be next to impossible. You would have to rewrite alienware control center and the osd drivers as well as some complicated rewiring -
Actually its not that complicated. all you need is 4 wires, a solder sucker, a soldering iron. you can actually use the spare wire from the wireless receiver as the wire is quite long.
-
Although this is something I will never try, none the less I find it a very interesting project. I think having easy access to that sync button is probably important enough to try and figure out a way to access it without having to take apart the computer. If the receiver is under the keyboard (if I am understanding the layout properly) why not try to figure out which keys it is under and try to line up the sync button where the edge of the keys over the receiver is located and drill a small hole through the keyboard? That way, you can use a paperclip or something like that to feed through the hole and press the button as needed...kind of like ejecting a CD drive without it powered on... Think that might be a feasible option?
-
I started playing around with the receiver, and instead of trying to place the receiver inside the laptop (M15x, there is space where the receiver fits under the cover), Ill try and do my own receiver express card instead. The express card has access to the USB host controller, so that is not a problem.
Also, making it an express card will keep the warranty safe, and the usb ports free. -
just cool. Good luck, dont break anything. Must subscribe.
Any chance this will work on a 15x? -
The stealth mode button is not mechanical...it is touch capacitive and goes through a panel that controls and organizes those signals and then goes to the motherboard. It is not as simple as just soldering a wire to it
As for moving the button physically to another place, that is much more doable but a challenge to say the least -
I was talking about placing the button somewhere else in the chassis, not using the media buttons. there can be actually many approaches to this. One I have played around with was just shorting the button (once removed from the pcb) which will always reconnect when the notebook is powered. This solution forces you to restart the pc whenever you want to reconnect a controller
Also, as a matter of fact, you only need 2 wires for the button. -
If the PCB of the receiver is underneath the palmrest, he can just drill a tiny hold , the size of a paperclip to access that button. You just have to be precise on where to drill.
I will definetly do this mod on my next portable gaming laptop (16" and under). I do hate to carry the receiver dongle separetly. -
Very cool project...always amazed at how innovative folks on this board can be. Good luck!
-
Oh, I like that approach. Is the PCB thin enough to fit inside the slot? If you get it to work, make sure to post a detailed guide.
-
I am not sure it will fit in that low profile a space due to that plastic connector for the cable and the chips on the underside and the button
-
I got rid of that connector and soldered the cables directly to the pcb. I also removed the button to make the pcb as low profile as possible. Once I get a cage, I will try it out.
Also, I was thinking, the button could be placed inside the kensington lock -
I was actually using the PS3 controller along with a mini bluetooth dongle prior to starting this project on my Clevo... There are certain issues with getting the PS3 controller to work because using unsigned drivers under Windows 64(Vista or Win7).. You have to run your OS all the time in TEST mode to get this to work which is not a huge deal but its not for everyone and running it in test mode can leave your OS vulnerable to certain things ...
i also had problems with the PS3 controller in games even though it emulates the Xbox 360 controller very well if you run the right software ... There were issues with the Rumble(it would rumble longer and harder then it should and sometimes rumble would just stay on) and mainly it was the fact that the OS thinks you have the controller plugged in all the time so if you were not even using it and you fired up a game, the game thought the controller was turned on and your guy would take off running forward or spinning around till you sync the controller...
In the end it became a hassle for me to always have to power up the PS3 controller before playing a game that i was not even using a controller on.... So you can use the PS3 controller vs this way but its actually more of a hassle to get it all up and running then this little project IMHO... This works 100% the way it should and the PS3 way is decent but not perfect... -
Possible button location - if you are going to disable the usb port, you could locate the button there.
-
Any update scook? What wires from the receiver connects to the ones on the USB port?
-
no update yet, been busy with other things
contemplating button relocation at the moment though
I do not want to do anything non-reversible -
This is what I have decided to do:
Im bought a cheap expresscard (still not arrived) which I know uses the usb port of the expresscard slot. Then Im going to take that apart and connect a usb hub to it. I will be using the Smart USB hub which is very small. This will provide me with 4 internal usb ports. I will connect the following things as long as I find space for them:
* xbox wireless controller (there is space under the first cover).
* Logitech Mouse Receiver (i really dislike bluetooth mice; small enough to fit almost anywhere).
* Huwei UMTS mobile modem (No idea where to place yet)
I will be placing the push button into the Keningston lock as I have never used it. This way, I actually never solder anything onto the mainboard/usb connectors which will keep the warranty intact -
I am interested to see how you will integrate the button but this sounds fantastic!
Keep us updated on how it all goes - I may try the same thing. -
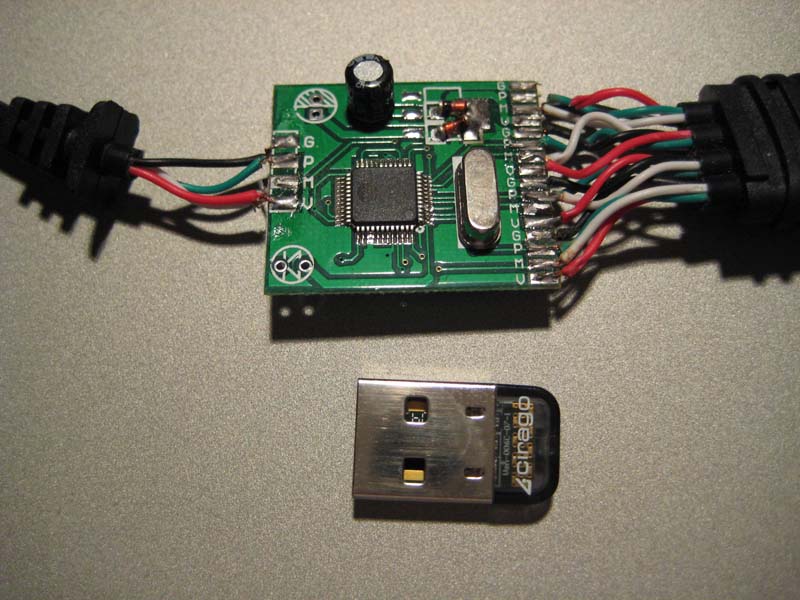
Here is my "prototype" of the wireless receiver module with the button on 2 wires. This works just as the original. Also, I have removed the connector because its too big. Its still a mess as its a work in progress. Also, I cut off a bit of the tip to make it a bit smaller
Attached Files:
-
-
nice! keep us updated!
meanwhile i was thinking about another mod, since my lappy is most of the time on the CryoLX, i might mod the controller to fit inside the cryo -
What if..... I just went with a USB-wired controller
-
you would look lame. Nobody uses wires in this day and age!
besides, its not only about this being practical, its fun ^^ -
A mod for putting it in the Cryo is nothing at all....just a piece of electrical tape on the bottom haha
But if you do that, and are not at the Cryo, no xbox 360 controller for you!
Looking awesome Wattos, let me know how it goes, you are inspiring me! lol. I had also considered sawing off the tip as it is pointless fiberglass
Just looked at the pictures...dammmm son, get yourself some flux remover? lol
Looking good though
-
Although I haven't done much SMT soldering, usually when I do solder something and there is excess flux...when I am removing the iron from the spot just soldered, I will spritz it with some water. This causes the flux to crack and flake off. Not sure if this is feasible with what you are doing, but with wires and such, works great.
-
Flux remover dissolves and evaporates the flux. What you are doing just cracks the flux due to the rapid cooling from the water
-
I know, it cracks and falls off nearly everything I have soldered and done this too.
-
Does this also work with the PS3 controler, it would be awesome if it did.
-
the PS3 controller just needs bluetooth connectivity and some drivers
the xbox controller is completely seperate from that as it uses proprietary radio technology -
Hey,
I finally received the expresscard I wanted to sacrifice for the project. Can you believe it, 10 days shipping time. THe bad news is that I still havent received any of the usb hubs I ordered nor the voltage converter
(because it will be shipped out tomorrow
).
Here is some progress. I dismantled the expresscard (Omnikey CardMan 4321 ExpressCard 54 Reader) and checked out the components. Unfortunately it does *not* have a dc -> dc on board (the expresscard interface only provides 3.3V whereas USB uses 5V). However I began experimenting, so the first thing was to remove the components I didnt need. I didnt go as far as removing all of them (because I am lazy, just the most important one, the microchip and some plastic).
Then I found the places where d- and d+ are located. Unfortunately they seem to be only on the chip, so you either need to solder them to the connector or the place where the chip was. I chose the latter. Then I connected 3.3V and gnd.
With that prototype I went ahead and tested it on a laptop I dont really care if the expresscard slot of that breaks. As exprected, the Xbox receiver did not start, but the logitech mouse receiver did and worked perfectly.
Thus the xbox receiver will also work once I install the dc -> dc step up.
This will be the dc-dc step up i will be using:
http://www.circuitsathome.com/products-page/power-supplies
and this is the USB hub I am waiting for:
http://www.sourcingmap.com/mini-black-smart-usb-hispeed-4port-octopus-hub-for-notebook-p-11782.html
Once this arrives, Ill be able to finish the project and maybe do a guide. -
Cool Watos, if you get the xbox to work I'd so buy that off of you, lol....
-
So you are pretty much making the xbox 360 receiver an insertable expresscard?
hmmm, that would be a good alternative to my idea -
I wanted to, but it most likely will not fit. I use the express card because:
1) I dont use the expresscard slot anyway
2) I can get access to a usb port inside the machine (with a little bit of wire routing) without soldering any cables to any port. -
Whats the thickness of the RF board in comparison to the Express card?, I be interested in making an express card version if it fits height wise, Components can always be relocated and boards reshaped its just the height that's a problem.
[GUIDE] Installing an XBOX 360 wireless controller receiver into the M17x
Discussion in 'Alienware 17 and M17x' started by cookinwitdiesel, Mar 29, 2010.