The MXM form factor dictates things like memory chip placement and GPU core location and then it's just a case of moving the thermal pads for the PWM parts on alienware heatsinks, it's tricker on other brands that have solid metal going to the VRM parts which differ on different cards.
-
-
Well that is interesting. I would not have expected the MXM standard to specify chip positions, only current draw, physical size, and heat generation; since it can be used for a multitude of different card types (not just video)
 .
.
I do know the VR's are different and the second hottest parts on the card so making sure of contact is important. Dell use a thick putty on my 675 to make contact with them. -
MXM is just for video cards, maybe you are thinking about mini PCI-E?
-
I was Doh! Here endeth today's lesson - thanks
Still getting to grips with all this laptop thingy
-
The MXM version 3.0 hardware specification defines two electrically, mechanically and thermally
compatible form factors (Type A and Type B). The electrical compatibility is provided by the use of a
single style connector and pinout for all modules. The thermo-mechanical compatibility allows the use
of type A modules on type B systems without any modification to the thermal solution or to the system
mechanical design. Note that each type has a distinct form factor and is aimed at different performance
requirements and power consumption. Additionally the two form factors have identical 3D forms
where they overlap; the larger of the two modules has the same 3D profile as the smaller module plus
an extension. This was done to enable systems with a wide range of upgradeability and allows for the
design of a single thermal solution across all MXM version 3.0 designs. The form factors defined in
the specification provide a simple upgrade/upsell option for both system types. Type A systems can
upgrade from a 64-bit GPU to a 128-bit GPU (both on type A modules). Type B systems can upgrade
from a 64/128-bit type A module to a 256-bit type B module.
perhaps this is easier....
MXM Hard and Software specs....so you are both right
-
Either way it show why the heatsinks are interchangeable - although some minor design differences could make an impact on a high-performance system. Always wondered why different heatsinks worked, with only things like removing tape needed
-
In theory yes, in practice VRM component differences often mean MXM-A cards wont match with MXM-B systems (Usually to do with inductors at the top right of the card)
It's easier to go from MXM-B to MXM-B often (unless you have a dremel handy). -
lol. My best friend when I built a multi-block water cooled rig
-
I installed Nvidia Inspector but it wont let my change fan speed, the bar is greyed out.
-
The only program I know of that can adjust fan speed is hwinfo64. It is buried in there (will need research) and will overide the bios fan control - taking away the independence of the cpu fan from the gpu fan. You set different temp points for fan speeds. It can also make the fans work in an unexpected manner (I had a machine reach 90C+ before I noticed the fans had stopped altogether!).
All the fan control functions in OC utilities do not work on mobile chipsets
Why do you want to mess with the fan speed? I had to on an earlier machine I had but that had overheating/throttling problems, and I had to have the fan full blast all the time to game for any length of time
-
I want to see if setting the fan high manually will keep the temp under control
-
As long as the fan is going 'loud' at temps above 63C then you will probably not see any difference. There is one speed higher that I never hit and used hwinfo to achieve it, but as I said that machine had problems and needed it. Also VERY loud! Hwinfo will allow you to see the fan speeds and temps that trigger them.
I'd still be inclined to track down a heatsink designed for that card first if you have overheating issues (or look into memory pads/VR contact with the existing one)?
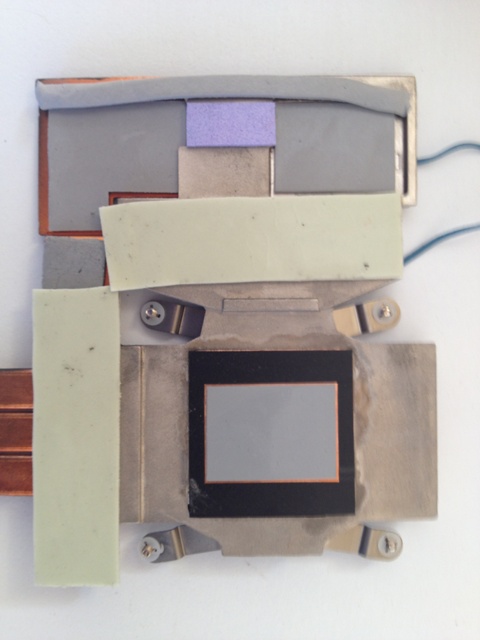
This is my 580 (same as a 675) padded and pasted by dell: Note the thick strip of puty at the top, this contacts the voltage Regulator and there are different thickness pads in different places:Attached Files:
-
-
There isnt a specific heatsink for this card on this model Alienware so unless there is a better heatsink for the R2 there is nothing I can do but try more thermal paste and gum...
-
Sorry, forgot that bit. Hopefully my pic will help? You can use putty to 'dry' assemble and check the clearances for the pads. Also a tiny dab of paste (1mm or less) on everything and screw down, open up and look at the spread pattern.
-
View attachment Borderlands2.txt
Thats a lot more putty then ive got on, think I will try adding some more tomorrow. In the mean time just ran Borderlands 2 for a min and it kind of leveled off at 100c :\ Think for now im going to add some more paste and see what happens. -
Yeah that is way too hot, Im surprised it didn't throttle back to impossibly slow clock speeds. In the R3/R4 this happens at 78C and nobody could stop it. The only solution was to make sure it never got there. Dell were heavily invloved with the issue back in the day.
Check this thread out if you have a few hours to kill
http://forum.notebookreview.com/ali...x-580m-78c-throttling-see-post-191-later.html
-
Thanks again for all your help, everyone. Just wanted to let you know I successfully installed a new NVIDIA GTX 675MX 4GB tonight on my M17x R2.
Upgraded from the original HD5870 which had gone bad. FYI I used the original HD5870 heatsink. My understanding is that the M17X R2 only had a single style heatsink (no difference between ATI/NVIDIA), but I'm not 100% sure.
Using 310.90 drivers (current as of today). Had to mod one of the INFs, but otherwise easy. Full details later.
Fans work perfectly and automatically. HWInfo not required for fan control. Screen brightness works perfectly. Will test HDMI with audio later.
Temps:
About 36C at idle
Max 74C in Civ5, maxed out, scrolling around like crazy (that's all I had time for tonight)
Special thanks to reborn2003 for the inspiration, and upgradeyourlaptop on eBay for the hardware and kit.
Quick FurMark runs:
Preset 1080: 1200, max temp 69C, 20 FPS
Preset 720: 1969, max temp 71C, 32 FPS
I had some throttling in both tests, but I'll deal with that later.
More details and tweaks to come, but I gotta go to bed now...
Feel free to ask any questions, or ask for feature tests, or benchmarks. I owe this forum a ton! Thanks again for all your help. I just created my sig for the first time, I'm so proud...
Long live the R2!!!
-SloMoHolic
A few more details before I hit the sack and forget how to explain all this stuff...
The LaptopVideo2Go drivers did not work for me this time. Here's what I did:
How I Modified the INF to Work for my System:
(These specific notes are targeted for my specific combination, the M17X R2 with the 675MX, with driver version 310.90, but I hope it might help others in similar situations).
I downloaded the 310.90 driver package from NVIDIA, specifying Win7x64. I ran the installer, which failed as expected, but also as exptected, it extracted all the important files to C:\NVIDIA.
I then went into device manager and got the Hardware ID of my new graphics card, as seen by my M17X R2. It was:
PCI\VEN_ 10DE&DEV_ 11A7&SUBSYS_ 043A1028&REV_A1
10DE = NVIDIA
11A7 = 675MX
043A1028 = MY specific version of the 675MX (yours may be different, just replace mine with yours in the instructions below)
I used Notepad++ to search for "11A7" (the "Device Code"). I searched this folder:
C:\NVIDIA\DisplayDriver\310.90\Win8_WinVista_Win7_64\International\Display.Driver
The search found "11A7" in the ListDevices.txt file, the nvcv.inf file, as well as the nvmi.inf file. It was also found in a DL_ file, but I ignored that, as it seemed like it was just a coincidence (no legible text, plus it was clearly an operational DLL file, not an installer-related file). I noticed that there were only three SUBSYS ID's in the TXT and INF files that had the 11A7 Device Code.
None of these lines matched "MY" hardware ID as reported by "MY" Device Manager (which is why the installer was failing), so I chose one to focus on one, and left the others alone.
I arbitrarily chose SUBSYS_51051558. If you're doing this kind of upgrade, then like me, you won't be installing any other graphics card for a while, so it really doesn't matter which one you pick, as long as you pick one and only one device ID to alter, across all related files.
A quick explanation: each of the nvXX.inf files contains installation details for a variety of cards. Technically, your hardware ID should only appear in ONE and only ONE of these files, so I am reinforcing that you should only choose ONE "surrogate" hardware ID, and leave the others alone. Please let me know if this doesn't make sense...
In the file edits below, you'll see that I changed the name of the device from "NVIDIA GeForce GTX 675MX" to "NVIDIA GeForce GTX 675MX AW" because when you are installing the driver, you may need to identify the specific entry that you have worked so hard to alter. Otherwise, you may see 5 lines of "NVIDIA GeForce GTX 675MX", not knowing which one to select.
NOTE: Changing the device name may affect your comparitive benchmark results if you post them in online databases, so if that's your thing, leave off the " AW" in the following lines, but you'll have to make sure you "choose" the correct 675MX....
I only edited two files:
FILE ONE:
C:\NVIDIA\DisplayDriver\310.90\Win8_WinVista_Win7_64\International\Display.Driver\ListDevices.txt
I changed line #1031 from this:
DEV_11A7&SUBSYS_ 51051558 "NVIDIA GeForce GTX 675MX"
to this:
DEV_11A7&SUBSYS_ 043A1028 "NVIDIA GeForce GTX 675MX AW"
FILE TWO:
C:\NVIDIA\DisplayDriver\310.90\Win8_WinVista_Win7_64\International\Display.Driver\nvcv.inf
I changed line #962 from this:
%NVIDIA_DEV.11A7. 5105.1558% = Section073, PCI\VEN_10DE&DEV_11A7&SUBSYS_ 51051558
to this:
%NVIDIA_DEV.11A7. 043A.1028% = Section073, PCI\VEN_10DE&DEV_11A7&SUBSYS_ 043A1028
I changed line #1149 from this:
%NVIDIA_DEV.11A7. 5105.1558% = Section074, PCI\VEN_10DE&DEV_11A7&SUBSYS_ 51051558
to this:
%NVIDIA_DEV.11A7. 043A.1028% = Section074, PCI\VEN_10DE&DEV_11A7&SUBSYS_ 043A1028
I changed line #7419 from this:
NVIDIA_DEV.11A7. 5105.1558 = "NVIDIA GeForce GTX 675MX"
to this:
NVIDIA_DEV.11A7. 043A.1028 = "NVIDIA GeForce GTX 675MX AW"
After editing these files, I tried the NVIDIA setup.exe file, but still got the same message, "The driver could not find compatible graphics hardware". This original NVIDIA setup.exe file may or may not work for you.
I went back to the Device Manager, expanded the Display Adapters section, double-clicked the only entry present (which was a generic Windows VGA driver), and went to the Driver tab.
I then clicked Update Driver... and selected the "Browse my computer for driver software" option, then the "Let me pick from a list of device drivers on my computer" option.
I then clicked the "Have Disk" button, and browsed to the nvcv.inf file that I had previously edited (mentioned above in this post).
Now, since I had already successfully edited that file with a matching hardware ID, the only option in the list was the "NVIDIA GeForce GTX 675MX AW" (because the "Show compatible hardware" box was checked). I chose that and hit Next. The driver installed, and Windows requested a reboot. After the reboot, everything was working properly and I was happy.
I realize this is a long post, especially for a forum n00b, but I hope it is helpful to anyone out there in the NotebookReview forums that is either trying a "standard" upgrade, or possibly in the future, if you are trying a new device.
Once again, I owe so much to this forum, and I am very grateful for all the help I have received here.
Good luck, and please let me know if I might be able to help.
-SloMoHolic -
Thanks, reborn2003!
I just installed my own GTX 675MX. I posted a new thread here with detailed instructions on how I modified the 310.90 driver INF files to work.
+1 for being a pioneer and giving me confidence to give this a shot.
Thanks,
SloMoHolic -
How much thermal putty do you have on yours? My card doesnt read below 40c and when I do anything even simple as watch an HD vid it shoots to 70+ and games take it over 100! I put new paste on the heatsink and used all the thermal putty I could get from my other 2 graphics cards. Also cant seem to find anywhere that sells the strips of putty so any suggestions for that would be appreciated
Edit: Also the air comming out the back of the laptop is only warm, when I had my old card it would come out MUCH hotter. Is there a chance my temp readings are wrong?
Edit 2: Just orders some thermal PADS. Helps to search for the correct item
I cant find anywhere to get more thermal putty, only paste. Any ideas? Also is it possible that I am getting false temp readings? If so how could I remedy that?
Edit: just ordered some thermal PADS. Searching using the right name really helps
-
Unlikely it's a false reading, just a case of getting the heatsink to work (I believe). I had a look around and indeed I couldn't find anything that looked like the stuff dell used but this seems to be what you are looking for:
Thermally Conductive Putty - Timtronics.com
-
I ordered this Phobya Thermal Pad Ultra 5W/mk 1.5mm (120x20mm) | eBay as that looks like what is needed
Also got impressive thermal conductivity at 5 W/m-K
-
Fortunately, I snapped an overhead picture of my card with the thermal pads stuck on before I installed the card. I'll post it up later, probably late tonight. For now, I can tell you this: I used two different thicknesses of pads - thin (guessing about 1/16") for the memory and the three big chips, and very thick (about 3/8") for the 6 smaller chips along the outside edges of the card, since they are shorter and the heat sink is "higher" above them. I used a "pea-sized" amount of IC Diamond 7 thermal paste on the GPU, and didn't spread it out manually. I just installed the card, squirted on the paste, then installed the heatsink on top. I let the X-bracket screw tension spread the paste.
I hope this helps. I'll post the picture later.
-SloMoHolic -
Those will work for the memory and other areas but 1.5 is not thick enough to reach the VRM. The strip of putty at the top in my pic is around 3mm high. IF you are not cooling this area then it could be the cause of overheat.
In that thread I pointed at earlier, a guy had taken thermal images of the card in use. The VRM area was by far the hottest area on the card outside of the GPU core. -
I will just have to wait to see if its enough. if not then I will get something thicker
Should arrive on the 1st, I can hold out on gaming until then
-
View attachment Borderlands2-underclock.txt View attachment Borderlands2.txt
Got the new putty today, its better but I still cant get it to run less then 100c under load :s What would be a safe level to undervolt it? Less power=less heat. -
An idea but you'll probably end up with the card artifacting unless you lower the clock speed as well. I don't mess with voltage on a laptop so you'd need to find a vbios that has the vlotage pre-set at what you want. No other way.
Your thermal solution simply is not working as well as it should. A pain I know but since you are using a heatsink different to the one specifically for it you now need to look at clearances and making sure you cool all the bits on the card that are meant to be.
1. track down a pad placement diagram for the card. I believe there is one somewhere in the conference call thread but one of the card suppliers I saw on eBay had them.
2. Remove the heatsink and clean the die. Put a tiny dab of paste on each of the areas that are supposed to contact and dry assemble.
3. Open it up again and look at the spread pattern. A nice thin even spread indicates at least a reasonable good fit.
4. Clean and reassemble with the correct amount of paste on the die (hopefully you have identified a poor contact point!)
Question: was there any tape around the core contact area on the heatsink? I've seen this needing to be removed or overheat is inevitable (different die sizes)
Just had a look through that log. Interesting. You seem to be able to maintain full clock speed for most of it but towards the end I can see a brief P1 power throttle (clock and voltage go lower) but curiously it goes back to an even higher clock speed (750, probably something to do with turbo boost - I don't know if that card supports it). No temp related throttle though which is curious in itself. maybe not being in the bios as a supported card the overheat throttle no longer works
EDit: I read it wrong! You are only getting full clock right at the end though... -
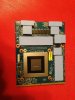
Use MickyD heatsink picture http://forum.notebookreview.com/ali...-m17x-r2-running-gtx-675mx-7.html#post9059307 with this one to properly place the thermal pads http://dl.dropbox.com/u/56470267/670M.jpg and check if the gpu fan is spinning correctly.
-
Thanks for saving my lazy a** with the pics
Before you ask trekimann, HWInfo will show you the fan speeds
-
There are 2 spots on that pad placement where I dont have it. As for contact ive spent a while making sure everything is touching where it should be. im using HWinfo to manually control the fan speed already. Going to open up now and have another go at getting it set up. Hopefully this is the last time!
-
Cool.
Good luck! Was there any black tape around the core area on the heatsink? -
View attachment rendertest.txt
no joy. Cleaned everything, new paste and careful putty placement. still runs at 100c. no tape on the card either. Is there a newer BIOS then the latest official one on the dell site? Maybe someone modified their own and it will support the card better -
Tape was on the heatsink but I guess you checked it all. I'm out of options now...
-
My only other option is it try and find a better putty. Or suffer the wrath of gaming at 100c all the time time lol. There is pad with 7W/mk so might try that as a last resort...
-
Worth a try but better putty usualy results in a few C lower. You are looking for a 20c drop which points to something very wrong. But as you are not throttling 100C, gaming (with your fan cranked at full) is on - only it might lead to early card failure
-
Could you post a screenshot of HWinfo fan control settings + GPU-Z ? http://www.techpowerup.com/downloads/2198/TechPowerUp_GPU-Z_v0.6.7.html
-
FWIW, I measured my thermal pads - they were 1 mm thick and 4 mm thick.
Here's how I laid out the pads on my card. The three pads on the edges are the 4 mm; the rest are 1 mm.
-SloMoHolic -
Curious. That core looks a completely different size/shape to the pic j95 posted, wondering if that has bearing?
-
It's a 670M, reference here Alienware M17x M18x VGA Upgrade Kit NVIDIA GTX 675MX Kepler 4GB DDR5 MXM 3 0B | eBay
Copy SloMoHolic thermal pad placement, that's how it should be done.(If you don't hurry, It looks like Spok is gonna get it ) sepia orange red.
-
Whoa dude awesome.Bro, do u mind telling me is alienware m17xr2 capable of handling gtx 680 instead of radeon hd 7970M?Do i need another PSU if jz using one gtx 680?
-
Maybe a good pic of the heatsink and card right after opening up might help? Should be able to see the impact indentations on the pads as well as the paste spread...
-
I can say the power supply will be OK. The R2 is designed to handle dual cards so should not be an issue. As for getting it to work you might have to check out the 680 threads unless someone else knows
-
Well just be a little cautious of the dual 100W cards, they are a bit heavier than it shipped with.
-
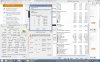
Here is that Screen Shot. -
So GPU1 Fan controls both gpu fans ? That's strange from 58 C (4000 rpm) to 104 C it looks like the die has poor contact with the heatsink. Maybe you applied the thicker pads in the wrong places so the heatsink makes no pressure on the Die. Gap between vents/surface at least 3cm and exhaust 20cm.
-
Yeah, you loose independent control of the fans with HWInfo, I do remember that bit when I needed it. I'd say you are on track with the pad thickness. A pic of the pads/paste upon opening it up should show if the die paste is too thick because of poor contact?
Another thing I just though of is the X-bracket. I recall that using the wrong one had an impact on the contact of the die (probably the height of the posts?) -
The chip in the middle has a raised area around it, should that have thermal contact too?
-
Pic?
10cha
Edit: just remembered, using hwinfo stops the 78C overheat throttle (did for me) as well. -
Yeah pictures !
I know with the R3 http://forum.notebookreview.com/alienware-m17x/672230-m17x-r3-680m-compatability-58.html#post9026664 but thought that R2 GPU fans were independent, still better than R3/R4 7000 rpm fans/anodized aluminium/RGB screen and we still pay more for cheaper parts
-
[
Ahh, thanks
-
The shim around the core (a square rim around the core) is there to prevent excess pressure. It does not need thermal compound.
Alienware M17x R2 running a GTX 675MX
Discussion in 'Alienware 17 and M17x' started by reborn2003, Dec 4, 2012.