
Looking at others GPU-Z temps, it sure seems the RAM temps are (by far) the highest, correct?
Rereading your response, I'm not really clear what you are saying...
-
Mate I think your spreading is causing the issue.
There is a good reason why Arctic Silver advise against "spreading" the paste - it adds air bubbles to the paste while you do it.
When you push down the heatsink the air bubbles cant get out and form a barrier between the die and the heatsink. It can take up as much as 60% of the contact area.
Re-apply, and use just one small drop about the size of a grain of rice. Its really all you need.
Let the pressure of the GPU heatsink push it down naturally when you tighten the screws.
Note that my heating is always on in the winter so my ambient temps are akin to a summer day - I dont use a notebook cooler, and my temps are 10c lower.
-Ash -
That statement in bold is not true Lots of paste manufacturers use a spread technique even AS
that link is to show that they have different methods of application notice core i7 mobile even though that is a CPU any of those 4 application types are acceptable horizontal/vertical lines, Dot, or surface spreading.
Arctic Silver Incorporated - Home -
YouTube - How Thermal Compound Spreads
That shows the effect I was talking about, re: Spreading, at about 2 minutes.
See how much air bubbles happened and how little thermal paste contact there is.
-Ash -
The link Mkelliny posted, a document from Arctic Silver, seems to certainly demonstrate that spreading the compound is an AS approved method, and seemingly contradicts your statement that AS advises against spreading.
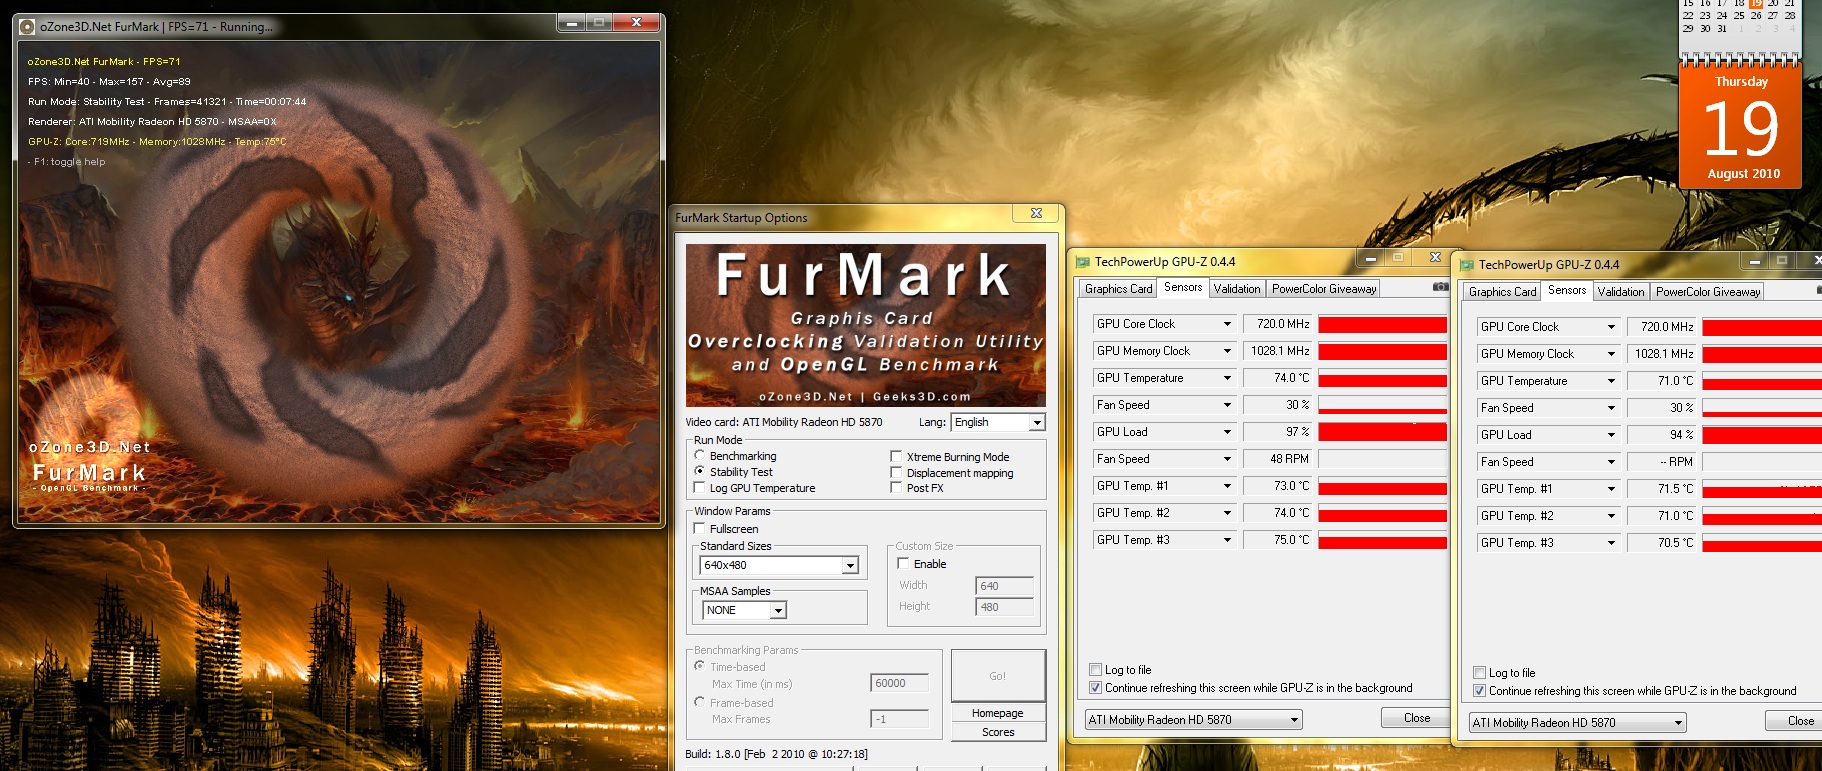
In any case, I figure I'm about 10C degrees off, plus or minus a couple. I also noticed that some of those who posted their figures it shows their GPU clock speeds lower. I had to enable PowerPlay just to get my clocks at 700/1000, otherwise they were at 300/400 and therefore running much cooler.
Is everyone running Furmark with their GPU at 700/1000 (minimum)? -
I run mine at 780/1100 or 700/1000 if i forget to OC.
AS have obviously changed their stance on spreading since I last checked, but the fact remains that your eyes dont lie.
If you watch the vid you can see its a very bad idea.
-Ash -
ok, so that explains it, bottom line - it's a big no no to put 0.5mm pads on the 4870.
-
Are you in Perth by anychance mate? If so, please PM me
-
They're by far the highest heat generating, but that's because they have a flat piece of aluminum of a heatsink instead of anything decent. They really don't produce more than a few watts worth of heat each.
I used the spread method before and I know several times at least 1/4 of the core looked like it didn't make contact with the rest of the die(that was even using a razor to spread it), that said I wouldn't take that youtube for face value, the clear plastic he uses is probally not as flat as a HSF and it probally flex's a little as well. I like to make a line of material down the middle of the cores horizontially across the die (or whichever way is longest if it's rectangular like the i7 core die) and it seems to spread it 100% across the die without much excess every time. -
Saw the video and it convinced me to redo my application. (I'm easily swayed).
After removing the heatsink, it was apparent that one of the banks of RAM was not getting good contact (the RAM closest to the center of the board). The other bank of RAM had the Ceramique well pressed on each RAM chip.
So, I cleaned the MX-3 off the GPU and heatsink and this time, I applied the MX-3 in a "X" pattern (according to the video), and pressed down slowly and firmly on the heatsink, then screwed down the retaining screws. I tightened the ones closest to the poorly covered RAM bank a bit more than before, but not too much (hopefully).
Same Furmark test, 5 minutes, and this time got 67C/72C/72C. Only a couple of degrees cooler, and that could just be attributed to it being morning here and the ambient temp a little lower.
I'm idling at around 42/44/46C (clocks at 100/150).
I understand the Ceramique may need to "set" for a while, so I might get a few extra degrees, but I think, still, that one RAM bank is running hotter than the other.
In any case, I think I'll just leave it as-is. -
For those that did the retention clip portion, how did you get the clips back on to the screws? I'm having quite a bit trouble with that part.
-
I used some pointed nosed pliers to grab the middle and ease them on slowly. It will eventually click into place.
It is a PITA though.
-Ash -
Agreed. I had a helluva time getting the clips off the screws. Even though I had a teeny tiny flat blade to pry them off, I couldn't get in there enough to do so. I had to revert to the more dangerous way of pushing them off (and risk them flying across the room).
And, yes, putting the clips back on is a PITA. Like Ash, I used needle nose pliers, sat the clip on screw (in the indent) then using the pliers, squeezed them (carefully) so they locked down in place.
Joker, let us know how it goes and your temps (before and after). -
There's a great comparison of the various thermal interface material (TIM) application methods on BenchmarkReviews.com. They compare several different methods, such as a single dot, a line, multiple lines, and spreading. The single dot manages to get good coverage of the heatsink, and doesn't leave any air bubbles.
My main concern about spreading is that you're more likely to get a thicker application of the TIM. Less TIM = better, so I'd be more likely to go with one of the other methods. -
Mod is done and I did a temp check at my normal 3D clocks of 720/1030 mhz and the results are a major drop in temps. Before load temp at my 720/1030 clocks was around 88-89C and now here's what I got. Some things I did different than others is I screwed them down all the way, not just 2-3 turns. It put a lot of tension on the board but I wanted to make sure there was ample contact with the ram chips. The tension pressure even with this mod is not even close to enough to hurt the die.
Attached Files:
-
-
Really??? With my screws turned 2-3 full turns each, my PCB was visibly bent in one direction. Are you saying with your screws fully turned down that your PCB wasn't bent in any direction???
Also, it looks as though your temps aren't too far off from mine. What did you use for GPU goop and for the RAM?
I must say, though, even though the temps are quite a bit cooler, my fan still runs pretty darn fast and loud!!! -
There are risks besides damaging the die.....flexing the pcb can crack the internal traces permanently damaging the board
-
Wow check this out, these settings (everything turned on) would have thrown my GPU's into the mid 90s before the mod. Now that the paste is settling in and ambient is dropping a bit (it was hot as hell here today) the temps are amazing. The fan still revs up once it hits 70C though so I gotta find a way to get both below 70C:
True the traces can break but I don't see that happening. The flex on my board was minimal. I used MX-3 on the GPU and ram. I had ASC handy but decided not to use it. Lancorp, run yours at 720/1030 if you want a direct comparison with my temps and use the settings I did in the last post I put up. I'm going to apply this tension mod to the CPU if I can.Attached Files:
-
-
Excuse my laziness, but I've never OC'd the GPU. What tool do you recommend?
-
Common issues & resolution - Alienware M17x Wiki
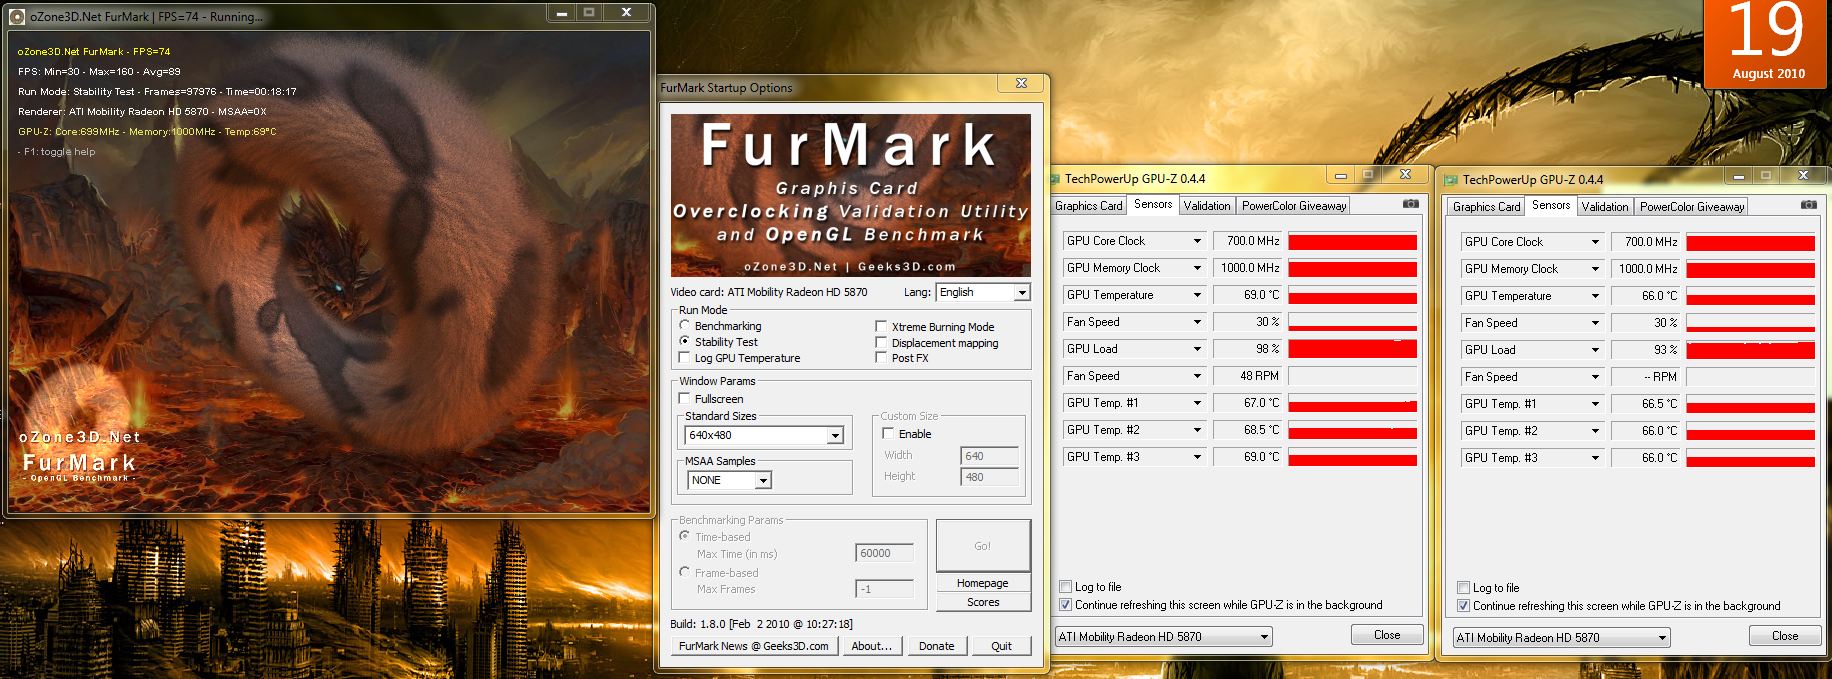
I ran it at 700/1000 so we could do a direct comparison:Attached Files:
-
-
Nice work joker. Maybe I might tighten my GPU down further too! lol.
See if you can do a similar mod to the cpu, could be interesting!
30% fanspeed forever with OC is a pretty damn good result too man!
-Ash -
It won't work with the CPU, I gave it a try just now. The HSF ends up just bending but not making good contact in the center so it was a waste of time. I just reapplied MX-3 and the temps are the same as before so far so I might have to open it up again in a few weeks when I have time.
-
Do Furmark in 1920*1200, 640*480 don't use GPU too much.
-
Makes little difference running furmark at 1200p. I just did a run at 720/1030 @ 1200p and the temp was 3C higher. Not really a big temp jump at all.
-
Because you have a good cooling
-
Actually, when running Furmark at 640x480, GPU-Z reports the GPU at 100%. Are you saying running at 1920x1200 runs the GPU at more than 100%??? How can you have more than 100%???
At same speeds, our GPU cores are the same...it's the RAM where yours is cooler by 4C. I'm sure one bank of my RAM isn't making the best contact, plus I used Ceramique on the RAM and you used MX-3, which I think will give you a few degrees cooler right there...
When I get the time again, I might clean off the RAM and do MX-3, but how thick was your MX-3? Mine is almost like AS5...whereas with Ceramique, I have to struggle to squeeze it out of the tube. It has a noticeably higher viscosity than my MX-3...
Also, in GPU-Z, what is the GPU #3 temp sensor measuring and where is it on the board? -
Well I did a dual Furmark run on dual monitors. I ran one instance of Furmark at 1900x1200 on the M17x screen, and used a 1280x1024 monitor attached via VGA. On the external I ran a Furmakr 0f 1280x1024. GPU 1 (M17x screen) stabled off at 74*C and GPU 2 (external 1280x1024 monitor) stabled off at 72*C. I ran both applications simlutaniously. Admitted ly the only changes I've made to GPU cooling is replaceing the crap 2mm Dell thermal pads with frozencpu 1mm thermal pads, and replaced the dell thermal compound with IC Diamond. Attached is the screen shot. I ran the stability test. I attempted to run Intel Burn test at the same time, but that locked up the system after 30 sec or so. To much stress I suppose.
Another issue I had was when running with crossfire enabled, the load on GPU 2 never got very high. Is this common? I increased the load by putting it on the external.
![[IMG]](images/storyImages/gpufurmarkdualmonitors.th.jpg)
I'm guessing this is decent for not messing with the cooling system more then I have. -
So I assume you disabled crossfire and had each monitor controlled by a separate video card to max them both out?
-
I'm not sure that 30% fan speed is accurate. In GPU-Z, my fan starts to rev up at a GPU temp of around 50C. Then, when it hits somewhere in the high 60's, it revs up even faster, yet the fan speed still shows 30%.
As a matter of fact, right now, with nothing going on, GPU-Z says my fan speed is 30%, and it's perfectly quiet. The Fan RPM is completely useless also, so I question the validity of the fan sensor readings in GPU-Z. -
Scook, it just seemed to work out like that when I plugged in the monitor, I have the monitors in extended mode. Never really noticed it before. But it looks like one GPU pushes each monitor if you use a dual setup. Later I might try and see how it works with crossfire disabled.
-
the Dell pads are 1.0mm. I didn't notice any difference (acutally it ran hotter the first day, but that was probally just a break-in period) with EK thermal gap pads versus the Dell stuff.
I would just keep an eye on it, because the PCB can start to mold into that shape bla bla bla.
I doubt it's any different, but I noticed HWinfo32 acutally reads in RPM's instead of percent, might be worth a look to see if it updates better. I Did notice that it *does* have the various mainboard internal chassis tempreature sensors, so I thought that was neat.
AMDGPU tool should have the correct string names for the sensors, but iirc 3 is one of the ram sensors. don't think there's a way to identify it's exact location on the board without the reference board design datasheet or something to that effect. -
Good call. My mistake, I replaced the 1.0mm pads with 0.5mm pads. Helps to close the gap.
-
So is the conclusion that for the 4870s the 1mm pads are best? Due to the spacer around the GPU die package?
-
How do thinner pads help to close the gap? Did you use 3 of them, stacked?
(edit: or did you mean closing the gap on the GPU by using thinner pads on the RAM?) -
^This, and it gives less pad for heat to have to transfer through to get to the heatsink.
-
Have you removed the HSF and inspected the .5mm pads to see if they are making good contact?
-
Not in a while, but when I was installing them I checked to makes sure they would work out and then were making good contact at that point. Still seems good seeing as how the temps never went over 74*C. I'm pretty happy with them.
-
Yep. Go with those, once you open it you'll see that 0.5mm wouldn't be enough
-
if your temps are good I wouldn't rip it off to check. alot or the higher performance material is denser, so it's not going to leave an impression like the Dell stuff does, as well as the fact that it doesn't have to compress as much since it's the correct thickness.
-
Awesome and thanks! -
Note that before the mod, the fan speed reading in GPU-z actually does go to 100% under load.
It seems to only recognise a difference between 30% and 100%.
After the mod, it never hits 100% again. It is noticeably quieter.
-Ash -
all we need now is some manual fan control so we can kick it to 100% and drop those temps another 5c or so
-
Have applied your mods to my M17XR1. Not too much improvement in the cooling of the discrete cards but turns out the cooler for the 9400 on the mobo only used a crappy .5mm pad with lousy tension. Replaced pad with Shin Etsu X23-7783D and applied washer mod to apply proper tension. Got immediate 10 deg C drop in GPU temp! Admittedly it's only the integrated chip but, hey, 10 degrees! Thnx!
-
It is also the northbridge and memory controller so that is actually quite relevant if you overclock. Congrats on the mod!
-
Hi, got my M17X today as a replacement for the M15X but the fans are going crazy all over and CPU temps are reaching 85 whilst installing updates! What is happening! Checked the CPU paste and reapplied a nice thin layer of my own so that shouldn't be it, is there any Bios update I should carry out?
Thanks for any help
http://img534.imageshack.us/img534/6946/89910035.png -
I would redo your application as its only one core that is outta sync the others seem to be fine run a prime95 torture test then post your results.
reason I say redo the application as it seems you didn't get it as even as it should be. -
Ok, I shall go through the process of opening the rig again.
How thick should I paste it?
Thanks for your advice
-
Not to thick, Just make sure you get an even coat what TIM (thermal paste) are you using?
-
I am using Arctic Silver 5, I cleaned the paste on the heat sink and layed an even coat all over the CPU core.
Maybe it has to be a bit thicker for better contact...
That's the only option anyway isn't it?
I have the latest Bios, the system operates correctly but fans seem to go off a lot (loud loud louuud).
-
follow directions in this lin Arctic Silver, Inc. - Instructionsk
M17x R2 full internal cooling mod - huge improvement!
Discussion in 'Alienware 17 and M17x' started by Ashtefere, Aug 9, 2010.


![[IMG]](http://img826.imageshack.us/i/gpufurmarkdualmonitors.jpg/)

