
I did it with both cards in.
Atiflash 0 bios.rom -f for first card
Atiflash 1 bios.rom -f for second card
-f for force flash so it doesn't pester you with info that a certain vBIOS is not of that release. In many cases it will work.
When flashing switch your boot options so that your Rufus Free-DOS stick is on the first spot and write down your command list in case of blind flash. Do a Google search on how to save your rom, in case you need to restore it, I think it was
Atiflash 0 (or 1) s default.rom
Name of the ROM is obviously up to you, that's how I usually name them. With M17xR2 I just called the left.rom and right.rom")
Be ready to memorize how much time and what inputs Free-DOS boot needs before the command prompt appears, so you can hammer that default BIOS restore
EDIT: don't hold to tightly to the Dell thing. Avoid HP releases, but other than that it's free game. Also possible that Dells were without CF functionality, so I'd stick with CLEVO. I've seen quite a few Dell cards on sale without CF ports, so I think it's safe to assume that they did not go in pairs
-
Thanks for the advice. I'll try and give it a try over the next few days. I hate doing BIOS flashes, it always seems so complicated for an old man like me. Most of what you wrote seems like a different language.....
It doesn't matter if the crossfire cable is attached?
Would it matter if I flash an M290x or 8970M BIOS? They are the same card right? -
Old man, hmph. You are as old as you feel
It's quite easy really (well, To me it's like going back to my comfy zone of when I was 7 or 8 and running games by myself in DOS, so I definitely have a positive bias towards that
), just running commands, that's all there is to it. Nothing complicated, really step by step. Have a tutorial displayed on another machine to keep you comfort, just screwdriver in one hand, beer in the other, and you'll pull through
I would disconnect the CF, but I don't think it should be an issue. In M17xR2 it was, because when by default both cards started the system would crash. So one at a time. Leave the top cover undone, so it's easy to reattach when you're done. or just leave the keyboard loose?
Shouldn't matter if the vBIOS is labelled as R9 290X or 8970M, The cesspit of Unverified ROMs is really a free-for-all when it comes to naming convention. I've seen Radeon 797M (apparently developed by Boeing), Quadro M4K, and other tosh. Just keep a rollback handy. I really recommend getting an EEPROM flasher, that is a toy you can never have enough of, I've been reading roms from everything, from all the GFX cards I have, from all the motherbords, even attempted to find a readable chip from an old power supply (failed, though). It was kind of exciting, but going back to the point, with that you will be able to read a card without even inserting it into a machine, which is plenty helpful if a machine decides to go primadonna on you and not POST with a card you've paid handsome for. It's like 15-20 bucks in total for a flasher, 1,8V adapter for Pascal+ cards, and a clamp for it. Software may be intimidating at first, but after a while it serves it's purpose well.Maxware79 likes this. -
Something like this?
-
Exactly. Although if you want to flash newer cards you need 1.8V adapter. S with this set you go up to GTX 980M/Quadro M5000M in case of Nvidia. And, of course, 290X in question
-
Ahh ok. It would be great to work how to do it one day.
Sent from my iPhone using Tapatalk -
Since most of us need to stay at home I can't think of a better time to play around with stuff like this
if you want I can guide you through the process
-
That would be great! I’m still at work though. No sign of us getting shut down yet. Could do with a break though.
Sent from my iPhone using Tapatalk -
be careful with the ch341a, it "is not compatible" with 3.3v eeprom unless you hardmod it, it only run at 5v, it's okay for quick flash of 3.3v eeprom (start from "mid" kepler) but longer session can make the eeprom unusable (= broken), except for that, 5v and 1.8v (with adapter, mostly for pascal and +) eeprom works without any issue, it's faster than using windows too
MrMogwai likes this. -
Yes, shold've mentioned that it should be 3.3V ;P
Yeah, it is extremely quick, and in many cases doesn't require disassembly. With the Ranger, though, it does (with P4000M, the chip is unreachable :/ ), but for example M17xR2 just requires removal of the radiator, same with M18x -
They are averting it's working with 3.3v, but it never switch to 3.3v, only 5v, for exemple I recently fried an eeprom on a 880M, I thought it was 5v, like other kepler I have but it was 3.3v, I was wondering why it failed everytime, it failed after 10min with 5v, but your luck may vary. I thought that kepler and older -> 5v, maxwell -> 3.3v and pascal 1.8v but I was wrong, always check datasheet of the eeprom before trying something
-
I recognise a lot of the words you just used but when strung together they formed a mysterious language that would need decades of deciphering by Jean-Francois Champollion, if only he were alive to help me.
-
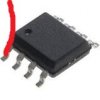
If you want to use an external eeprom programmer like a CH341A you need to have a SOP8 eeprom on you graphics card, otherwise it will require soldering skills (and it that case, it's easier to use nvflash)
- Install the drivers
- Run the software
- Find the datasheet of your eeprom to know at which voltage it operate, it could be either 5v (mostly for fermi/early pascal), 3.3v (mostly for late kepler/maxwell) or 1.8v (mostly for pascal)
- If your eeprom operate at 5v, you need nothing more, if your eeprom operate at 3.3v you need to modify (soldering) your CH341A (or take the risk to burn your eeprom, if you are fast enough it will be okay), if your eeprom operate at 1.8v, you need a 1.8v adapter for CH341A
- Plug everything as shown below
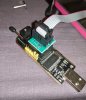
- Hit "detect" or find your eeprom with the chip search (in red), if it's not here, find a similar chip name with the same size in Bytes/bits
- Click on "Read" (in orange) then save (in brown) what you get, it will be your backup in case something wrong happen
- Open the file of your new eeprom (in brown)
- Make sure everything is checked below "auto" (in green)
- Press on auto and wait until this message show up
*picture of ok message*
- Then your good to go, unplug everything and try it
Temporary link to all files needed :
https://www.mediafire.com/file/n5mw8cfy45q74in/CH341A.zip/file
Is this better ? It's a sample of what will be featured on my M6700 upgrade thread -
O
Or check from the lowest one you've got once it reads it's fine, when you write check the writing, if it doesn't - increase by one step
-
So you modified your CH341A to be 3.3v ? by default it only output 5v signal, and you can't change it with software.
-
I got one with default 3.3V. Quite a popular thing it seems in Arduino circles around here. At least it was sold as 3.3V. will test tomorrow out of curiosity what's the output with a multimeter
Just checked the listing, yep, advertised as 3V programmer. Will do the check anyways -
is it the one with black and gold pcb ?
-
Oops....just bought another 17 R1 off a guy on Gumtree.....
Papusan likes this. -
Your list is going to turn into an essay soon lol.
-
Well hopefully I'll sell a few soon. Someone is coming to grab one of the 17's on the weekend and he said he wants the 18 for his wife in a few weeks. I'm not too fussed about selling the second M18x, it's so pretty.
Papusan and Rengsey R. H. Jr. like this. -
Well it's happened again......another broken Ranger on its way to get some TLC...
My wife is going to kill me!
Discussion in 'Alienware 17 and M17x' started by Maxware79, Mar 17, 2020.


