Hey Guys.
So many people are asking how to upgrade AW18 to 980ms and i decided to make a tutorial how to do it (or i have done it..) I made an upgrade from 880m SLI so i have 100W Heatsinks. It does not work with 70W Heatsinks (Thx to Shekelstein)
Heatsink Partnumbers for AW18 980m cards:
Heat sink - 980M - part number 43K2P (right)
Heat sink - 980M - part number 54TRV (left)
- Buy 980m or 980m SLI
Vendors: Eurocom, CEG, RJTech, HIDevolution
All of them are working i think, cause there is no special difference between each other.
I bought it from CEG, 8GB vram.
!Dont forget that you need: 4 screws + X-bracket!
- sBIOS A10 or A12?
If you have BIOS Version A12 continue with Step 5, because there is no need for an UEFI Partition
- Create bootable UEFI windows 8.1 installation USB flash drive with Rufus
Rufus is freeware and a small utility that creates bootable USB flash drive for Windows 7 or 8. Just select Windows 8.1 ISO Image and then !GPT partition scheme for UEFI computer!
- Prepare BIOS for Upgrade to pure UEFI
Before install 980m in AW18 you need to modify Bios settings: Under Boot Section: Secure Boot: Disabled, Load Legacy Option Rom: Disabled, Boot List Option: UEFI
- Adjust Heatsinks
I just used a Hand milling machine. It is very easy, if you havent 2 left feet.
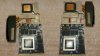
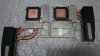
Left Picture: Area with Red Border need to be modified, Right Picture: Modified Heatsinks
- Put 980ms into AW18
I used Gelid GC-Extreme (Idle ~44°C, Full Load ~71°C)
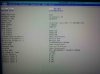
Both cards are recognized in BIOS
- Update vBIOS
Update vBios from Both Cards with Prema Mod v1.1.1
AW18_8GB_GTX980M_OC_PM_v1.1.1 --> LINK
If you want to use latest Nvidia Drivers use Prema Mod v2
GTX980M_8GB_MXM_OC_PM_v2 --> LINK
- Install Drivers
I installed drivers vom Mr. Fox 344.75 Mod and i havent any problems till yet. If installer shows an error, try to Disable Driver Enforcement Signature Verification. --> Disable DESV
344.75 Driver Mod from Mr. Fox --> LINK
or newer ones from J95 (ONLY with PremaMod v2) --> LINK
- Adjust Fans (SLI) with Hwinfo64
If you installed 980m SLI, and second Fan is not working, you need to use hwinfo to activate and control the fan of second 980m.
I just followed this tutorial from Mr.Fox. --> LINK
- IMPORTANT THINGS
- BIOS A10 -> Don't switch to Legacy Mode afterwards! -> 8 Beeps = Reinstall old cards :/
- The recent Versions of EVGA Precision X (through Nvidia Driver) are bricking the LCD Screens EDID!BRICKED LCD-Display?
For all people, who bricked their LCD-Display, follow this Instructions: (BIG THX @t456)
Good Luck and Enjoy 980m in AW18
- Download this Linux Image: LINK
- Write to a USB Stick with rufus or USB Image Tool
- Follow this Instructions
start
01 check 'pnp id -panel nrs.txt' for the correct bin
02 copy it to the 'write-edid' folder
03 open terminal (ctr+alt+T)
04 sudo bash
05 sudo sensors-detect
Hit 'n' for all 'YES/no' questions, EXCEPT I2C/SMBus, hit 'y' for that.
There'll be something like 'Using driver 'i2c-XYZ' <- mine was i2c-i801 (Lynx Point),
hit 'n' for the remaining questions.
06 sudo modprobe i2c-XYZ (i2c-i801 for me)
07 sudo modprobe i2c-dev
08 sudo i2cdetect -l
result:
######################################
root@it:~# sudo i2cdetect -l
i2c-0 i2c i915 gmbus ssc I2C adapter
i2c-1 i2c i915 gmbus vga I2C adapter
i2c-2 i2c i915 gmbus panel I2C adapter
i2c-3 i2c i915 gmbus dpc I2C adapter
i2c-4 i2c i915 gmbus dpb I2C adapter
i2c-5 i2c i915 gmbus dpd I2C adapter
i2c-6 i2c DPDDC-A I2C adapter
i2c-7 i2c DPDDC-C I2C adapter
i2c-8 i2c nouveau-0000:01:00.0-0 I2C adapter
i2c-9 i2c nouveau-0000:01:00.0-1 I2C adapter
i2c-10 i2c nouveau-0000:01:00.0-2 I2C adapter
i2c-11 i2c nouveau-0000:01:00.0-5 I2C adapter
i2c-12 i2c nouveau-0000:01:00.0-6 I2C adapter
i2c-13 i2c nouveau-0000:01:00.0-7 I2C adapter
i2c-14 i2c nouveau-0000:01:00.0-8 I2C adapter
i2c-15 i2c nouveau-0000:01:00.0-9 I2C adapter
i2c-16 i2c nouveau-0000:01:00.0-26 I2C adapter
i2c-17 i2c nouveau-0000:01:00.0-27 I2C adapter
i2c-18 i2c nouveau-0000:01:00.0-28 I2C adapter
i2c-19 i2c nouveau-0000:01:00.0-29 I2C adapter
root@it:~#
######################################
If, for whatever reason, you have restarted/rebooted AFTER running 'i2cdetect -l';
ALWAYS RE-RUN THAT COMMAND before asssuming the edid will be on the same bus. The bus
enumeration is usually fixed, but not always so; make CERTAIN you have the right bus.
Those 0-19 are the list of buses, now we need to find out which bus the panel is on.
It could be 'panel' (bus 2), but one the 'DPDDC's is also possible.
Let's try bus 2 first. we read (-r) the bytes 0 to 127, so 128 bytes in total, and
we check this bus 2 at address 50 <- this SHOULD contain the edid, BUT-T-T-T ...
that is not guaranteed -> IF it is on a different address then either the read part
or, especially, the writing part can change things that are hard to fix.
We're not interested in the difference between 128 byte or 256 byte edids yet,
so extracting the first 128 bytes will do for now.
09 sudo i2cdump -r 0-127 2 0x50
result:
######################################
root@it:~# sudo i2cdump -r 0-127 2 0x50
No size specified (using byte-data access)
WARNING! This program can confuse your I2C bus, cause data loss and worse!
I will probe file /dev/i2c-2, address 0x50, mode byte
Probe range limited to 0x00-0x7f.
Continue? [Y/n] y
0 1 2 3 4 5 6 7 8 9 a b c d e f 0123456789abcdef
00: XX XX XX XX XX XX XX XX XX XX XX XX XX XX XX XX XXXXXXXXXXXXXXXX
10: XX XX XX XX XX XX XX XX XX XX XX XX XX XX XX XX XXXXXXXXXXXXXXXX
20: XX XX XX XX XX XX XX XX XX XX XX XX XX XX XX XX XXXXXXXXXXXXXXXX
30: XX XX XX XX XX XX XX XX XX XX XX XX XX XX XX XX XXXXXXXXXXXXXXXX
40: XX XX XX XX XX XX XX XX XX XX XX XX XX XX XX XX XXXXXXXXXXXXXXXX
50: XX XX XX XX XX XX XX XX XX XX XX XX XX XX XX XX XXXXXXXXXXXXXXXX
60: XX XX XX XX XX XX XX XX XX XX XX XX XX XX XX XX XXXXXXXXXXXXXXXX
70: XX XX XX XX XX XX XX XX XX XX XX XX XX XX XX XX XXXXXXXXXXXXXXXX
root@it:~#
######################################
So the edid is not here. If it was the edid then you'll see the
'00 FF FF FF FF FF FF 00' start header, even if a little corrupted.
If you find that then you know the bus AND the address.
Anyway, let's try bus 6 next (DPDDC-A).
09 sudo i2cdump -r 0-127 6 0x50
result:
######################################
0 1 2 3 4 5 6 7 8 9 a b c d e f 0123456789abcdef
00: 00 ff ff ff ff ff ff 00 4d 10 ff 13 00 00 00 00 ........M?.?....
10: 00 17 01 04 a5 1d 11 78 06 de 50 a3 54 4c 99 26 .??????x??P?TL?&
20: 0f 50 54 00 00 00 01 01 01 01 01 01 01 01 01 01 ?PT...??????????
30: 01 01 01 01 01 01 56 5e 00 a0 a0 a0 29 50 30 20 ??????V^.???)P0
40: 35 00 26 a5 10 00 00 18 00 00 00 10 00 00 00 00 5.&??..?...?....
50: 00 00 00 00 00 00 00 00 00 00 00 00 00 10 00 00 .............?..
60: 00 00 00 00 00 00 00 00 00 00 00 00 00 00 00 fc ...............?
70: 00 4c 51 31 33 33 54 31 4a 57 30 32 0a 20 00 b0 .LQ133T1JW02? .?
######################################
Good, bus 6 it is. Now pay attention to byte 7e. Read address
like it was excel: ROW-COLUMN. In this example 7e = 00 (zero) and
it's in-between values 20 and b0.
The b0 is the final bit (and checksum), if 7e = 01 (one)
then you have an extension block and require a 256 byte edid.
These are also availeable the archive, but the difference is that
you need to use 'write-edid-256.sh' instead of 'write-edid.sh'.
Let's make an export to verify actual corruption first and
also to help further research:
09 sudo i2cdump -r 0-127 6 0x50 > EDID/edidexport.txt
Or, if case you have a 256 byte edid:
09 sudo i2cdump -r 0-255 6 0x50 > EDID/edidexport.txt
Check the export by opening the .txt and copy/pasting the
significant hex values to the Web Based EDID Reader website.
The pasted values should be stripped of row and column id
and the ascii characters to the right:
example:
######################################
00 ff ff ff ff ff ff 00 4d 10 ff 13 00 00 00 00
00 17 01 04 a5 1d 11 78 06 de 50 a3 54 4c 99 26
0f 50 54 00 00 00 01 01 01 01 01 01 01 01 01 01
01 01 01 01 01 01 56 5e 00 a0 a0 a0 29 50 30 20
35 00 26 a5 10 00 00 18 00 00 00 10 00 00 00 00
00 00 00 00 00 00 00 00 00 00 00 00 00 10 00 00
00 00 00 00 00 00 00 00 00 00 00 00 00 00 00 fc
00 4c 51 31 33 33 54 31 4a 57 30 32 0a 20 00 b0
######################################
If the EDID Reader says 'checksum valid' then do not proceed
any further; the edid is fine and, thus, something else must be wrong ...
If it says 'checksum fail' AND you have your bus AND address by now;
skip the stuff below and proceed to step 10.
If, on the other hand, you received all XX on all buses then 50 is not
the right address for you ... we need to look beyond 50:
09 sudo i2cdetect 6
result:
######################################
root@it:~# sudo i2cdetect 6
WARNING! This program can confuse your I2C bus, cause data loss and worse!
I will probe file /dev/i2c-6.
I will probe address range 0x03-0x77.
Continue? [Y/n] y
0 1 2 3 4 5 6 7 8 9 a b c d e f
00: -- -- -- -- -- -- -- -- -- -- -- -- --
10: -- 11 -- -- -- -- -- -- -- -- -- -- -- -- -- --
20: -- -- -- -- -- -- -- -- -- -- -- -- -- -- -- --
30: -- -- -- -- -- -- -- -- -- -- -- -- -- -- -- --
40: -- -- -- -- -- -- -- -- -- -- -- -- -- -- -- --
50: 50 -- -- -- -- -- -- -- -- -- -- -- -- -- -- --
60: -- -- -- -- -- -- -- -- -- -- -- -- -- -- -- --
70: -- -- -- -- -- -- -- --
root@it:~#
######################################
So there IS something else here besides the edid at 50 ...
Wonder what that button does ...
Anyway; go back to the beginning of step 9 and redo the 'read bus',
only this time at address 11 (or whatever your results were).
######################################
10 cd EDID/edid-rw
At this point we should have:
- BUS (here 6)
- ADDRESS (here 50)
- EDID LENGTH 128 or 256 (here 128).
11 sudo ./edid-rw 6 | edid-decode
This is just a precaution; we want to make sure edid-rw uses the
right address, if not then we need to change its code (report this if so).
result:
######################################
root@it:~/EDID/edid-rw# sudo ./edid-rw 6 | edid-decode
Extracted contents:
header: 00 ff ff ff ff ff ff 00
serial number: 4d 10 ff 13 00 00 00 00 00 17
version: 01 04
basic params: a5 1d 11 78 06
chroma info: de 50 a3 54 4c 99 26 0f 50 54
established: 00 00 00
standard: 01 01 01 01 01 01 01 01 01 01 01 01 01 01 01 01
descriptor 1: 56 5e 00 a0 a0 a0 29 50 30 20 35 00 26 a5 10 00 00 18
descriptor 2: 00 00 00 10 00 00 00 00 00 00 00 00 00 00 00 00 00 00
descriptor 3: 00 00 00 10 00 00 00 00 00 00 00 00 00 00 00 00 00 00
descriptor 4: 00 00 00 fc 00 4c 51 31 33 33 54 31 4a 57 30 32 0a 20
extensions: 00
checksum: b0
Manufacturer: SHP Model 13ff Serial Number 0
Made week 0 of 2013
EDID version: 1.4
Digital display
8 bits per primary color channel
DisplayPort interface
Maximum image size: 29 cm x 17 cm
Gamma: 2.20
Supported color formats: RGB 4:4:4
Default (sRGB) color space is primary color space
First detailed timing is preferred timing
Established timings supported:
Standard timings supported:
Detailed mode: Clock 241.500 MHz, 294 mm x 165 mm
2560 2608 2640 2720 hborder 0
1440 1443 1448 1481 vborder 0
-hsync -vsync
Dummy block
Dummy block
Monitor name: LQ133T1JW02
Checksum: 0xb0
EDID block does NOT conform to EDID 1.3!
Missing monitor ranges
root@it:~/EDID/edid-rw#
######################################
Good, so we're looking at the same thing. If you've made it this far
then we're pretty much finished.
IF you have an edid address different from 50, then we need
to change the write-edid.sh script accordingly (report this).
If it is the standard address 50, then proceed:
Let's rewrite the edid (the .bin you copied to the 'write-edid' folder).
We'll presume it's called ABCDEF.bin. The actual tool it uses is i2cset
(docs bookmarked), but this writes byte-for-byte, whereas
the write-edid.sh script automates that (with address=50 pre-set).
12 cd ..
13 cd write-edid
14 sudo bash ./write-edid.sh 6 ABCDEF.bin
result:
######################################
root@it:~/EDID/write-edid# sudo bash ./write-edid.sh 6 SHP13FFmod.bin
Writing byte 0x00 to bus 6, chip-adress 0x50, data-adress 0x00
Writing byte 0xFF to bus 6, chip-adress 0x50, data-adress 0x01
Writing byte 0xFF to bus 6, chip-adress 0x50, data-adress 0x02
Writing byte 0xFF to bus 6, chip-adress 0x50, data-adress 0x03
Writing byte 0xFF to bus 6, chip-adress 0x50, data-adress 0x04
Writing byte 0xFF to bus 6, chip-adress 0x50, data-adress 0x05
Writing byte 0xFF to bus 6, chip-adress 0x50, data-adress 0x06
Writing byte 0x00 to bus 6, chip-adress 0x50, data-adress 0x07
Writing byte 0x30 to bus 6, chip-adress 0x50, data-adress 0x08
Writing byte 0xE4 to bus 6, chip-adress 0x50, data-adress 0x09
Writing byte 0x6C to bus 6, chip-adress 0x50, data-adress 0x0a
Writing byte 0x04 to bus 6, chip-adress 0x50, data-adress 0x0b
Writing byte 0x00 to bus 6, chip-adress 0x50, data-adress 0x0c
Writing byte 0x00 to bus 6, chip-adress 0x50, data-adress 0x0d
Writing byte 0x00 to bus 6, chip-adress 0x50, data-adress 0x0e
Writing byte 0x00 to bus 6, chip-adress 0x50, data-adress 0x0f
Writing byte 0x00 to bus 6, chip-adress 0x50, data-adress 0x10
Writing byte 0x18 to bus 6, chip-adress 0x50, data-adress 0x11
Writing byte 0x01 to bus 6, chip-adress 0x50, data-adress 0x12
Writing byte 0x04 to bus 6, chip-adress 0x50, data-adress 0x13
Writing byte 0xA5 to bus 6, chip-adress 0x50, data-adress 0x14
Writing byte 0x1D to bus 6, chip-adress 0x50, data-adress 0x15
Writing byte 0x11 to bus 6, chip-adress 0x50, data-adress 0x16
Writing byte 0x78 to bus 6, chip-adress 0x50, data-adress 0x17
Writing byte 0x06 to bus 6, chip-adress 0x50, data-adress 0x18
Writing byte 0xDE to bus 6, chip-adress 0x50, data-adress 0x19
Writing byte 0x50 to bus 6, chip-adress 0x50, data-adress 0x1a
Writing byte 0xA3 to bus 6, chip-adress 0x50, data-adress 0x1b
Writing byte 0x54 to bus 6, chip-adress 0x50, data-adress 0x1c
Writing byte 0x4C to bus 6, chip-adress 0x50, data-adress 0x1d
Writing byte 0x99 to bus 6, chip-adress 0x50, data-adress 0x1e
Writing byte 0x26 to bus 6, chip-adress 0x50, data-adress 0x1f
Writing byte 0x0F to bus 6, chip-adress 0x50, data-adress 0x20
Writing byte 0x50 to bus 6, chip-adress 0x50, data-adress 0x21
Writing byte 0x54 to bus 6, chip-adress 0x50, data-adress 0x22
Writing byte 0x00 to bus 6, chip-adress 0x50, data-adress 0x23
Writing byte 0x00 to bus 6, chip-adress 0x50, data-adress 0x24
Writing byte 0x00 to bus 6, chip-adress 0x50, data-adress 0x25
Writing byte 0x01 to bus 6, chip-adress 0x50, data-adress 0x26
Writing byte 0x01 to bus 6, chip-adress 0x50, data-adress 0x27
Writing byte 0x01 to bus 6, chip-adress 0x50, data-adress 0x28
Writing byte 0x01 to bus 6, chip-adress 0x50, data-adress 0x29
Writing byte 0x01 to bus 6, chip-adress 0x50, data-adress 0x2a
Writing byte 0x01 to bus 6, chip-adress 0x50, data-adress 0x2b
Writing byte 0x01 to bus 6, chip-adress 0x50, data-adress 0x2c
Writing byte 0x01 to bus 6, chip-adress 0x50, data-adress 0x2d
Writing byte 0x01 to bus 6, chip-adress 0x50, data-adress 0x2e
Writing byte 0x01 to bus 6, chip-adress 0x50, data-adress 0x2f
Writing byte 0x01 to bus 6, chip-adress 0x50, data-adress 0x30
Writing byte 0x01 to bus 6, chip-adress 0x50, data-adress 0x31
Writing byte 0x01 to bus 6, chip-adress 0x50, data-adress 0x32
Writing byte 0x01 to bus 6, chip-adress 0x50, data-adress 0x33
Writing byte 0x01 to bus 6, chip-adress 0x50, data-adress 0x34
Writing byte 0x01 to bus 6, chip-adress 0x50, data-adress 0x35
Writing byte 0x2A to bus 6, chip-adress 0x50, data-adress 0x36
Writing byte 0x44 to bus 6, chip-adress 0x50, data-adress 0x37
Writing byte 0x80 to bus 6, chip-adress 0x50, data-adress 0x38
Writing byte 0xA0 to bus 6, chip-adress 0x50, data-adress 0x39
Writing byte 0x70 to bus 6, chip-adress 0x50, data-adress 0x3a
Writing byte 0x38 to bus 6, chip-adress 0x50, data-adress 0x3b
Writing byte 0x27 to bus 6, chip-adress 0x50, data-adress 0x3c
Writing byte 0x40 to bus 6, chip-adress 0x50, data-adress 0x3d
Writing byte 0x30 to bus 6, chip-adress 0x50, data-adress 0x3e
Writing byte 0x20 to bus 6, chip-adress 0x50, data-adress 0x3f
Writing byte 0x35 to bus 6, chip-adress 0x50, data-adress 0x40
Writing byte 0x00 to bus 6, chip-adress 0x50, data-adress 0x41
Writing byte 0x26 to bus 6, chip-adress 0x50, data-adress 0x42
Writing byte 0xA5 to bus 6, chip-adress 0x50, data-adress 0x43
Writing byte 0x10 to bus 6, chip-adress 0x50, data-adress 0x44
Writing byte 0x00 to bus 6, chip-adress 0x50, data-adress 0x45
Writing byte 0x00 to bus 6, chip-adress 0x50, data-adress 0x46
Writing byte 0x18 to bus 6, chip-adress 0x50, data-adress 0x47
Writing byte 0x56 to bus 6, chip-adress 0x50, data-adress 0x48
Writing byte 0x5E to bus 6, chip-adress 0x50, data-adress 0x49
Writing byte 0x00 to bus 6, chip-adress 0x50, data-adress 0x4a
Writing byte 0xA0 to bus 6, chip-adress 0x50, data-adress 0x4b
Writing byte 0xA0 to bus 6, chip-adress 0x50, data-adress 0x4c
Writing byte 0xA0 to bus 6, chip-adress 0x50, data-adress 0x4d
Writing byte 0x29 to bus 6, chip-adress 0x50, data-adress 0x4e
Writing byte 0x50 to bus 6, chip-adress 0x50, data-adress 0x4f
Writing byte 0x30 to bus 6, chip-adress 0x50, data-adress 0x50
Writing byte 0x20 to bus 6, chip-adress 0x50, data-adress 0x51
Writing byte 0x35 to bus 6, chip-adress 0x50, data-adress 0x52
Writing byte 0x00 to bus 6, chip-adress 0x50, data-adress 0x53
Writing byte 0x26 to bus 6, chip-adress 0x50, data-adress 0x54
Writing byte 0xA5 to bus 6, chip-adress 0x50, data-adress 0x55
Writing byte 0x10 to bus 6, chip-adress 0x50, data-adress 0x56
Writing byte 0x00 to bus 6, chip-adress 0x50, data-adress 0x57
Writing byte 0x00 to bus 6, chip-adress 0x50, data-adress 0x58
Writing byte 0x18 to bus 6, chip-adress 0x50, data-adress 0x59
Writing byte 0x00 to bus 6, chip-adress 0x50, data-adress 0x5a
Writing byte 0x00 to bus 6, chip-adress 0x50, data-adress 0x5b
Writing byte 0x00 to bus 6, chip-adress 0x50, data-adress 0x5c
Writing byte 0xFE to bus 6, chip-adress 0x50, data-adress 0x5d
Writing byte 0x00 to bus 6, chip-adress 0x50, data-adress 0x5e
Writing byte 0x4C to bus 6, chip-adress 0x50, data-adress 0x5f
Writing byte 0x47 to bus 6, chip-adress 0x50, data-adress 0x60
Writing byte 0x20 to bus 6, chip-adress 0x50, data-adress 0x61
Writing byte 0x44 to bus 6, chip-adress 0x50, data-adress 0x62
Writing byte 0x69 to bus 6, chip-adress 0x50, data-adress 0x63
Writing byte 0x73 to bus 6, chip-adress 0x50, data-adress 0x64
Writing byte 0x70 to bus 6, chip-adress 0x50, data-adress 0x65
Writing byte 0x6C to bus 6, chip-adress 0x50, data-adress 0x66
Writing byte 0x61 to bus 6, chip-adress 0x50, data-adress 0x67
Writing byte 0x79 to bus 6, chip-adress 0x50, data-adress 0x68
Writing byte 0x0A to bus 6, chip-adress 0x50, data-adress 0x69
Writing byte 0x20 to bus 6, chip-adress 0x50, data-adress 0x6a
Writing byte 0x20 to bus 6, chip-adress 0x50, data-adress 0x6b
Writing byte 0x00 to bus 6, chip-adress 0x50, data-adress 0x6c
Writing byte 0x00 to bus 6, chip-adress 0x50, data-adress 0x6d
Writing byte 0x00 to bus 6, chip-adress 0x50, data-adress 0x6e
Writing byte 0xFE to bus 6, chip-adress 0x50, data-adress 0x6f
Writing byte 0x00 to bus 6, chip-adress 0x50, data-adress 0x70
Writing byte 0x4C to bus 6, chip-adress 0x50, data-adress 0x71
Writing byte 0x50 to bus 6, chip-adress 0x50, data-adress 0x72
Writing byte 0x31 to bus 6, chip-adress 0x50, data-adress 0x73
Writing byte 0x37 to bus 6, chip-adress 0x50, data-adress 0x74
Writing byte 0x33 to bus 6, chip-adress 0x50, data-adress 0x75
Writing byte 0x57 to bus 6, chip-adress 0x50, data-adress 0x76
Writing byte 0x46 to bus 6, chip-adress 0x50, data-adress 0x77
Writing byte 0x34 to bus 6, chip-adress 0x50, data-adress 0x78
Writing byte 0x2D to bus 6, chip-adress 0x50, data-adress 0x79
Writing byte 0x53 to bus 6, chip-adress 0x50, data-adress 0x7a
Writing byte 0x50 to bus 6, chip-adress 0x50, data-adress 0x7b
Writing byte 0x44 to bus 6, chip-adress 0x50, data-adress 0x7c
Writing byte 0x31 to bus 6, chip-adress 0x50, data-adress 0x7d
Writing byte 0x00 to bus 6, chip-adress 0x50, data-adress 0x7e
Writing byte 0x6B to bus 6, chip-adress 0x50, data-adress 0x7f
Writing done, here is the output of i2cdump -y 6 0x50:
No size specified (using byte-data access)
0 1 2 3 4 5 6 7 8 9 a b c d e f 0123456789abcdef
00: 00 ff ff ff ff ff ff 00 4d 10 ff 13 00 00 00 00 ........M?.?....
10: 00 17 01 04 a5 1d 11 78 06 de 50 a3 54 4c 99 26 .??????x??P?TL?&
20: 0f 50 54 00 00 00 01 01 01 01 01 01 01 01 01 01 ?PT...??????????
30: 01 01 01 01 01 01 56 5e 00 a0 a0 a0 29 50 30 20 ??????V^.???)P0
40: 35 00 26 a5 10 00 00 18 00 00 00 10 00 00 00 00 5.&??..?...?....
50: 00 00 00 00 00 00 00 00 00 00 00 00 00 10 00 00 .............?..
60: 00 00 00 00 00 00 00 00 00 00 00 00 00 00 00 fc ...............?
70: 00 4c 51 31 33 33 54 31 4a 57 30 32 0a 20 00 b0 .LQ133T1JW02? .?
80: 00 00 00 00 00 00 00 00 00 00 00 00 00 00 00 00 ................
90: 00 00 00 00 00 00 00 00 00 00 00 00 00 00 00 00 ................
a0: 00 00 00 00 00 00 00 00 00 00 00 00 00 00 00 00 ................
b0: 00 00 00 00 00 00 00 00 00 00 00 00 00 00 00 00 ................
c0: 00 00 00 00 00 00 00 00 00 00 00 00 00 00 00 00 ................
d0: 00 00 00 00 00 00 00 00 00 00 00 00 00 00 00 00 ................
e0: 00 00 00 00 00 00 00 00 00 00 00 00 00 00 00 00 ................
f0: 00 00 00 00 00 00 00 00 00 00 00 00 00 00 00 00 ................
######################################
So ... it's the same edid ... Seems my eeprom is already
write-protected (unfortunately, for me; it's be 75Hz otherwise).
If successful then you should have a different edid than before
and your panel is fixed.
There's also a vcom eeprom, but let's not get into that right now.
finish
All correct edids collected so far are on the drive (folder 'home -> EDID -> archive'). Everything you need is there, including the instructions and the edid tools.
-
Attached Files:
Last edited: Mar 8, 2016Dr. AMK, schnoergsdalumaner, MariusM18X and 15 others like this. -
-
Nice tutorial. This need to be stickied.
reborn2003 and 1Schumsta1 like this. -
Pointer: it won't work with 70W heatsinks, only 100W.
1Schumsta1 likes this. -
Awesome tutorial. Thank you for posting it.
Now we just need to get the 980M SLI to work right on a consistent basis. Have you bumped into the throttling bug yet?
980M SLI Fire Strike run: NVIDIA GeForce GTX 980M (x2)video card benchmark result - Intel Core i7-3920XM Processor Extreme Edition,Alienware M18xR2
980M (single) Fire Strike run: NVIDIA GeForce GTX 980M (x1) video card benchmark result - Intel Core i7-3920XM Processor Extreme Edition,Alienware M18xR2mikecacho likes this. -
1Schumsta1,
This is awesome, I just updated my 18 today and it was a pain in the backside.
I had already installed 8.1 a week ago. When I changed the bios and installed the cards it was a no go. I had to go back down to win 7, change bios use USB to install 8.1, had to change hdd from MBR to GPT, before win 8 would install, did it with command prompt while at boot-what fun. I did a clean install. Again thanks for those picks of the heat sink mods, I used a flat head screw driver to file those spots down. Had to use the IC Diamond paste that came with cards, ran out of Liquid Ultra. Got my cards from Ted at Hidevolution, also got new SLI ribbon. Using driver 347.09 gotten from Laptopvideo2go.com. -
What does the AW 18 come with? 70W heat sinks?
-
I think it depends on what card you had. The Aw 18s that came with 780/880 card have three copper pipes 100w, and thing before 2 copper pipes and less watts. I could be totally wrong, but that's what I think.imest likes this. -
I just made some tests with 980ms... @Mr. Fox. I hope you have enough Tests and information yet
Single:


 Kade Storm and reborn2003 like this.
 -
SLI:


Sorry for 2 posts, but only 6 Attachments per post
Kade Storm, TBoneSan and reborn2003 like this. -
Hey 1Schumsta1,
Nice post! Great job:thumbsup:
I was just wondering which hwinfo version you were running and also what fan RPM speeds you have available when you run hwinfo?
ATM mine only give me 1800RPM and 3700RPM for the CPU
Then 1700RPM and 3500RPM for GPU 1
and 1700RPM and 3300RPM for GPU 2.
I was hoping to get more fan speed RPM ranges so that I could use say 3000RPM speed as my max instead of 3500RPM.
Cheers.
imest and 1Schumsta1 like this. -
I'm keen to see what happens if we use the official dell 980m 4gb drivers . I checked their page earlier but they don't have anything for download yet
reborn2003 and 1Schumsta1 like this. -
-
So jealous. My R1 can't work with the Maxwell cards. Thanks for the post, there is also a vid by Eurocom here
https://www.youtube.com/watch?v=AitCbvv3lcQ -
Yeah, that sucks. Its because R1 doesnt have UEFI which is the only boot that works with 980M/970M
-
Here are the official dell Part Numbers:
ALIENWARE 18 VIKING - TJ6G8 - ASSY,HTSNK,NV14E-GTX,AW18R1,RT - MXM THERMAL MODULE R 100W(GTX)(For N14E-GTX, GTX780)
http://www.computer-spare-parts.info/catalog/product_info.php/products_id/981
ALIENWARE 18 VIKING - HTXFC - ASSY,HTSNK,NV14E-GTX,AW18R1,LF - MXM THERMAL MODULE L 100W(GTX)(For N14E-GTX, GTX780)
http://www.computer-spare-parts.info/catalog/product_info.php/products_id/1137Rafix, reborn2003 and Kade Storm like this. -
Do you only got the throttling when over clocking? Also I don't know if this "fix" works, but in my M17 R1 when I got a throttling issue I just unplug and plug the ac adapter back and it eliminates it. Have you tried that?
-
How can I know if the heatsinks are 70 or 100 watts ???
-
There should be a sticker on the heatsinks with the wattage and what type of card (AMD/NV) its designed for
-
On my heat sink there is a sticker that says 100 watt. As for saying Nvidia or amd don't know.
-
Yeh some peeps have tried and reported that they are old and suck.
-
Thanks
-
Can I buy a 100 wattage heatsinks if I have 70 wattage heatsinks ???
-
Post a pic of the underside of the heatsink and I'll let u know which one it is
-
For the 970m installation is also required changes in heatsinks?
-
The 970M will work fine with the 75W heatsink. 100W is recommended for 980M though.
-
100W is a must, card will burn with 75W heatsink.
-
Thanks. I have a 765m SLI currently, as I have no experience in modifications and I can't find the 100w heatsink to buy I'll bet on 970m.
-
For a 970M no. It's not a 100W TDP card like the 980M. I just sold my 970M to a member here with a Alienware 17 that previously had a 860M. No issues at all.
The 970M will be a nice upgrade.dimobr, reborn2003 and Cloudfire like this. -
970M will work 75W heatsink... 100W heatsink is just for better cooling but 75W will work too..
dimobr and reborn2003 like this. -
www.eurocom.com/ec/vgas(1)ec
In this link alienware 18 970m upgrade kit there is heatsink 100 w with the kit , can I use this heatsink for future upgrade or with 980m ??? -
Yup, 100W heatsink is required for 980M and its better for 970M than 75W anyway.
Before you upgrade to 970M with AW18, read this so you understand the risks
http://forum.notebookreview.com/threads/alienware-18-and-970m-sli-about-to-give-up.769965/Kade Storm and reborn2003 like this. -
Thanks for this warning , So there is no way to upgrade from 860m to a more powerful one !!!
-
Not really. If you read Cloudfire's thread, he's done the work and the upgrade is possible. It's the lack of support and the added work on getting the fans to run through HWInfo64--in a less than perfect manner--that's a serious trade off. Either keep the fans running full blast during gaming, or stick with cards that are officially supported by the system BIOS.Cloudfire likes this.
-
Arrrrgh, I think I maybe tired but I think I'm going to scream with people *****ing about the 98os and the fans. No, the fans don't run correctly when 980s are put in. Can it be corrected--YES, is it perfect NO. HWinfo64 is not perfect, but it gets the fans moving. Some people complain the fans are to loud-WTF is it being used in the library!?! Jeez, the only real problem I see is if your an over clocker and the throttling issue that is in most threads. Otherwise, it works and furthermore, when I first got my aw 18 people were complaining about Dells fan tables, and how the fans didn't kick in fast enough-hence HWinfo64 was being used.
-
As far as I'm concerned, as a matter of personal preference, the fans aren't an issue. I actually prefer running them at maximum in general, but this isn't a preference shared by many others.
-
Every man to himself, but when the fans with HWinfo becomes so loud you have troble hearing the speakers, its a no go for me
-
I'm another ones of those max fans guys (well my fans are almost close to max when gaming).. The only way you can deal with this is with headset and audio through speakers is just not possible.. It's not an issue for me because no one in my house wants to hear my games so I have to use headsets and I want to do so too.. Cloud, your'e being fussy
Cloudfire likes this. -
I would assume an AW18 that came with SLI GTX 770M would be using two 70W heatsinks?
-
So the only issue here is the sound of the fans , so how can I upgrade from 860m sli to 970m sli ? I mean the steps of upgrading . And Does the speed of the cpu sould be taken into consideration ?
-
The steps for the 970m would be the same as those listed in the beginning of this thread. I don't understand the complaining of the fan noise. I set HWinfo64 to kick on when temps reach 50c. When gaming I run fans full blast. CPU runs at 60-65c Max, GPUs run @40-45c max. I never notice any fan noise when I'm playing game. If you over clock you may also run into the throttling problem the people with the 980m have when over clocking. -
Thanks
-
Can you tell me how to adjust the fans with HWinfo64? I just haven't been able to figure it out because obviously I'm not as smart as you guys. Right now I am running a mining program that has my CPU around 80-90c and I can't even use the GPU mining because it runs too hot. -
Wow, the CPU temp is really up there. I'm using HWinfo64 v4.45-2327 mobile version. The setting should look like the following:
http://forum.notebookreview.com/attachments/hwinfo64-setup-jpg.79627/
You should read the full thread of the above link, there are other helpful tricks to use. In particular look at Mr. Fox's spoiler boxes. Here is the full link to the thread:
http://forum.notebookreview.com/thr...e-in-benchmark-with-on-screen-display.655138/
I set my CPU fans to run at 1800 rpm at 0-55C, 3700 for temps 55c and above, GPU1 0-45 1800rpm, 50c-and above 3500rpm, GPU2 same. The GPUs (980s) usually don't go above 45c, and I've noticed the hotter the room the higher the temps. The top fan speeds are during gaming.
Have you every repasted the thermals of your CPU, GPUs? If those are your normal temps maybe you should.
Good LuckLast edited: Mar 1, 2015Kade Storm and reborn2003 like this. -
any progress with this ?
-
What do you mean? Do you mean can 980m sli be placed in the AW 18, then the answer is yes. I've had mean in since January. Or, do you mean the throttling and other problems caused by overclocking has been fixed, then the answer is no. I've accepted the short comings, and I'm enjoying them. Playing GTA V, with all the bells and whistles cranked up to the max and loving it.
-
I've accepted the short comings ......... well u should post a video on youtube, i'm planning sell my AW 18 with SLI 880m, and get an MSI TITAN, or something similar, or can you give me your opinion about getting a new machine or keep my aw 18 and get those 980m.
Mr. Fox likes this. -
The MSI Titan is crippled by a low-TDP CPU that is permanently welded to the motherboard. I don't think you would be accomplishing anything selling the 18 and buying an MSI Titan if you are looking for performance. Might as well save a few bucks, upgrade to 980M SLI and run it stock. If you just want another machine, like the Titan better and don't care that much about performance, then by all means do whatever you think will make you happy. When it comes to buying something, as long as you're happy nothing else matters. The million dollar question is, "Will you be happy?"
The highest recorded 3DMark 11 run for the MSI Titan with 980M SLI and 4980HQ (king of BGA turds) is only like P18824, which is about on par with an M18xR2 with 980M running a stock vBIOS with severe throttling and BIOS compatibility problems. Here is a side-by-side comparison of my highest malfunctioning M18xR2 980M SLI benchmark run with the highest recorded MSI Titan run. As you can see, the Titan cannot even keep pace with a broken M18xR2, LOL. 980M is pretty awesome in most machines, but that wimpy 4980HQ is clearly the Titan's Achilles Heel.
http://www.3dmark.com/compare/3dm11/9202332/3dm11/9716901Kade Storm likes this. -
I would say do whatever makes you happy since it is your money. But, since your a member of this forum I would say STAY AWAY FROM THE 980m for your AW 18. It does not work hundred percent, and for the price its too expensive. Yes, I have them but back in January I didn't know what I know now.Kade Storm, Ashtrix and Mr. Fox like this.
Step by Step: 980m Install in Alienware 18
Discussion in 'Alienware 18 and M18x' started by 1Schumsta1, Jan 8, 2015.