well i dont think we will know for sure this works for at least a couple months. Since the hinge with just the plastic supporting the screws takes a couple months to break it might take around that much time to see if it holds up so i dont think we can give a definite answer just yet.
The hardest part about opening up the lcd is taking off the front bezel. You have to take off the 6 rubber feet all around the bezel first and remove all 6 screws. Then u have to slowly pry it open because the front lcd bezel is secured by these plastic clips and the front lcd bezel is also quite flimsy so u have to be pretty careful. Once u take that off u take off the monitor and disconnect the webcam wire in the back. Once the monitor is off u can get to the hinge.
The hinge itself is quite stiff and u cant move it by hand so im guessing due to the mass of the monitor itself and the plastic being flimsy is why the lcd will shake so much. The hinges dont move at all if the monitor shakes and the monitor doesnt shake that much at all if the monitor isnt connected to the back panel. So this might fix the hinges but it wont make the monitor more stable due to it being a bit too heavy.
-
hey any updates???? -
well the hinge creaks less after the application but all i can tell for now. Hinge feels the same when opening and its too early to see if the hinge will open up at all. Tho if anyone is out of warranty and they already have to replace the back panel themselves, i would recommend just filling the gaps around the screws since having something there is better than nothing.
I dont exactly recommend everyone go out there and start filling the gaps since i dunno if this method would work 100%. The hinges wont crack for a while so it will take some time to tell.
I might be able to do a tutorial but i need to finish school first and start winter vacation. -
i hear that...i mean anything is better than nothing...the prices that alienware wants to fix there problem is straight up crap. and if anyone wants to just write the supplies and what needs to be done for this, i will try it myself. i am desperate...the screen is hangin off (practically) and on top of everything else, my whole black border part around the front of the screen is cracked now too
-
I am so happy I won this laptop in a contest.
To everyone having the problem, I am truly sorry you paid this much for a machine and it's breaking. I won mine, and it's breaking a month after shipment. -
The materials list isnt too bad.
Material #1
Epoxy Steel from Amazon - $3,75
i used
http://www.amazon.com/Epoxy-Steel-s...ref=sr_1_1?ie=UTF8&s=hi&qid=1257437974&sr=8-1
It says it sets in 4 minutes but it wont get hard until 24 hours or so later. Also when you mix the resin and hardener together just make sure to mix for at least 1 minute so the resin and hardener are thoroughly mixed together. If it isnt mixed well enough it will just stay at a putty like texture and then u will have to take it off and reapply.
I orignally bought 4 tubes of that stuff and didnt need that much. I only ended up using 1 tube of resin and 1 tube of hardener so you will only need to purchase 1 tube. 2 tubes if you want some practice applying the epoxy before doing it on the real thing.
Material #2
Fiskar Glue Dots
http://www.amazon.com/Glue-Dots-Inc...1?ie=UTF8&s=home-garden&qid=1257438200&sr=8-1
The rubber feet are held on to the screw by glue. Once u remove the rubber feet the adhesive that AW put on sticking the screw to the rubber feet wont really stick anymore. So when you remove the screw for the back panel you just have to scratch off all the glue on the top of the screw. Reapply the screw when u are ready to reassemble everything. Then put glue dots on the rubber feet and stick the feet back on the screws.
The ones on amazon are a bit expensive and not exactly the ones i used. The ones i used were made by fiskar that i bought from target for 3 bucks or so. The one in target also gives u 300 compared to the 275 from amazon.
So the material list isnt too bad. Only around 10 bucks. -
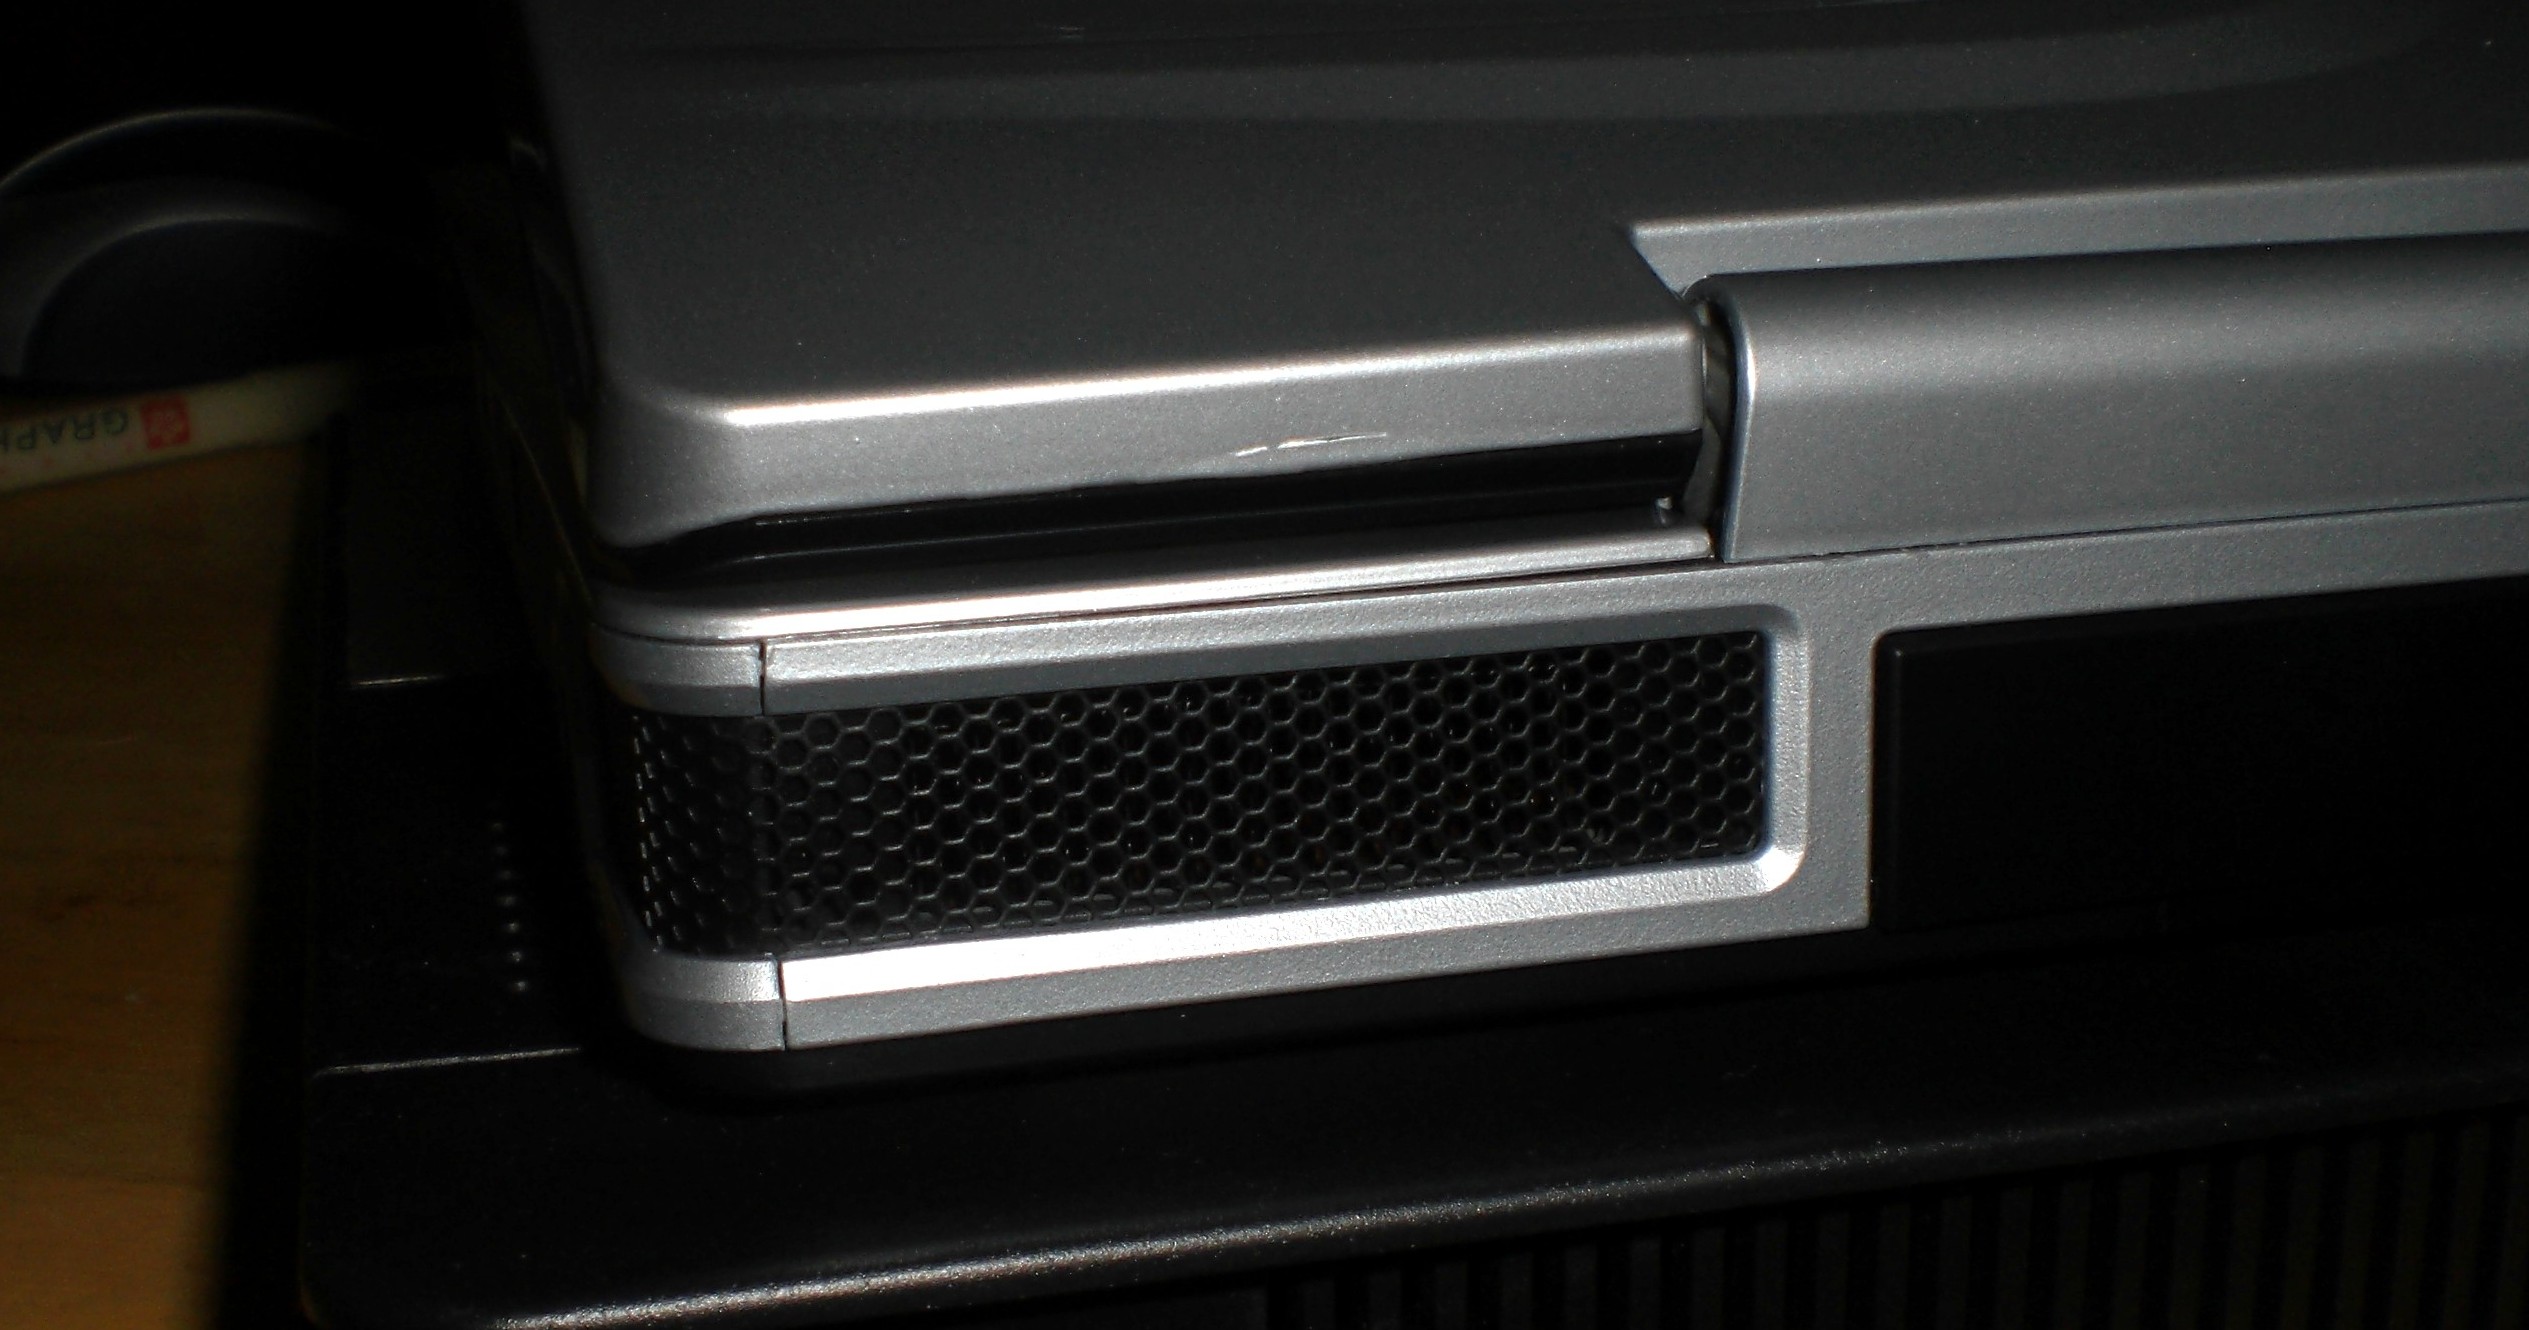
I have recently purchased my Alienware m15x on Ebay after about 2 weeks i have a ....... ***Pic showing the hinge***
"Small but not really noticeable" Stress-crack line on the right-side LCD hinge cover
I decide i want to try one of the methods that "Exiled" Has Suggested
Stumbled across this Plastic repair Check this out
Can a Urethane Resin be better for the repair VS a Epoxy Repair????Attached Files:
-
-
I dunno if Urethane Resin is any better since i havent heard of that material before.
Here is an article on what epoxy steel is mostly used on tho.
http://www.epoxy.com.pk/steel.htm
It gives a pretty good idea of how strong epoxy steel is i think. Of course i cannot guarentee this method will work since i only did this like 1 or 2 weeks ago so i havent had enough time see if it works. Especially since normally the hinge takes like a couple months to break. In theory it should work tho. So try this at your own risk")
-
I just got a brand new m15x in the mail and I was wondering what is the best way to prevent the hinge from breaking. Is it a good idea to apply some epoxy to the hinge before I even start to use it?
Any other suggestions would be greatly appreciated! -
where you get a brand new one, I want to buy a new one (Not second hand) cant find any anywhere!
I prefere the look of the old one vs the new All Powerfull m15x -
If you still have warranty so u shouldn't do it yet. You dont want them voiding your warranty because of this. If you had a hardware failure it would be pretty bad if they wont fix it because you modified the hinge. the only reason i did this was since im out of warranty i minus will try my best to prevent the hinge from breaking.
-
Do you know of any other ideas to keep the hinge from breaking if I am in warranty?
-
if u are in warranty theres really nothing u can do since you can modify the hinge. im pretty sure they will void ur warranty if you do it.
if you are still under warranty it should be fine since they will repair the hinge for you if it breaks. -
Sorry been away....
I had problems with the touch pad on this fix, one had a broken corner, then another just wouldn't work, now have third replacement and three weeks into it, and still have to install it.
As far as how it is holding up, like exiled mentioned, too early to tell, the bond on my fix is holding up fine, though I have had limited movements with opening the laptop, guess I will find out when the owner takes it back and uses it. I don't see this as a permanent fix, as now the stress is changing to the cover, not the hinge support area.
When I took it apart, I basically took it apart without knowing anything about it, re-assembly was "this goes here, and this...no that goes here...and uh oh have 2 screws left"...lol
Though now after having to take it apart over and over, I can do it rather quickly, The one thing that is tricky is the cables, and the cable clips, I broke one in half and popped another off.
If I can take photos while dis-assemble I will post something of a DIY
Gerry
PS when the owner brought it to me, the left hinge was frozen, and thats why I took the touch pad cover off, to get to the hinge completely, I was looking to replace the hinge when I came across all of this other stuff. -
Urethane Resin, hmm, I would try it out first before actually using it on ur laptop, thats what I did with the first test I made, luckily I had a spare cover laying around.
The plastic Epoxy I used worked out good, I liked the way it formed around the base.
Gerry -
What are they quoting? If you dont want to go thru the trouble, I'll do it for you.
Gerry -
Disassembled my m15x today because of my screen flickering problem and discovered that not only the hinge support crumble but also nearly all nut supports in the top cover (by top cover I mean the silver plastic part where the palm rest and the touchpad is situated).
So the problem seems to be a general fault in the plastic material.
Will post some pictures later. -
Hey guys I just got my Skullcap m15x back from repair in Ireland today. I noticed something weird. First I thought that they were just going to repair my screen. When I took the repaired computer out of the box I noticed some protective film on the underside, similiar to what you would see in a brand new product. I discounted it as just something the Tech did, and moved on. Then I tried hooking it up to the internet here at the dorms and it didn't work. hmmm? To hook up to the internet here at school you have to enter your MAC (physical) address into a database. Long story short I had a different NIC (network interface card) installed than I did before the repair. So I did some more investigating. The keys looked oddly new, there were scratches my watch had made that mysteriously disappeared. I thought it was just my screen they were working on, but they simply took my hard drive and my aftermarket ram and installed them on a completely new (or VERY REFURBISHED) system. Turn around time was 14 days from shipping it to receiving it. All in all I am more than satisfied with the repair process. They told me numerous times that the new hinges are made of a better material, so I wont have this problem again. Creaking has been reduced (but is still there). Hope this helps for those afraid to turn it into warranty. Oh and I bough this system in America and live in the USA. I am studying abroad in the Czech Republic and I couldn't be happier with the easy warranty service that I received while out of my home area. Thanks AW. You have redeemed yourself in my eyes.
-Firecat -
Gerry, thAts very nice of you... but i have no problem trying it on my own... CHA...any update? did you get your system back and open it up to see what they did?
ALSO Loctite Plastic Epoxy or the steel epoxy? -
Heya guys, sorry I haven't been able to post in a while now.
Mj_four already has his laptop done, and I think he is really happy with the results as well.
It's been more than a month since I had this done, and it still feels really sturdy. I'm just scared that if I open it up, I won't be able to put it back together.. -
if you remove the black bezel you can see the hinge. the black bezel isnt too hard to remove and put back together. its just being held together by the 6 screws and some plastic tabs. Unless they bonded the front lcd bezel to the entire lcd it should be pretty easy to remove and just look at the hinge to see what they did.
-
(CHA) yeah I second what 'exiled' said, remove the black bezel with the 6 screws (peel off the rubber on top of screws), and pull away from screen, it is held in place by magnets. You can then see the hinge screwed into top cover, and you should see what they fixed, take a photo and post it.
-
No problemo....
either one should do.
Gerry -
cmon chaaa....tell us what you see!
-
here two of the pics:
![[IMG]](images/storyImages/34i2r9e.jpg)
![[IMG]](images/storyImages/2mqq0ht.jpg)
don't think that it's just mine...
-
wow that is pretty bad. I would fill those gaps with some epoxy steel to keep the plastic from breaking apart further. the dmg can at least still be minimized so the whole laptop wont crumble itself on you.
-
Well the difference to the hinge is that most of the nuts of this part are covered with some metal so it doesn't fall apart immediately. The problem with the metal is that while disassembling it holds the parts together but because of the broken nut support the nut rotates with the screw so it's very tricky to disassemble the parts.
I used some super glue on it for a temporary solution, but I'll need some new part sooner or later. -
Hello again guys, I tried to open it up given exiled's instructions this weekend. Unfortunately, the screws aren't the only problem. They seem to have placed some adhesive connecting the bezel and the front LCD..
-
There are also some plastic hooks holding the two parts together.
To get the bezel off: having the notebook in front of you try to put your nails between the both parts in the webcam region and gently pull the bezel down with little additional force in your direction.
That should separate both parts in the upper region, the rest is easy, you have to gently pull all the other hooks out by pulling towards the screen. Except for the bottom middle part that comes at last and should be pushed down towards the touch buttons. -
Hey guy running into same problem after having my m15x for over a year. Bought it used, I tried calling tech support and after being on hold for 3+ hours, they told me they can not help me out at all because I bought it second hand. They would not even sell me replacement part. So I bought some replacement parts on ebay. So I was wondering if there is a guide to replace the old cover with the new cover, I couldn't find it in search. Please help.
-
Hi Guys,
just my two cents:
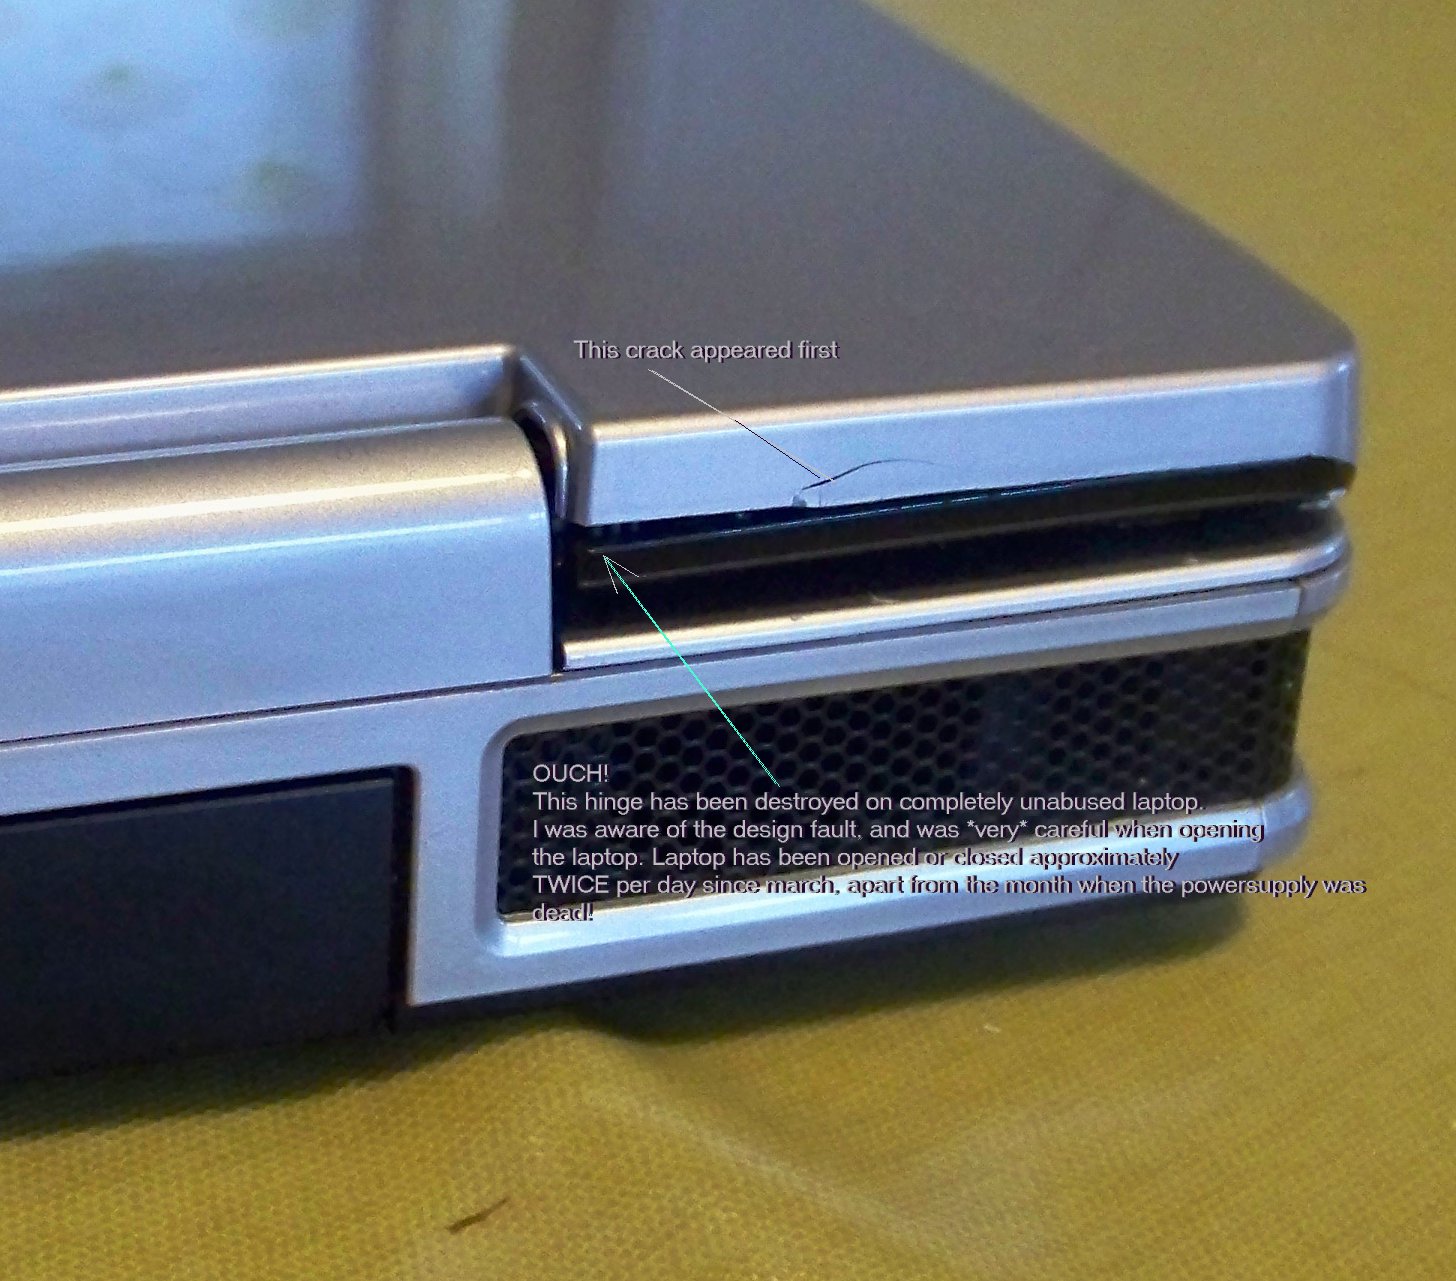
I bought my M15x in march 09. Hairline crack appeared after about 3 months. I then used the best grade Gaffer (DUCTAPE) I could find to attempt to bind the hinge together. After reading this thread I decided to peel off the tape and peek a look at what was happening. Sure enough the left hand hinge has the tell tale case lid coming apart issue. So perhaps the tape has prolonged life a bit.. And since its silver it does show that much. (And nothing can really be called your own till you've fixed it with a bit of Ductape).
... anyway...
Phoned alienware tech support yesterday, early morning (9 am) UK time, and got through to someone who sounded like they were in a polish call centre or perhaps central europe. No offence to our central european chums intended, but the guy on the phone was not particularly helpful, and just said, please take a picture of the issue and email it to [email protected]. I did that and got no acknowledgement at all.
That was yesterday.
Today, I phoned the UK 0800 number at 4 PM GMT - this time I got through to a guy from the UK. The UK tech guys seem pretty clued in. When I said what the issue was he immediately admitted that there was a known issue, and that as I am still under warranty, its a replacement case for me.
He also said that the fix is a guaranteed fix that should overcome the problem completely, rather than something that will start happening again in another 7 months.
He didn't ask for any photos or anything. Just told me to pack up the machine, and arrange a time for DHL to collect it.
He also said that there was no problem with leaving the HDD out when sending it back since its just a switch of the case that is required - At least that way I can still get data off my HDD while its gone if I need to...
Before I put down the phone with him the DHL email was in my mail box.
So... if you are still in warranty, try and phone in the UK aftfernoon, say 1600 -> 1800 GMT and you should get a good result.
I'll let you know what happens next.....
Win.Attached Files:
-
-
yea i dont recommend trying to reinforce the hinge yourself until you run out of warranty. the only reason i reinforced it was cause i know it will happen eventually and since i dont have warranty anymore i decided to do something about the hinge so the best i could come up with was reinforce the plastic surrounding the nuts holding the screws in place.
-
how is the epoxy holding up
... -
Thanks for this post. A crack has appeared on the hinge of my m15x exactly like in your photo.
So, it would appear that Alienware have finally got a fix for this then... if you believe what the guy on the phone told you anyway.
Cheers -
So far its been holding up quite well. No problems yet so far. Lets see how much longer this will last.
-
should i purchase a new top before applying epoxy...because the pastic peices to fit the nuts on mine are just about all worn away...also, is it difficult to repllace the top? last but not least, what about if i misplaced a gold nut, screw, or rubber peice?
-
I replaced a top on mine, it wasn't too difficult. let me know if you need help.
-
@ cha
we put some trick when we fix your laptop so if you try to open that .. you get some problem..
respect our company secret.. -
My hinge broke a while back, and when I called support they told me to send pics to "[email protected]" too. The laptop was one month out of warranty and they still repaired it. They just put a new back piece on, so I guess it's gonna break again. Well, I'm happy they did something..
-
well let me tell you REPAIRING IT WONT SOLVE THE ISSUE.... I called up alienware regarding the same issue as my laptop had a creaky broken hinge and they did the repair free as i was under warranty but when i received it after a week or 2 it had the irrritating creeaaaky noise. i emailed them with a video demonstrating the issue and called them right after that. they gave me a partial refund deducting £500 of my original £2400 (for having used it for 7 months).... and also alienware will refund the entire amount if they are unsuccessful in resolving the same issue even after the 3rd repair... hope this helps
-
Also, When I asked the guy if they were gonna reinforce the hinge so it wouldn't break again he replied: The hinges should be reinforced as the standard hinges.
...
Thanks for info on the 3rd repair refund thing, I think it'll break one time per year
-
So, quick update: got the laptop back (sent thurs, got back weds of following week) : opens and closes with v.slight creak but no where near as much as last time. looks like the entire case is replaced - I say this because the nice sticky thing on my touchpad has gone, USB ports seem more snug and new,the plastic around the web cam fits more secure than the last one, etc etc. I didn't send them the HDD so I know thats still mine . and I still connect to my router, so my wireless mac address hasn't changed, but that looks like its the only thing that's stayed the same.
The guy on the phone said its under warranty for <another> 12 months. We shall see. I'm tempted to put the Ductape back on anyway, just to give it a bit more protection. -
I'm sending mine in this week for the broken case/hinge issue. We'll see what happens. It would be sweet if they change out the respawn software and install windows 7 on it but I'm not holding my breath.
-
i tried to get them to help me out... the guy was nice on the phone. but they want 300 up front and then extra $ for parts. rediculous
-
hi all, this is my second time dealing with this issue (the first time was "fixed" by alienware) and decided to try the epoxy repair before my problem worsens further. i've had it with alienware just temporarily masking the problem for me.
it took me a good hour to get my cover just partially off (very carefully since i couldn't find any guides) and i didn't go the whole nine yards and undo the joint for fear of introducing more problems. my cover now has enough freedom of movement to lie flat on my table, allowing me to fill it with epoxy (once home depot opens and i can buy some!)
half of the sockets holding the metal nuts in the cover are broken on my laptop, which i see as a possibly good thing, since the epoxy will now have a much tighter grip on these stress points. i do not trust the flimsy plastic sockets at all; for me it only took about 50 careful open/close cycles to crack them! considering how hard it is to even move the metal plates by hand i can't believe that they used 1mm thick plastic walls to secure those nuts in place. unbelievable!
anyway, i'll update you guys as soon as i make more progress. thanks for the inspiration! -
okay, i fixed it myself fairly easily. it's amazing that my sockets had fully broken, and yet my laptop is now sturdier than it was when it was new! so yes, the epoxy fix WILL WORK even if you think your hinge is beyond repair. since i did this to an already broken hinge and made it work better than new, it very likely means that the fix works on a new one too!
here is an overview of how to go about doing it:
1. remove the 6 screws behind the little rubber dots on the black bezel.
2. pry along the INSIDE edge of the bezel to remove it. use your fingers and start from the top edge. be gentle, the hooks are fragile!
3. unscrew the metal rails holding the LCD in, starting from the bottom. make sure you have something supporting the screen from behind so the hinge doesn't snap when you remove it -- if you're working on an already broken hinge like mine, this will prevent further damage. careful when you're holding the LCD!
4. remove the ribbon cable from the top of the back on the lcd display. there are little hinges on the edge of the cable that you have to push IN on to remove it.
5. remove the cable from the bottom of the lcd. this was the tricky one - you can pop out the white bar a little bit towards you to make it easier, and you can also pull off the white tape to give yourself more wire to work with.
6. the lcd should be free now, put it somewhere safe!
7. now remove the rest of the screws holding the hinge onto the silver cover. keep track of the golden sockets; if your hinge is already broken, don't lose them when they fall out!
8. set the silver cover down flat on your desk -- you'll need to unstick some of the wires that they have taped onto the cover to do this
IF YOUR HINGE IS ALREADY BROKEN:
1. remove any little broken plastic pieces from the hinge area
2. figure out where the golden sockets used to be. there should be little stubs of plastic left over for you to judge from. i would doublecheck by measuring the distance between the holes on the hinge and comparing that to your intended layout.
3. the sockets should fall into place nicely. superglue them to the cover so they don't move when you fill the cavities with epoxy. make sure that those sockets are pointing STRAIGHT UP. if they are tilted, you won't be able to close up your hinge when you're done
NOTE: the epoxy will very likely harden too fast for you to work on both joints at once. mix enough for one side, finish it, then mix more for the other side.
9. Now mix up your epoxy (use one with a thicker texture) and apply it with a toothpick (have lots of them handy) very liberally. don't put too much on the side facing the alienware logo, because the hinge has a lip that has to go in there. also, pay attention to the little plastic nub on each side that is right by the sockets. that little nub fits into a hole in the metal hinge. try not to get epoxy on it. also, don't get epoxy inside the metal sockets.. use a toothpick to clean any excess out.
10. let your epoxy set. mine was strong enough after an hour to be put back together.
11. now just put everything back together, carefully. before tightening everything back up, i would make sure that your screen still turns on and the alienware logo lights up.
12. the order that the screws go back in is not very straightforward. the two top corners and two screws on the bottom are actually inserted last, through the black bezel. you'll figure it out.
congratulations, enjoy your better-than-new hinge!
edit: i've attached some pictures to help with the reassembly process and better illustrate the fix.
![[IMG]](images/storyImages/img6024.jpg)
![[IMG]](images/storyImages/img6025h.jpg)
![[IMG]](images/storyImages/img6026i.jpg)
![[IMG]](images/storyImages/img6027e.jpg)
![[IMG]](images/storyImages/img6030.jpg)
![[IMG]](images/storyImages/img6031a.jpg)
![[IMG]](images/storyImages/img6032i.jpg)
The screen still creaks a little from the sound of the bezel and cover flexing, but the hinge is now dead quiet. smooth smooth operation. i couldn't be happier.
good luck with your own repairs folks! forget about alienware support, they just replace your cover with an equally weak one. if this works for you, send a cookie to the folks earlier in the thread who came up with the fix! i just wrote the guide
-
Good work, great guide. hats off!
-
sorry i havent been active. i finally finished with finals so im back. Great to see another person try this (+rep for you
). So far mine has been holding up pretty well still. I will continue to see how long this will last.
but as gigaman suggested yea i guess if it breaks we can fix it with epoxy again and again. Its a pretty good solution but best case scenario would be this actually solves the problem
-
Now I've also used some epoxy on my new (used) lid and loosened the nuts on the hinge a bit.
So I hope that it holds longer than the original one
-
First, might I say very well done sir, this is very informative and helpful. I am encountering the same problem, and found this during a google search. I plan on doing this tonight, and I will report back my successes/failures. Just one thing to add, and that is while it may have taken an hour for yours to set, its usually suggested to wait between 16-24 hours for the epoxy to fully set before stress is put on it. Very minor thing, and I'm not trying to take away from your post at all, but some people are stupid and could cause even more damage.
Do you have to take off the whole plastic cover which is on top of the keyboard before taking off the hinge cover? or does it just come right off? I'm trying to do this as well, but I really do not want to remove the whole plastic cover.
The Area 51 m15x hinge
Discussion in 'Alienware Area-51/Aurora and Legacy Systems' started by cha, Oct 8, 2009.