Seriously man, you can't do a Google search? The answer to your question can be found on this site. Please check this link for step by step instruction on how to create a profile for underclock/overclocking your GPU. F.Y.I I am using the latest nvidia drivers and underclocking. You can underclock just like you overclock, just clock down instead of up. I set the GPU Profile to go from 200/400/400(desktop setting @ start up) to the gaming settings of 550/1400/800.
http://forum.notebookreview.com/asus-gaming-notebook-forum/401345-optimization-guide-asus-g51.html
You will need to spend a little time making profiles but it will help. Its possible that you botched the thermal paste job and you should likely redo it, very carefullyThe case mod I did also made a huge improvement temperature wise. Let me know if this helps you
-
when you say 200/400/400 do you mean core/shader/memory clock
-
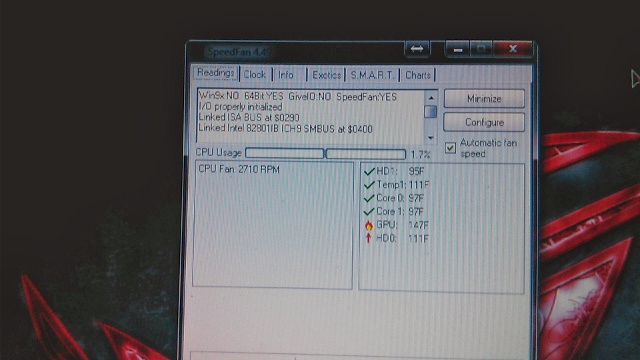
Yep you got it check out my picture. I had similar problems with temps when I first got my laptop. You can see the temperatures I am getting right now while running Photoshop and writing this. The ambient temperature of the room is 26c. You will need to make profiles polices for each game that starts and stops your profiles. I have an underclock and an overclock profile. I hope this helps
![[IMG]](images/storyImages/underclock2.jpg)
Uploaded with ImageShack.us -
I just figured out that using my G51J not in dual-screen mode (xtra monitor attached, extended desktop) would also bring down the temp. of the GPU somewhat 12 to 13 degrees (105 to 93/92).
Ambient temp. also has a big(!) influence, cannot give some measurements yet, because I cannot accurately measure the ambient temp.
Bought mine in Europe and am living in China now; I figured why asus is not selling these models in China... -
Yes having multiple monitors on brings the card up to extended voltages and clocks the same as a game would. I found on my 9800M that if i unplugged the monitor it wasn't always leaving that state causing unneeded heat.
Lowering the voltages with the clocks would actually have a bigger effect than just lowering the clock speed. Mind you, you would have to flash such settings and clock speeds are limited by the voltage so they do go hand in hand.
So are you guys not able to edit and flash the vbios? Because if your looking to change the non extended states thats the best way. The card should already throttle itself. -
oh well looks like I might have to go computer shopping, its a shame this thing has lots of life left except for it overheating. this model takes a standard mxm module doesnt it? i have 2 asus with mxm cards but I know one of them is reversed. I wonder if i can just find a lower model mxm for the swap
whooooooooooooo hooooooooooooooo 120c
![[IMG]](images/storyImages/120cm.jpg)
-
Talking about the swap, the G50 was reversed and we do 260M GTX swaps from G51/60's into G50's so i think there is the answer.
Apparently the G73 isnt as it turns out which surprised me. -
wasnt the 50's card pretty hot too?
-
sqtarky i don't know how the hell your temps are that high. Probably your repasting is screwed try repasting again carefullly. I have the same laptop with no mods at all just and i run around 50 - 53 idle and 90 - 93 while gaming. make sure you have the latest driver as it under clocks the gpu when not in use. Also clean out your fans if not don't yet. Last but not least if nothing works just drill through the fake vent.
-
I agree with Illz. this does seem like a botched thermal paste job. It should only be a very thin layer of paste. A thick layer will result in the sort of temps we appear to be seeing on your system. Before you declair 'game over man' you should seriously give this a second go. Especially since you don't seem to be having any hardware malfunctions as a result of your high temperatures. Your laptop might be perfectly fine once you fix the paste situation. If you post some pictures of your paste job I might be able to further help you. At the very least take it into your local computer shop and let them a have a go of it. Anything you try has got to be cheaper than a complete replacement.
-
I was pretty sure the nvidia card got some massive throttling around 105, and turned itself off at 115 ...
-
Here you can see a blurry picture of my g51vx when I installed a new CPU and fresh thermal paste. You are going to want to gently clean the surface of the chips and lightly apply a small amount of thermal paste.
![[IMG]](images/storyImages/img0375cn.jpg)
Uploaded with ImageShack.us
If the layer of paste is too thick or lumpy it will actually increase the temperatures. -
Open question-
Last week I applied new thermal paste to my G51-VX in hopes of lowering the startlingly high temps. However in the process my laptop has been running several degrees hotter on average than before. I used a two-stage chipset cleaning solution to make the chips as clean as can be and then applied Arctic Silver 5 to the chips. Prior to doing so I studied up on proper paste application techniques and spent a good hour taking my time to make sure I did it all correctly. After 2 more attempts at re-pasting, I was still getting higher temp readings in benchmarks. Where Furmark was giving me readings of 93-95 degrees Celsius before, now I get up to 100 before I exit prematurely in fear of damagin the GPU. So my question is this, what am I possibly doing wrong here?? I've read of people using the same two stage cleaner and AC5 on the same laptop and getting 10 degree C temp drops. Any insight from a more well-knowledged mind would be appreciated. I'd hate to break this computer, it was a gift from my gf 2 months ago.
I have also tried a different thermal paste from Vantec.
Also, is the mod where you cut a hole over the fan worth the effort? This seems like a lucrative idea I may try out.
Thanks.
-Jordan -
just did mine last night , did with mini hawksaw, as i dont fancy machine, does not look that good , but gets the job done.
i cut the hole and keeping the holes for the silver thing at the back , so i can put that back on.
i also put back peace of mesh at the back.
temps before i did , i was getting up to 99c in gaming, now i get 92 c furmark and just under 90c while gaming .
i also adjusted 1 of notebook cooler fans just under where the hole is so that helps as well
-
Hi Jordan
Sounds like you have done your homework on thermal paste. Although I had the same problem with temps rising a little after I applied new thermal paste for the first time.
I can offer two possible explanations. One would be that your live somewhere warm and you haven't taken into account the ambient temperature of the room you are in. Temperatures for me here in Canada fluctuate drastically from summer to winter. They've been on the rise lately and my room is quite hot. I have a fish tank so I can just look at that temperature when i'm testing. I posted this result a couple of pages ago
CPU with a P8700 @ 3ghz 550/1400/800
Windows ex 6.5/6.5/6.8/6.8/5.9. 3D06 11248 2.0=5209 3.0=5090 CPU=2622. Vantage P4500 GPU=4236 CPU=5538. Temps: Idle CPU=43c GPU=61c Max CPU=63c GPU=85c(BFBC2) Room temp 26c
Notice I put the room temp at the end. So you have a frame of reference for your own testing.
Secondly I found after I applied thermal paste the fist time, that I didn't make it thin enough and also didn't tighten the heat sink screws enough. After doing it a second time with less paste I got a better result.
I would totally recommend the case mod for your laptop. I changed mine a bit. I will post it below and explain a little more.
-
![[IMG]](images/storyImages/g51vxmod2.jpg)
Uploaded with ImageShack.us -
As you can see from the above pictures I added a thinner mesh screen.
The trickiest part about this is cutting through the thick plastic on the bottom. hereticangel used a hacksaw, I used a soldering iron. First you must remove the little metallic ring. Carefully! cut the little circle bits holding it off the backside. I also used a little hand drill and a knife to do this.
Once its off you must find a way to cut through the plastic. Use the little holes left from the ring as a guideline. For the best result use a large file and or exact o knife to do the fine cutting of the edge bit.
You can test fit the little ring to make sure you have removed enough of the surrounding plastic to not show through. Try to leave a little lip so you can super glue the ring back into place after you apply your mesh.
Feel free to ask any questions, I Really like this laptop and wanted to do a good job of it. take your time with it, i will be worth the end result.
As the fan spins it sucks in air from that area. If you have that piece of plastic there is draws it from inside the case. Put a little screen there instead and it will draw cooler air from under the case. Add and extra laptop cooler I have this thing, got in on sale for cheaper though... and you will have a cooler looking and feeling laptop.
Thermaltake Massive23 CS, Notebook Cooler - Aluminum Design, Up to 17", Ultra Silent 23cm Variable Colour LED Fan w/ On/Off Switch (CLN0008) | Canada Computers -
Thanks milkit for your replies and pictures. I'm sure the ambient room temperature is not to blame for my rising temperatures. I am seeing an overall increase in temps wherever my laptop may be. Lately I've just been underclocking the CPU and GPU to keep temps down in Windows. In Ubuntu/Linux however, the system seems to run much colder. But that is obviously not a fix. It seems I need to re-apply (different brand?) thermal paste and I will go ahead and cut out the back-panel. Speaking of thermal paste, I'm curious as to how much the brand and type of thermal paste plays a role in all of this. I've heard MX-7 is a solid paste as well as a few others I may try out. I'll be doing research in that area separately as well. After 3 pain-staking attempts I'm beginning to think Arctic Silver 5 may not be the best choice for this setup for some reason. If anyone can recommend a good paste I'd appreciate it.
As for the back-panel mod. . . I'll post some pics and results once my modification process is all done. It is exciting to see the results that people are posting about how effective this mod is! I understand the reasoning for Asus to not open up that area by default so as to cool secondary components, but after looking over the notes of others in this forum it seems as though the components do just fine with the drop in airflow. I imagine they still receive cooling by the fan, just maybe not as much.
-
Hi Jordan i'm glad to be of help
It seems your higher temps are about the same as what I got after applying a little too much thermal paste. What is you application method?
Mostly I cover my index finger with a littler plastic wrap and gently spread a dab of thermal paste over the chips. I helped a friend install a zalman cooler on his cpu a while back. He had what looked like a nail polish bottle full of thermal paste. It was more viscus than other types I used and had a brush in the cap for application. This worked really well and I thought I should get some but never did. That sort might be perfect for an easy application.
Have a look at the memory chips on my gpu, the internal pic of my G51 above. That was an over application of paste that I was removing. It looks a little chunky it was about twice as much as I needed. It really needs to be very thin, I can't really think of why else it would go up. You could post a picture once you apply if but haven't attached the heat sinks yet.
Did you do the case mod? That was very helpful for me. Sorry it took me so long to respond. Keep me updated on your progress
-
![[IMG]](images/storyImages/DSC_0055.jpg)
![[IMG]](images/storyImages/DSC_0051.jpg)
Completed my mod of the back panel of my G51-VX^^
I cut the hole out of the plastic using a jig-saw with starter holes drilled by a power drill. I use a flat file to smooth the edges and a plastic epoxy to hold the metal mesh in place. The epoxy dried with a weight on top of it for a secure hold. The metal mesh itself came from a car audio speaker cover I shaped to fit.
I've noticed a slight drop in idle temps. The laptop averages a 46 degree Celsius to 50 C temperature at idle. When stressed with Orthos, the CPU jumps to 62 degrees C (142 F). When stressed with FurMark, the GPU will reach 101 C before I exit in fear of damage. In retrospect I really regret re-applying the thermal paste when the temps before were still within operating conditions. Despite my best efforts and psychotically fastidious procedure, my temps are still higher than they were before, even with the back panel mod. It seems my comp still has overheating issues, most likely due to my paste-job. I'm genuinely baffled at my results being worse than stock, and I can't imagine I'm using too much paste as I have tried different amounts and spreading techniques already. My success story will have to wait. Stay tuned. -
have you tried a different paste? like ICD7 for instance? You've already tried AS5, a thinner paste, so why not try it out. For under ten bucks it can't hurt. Absolutely amazing job on the mod by the way. It looks stock.
-
Completed my mod of the back panel of my G51-VX^^
I cut the hole out of the plastic using a jig-saw with starter holes drilled by a power drill. I use a flat file to smooth the edges and a plastic epoxy to hold the metal mesh in place. The epoxy dried with a weight on top of it for a secure hold. The metal mesh itself came from a car audio speaker cover I shaped to fit.
I've noticed a slight drop in idle temps. The laptop averages a 46 degree Celsius to 50 C temperature at idle. When stressed with Orthos, the CPU jumps to 62 degrees C (142 F). When stressed with FurMark, the GPU will reach 101 C before I exit in fear of damage. In retrospect I really regret re-applying the thermal paste when the temps before were still within operating conditions. Despite my best efforts and psychotically fastidious procedure, my temps are still higher than they were before, even with the back panel mod. It seems my comp still has overheating issues, most likely due to my paste-job. I'm genuinely baffled at my results being worse than stock, and I can't imagine I'm using too much paste as I have tried different amounts and spreading techniques already. My success story will have to wait. Stay tuned.[/QUOTE]
Hey Jordan
It looks like your case mod was a success. It looks very clean and well executed congrats on that. It seems some temperatures have dropped but not the GPU. Have you considered that your method of testing might skew your results? I have noticed more of an improvement in gaming temps but Furmark is a stress test. It tends to push the GPU more than a normal game would even BFBC2. I tested out my GPU with Furmark to test this. My Temps maxed out at 101/102C, this seems quite high to me but my CPU only hits 57C(note that I am overclock the GPU). Also even other benchmarks like 3D makr06 don’t hit such high GPU temperatures. 93C was the max I got in 3D06 right after running furmark.
I usually recommend a number of different tests, some synthetic like 3D mark and some real time/world like BFBC2. I think you have made some headway in your work. I would recommend installing MSI afterburner. Running some actual games for about 30 mins and recording the maximum temperatures. Also try downloading 3d mark06.
I think you will have better results than you are getting now from just the one stress test. Then maybe you can see your own success more clearly.
3D mark06
Futuremark - world's most popular benchmarks and PC performance tests - Benchmarks - 3DMark06 - Download
![[IMG]](images/storyImages/furmarkt.png)
Uploaded with ImageShack.us -
Well I put on a new stock backplate and repasted the thermal goop on the CPU (was ICD7, is now AS5) and ripped apart and fully cleaned out the grille. I mean OCD clean. To my utter surprise both CPU & GPU temps are lower. Than when I had holes drilled in the backplate underneath the fan intake.
The rest of the unit hardly heats up now to the touch. Keyboard never gets warm... just like when it was new. I think it was removing and cleaning the CPU heatpipe and fan as it's also quieter now.
I know it's a pain and it involved slowly peeling off the sticky rubber from the top of the heatpipe radiators - which alone took 20+ minutes - but I really suggest doing it. It has made a way bigger difference. Both CPU and GPU are idling mid-50s again
Dirt 2 now doesn't even top 90C on the GPU even at 560/1400/900. I didn't touch the GPU btw (didn't have new thermal pads for the RAM and it looked like I'd need to ruin them to get them off). Before it was clocking down (see sig re nTune profiles) and sitting on the 480/1200/800 profile at 94C.
That guy getting 90+C idle needs to pull his lappy apart and repaste it all properly, something is just not right there. Remember - rice grain size and let the HSF block spread it for you. -
After watching a clip on YouTube on modding the backplate, he also said that by cutting the blue wire of the fan, it will leave the fan running at max speed at all times. I went ahead and cut it, and now my temp are always at 62oC idle and 79oC max load!!!!
The mods I did:
1. Replace thermal paste with MX-2. This mod by itself only reduce the temp by a margin.
2. Drill holes in the fake vent, will go ahead to replace with it a new grill later on.
3. Cut the blue wire. I did this last, and before cutting it, even with the fake vent drilled, the temp was still very high at around 90oC. After I cut it, idle at 60~ oC and doesn't even get up to 80oC anymore! So So So Happy with it now.
4. Last but not least, having a Cooler Master Cooling Pad and its detachable fans to place it right under the drilled fake vent helps a bit too.
Conclusion:
Before, I always play games on the lowest of low settings with all effects turned off. And the damn temp still get above 90oC and sometimes 100oC!. Now with this cool temp, I can play Heroes of Newerth and any games at high settings with 60fps and no stutter at all. Therefore, it was the heat issue all along, not the capabilities of the GTX 260M. I'm sorry NVIDIA
.
-
I just finish my mod... is no where near as smooth as the other guys (cutting the plastic circle is real , cut the metal mesh was a nightmare too)
I finally got it, and to be honest I have no change in temperature
PS: I am a failure as a handy man -
You might need to put it on a cooler to see the effects, my temp stay the same when the laptop is on its own but when put on my Cooler Master cooler, the temp drops significantly.
-
Yeah, I know it's a 2 month(and 2+year old) thread but if came across it after 2 years since started, some others may too. So here's my feedback.
Before I continue I should say, it's better to get a cheap modded backplate off from Ebay or somewhere else in case you don't feel comfortable doing it. But even if you do, I still recommend buying one to save you the hassle.
I sold an ASUS G51VX-RX05 to a customer(teen) 1.5+yrs ago. This summer he was complaining about random shutdowns(overheating). So he finally brought it to me and I did my magic(mods).
Replied thermal. MX-4.
Replace that fake vent-wanna-be to the one on the photos. Oh and I painted the fan all black. It's quite better. Although no one is gonna be looking it that much. hahaha
![[IMG]](images/storyImages/wwm5qx.jpg)
![[IMG]](images/storyImages/dzjdhe.jpg)
With Furmark the GPU reached 81-82c at 1366x768 with no AA and post effects on. I'm quite happy with the results. Only tested twice. 1st test. Waited to cool down and re-tested.
CPU was idling at 40-42c.
It's Fall here now so temps are a bit lower than what would have been in the summer because of ambience temps, but by not that much I believe, since noone is gonna test it outside in direct sunlight. Right?
P.S2: If anyone has found an alternative fan(Higher perf), please do share.
Thank you. -
ANY suggestions for getting someone else's backplate, or a spare, or a knock-off would be appreciated. I've been looking for one for a year. Thanks.
I'd be happy to buy someones at the right price. -
It's not used (it's refurbished), but I managed to find it on ebay:
Asus 13GNSZ5AP040-1 Asus Cpu Door Sub Assy | eBay
Just thought I'd post that if anyone is still looking for one, since they aren't sold new any more. -
I did a bit of a different mod to my G50V that took very little in cost.
essentially cut a hole in the bottom and made my own grill for it.
ASUS G60VX Gaming NoteBook Heat Mod Fix - YouTube
the link above is essentially what i did, cut a hole, used a metal file to smooth and curve the opening, put the silver piece back on, and used crazy glue to mount a grill made from a cutlery tray. -
Hope that guy knows a needle or something like it could have bent the pin on the blue wire so you could pull it out of the connector. Making it less permanent. Piece of tape on the end to insulate it. Do it all the time for overclocking bench runs.
-
I figured i'd add my 2 cents and post my temps and mods to my g51vx i bought on ebay with a no video issue.
I reflowed the gpu and the southbridge with my hot air machine and reassembled the laptop using arctic silver 5 thermal compound. The computer would get about 195F before the fans would turn on, then they would go near 80% power to get the temps down to about 150F then the fan would turn back off. If i left the computer running for about 30 minutes the cpu heatsink would finally heat up enough to keep the fan on and idle at a stable 152F. But if i exited all my programs and left it just idle the temps would vary again.
I knew these computers had problems because i fixed a g51vx about a year and a half ago that had the same issue. I ended up just cutting the wire that controls the fan to keep the damn thing cool. I also modified the bottom with a speaker grill.
Anyway i ordered a 1mm thick thermal pad and decided to redo all the thermal pads on the gpu heatsink, the thermal pad on the southbridge and reapply ic diamond thermal compound to both the cpu die and gpu die. I also put a thermal pad on the bottom where the cpu and gpu heatsink meet as well as on the top. I tried to fill in the empty space with some rubber i took off the heatsink. I have a switch ran to the front left side of the computer (where the mesh grills are on the front of the computer), it's nice and hidden and out of the way.
Here are some pictures and a log of my temps.
Inside Bottom Cover
![[IMG]](images/storyImages/IMAG0698.jpg)
Outside Bottom Cover
![[IMG]](images/storyImages/IMAG0699.jpg)
GPU Heatsink with new Thermal Pads
![[IMG]](images/storyImages/IMAG0695.jpg)
GPU Heatsink Mounted, CPU die pasted, SB Thermal Pad
![[IMG]](images/storyImages/IMAG0697.jpg)
Hooked up to an external monitor
![[IMG]](images/storyImages/IMAG0667.jpg)
Screen shot after running over 4 hours
![[IMG]](images/storyImages/ssaftermod4.png)
LOG:
3-25-12: Post After GPU + Southbridge reflow
=================================================
3-27-12: Thermal Testing with Arctic Silver 5
Lowest idle for gpu 124F 100% fan
Lowest idle for gpu 108F 100% fan on battery
Lowest idle for gpu 149F pwm connected
==================================================
5-4-12: Thermal Testing with IC Diamond + New Thermal pads
Lowest idle for gpu 144F pwm connected
Lowest idle for gpu 132F pwm connected on battery
Lowest idle for gpu 108F 100% fan on battery
Lowest idle for gpu 116F 100% fan
I bought both the ic diamond thermal compound and the 1mm thick thermal pad off ebay.
Here are the links to them
Thermal pad
IC Diamond Thermal Compound
If you want to complain about me posting temps in Fahrenheit instead of Celsius then click here
Thanks everyone for the informative threads and posts on this forum.
Feel free to contact me with any questions. -
Hi. thanks for sharing your cool experiences with the this laptop. I was wondering which component keeps burning out on this laptop. It interests me that you have repaired a few of these.
Your cooling mod looks nice and clean. I was also thinking of getting the thermal pads but wasn't sure if it would help. It looks like the results using the pads actually increased the heat vs your tests with Arctic Silver 5.
I wanted to mention that you should try clocking down the GPU. It doesn't seen to do it automatically but it makes a significant difference in temps.
I'm currently typing in bed with my G51 and i'm idling at 58C or 135F, with the GPU clock at 200/400/400. The lower clock speeds really help with the temps. My fan is at 2800 rpm. I haven't cut the blue wire, I prefer my laptop to be silent unless i'm gaming.
I found that by modifying the clocks with the Nvidia profile policies, I got much improved temps. This seemed to have the biggest impact for me. It's definitively worth a try and it will increase the life span of the laptop.
Happy Modding
-
It's not that a component keeps burning out it's that the solder under the component gets hot enough and forms a small crack at one end of the solder point. This is caused by extreme heat cycles (usually dirty heatsinks or a poor thermal connection to the heatsink), sometimes the solder will form a cold solder point and work until the computer heats up. I actually have written a few explanations about this on various forums.
The root of the problem is from the RoHS directive and japan taking the lead out of solder in like 2000-2001. Pretty much the whole purpose of taking the lead out of solder was to limit our exposure to lead, though RoHS targeted consumer electronics to limit lead exposure to children using the electronic devices. Also this would limit the amount of lead in landfills after the electronic device failed, probably having something to do with the lead contaminating our water supply (who knows?)
The xbox 360, ps3, dlp tv boards, various laptops (dv6000, dv9000, tx1000, tx2000, f700, d630) and even my bothers cable modem (ha) are all plagued by this issue. Nvidia had a giant class action lawsuit to try to deal with the majority of their laptops dying.
These chips are all bga (ball grid array) which means all the solder points are below the chip in a grid. There could be 700-2000 little solder balls beneath the chip and if one has a hairline crack in it you will start experiencing issues.
Take a look at this picture, it's from the gpu from an xbox 360
![[IMG]](images/storyImages/bga_common_crack.jpg)
You can clearly see the crack between the ball and the pad, this xbox had the infamous red ring of death.
Anyway there's a couple ways to fix this issue, one is to reflow the chip, the other is to reball the chip.
Reflowing is just reheating the board and solder up to a certain temperature to help the solder crack seal, most of the time people try to cut corners or don't know what they're doing so reflowing has earned a bad rep. You need a machine that's specially designed for bga soldering and they aren't cheap. Some people (youtube mostly) decided that using a heatgun would have the same results. Compare a heatgun to this machine and you can clearly see which one is better. Plus using flux speically designed for reflows helps your success rate.
Reballing is exactly what it sounds like. The chip is removed completely, the solder balls are cleaned off the chip and board, the chip is reballed using a stencil, then the chip is placed on the board and reconnected. This is a really complicated process but it's usually a 100% success rate. Though there are some machines out there (L2 computer from brooklyn ny has one) that are completely automatic and will heat the chip and remove it automatically. I personally won't mess around with reballing, it's just not worth the time and frustration.
Anyway you asked why they fail, there you go. -
Great post! Very informative and interesting to read. I am intrigued by this problem. I wonder if this is the reason for all the failure that was seem on Nvidia 8xxx series cards. I owned a 8600gts that may have died in this way.
I assume the video card manufactures try and reflow the returned cards and ship them out again once fixed.
I bought my G51 refurbished from TigerDriect, who was selling off these laptops for $600. They sold them off for a couple years so I assume they had a lot of refurbished stock.
I wonder if mine already had this problem and had been repaired once. Do you know if it is likely to happen a 2nd time? or would reflowing the chips actually fix better than is was originally?
Did you learn how to do this in school or take a course about it? It's a very interesting subject. You got a great deal on your laptop, considering you fixed it yourself too. Great work -
Simply put, i own a computer repair shop.
I actually went to ITT Tech in in 2002 and got my bachelors in multimedia. Then when i was looking for a job but nobody would hire me because i already had a job (working at a mall). I had 4 interviews with this one company and they picked the guy that didn't have a job. Anyway i ended up reading and studying and got my compTIA A+/MSC. Then i was head tech for a local computer repair shop for a few months and he had to close because he didn't know how to manage money. So i figured i could do it, opened up my own shop and i've been in business about 2 years.
As far as the reflowing and smt or bga soldering i kind of picked it up as a hobby. If you look on afterdawn forums you'll find hundreds of posts just like the ones above. That's really where i learned and researched everything. It all started with xbox 360 repair and it's evolved into fixing anything and everything.
It's almost second nature being able to fix everything i see. I've had a few ROG laptops so far, the next one will be a g53 with a broken dc jack if i can find one cheap enough (i keep getting outbid on ebay). I just bought an rog am3 crosshair iv formula board for cheap and plan to use a bulldozer 8 core in it with 16gb because it's so ridiculously cheap.
Anyway like i said before, reflows only fix the cracked solder balls under the chip in the bga. The end all solution would be to reball with lead solder but that's expensive and time consuming. It takes specialized equipment to do it and the knowledge to use the machine. At that point you're almost better off buying a new video card or laptop. -
I finally got around to mounting my fan switch, i had to modify the switch to fit the opening but it fits perfect. I might end up shortening up the switch a bit but we'll see if it gets in the way.
Here's a few pics, if you have any questions feel free to pm me.
![[IMG]](images/storyImages/IMAG0764.jpg)
![[IMG]](images/storyImages/IMAG0762.jpg)
![[IMG]](images/storyImages/IMAG0763.jpg)
![[IMG]](images/storyImages/IMAG0765.jpg)
-
those are really amazing temp drop. I tried playing without the bottom panel but all i could get is 3-4 C lower. I know that you did this with laptop on your lap. Even though I was running test on my table i think i still should have more temp drop then that.
how does cooling mod serve everyone else around here? -
I feel bad about posting in such an old thread but it seemed like the only place to ask. In the above posts C4RN1 said he installed a switch, was that a switch between the blue wire? My understanding is that putting a switch in would allow the wire to act normally, but also be able to disconnect it to make it run at full power when needed. My apologies if I missed something or this is an extremely obvious question, modding computers is a new adventure for me.
-
So on my G50vt (G51 fan assembly) there are four wires. The blue one is PWM, which I'm 80% sure makes the fan go full speed when cut.
So if you spliced a switch in series with the blue PWM wire, you could have it run at full speed (switch is open) or at whatever normal speed (switch is closed).
Refer to this thread here where I had a similar discussion with another fellow NBR member
http://forum.notebookreview.com/asus-gaming-notebook-forum/560381-g50vt-fan-cable.html
Good luck! Let us know how it goes! Maybe it is a bad thing but it might be more relevant to resurrect that thread instead of posting more to this one. -
The blue wire is the signal wire and if you have it connected it will work normally. Flip the switch and it will disconnect the wire and the fans will run 100%. It works great for playing games, though in furmark you probably won't see a difference in max temp (though you might get a better score due to it throttling in the beginning where it ramps up the fan). I've done this mod on several g50-51 computers so far (a couple from this forum), and it's more than worth the time to do this mod.
-
Hi C4RN1, I saw your mods for the G51 and they look great. I'm trying to do something like that as well.
I have a question for you, is it okay to use 1.5MM thermal pads instead of 1MM on the GPU heatsink? That's the only thing I have and I'm worried that when I put back on the heatsink, it will be too tight. -
I would not worry, the core can take quite a bit of pressure and too little will lead to heat problems.
Now installing a high pressure heatsink in the athlon XP era was scary. -
Thanks a lot for the reply. I understand what I need to do now... I need to rescrap all of the thermal pads and put new ones because the current ones are just falling apart.
-
I like phobya 5mw/k pads, not quite their highest performing pads but easy to use/place (The 7mw/k ones move very easily) and still very good.
-
Hello, I'm new to forum. I live in Brazil and here is really warm, so my G51JX-X5 goes all time ~96C. I was wondering if backplate (also know as bottom door in asus store) for G50VT works well for G51JX. If work I'm planing to buy one.
-
A PC repair customer dumped his 'baby', a G60VX, into my laptop over a year ago, after giving up on repairing the same ole' overheating issue. Due to some carpal tunnel and weather-related arthritis issues (OK, I'm OLD--45 is the new 90), I held off on doing anything to it until I could see enough successful mods (that looked good, too), to maybe inspire me to have some 'extra' confidence (because--remember, kids-- "The difference between ordinary and extraordinary, is that little extra").
Thanks to the EXCELLENT pics posted by C4RN1, I did finally 'grow me' some confidence, and I'm very happy how mine turned out.
Like so many other owners of these, I kept 'discovering' things that either just don't make any sense, could have been improved on, and even indicate this bottom plate was just thrown out there to see if there were 'any suckers in the market to buy these suckers'. You'd think ASUS would've seen a lawsuit over this...I mean, everybody called 'shenanigans'--(seriously).
After seeing the bottom of the RoG N71JV, there's almost no doubt in my mind that somebody at ASUS was thinking of putting a speaker (or something) in there, but somebody else 'higher up' was just too cheap, and didn't care at all if customers' laptops turned out to be firebombs.
ANYWAY, here's the 'current shortlist' of what I did to mine ('current', because I'm already started on 2 more MAJOR mods):
- re-pasted CPU and Northbridge (used AS5 first time, ICD7 the second)
- re-padded CPU, NB, and GPU heatsinks (used Phobya 1mm Ultra 5W/mk)
- did a 'hole mod' (had an unused Kenwood car speaker grill laying around that turned out pretty well, I think)
- installed the best NVidia driver I could find on the 'net (186.82 turned out to be 'it' for me, even seems to be working with...)
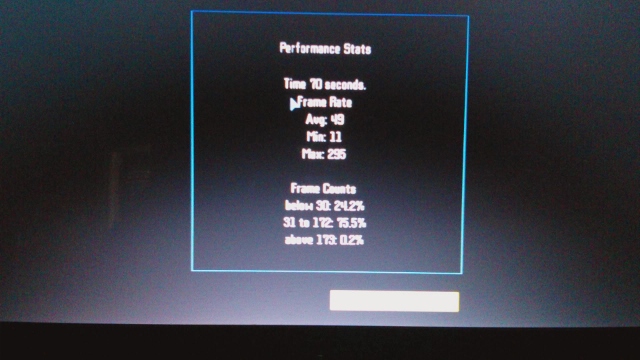
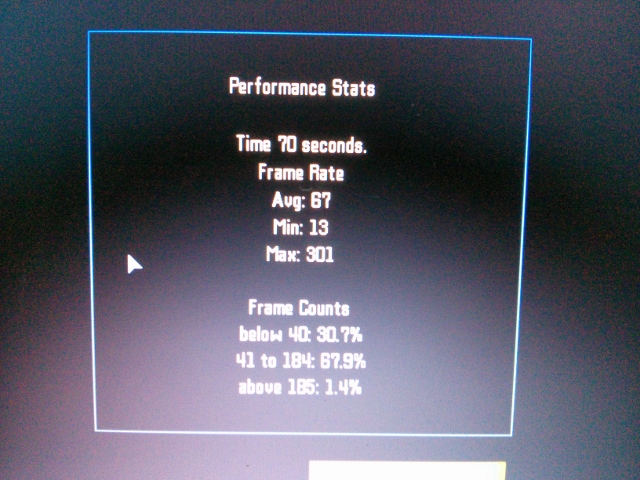
- RivaTuner...which did turn out to work with this driver, and brought idle temps down remarkably (I've attached some pics of game tests)
Prior to all this, the thing would get up to 90°C (194°F), even venturing briefly over this insane mark before just shutting down, and the GPU seemed to have no idea what it was doing while idle--so much I began making idiotic comparisons between it and a musclecar, that it 'needed a workout' to really keep it in shape.
That was bunk, of course--no laptop should be churning away like this, and I still can't believe they left that large circle without ANY real purpose besides absolutely useless cosmetic (somebody should get an insider to spill on this, it would make a great story).
Now I'm on my way to figuring out how to install a VERY tiny (just 1.5"!) 'squirrel-cage-style' laptop cooling fan in the area behind the laptop's WiFi switch, using that very switch to control it (or maybe dual control, wiring it to the main one so the smaller one can only be turned off or on while it's on...don't know quite yet)...I'm figuring out now how to use that tiny fan's entire cooling assembly to wick heat directly off the GPU, and it looks like it could be done.
I canned an idea I had to cut out tiny fins in the side of the main fan, to let air escape over, under, and around the GPU, due to concerns that I'd actually be 'superheating' the GPU if the actual air temps inside the main fan housing were overly warm. However, I still think that if someone measured those air temps and found them to be acceptable, this could be yet another way (possibly quite an awesome one, too!) of inducing airflow around the GTX260M.
One other thing I've been thinking about is a mod I 'invented' for the HTPC's I built over the years...it's simply taking a 'ShopVac' paper/cotton filter (round, blue-colored, about $6 for a 3-pack at Walmart), DYEING it black, then putting it behind fan intakes to a)filter air better (while not blocking it), and b)make things look a little better. Here, it would be to keep out dust from my fan.
My post-mod temps came down dramatically before I even applied the 'standard' Riva settings...I've attached a pic, but actually, that GPU routinely reports more docile temps well under 140°F, whether idle or hard-at-work (my game tests were done using a FSP I'm addicted to, called 'Section 8'--I ran the in-game video 'benchmarks' using all sorts of settings, with excellent results! (again--see pics).
I'd never seen a laptop--or any PC--with such strange video behaviors (ASCII characters in BIOS, many boot cycles, and Windows unable to run correctly over 5 minutes...and with ASCII too!). It looked poor, at best.
After my mods, though, I've enjoyed using my RoG for gaming, and even more mundane daily tasks...all with temps cycling at well under 140°F, like I said.
Cue up yet another obligatory 'Happy' by Pharrel...because I am.
Thanks again to user C4RN1 for his pics...'til I saw your pics and posts, even the Youtube videos I kept coming across had inspired nothing but doubt as to how mine would turn out.Attached Files:
ASUS G51 Cooling mod
Discussion in 'ASUS Gaming Notebook Forum' started by kondor999, Aug 25, 2009.

![[IMG]](http://imageshack.us/photo/my-images/830/underclock2.jpg/)


![[IMG]](http://imageshack.us/photo/my-images/51/img0375cn.jpg/)


![[IMG]](http://imageshack.us/photo/my-images/825/g51vxmod2.jpg/)

![[IMG]](http://imageshack.us/photo/my-images/27/furmarkt.png/)