Can you post the Log.txt file before that. I would like to see is there any change from the previous time. I will check again the vBIOS chip model.
Can you check yourself the vBIOS chip model, the one with the green label. It must be the same for GS and GT models (it should be SST25VF512).
Take a look at the BitBoard Blog for the idea.
pins:
CE# Chip Enable
Vss Ground
-
Sorry wrong post. Please delete it.
-
Ok, so i tried the 9600M GS ROM, Nvidia 9600M GT ROM, Asus 9600M GT ROM and ECS 9600M GT ROM and so far no luck

Attached the Log file from the ECS flashing..
By the way, is it normal that the flashing takes only about 1 second ? And i only get one beep overall.
Can we edit the original vBIOS (ACER) somehow (BIOS editor) ?Attached Files:
-
-
In our case Yes, because there is no flashing. Usually it takes about 30 seconds but depends from the supported write speed of the chip.
Did you check the EEPROM model number? -
Hi Duhai.
Could you please post here your BIOS?
That one from first page is for Samsung memory chips.
I have 9600GT/DDR3/512M/Quimonda
-
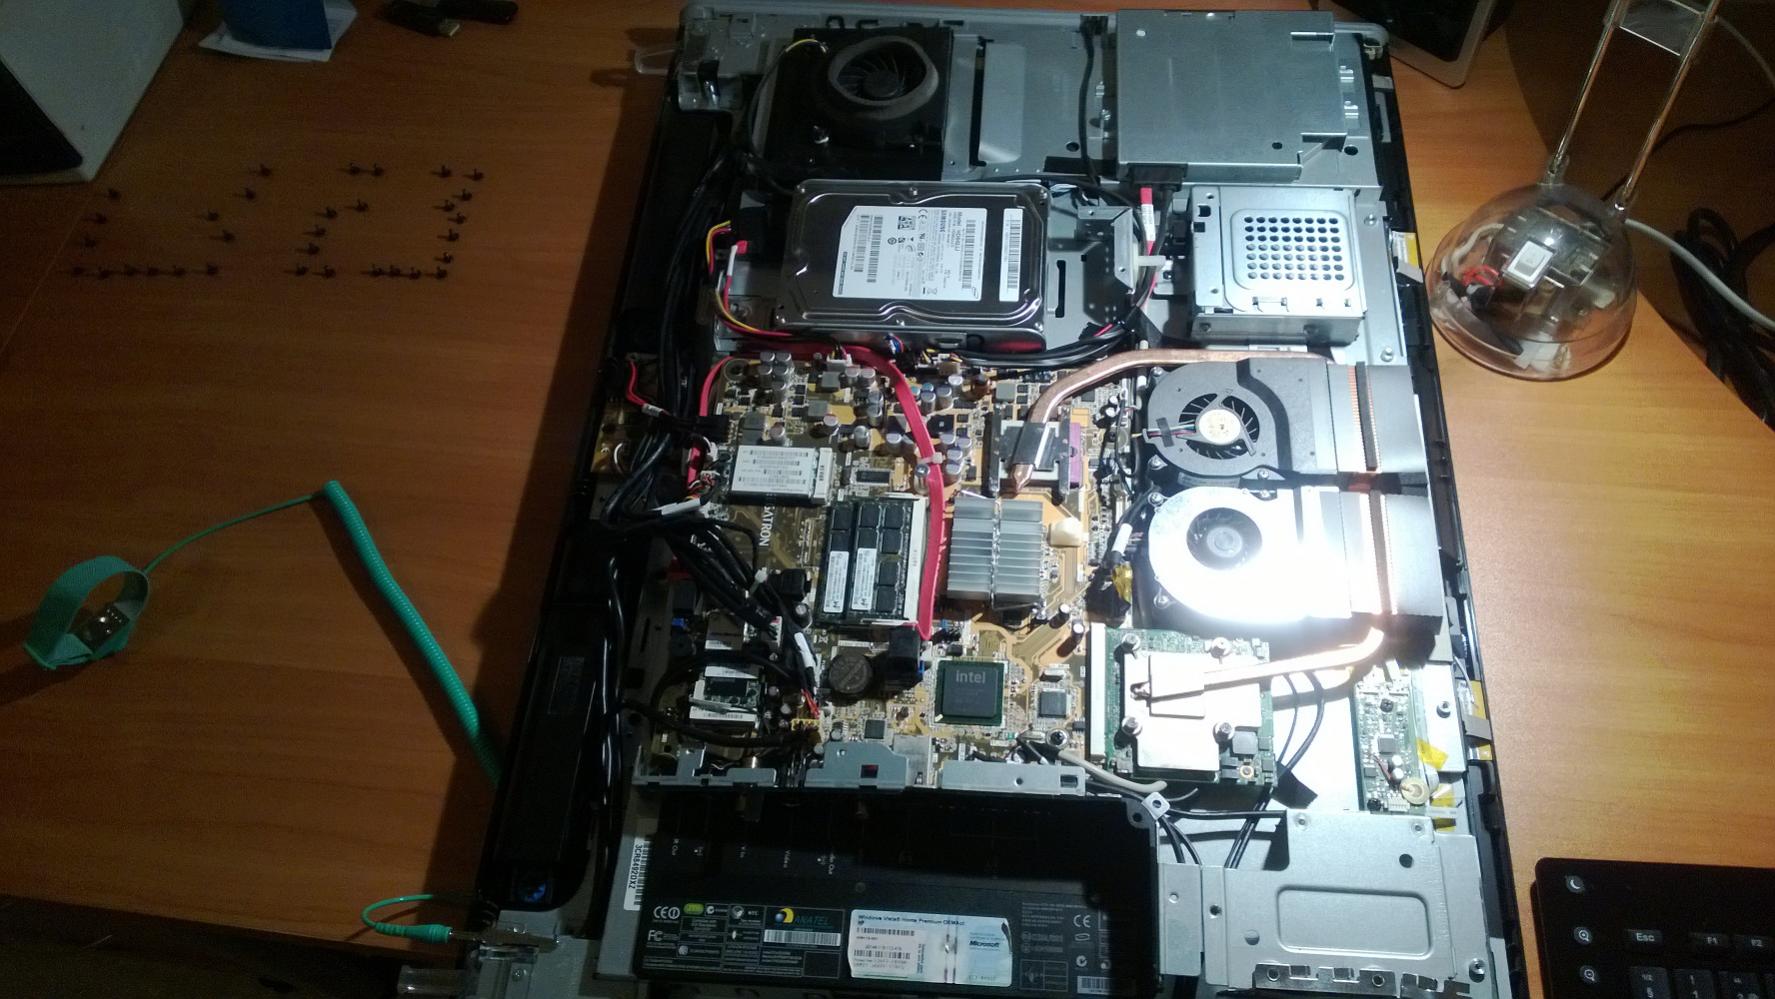
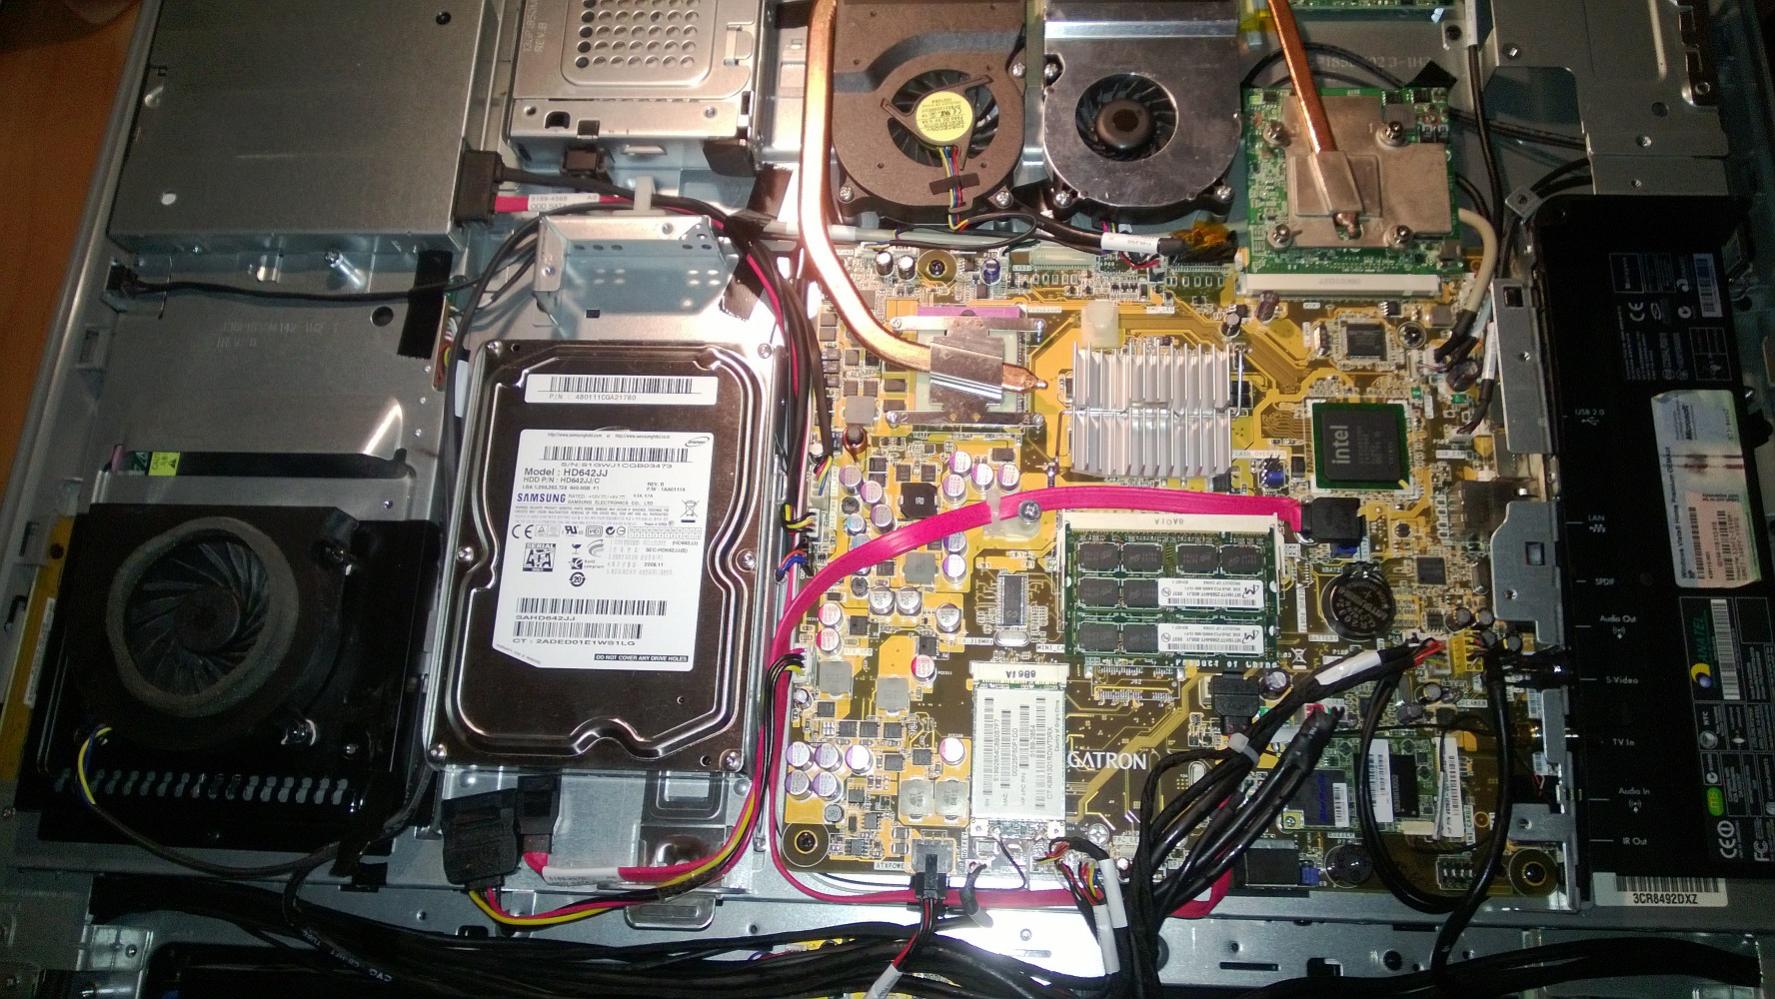
Not yet. I am going to dissassemble the Touchsmart in a minute.God this really is the most annoying computer to take apart, seriously it has like 3 layer casing. All layers are attached with millions of screws.. This time i will let it stay open to save time in the future..
-
No need, the chip is the same as GS you have.
-
This is the only picture i have taken previously, can you see the number from this ?
If it is the same, then should i be able to flash it ? Because i allready flashed my 9600M GS one time.. -
Hi RakDrak,
Here it is GT9600M/DDR3/Quimonda:Attached Files:
-
-
It is XX114A3103 (XX=something)..
Are we talking about the same chip ?
By the way, that BIOS you posted should fit my card too ? I have those Quimonda chips too and GDDR3 512Mb -
@Alajarvi84
I already tried and unfortunately I can’t see it, to small.
You are absolutely right! Maybe I am wrong and the chip on GT is different. Whatever you should to disassembled it again because the grounding requires physical access to the chip’s legs.
-
So there is no way to bypass the manufacturer lock by software ?
Oh well, i'll start taking it apart.. -
Yes, that is the chip.
Yepp! It should works for you too.
I don't know what is wrong! From the log files there are no indication that the card is bricked. It just refuse to be flashed. You can try with the -j option but it shouldn't works because the two pins " CE# - Chip Enable" and " Vss - Ground" are not grounded.
Here it is the pins description (just for a reference from BitBoard's Blog ) -
how do i use the -j option ? nvflash -4 -5 -6 -r -j 9600M_GT.ROM ?
So the CE# and VSS needs to be connected ? Is this only temporary or do i need to make it permanent ?
What does this actually do ?
Worst case scenario ? (actually it is better that i don't know) -
Yes, that is the line:
nvflash -4 -5 -6 -r -j 9600M_GT.ROM
Yes, they must be connected each other with a cable (it will be difficult)! It's very important to not short something else! An error at this stage means death for the card.
It’s only for the first successful vBIOS flashing. After that the link must be disconnected.
This is the procedure when a vBIOS was inconsistent (broken or doesn't works), and should be repaired.
A bricked video card if the connection between chip pins is not properly made.
The alternative is on "Need an advice on 9600m GT"
You can try to flash using older versions of nvflash, in e.g. 4.xx (I don't know if it support the chip in 9600M GT). Some times is better to be tested more versions.
If you feel yourself uncertain about the last step and there is no one who can do the job then it would be better to return the video card. -
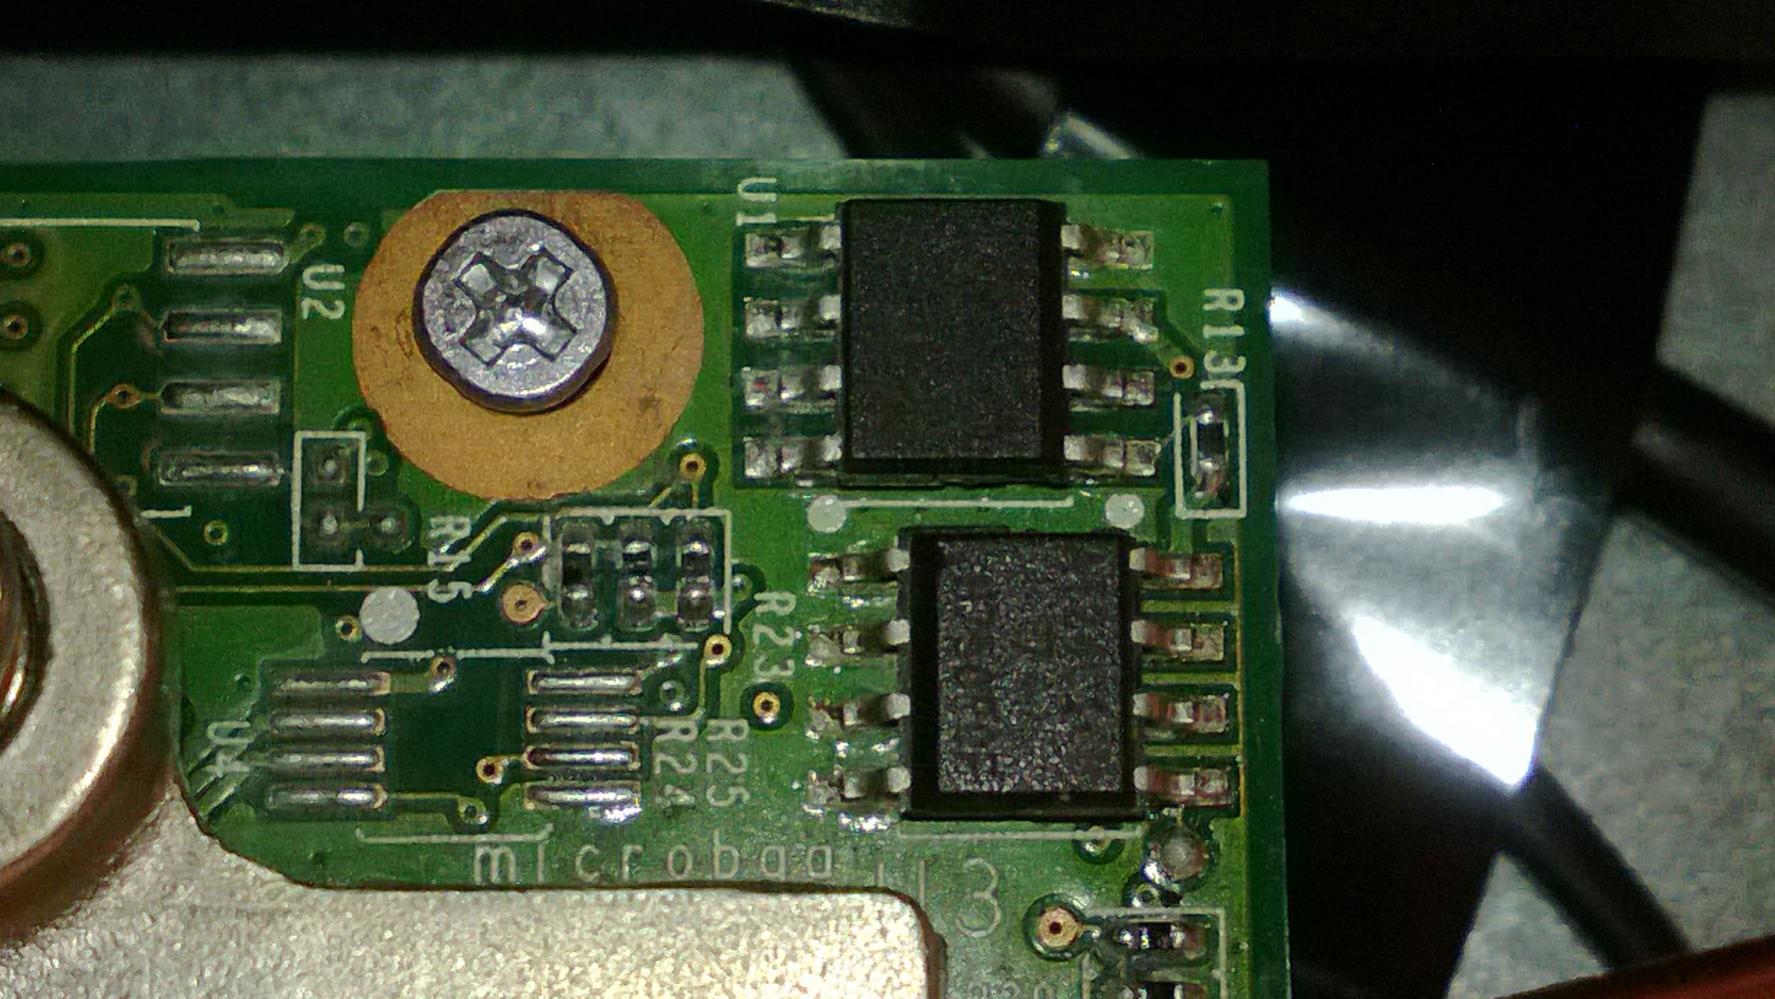
Ok, it is done. The taking apart side. Here are some pics, including a sharp shot of the chip. What now ?
Attached Files:
-
-
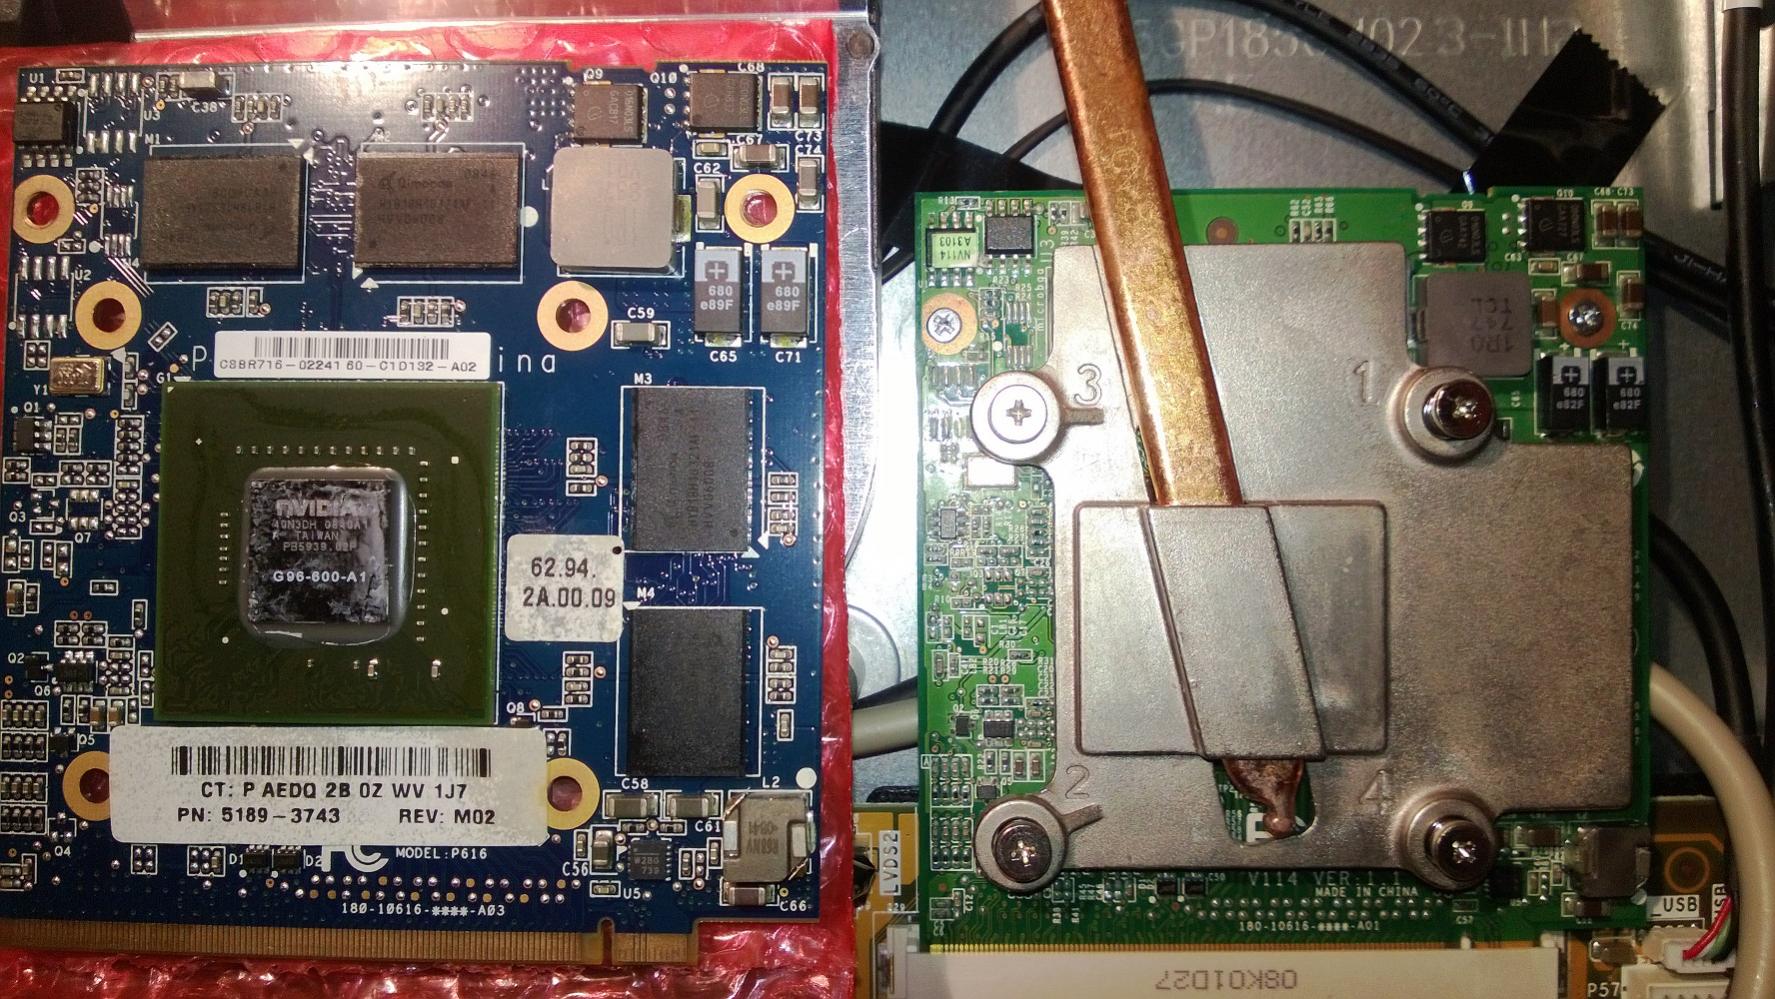
Something missing from the 9600M GS ? Or a different kind of chip ? GS is the blue card.
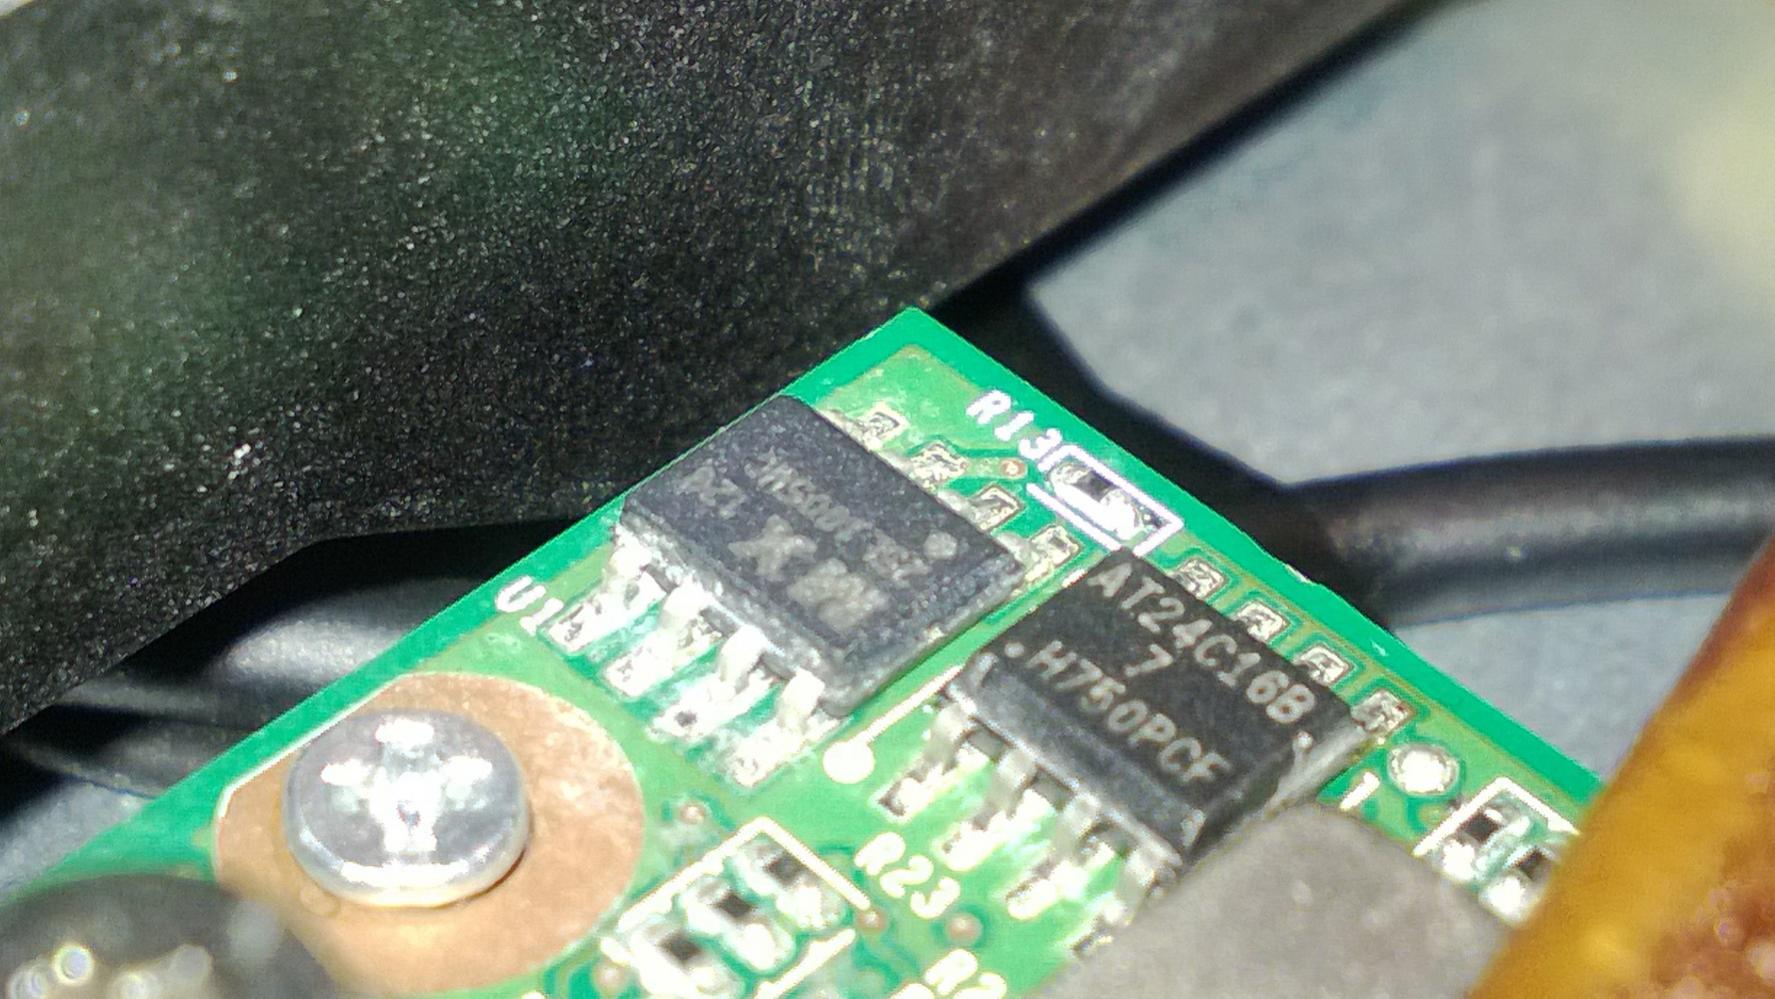
The chip missing from the 9600M GS (is on the 9600M GT) reads AT24C16B - 7 - H750PCF. Why is this to be found on the GT but not the GS ?
Strange..Attached Files:
-
-
Thanks for the pictures. Now we have to find out two things:
- The chip model (needed for proper pins identification)
- The pin #1 of the chip (on GS it's from the side of the chips top hole)
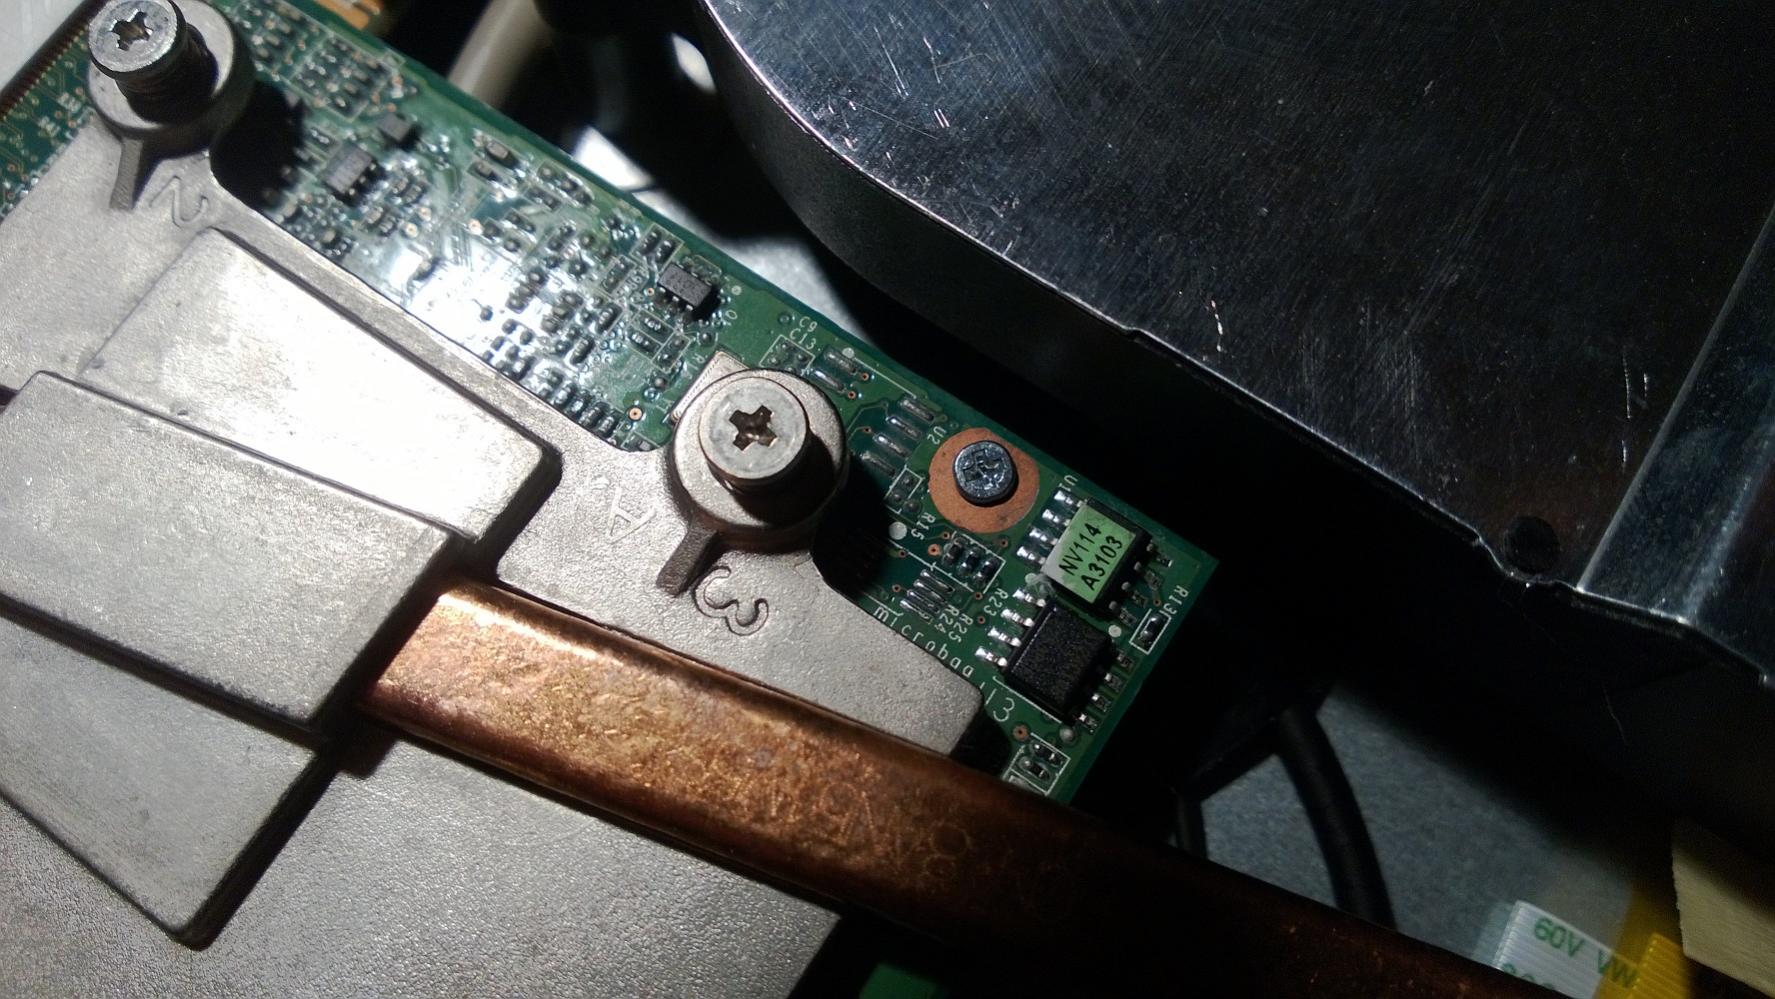
The chip model number is under the green label. It is the same as on the GS card. Can you see the number over the vBIOS chip on GS.
On this picture is 9600M/512MB/DDR3 card, the same as mine and yours without the green label. I can't see clear where is the hole that marks the pin #1. It should be on the down left edge.
On GS it's on the upper right edge. -
The chip in the GS (the only one) is SST(or ST or SS7) 25VF512 - 204CSAE - 0837066 - AA. Damn the print is so tiny and no magnifying glass
The chip on the 9600M GT (under the green label) can't be seen properly. Only thing i saw was big (MX) and 25 something..
So basically the two cards (GS & GT) do not share a single one chip. Also top of everything the GS is missing the AT24C16B7H750PCF chip that the GT has (sitting next to the green labeled one). Strange indeed -
Perfect, a moment to find out the chip documentation. That is the same chip I've thought - SST25VF512.
I need 20 minutes. -
A hole ? i am not sure what am i looking for right now ? The U1 text is in the same position (down left) on the GT, in GS it is (up left).
-
Here it is the chip:
![[IMG]](images/storyImages/vbiosnvidiachipsst25vf5.png)
The circle close to CE# defines that the closest pin is the pin #1. On your GT card you should find out the pin #1 (circle/hole) and connect it to the pin #4 with a cable/isolated wire/lead. The best way is the cable to be soldered to the two pins without touching anything else. That is the difficult part! On the your picture the pin #1 must be the one close to the “A” letter that probably is covering the hole (mark for where is pin #1). It will be better to check that.
U1 on the GT picture must be pin #5. The hole I'm talking about is on the GS picture in the upper right over the vBIOS chip (without the green label) -
Those are the closest pics i can get with my 920.. So are those little dots the ones we are looking for ? I do know what you mean, i just want to be sure.
Can i connect the #1 and the VSS with pins or something (no soldering), because i am not so confident concerning my soldering
Also is the vBIOS chip i must short circuit the one on the left (used to have green sticker) or the next to that ?
If it is the (up/left) chip, then i connect (right/up) and the (left/up) legs ?
What happens when i flash the vBIOS with this trick and then disconnect connection ? Does the problem return ?
Double check, do i use this one = nvflash -4 -5 -6 -R -J 9600M_GT.ROM (your BIOS) ?
Sorry for the hassle, i have ADD so i have to be 110% sure before i can do anything
Attached Files:
-
-
Just a moment, the pictures are perfect!
The Pins #1 & #4
![[IMG]](images/storyImages/pins14vbiossst25vf512.jpg)
The electrical connection between the pins must be securely attached without touching something else. If you have an old lead(s) from fans in example. Also if you can turn on the PC without assembling it again it would be good.
If it is possible but I don't know. Never did it. You can use thin tweezers, it is VERY, VERY RISKY if you are not careful! Not recommended!
![[IMG]](images/storyImages/2009122019232_nbw03.jpg)
It's correct!
Everything must be OK after that!
The correct line is:
nvflash -4 -5 -6 -r -j -L Log.txt 9600M_GT.ROM
You are right! The risk is with the pin's connection. -
I have a roll of extremely thin copper. So i tought that i bend a piece to U shape and solder it in place with a tiny amount of tin. Does the copper work properly as a bridge with the joints ? The current might be a little too weak for the copper, so i think i use your idea.
I also have many boxes full of laptop / desktop parts, so did you mean the little wires from a fan ?
I will not put it back together before this is done
-
That is perfect!
It's difficult to be find out something better.
Exactly! Yours thin copper will do the job too with the proper isolation!
The vBIOS must be yours from the GS card, because it contain the digital signature of HP (not completely sure).
nvflash -4 -5 -6 -r -j -L Log.txt 9600M_GS.ROM
It is not bad to be used the mine vBIOS. If after that there is no POST screen then we can be sure that you will need the vBIOS from the GS card because HP makes connection between the system BIOS and the vBIOS. -
Can't find my soldering gear anywhere, so i must buy some more tomorrow morning.. So lets continue tomorrow
-
OK, until then!
There are good video guides at YouTube for how to solder. Use not more than the 30W soldering iron (15-25 watts).
As far as the connection between the pins #1 & #4 if you want you can keep it for a while. Once when you finished with the vBIOS and its adjustment then you can disconnect it. If I were you I'll keep it for good.
It's good always when a vBIOS or BIOS will be flashed blindly to be used the log option if the flash tool is offering one. In our case -L Log.txt.
nvflash -4 -5 -6 -r -j -L Log.txt 9600M_GT.ROM
-r & -j are small letters
-L is capital
I've compared the vBIOS versions of yours and mine GT and they are the same. It means that your card will work perfectly on Asus C90S. Our goal remains to make the card flushable in your machine.
Scenario:
- The first step is to flash the card with the original vBIOS – yours VBIOS (the backup) or mine.
nvflash -4 -5 -6 -r -j -L Log.txt 9600M_GT.ROM - Check the Log.txt for the flash result. The screen will be black again because the vBIOS is the same.
- Flashing with your original 9600_GS vBIOS version and check the Log.txt for the result. Here we are not using the Jedi's Force (-j) because it is for kids
nvflash -4 -5 -6 -r -L Log.txt 9600M_GS.ROM - On the next restart you should see the POST screen.
- Edit the 9600_GS vBIOS and adjust the settings (copy from 9600_GT – the power states)
- Flash the moded 9600_GS to the card. Here we are not using the (-r) option because we are the Erasers
nvflash -4 -5 -6 -L Log.txt 9600M_GS.ROM - On the next restart everything must be OK.
- Installation/Configuration of the Nvidia Video Driver.
- Performance test
In a case of a problem I always have a joker in my pocket.
PS: I have many pockets.
Last edited by a moderator: May 12, 2015 - The first step is to flash the card with the original vBIOS – yours VBIOS (the backup) or mine.
-
Hi guys
finaly I received Log file:
View attachment LOG_SAVE.TXT
I dont know why, but this card absolutely not working in my C90S
If nvflash isnot able to find the card - i see no way how to continue.
Dammit, i think is dead
BUT:
I baked my old 8600m GT in oven. Crazy homemade REFLOW.
and its working
I now, its temporary.... -
You are right that nvflash can't flash a video card that can't see. One of the reasons is the death of the card.
From the Log file I saw that you've tried to save the vBIOS and nvflash failed. Did you try to save the vBIOS under clean DOS (without any additional drivers)?
Please try to clean the card's golden pins with the IsoPropyl alcohol, wait 5 min. and give it a try again. Don't turn off the laptop! Check the log file and if the result is the same as the previous one, try to repeat the procedure 30 min. later. Put the USB stick and restart the machine (it must be running more than 30 min. until now). If the Log is saying that the card is missing then probably she is dead.
You can try the tweezers method but maybe the wise way is to return the card. -
I started DOS as clear as possible.
The Card is OK. Service check it and said that is absolutely in good condition.
Is clear, that card wasnt initialized by notebook. Question is why.
1, I used my original PSU but I dont think its reason for that. Doesnt matter if power comsumtion diff between 8600 and 9600 is 3 or 10 W. This is question of stability of whole system in the case that all components are in use. And they are not in start up time (DVD, sound card, all USB ports....)
2, BIOS of card is locked and reject to be initialized.
3, BIOS of notebook is not able to initialized card. What BIOS do you have? I have 1002 -
Because the vBIOS is locked! I already described the procedure how to unlock it. Its risky if you are not careful and without someone to assist you.
At first you should to backup the current vBIOS and if you succeed then thats a confirmation that the card is accessible. Compare your vBIOS with mine. Use nibitor to gutter more information.
Mine is 1002a. -
Hello. The soldering operation went well but the vBIOS still refused to flash. I had to go the hard way and solder the chip from 9600M GS to the GT. This went also wery well and it is working now. The Touchsmart really sees the card as a GS (i think because the chip contains compatibility with GS only) but the clocks are correct. The Nvidia drivers still installed correctly for the GT model. Everything is fine and dandy it seems. Thanks for the valuable information and tips, because without those this operation could have been a disaster.
-
Congratulations! Im very glad for your success!
The physical replacement of the vBIOS chips was the final difficult and working step. You did it and credit is entirely yours :thumbsup:!
Please can you post your current vBIOS?
BTW you should make a backup for safety. Also you can flash the original GT chip with the original GS version. In that way the previous card will work too. If you are interested I will post the link with how to do that. It requires additional equipment that is priceless when you need to flash the broken system or video BIOSes.
Good work Alajarvi84 :thumbsup:! -
Hi Guys
I own an original Asus C90s.
My Nvidia 8600GT burned down, as known to be a faulty GPU.
I have acquired a new/used Nvidia identical card.
I want to change the thermal pads, but Asus support or no one can answer me how thick or which of these pads it have to be and which ones to use, both for the GPU core and the 4 memory chips.
View attachment 116131
I have found a partial answer on this thread but this is for a replacement to an HD4670 card, where i still have a nvidia 8600gt:
Asus C90s MXM Upgrade
"Your purchase will include a heatpad for the GPU core (one of our 17W/mK pads) and 4 for the memory chips as the original pads are only paper thin.
When we put the entire thing together, we were lucky that all components on the board did not interfere with the heatsink even though one component passed it with nothing to spare. As the drilling of the holes is a bit rough in terms of positioning you may be as lucky.. or not. In which case some minor 'surgery'on the heatsink might be needed.
In the picture the heatpads.... "
I can choose form this thermal pads form this shop (other buying suggestions are more than welcome):
Thermal paste ect.
Thermal pads
Hope anyone can help.
Thanks
Reda
[NW] Upgrade the C90S to a 9600M GT 512MB DDR3 [FIXED!]
Discussion in 'Asus' started by NightWalker, Oct 31, 2008.