Oh okay, great. Thanks!! Can't wait to do this mod.The instructions are still the same as in the original post, right? Not sure if Asus has changed any connectors or what-not in the year since this was published.
Thanks all!
-
-
yep, good luck dude.
-
hey ncc1701k
I am talking about the keyboard power source.
It appears to have 4 pins.
On the picture on the first post it appears that the outside left is for 5v, and the outside right is the negative.
MY question is regarding the soldering. So i have to solder them together? or just the outside pins? ( I will use the GLUE stuff) -
How about the U36jc
-
Whoa what do you mean together? The 5v goes to a random power source from the board, and the other (negative) goes to a screw as a ground. These shouldn't be connected together in any way.
The two pins in the middle are for 'data', which is for controlling the backlight intensity, but we don't have that so it's just "on" all the time.
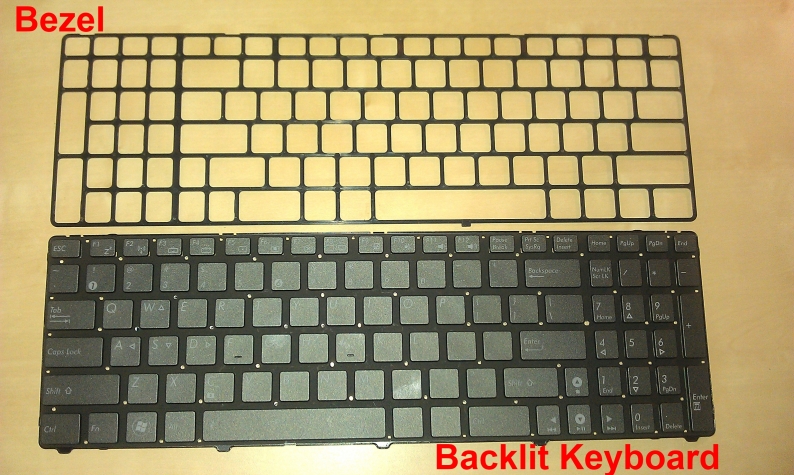
The keyboard is the same size, so it will fit. But, expect to encounter a lot higher difficulty in that one, since the top plate of the keyboard is part of the chassis, rather than the keyboard as it's own piece. -
Nobody was able to install an automatic light sensor (photocell/ambient light sensor) to turn this on in low light situations? Mac's have these next to the camera, and also blackberrys do as well for screen brightness and keyboard illumination.
-
You do realize how complicated such a mod would be right? For such a little gain.....
-
How do you figure? It can be had for $1-10 and would just replace the functionality of a switch.
-
You have to modify the bezel, mount the sensor. Power the sensor and its switch circuitry. Isolate a power supply for the keyboard light, run all the needed wires between the keyboard and the sensor.
I will admit, I originally though you meant a variable brightness based on the ambient light which would then need a PWM controller as well since LEDs are not very good with variable voltage levels. The simple on/off switch is simpler but still a considerable project. And again......not worth it (At least to me) -
Omg!! How the heck do you open the dang keyboard?1?!
I see the 4 pin things that pop it up, but i have pressed them every possible way and cannot seem to even pop one open!
Someone help me! Yes i am using a flat screw driver. -
Just twist your screw driver to unclip it. Or you could try poking towards the display end (not sure if that made sense).
-
You really don't need a back-lit keyboard if said keyboard it is bright and shiny like my stunning metallic silver hp dm3 3012...the afterglow of the screen lights it up quite adequately in dark room and the black letters on the keyboard are easy to see if you absolutely have to look which I normally don't unless it's like f12 or something.. Does Asus have any silver keyboards on any of their laptop models?
-
lol if people need a backlit keyboard, they'll know. And I've had a dm3, briefly. Sure, they keyboard is visible ... and if you can touchtype, you're ALWAYS fine ... but honestly? Not a good example. What if your screen brightness is down - suddenly, you can see the keys but not clearly. This is a great mod, and a good starting point for people just getting into electronics modifcations.
And stunning isn't the word I'd use
Asus has several models with a brightness sensors that changes the screen brightness depending on conditions. Too bad that every MBP I've seen changes brightness when someone walks by and casts a shadow on your screen for a moment. I'd hate to have my keyboard brightness changing like crazy, like that. -
Hi guys!! Yesterday I bought an ACER Timelinex 3820TG-5464G75nks in Germany and then the backlit keyboard with the Italian layout. Also for this notebook there is the possibility to make this mod (this is the thread). I think I'm gonna make the backlit mod with the ON/OFF switch in the kensington lock hole getting the power from the usb.
Just few questions:
1. what happen to the usb port when the KB is on?
2. I would like to try to make the mod without soldering first, so I want to use Wire Glue or invent something with this conductive trace pen where I'm able to do it. If not I will solder or maybe do anything (for warranty)
3. I saw some of you were able to make an ON/OFF switch with a touch sensor (very cool), is it possible to do this with the the 3820 as well? In this case is there someone that wants to try to build one for me if possible, I will pay?
4. Otherwise I will try to build the normal switch like Hendrickson and Bronsky did for the ACER, but I don't want to remove the kensington lock bracket and modify other parts if possible. This is the suggested switch to use, but it needs some fitting and modifications, so I'm looking for different types of switch that can pass through the original kensington hole. I found these, what to you think geeks?
SSAB010200 ALPS Slide Switches (not is stock now )
6VDC 0.3A DPDT Slide Switch - RadioShack.com
SPPH240100 ALPS Pushbutton Switches
101-35-5100-EV Mountain Switch Basic / Snap Action / Limit Switches
SPST Submini Slide Switch - RadioShack.com
2-Pack 3-Amp SPDT Sub-Mini Slide Switch - RadioShack.com
DPDT 0.5-Amp Hobby-Type Knife Switch - RadioShack.com
DPDT Submini Slide Switch - RadioShack.com
I'm not sure about Volts and Amps, I need some help. Thank you guys!!!
-
Does anyone know if speaker wire would work for this mod? (Like this one: Amazon.com: Boss SP18-50 18G OFC Speaker Wire (50 feet): Electronics)
EDIT: Is anyone willing to sell me their leftover wire glue + wire?
-
I would say no to the speaker wire, it is way too thick. You want something more like 30 gauge wire. You can find such wire pretty easily at radioshack or any hardware store, it shouldn't cost much
-
Ya as said above... that is wayyy too thick. If you got some junk headphones or something you can cut that up.
-
I see... thanks.
So I'm contemplating whether or not to do this mod. I have zero experience working with electronics and wiring so it's kind of scary. But I really want a backlit keyboard for the awesomeness.
Also, the price is kind of steep for what is essentially installing LEDs... 40+ for the keyboard on eBay and $10 for the wire glue (shipped from 3rd party vendor on Amazon, OOS on the OP's link).
Soooo tempted... -
pretty easy, for a first time project, ESPECIALLY with wire glue. Worst case scenario, you short it somewhere and it doesn't work.
-
If having a 13" is not all important to you......you can just get an Alienware M11x off the Dell Outlet pretty cheap right now - probably about the same as you could sell the Asus for. Same CPU, better graphics, better screen (same resolution), best backlit solution on the market. The warranty is amazing as well.
The only cons are the battery life will be less since it is just a smaller battery (no choice in an 11") and the keyboard is slightly smaller. -
Anyone want to sell me their old keyboard that they replaced? I screwed up the kb on my u35jc and need a replacement. Let me know if you have one in good condition.
-
You're probably going to get about the same deal as on ebay ... ~20 or so.
-
I just bought a bunch of these tiny switches that you can put in the kingston lock slot.
![[IMG]](images/storyImages/img2215o.jpg)
-
where did you get those switches? also, i am looking to swap a backlit keyboard onto a asus n43jf-a1 laptop.. its a 14".. would this keyboard from the ul80 fit? i cant find anything telling me what size the n43 series keyboard is.. any help??
-
I got the switches on ebay from a hong kong seller, shipping took forever, I wouldnt recommend it...
The u80 keyboard should fit, as Asus uses the same keyboard across all of its 13 and 14in models.
Just make sure your keyboard has 5 slots on the top that you can stick a flathead screw drivers in to pop it off. -
The keyboard should have 4 slots on top, not 5 haha.
Also... that N43 laptop seems to use a different keyboard compared to the new chiclet one... you should measure the width of the keyboard and see if it fits. If it is 302mm then it should work, but I won't guarantee it. -
oops sorry, it's been a while since I sold my UL50.
I didn't realize the n43 had the new non-chiclet keyboard either.
The best bet is to take the keyboard out and measure it with a ruler for width, height, and depth. And we'll see if it's the right size. -
I'm still having doubts. Don't know which way to go.
I like the touch sensor, but I don't know if I can do it. I only have experience building desktops and don't know squad about notebooks. Is it hard to do?
Also... I can't solder. So I would be using something like glue wire, only I read some bad things about it. Does any of you have experience with it?
The list I have right now:
- U80 backlit keyboard from ebay (seller 91deals) Original New ASUS U80 series Backlit Keyboard US Black - eBay (item 310209685290 end time Mar-21-11 03:50:30 PDT)
- the touch sensor: QUANTUM ATMEL|QT110A-ISG|SENSOR, QTOUCH, 1 CH, LO-VOLT | Farnell Nederland > Is this the right one?
- Wire Glue: Geleidende lijm Wire Glue - Soldeer-reingingsmiddelen - Conrad Electronic > Is there an alternative, because the reviews aren't that good if you ask me. Also, is it possible to remove this stuff if/when I make a mistake? How do you do this?
- Thin wire... would this do: http://shop.conrad.nl/componenten/kabels/draden-aders/enkeladerige-draden-h05v-k-en-x05v-k/608320.html ?
Is this the right kind of wire? It's .5mm thick (also available in .75 and 1.0mm ) and 22 AWG.
Like I said, I don't know jack shat about this, so do you think it's wise to do this? -
Anyone have a good pic of the ground wire hooked up to their UL30? I don't see any hooked up pics in the OP's post.
Also a pic of the 5v wire hooked up to a USB port would help a lot too! Thanks -
can this work on the asus ul80jt-a2
-
anyone know if this can work on the asus ul80jt-a2
-
If you can't solder, I recommended wire glue due to the fact that if you "screw" up, the consequences are a lot less severe. Also, wire glue is easily removed once it dries, so it's forgiving if you want to keep your warranty.
I can't really comment on the sensor, as I wasn't the one that invented that mod haha.... You might want to go to 24 AWG or even 26... there isn't very much clearance under the keyboard.
If you don't really know what you're doing, I suggest playing around with random circuit boards or something... such as tearing apart an old radio and messing around with that. The main concern is to not have anything short out, as it is entirely your responsibility if anything goes wrong, and I doubt warranty would cover it.
It should be grounded like this on one of the chassis screws: http://www.inspectorblues.com/blog/wp-content/uploads/2008/09/ground-screw.jpg
Be sure to tape it over to prevent any shorting and such.
Yes. -
Is this wire OK for the mod? I stripped it from some old headphones: (I'm not sure if the different colors mean anything? Are they all the same?)
![[IMG]](images/storyImages/kUXtQ.jpg)
-
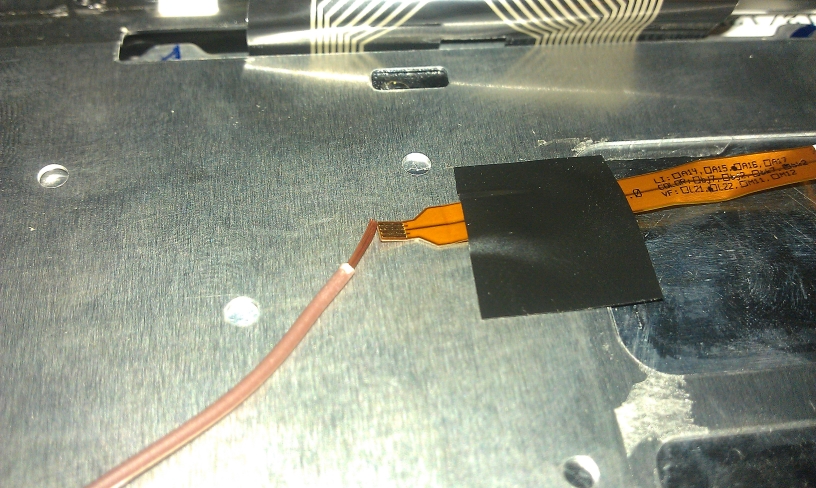
I'm doing this mod on my N61vn, stealing the power from a USB port. I have found something interesting, the backlight port on the mainboard normally doesn't work, but if you ground the last pin on the left side, the backlight works
. I don't know if this can be useful or not, i'm not a skilled tech.
Pics are from a phone camera
Overview
![[IMG]](images/storyImages/yp0mpd0x29e6sfqszn_thumb.jpg)
not grounded
![[IMG]](images/storyImages/purceq9vpezxx5jy3u9n_thumb.jpg)
grounded
![[IMG]](images/storyImages/ij7s6qainy7ttm632of_thumb.jpg)
-
Hi
Can you please give more information how u proceed with the connection of the backlit Keyboard on the Asus N61.
Thank you -
Read this guide to disassemble the N61vn.
http://www.gentechpc.com/Asus/N61JQ/N61VN%20Series%20Chapter%2002-v1.0.pdf
Im stealing the power from this USB port because i dont have a multimeter here and i wanted to be able to turn off the light by disabling that port. Unfortunately, even if i disable that port on the device manager, this lights are still on, i dont know why this port is always energized . It is in the same board of the Power switch.
![[IMG]](images/storyImages/xsepljxdy04ure5fl24.png)
Be extremely careful while woldering!
I had to split the backlight cable to solder and added some black tape after that. (ignore the transparent tape please, its not the final version )
![[IMG]](images/storyImages/c0e58dhsmr97p2tec2gp_thumb.jpg)
-
Hey Pache and everyone else.
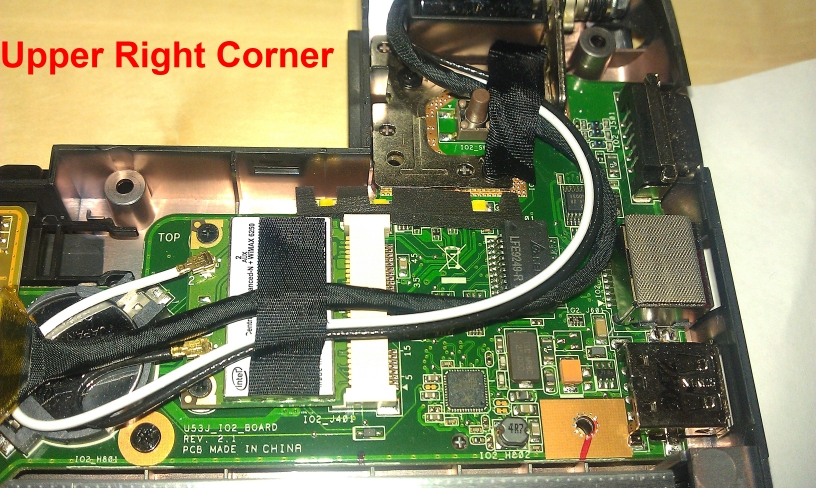
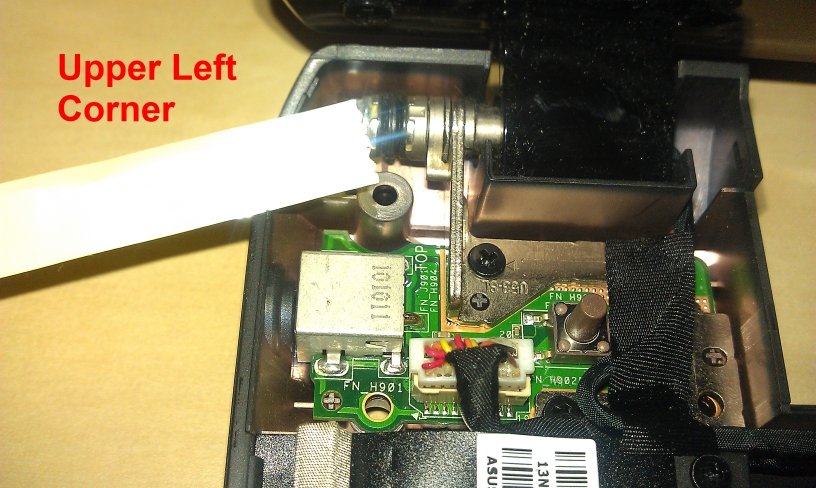
I have been reading this and related threads about the backlit mod and I am currently trying my own "luck" with the new ASUS U52F laptop, which has an ASUS U53F motherboard present. I received a backlit keyboard in the mail (ordered from eBay) and started dismantling everything. Now that almost every part has been taken apart, I realized the keyboard of the laptop is pretty much integrated with the entire case, which means I would have to detach the actual keyboard from the bezel; I have done this procedure with the newly purchased backlit keyboard to make sure I do not break anything (except the tiny solder-like plastic joints that held the keyboard tight with the bezel). I would be able to install the backlit keyboard with my laptop case, but before I do so I need to know where or how I can connect the +5V and the Grnd on the motherboard.
I have attached some pictures that hopefully clear some "inconsistencies".
PS: I am not much familiar with electricity itself but I would be able to follow instructions throroughly.
Thanks for eventual answers in advance. -
I would love to help but I don't see any pictures.
Try upload your pics with photobucket or imageshack, then paste the link. Make sure to use high res pics though, so we can see clearly all the details of the motherboard. -
Here are the pictures:
Sorry, I had some troubles uploading them.
-
Thanks. Your best bet would be to find a usb port. The one on the upper right corner looks like USB 3.0, so I wouldn't mess with that.
Can you take a close up of the lower left corner? It looks like there are a couple of usb ports there.
Also, are you planning on using switches to turn the keyboard on and off? If so I dunno if you looked at my early posts, I bought like 100 of those tiny switches and I can give you a few for a couple of dollars. -
Thank you for your quick response. If I really decide to do it, which will most likely be the case, then yes, I would definitely buy some from you as it seems to be hard to find any of this kind online.
Lower Left Corner:Attached Files:
-
-
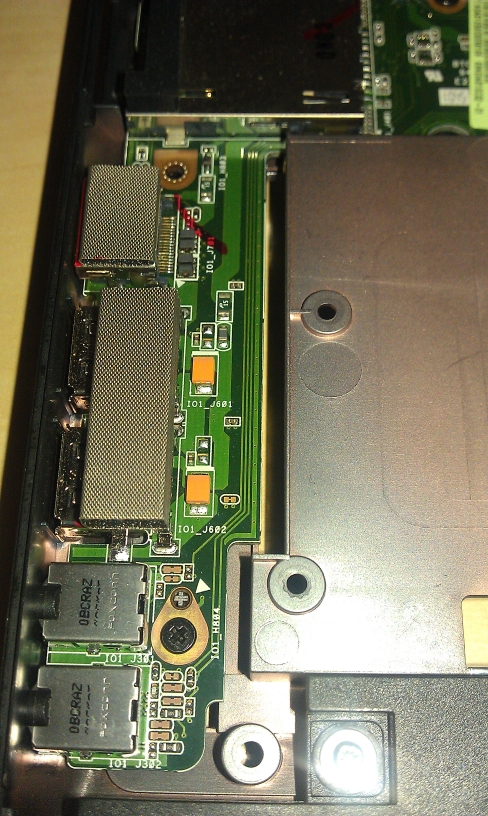
It seems like the soldering points of your usb port is covered by a piece of anti static shield (blue arrow)
![[IMG]](images/storyImages/capturefz.png)
If you can remove it (just peel it off, you can put it back on later), I'll be able to tell you which one is the positive 5v source. -
Now it's off, I hope that helps. I am currently working on adjusting the keyboard to the cover/bezel of the laptop. What a mess, I tell ya. Thanks again!!!!
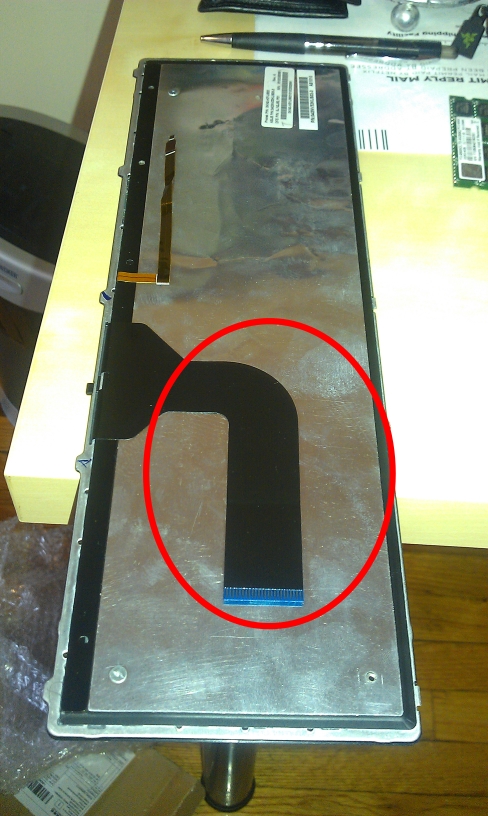
Another question while I'm trying to make everything fit here: Can I fold the large "cable" of the keyboard one time? The cable of the new keyboard points in the wrong direction, which means it points to the right instead of straight like the old one...please see picture.Attached Files:
-
-
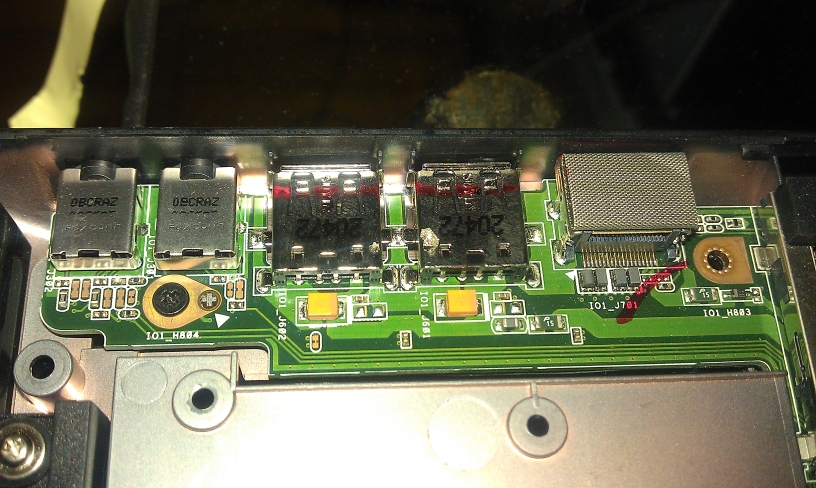
I see, here's the two solder point where i think it's +5v
![[IMG]](images/storyImages/capture1z.png)
I know it's a bit small, so just be careful to make only a point contact. I hope you have a precision soldering gun. As for grounding you can just wrap a wire to any motherboard screws.
And yes i think you can bend the keyboard cable no problem, these flexicables are usually pretty sturdy. Props man, you're probably one of the first guy here that did a backlit keyboard with the "integrated keyboard" design that Asus uses on their new-ish U series. Let us know how it goes! -
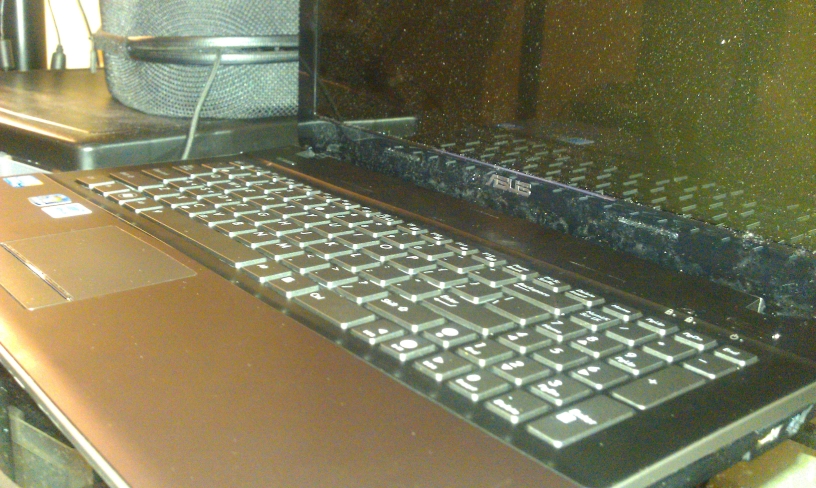
Sweet, thank you so much. It was a pain in the butt but I managed to integrate it successfully and it looks and feels just like the original one - with a slight difference in color as the backlit keyboard is anthracite whereas the original one is black; but I have to admit I like this difference.
The backlit, however, is not connected yet (too tired) and I am still thinking whether I should go with soldering or wire glue, what would you recommend? (I am a rookie in soldering but capable of doing it)
Here two pictures of the installed keyboard:
I will post a small how-to when I get everything done as I can imagine some people might not feel comfortable touching this laptop in particular based on the "integrated keyboard", but no worries it's not that bad. -
Nice job, does the keyboard feel more sturdy now? The backlit ones supposed to not have that much flex.
I would recommend soldering, since it will definitely hold up in the long term. -
Thank you. Yeah, the keys of the new keyboard are not as "soundly" as the old one; nevertheless, it's still a pleasure to write with as I'm a big fan of flat keys!
Say, I have a question regarding the connection of the backlit keyboard:
I came across a "disassembly how-to" from ASUS describing the exchange of the backlit keyboard of the ASUS N61VN. I noticed the picture (Pic 1) and thought about the unused connector of my own motherboard (Pic 2 & 3) --> Could I connect the power cable for the lights with this connector or would this fry my board? The reason I ask is because it looks so similar to the one in the ASUS manual as the end of my cable is as thin as the one in ASUS' picture.
Pic 1:
![[IMG]](images/storyImages/33070587.th.jpg)
Uploaded with ImageShack.us
Pic 2:
![[IMG]](images/storyImages/49548735.th.jpg)
Uploaded with ImageShack.us
Pic3:
![[IMG]](images/storyImages/85810471.th.jpg)
Uploaded with ImageShack.us -
It's not going to fry your board by connecting the backlight cable. I think a page back someone said that shorting one of the pins forced the backlight to come on.
From your pic though it doesn't look like the right kind of connector on the board. I could be wrong...
-
yeah trying shouldn't hurt, although I highly doubt Asus would leave a random keyboard light port on the motherboard and NOT put any backlit keyboard. Also the light control is fn+f4 and f3 for these keyboards, and I'm pretty sure they do something else on non-backlit keyboards.
-
OK, I finally received some more tools to work with and I also figured I cannot use the unused connector on the board as nothing happens. I will try my luck with wire glue first and see how that goes.
Quick question: Looking at the picture below, which pin is for the 5V and which is GRND? I really don't like the fact that this connector is so small at the end, which makes it hard for me to connect the "thick" but standard cable.
How bad would it be if I connect the 5V to the GRND by accident?Attached Files:
-
UL30 Backlit Keyboard Mod
Discussion in 'Asus' started by Soulsaber, Mar 8, 2010.


![[IMG]](http://img695.imageshack.us/i/img2215o.jpg/)


![[IMG]](http://www.imageurlhost.com/viewer.php?file=yp0mpd0x29e6sfqszn.jpg)
![[IMG]](http://www.imageurlhost.com/viewer.php?file=purceq9vpezxx5jy3u9n.jpg)
![[IMG]](http://www.imageurlhost.com/viewer.php?file=ij7s6qainy7ttm632of.jpg)

![[IMG]](http://www.imageurlhost.com/viewer.php?file=c0e58dhsmr97p2tec2gp.jpg)

![[IMG]](http://img842.imageshack.us/i/capturefz.png/)
![[IMG]](http://img41.imageshack.us/i/capture1z.png/)
![[IMG]](http://img5.imageshack.us/i/33070587.jpg/)
![[IMG]](http://img135.imageshack.us/i/49548735.jpg/)
![[IMG]](http://img805.imageshack.us/i/85810471.jpg/)