I can't offer you any advice because I'm still at least a week out from receiving mine, but I am very interested in reading about your results because it's something I would like to do as well. Good luck!
-
Yeah my caddy is supposed to arrive tomorrow and the Force GT SSD is supposed to arrive tuesday. I think I'm going to play around with the caddy this weekend though and just add another regular harddrive to it, and see how things turn out. I've got a spare 100GB 72k drive I can use for testing, so hopefully I'll have some results this weekend.
Ideally what I want to do is not have a recovery partition on the SSD, because it's only got 120 GB (111 usable). So I definitely don't want to waste precious little gb's for a 12GB recovery partition. I'm hoping I can set up the recovery partition to reside on the 2nd bay hard drive. I think that should be pretty easy, because obviously the recovery software will be able to recognize and pull the image from the 2nd bay drive during a recovery.
I am very open to any tips or suggestions about just how to go about getting a factory restore on the new SSD, without having the recovery partition, and then moving the recovery or copying the recovery to the 2nd drive. I have some pretty good ideas, and I think I'll be able to do it, but feel free to advise. -
RaMMiT and Bluecreek: Please, PLEASE post your results/troubleshooting when you get the caddy/SSD's! I really want to do the same thing, but also read that thread from 3 months ago about Windows not booting, so I hope the caddy helps out.
Best of luck! -
Ok Guys - here we go. I received the harddrive caddy today, so I'm going to attempt to test this out (in preparation for my Corsair SSD) by switching my primary 750GB harddrive with a spare 100GB harddrive I have lyin around, and install the 750GB drive into the harddrive caddy. This is essentially the exact same thing I plan on doing once I get the SSD, so this will be good practice
") .
.
I'm also anticipating being able to set up a dual boot system here too (for all you linux/ubuntu users, this might interest you), because if you power up into the boot menu, you have the option to boot from several different sources (obviously), so what I'm hoping for is the ability to boot from the 750GB drive (which already has win7 and everything installed of course) while it's in the caddy. I can't imagine why this wouldn't work flawlessly, because once the drive is in the caddy, it's directly connected to the mobo via SATA, so there shouldn't be any problems. But I'm going to test that after I attempt to get my freshly wiped 100GB drive "recovered" with Windows 7, using the USB boot drive I made with the Dell Windows 7 Operating System Recovery CD.
I'll keep everyone posted (with pictures!.
-
Phew.. after a few silent prayers and hail marry's -- I'M IN!
-
Wow. It looks so nice in there. Compared to like Asus, or Acer laptops. The internals usually are just fugly. By the way since you have it open what kind of HDD is Dell using in there?
-
Ok - Here it is all opened up with the components I needed to remove, out. Sorry for picture quality, I had to compress, and they were takin with iPhone cam - so noot the best of quality. But to answer Fenikkusu - the harddrive is a Western Digital Scorpio Black. And as I've mentioned earlier, it spins at 72k and accomodates 750GB's. I must admit, it's actually a very speedy harddrive. Just with my current configuration (no SSD), I cold boot to my login screen in about 30-35 seconds. So really not bad. But like all things in life, it's just
nevver gunna be quite fast enough
. Here's the pic:
If anyone wants to see anything specific, let me know quick because it won't take me long to perform the mods I need to, and then I'm gunna start puttin 'er back together. -
Awesome. That is good news. I intend to keep the HDD when mine arrives, the price of SSDs is too high for the amount of storage. I generate and keep too much data and it's not worth the trade of for me. I have 1.75TBs of data stored already on and off my current laptop.
-
Here she is all put back together, with the temp Hitachi 100GB in the primary slot (while I anxiously await the Corsair SSD) and the newly installed 2nd bay caddy with the factory 750GB drive installed, in place of the optical drive. Just a quick comment for anyone who's looking to repeat this, the stock brackets that hold the optical drive in place were a bit tricky to attach to the new hard drive cady; particularly the bracket that holds the coin-cell battery in place. It wasn't too big'a deal - I took an icepick and widened the screw holes a little in the bracket to get a more flush fit with the new caddy. Easy fix. I'll keep the updates comin'
-
Success! So the computer is back up and running. The process didn't go exactly as I expected, but looking back I should have known it would work out the way it did. So basically I assumed I'd be able to boot from the Win7 Recovery USB drive I made, and install windows onto the primary drive, which I had replaced with the blank hitachi 100gb. I was able to boot into recovery from the USB drive, but it wouldn't let me continue because it was looking for the DVD driver, which it couldn't find. This initially made me nervous because I thought i was going to run into the same problems that I read about that another user was having, who was trying to attempt the same thing. He definitely wasn't using this caddy though because he claimed he needed a different power cable for his caddy because he said the optical drive used a different cable than the harddrive. I'm not sure what he was talking about, because both drives are SATA and both use the same connectors. Plus there are no cables involved with this caddy. It plugs into the SATA connector on the mobo without any issues. But anyway..
Then I realized it wasn't trying to install windows on the primary drive, it was trying to repair the version of windows which was already on the stock 750GB harddrive that the computer came with, but which was now in the 2nd bay caddy. So that's why it was looking for the DVD drive - because the DVD drive existed in the version of windows on the 750GB drive, so windows repair must have assumed that must be a problem.
So I backed out of setup/recovery and just started the computer normally. The computer booted into "windows developer mode," which is not something I've personally seen, but all that did was basically repair the boot order. So I assume it corrected the MBR on the 750GB harddrive in the caddy, so that the computer would know to boot from that drive (since it has windows on it) instead of trying to install windows on the primary drive (the 100GBer). So it fixed it, rebooted and everything booted up like a charm. So it basically just pointed the drive letters to the proper partitions on the 2nd bay slave drive, and the primary drive is just an extra 100GB drive (letter E I have access to in My Computer. Also, the DVD drive is still showing up in my computer even though it clearly isn't there. I'm sure that's just cuz it
was there when windows was initially set up on the drive, and I'd probably have to manually remove it for it not to show up.
Curiously a new partition also popped up called "System Reserved" N: (which is only 137MB partition) but now that I think about it, I believe that partition was automatically created on the primary drive when I booted into recovery from the USB drive in preparation to install windows on it (and before it found the other version of windows on the slave drive).
So all in all, this worked out great. When I get the Corsair Force GT SSD on Tuesday, I'm going to format the 750GB drive completely, and remove all partitions so as not to confuse the installation of windows onto the new SSD drive. I think I'll back up the recovery partition just to be on the safe side, but I think this process will go very smoothly on Tuesday. I'll keep everyone who's interested in the loop.
Also just one final note. During the hardware installation you have to disconnect the coin-battery from the mobo, which powers the BIOS. So when you first turn the computer back on, the BIOS has lost it's time setting and the computer will make these loud drawn out beeps at you every 3 - 4 seconds until you have corrected the time and rebooted. This initially made me nervous because no one likes their computer screaming at them after they just made a big change to the hardware. So anyways - i was minor but just a forewarning for anyone who repeats this.
Let me know if anyone has any questions about the process. -
Someone should take your posts here and copy them to their own thread for a guide. I have a feeling a lot of people would rather have the second hard disk instead of the optical drive.
Rep for you. -
Also can you take a pic of the slot with the caddy installed? Just curious if it looks goofy or anything.
-
I tell ya what, I basically have to repeat the entire process tomorrow when I get the SSD, because I plan on formatting the 750GB so I'm going to remove it from the caddy for an easier process. So I'll take detailed step-by-step photos while keeping good notes and once I'm done, I'll package it all up into a .pdf. Or if anyone has any better suggestions, I'm open.
On another tangent, I'm actually still torn on whether or not to leave the recovery partition on the 750GB drive after I format the OS partition. I'm wondering if I'd actually be able to recover from it (if it's in the 2nd bay) but still recover windows onto the primary SSD. I'm not sure how that's gunna work, but I do know one thing - with only 111GB's of usable space on the SSD, I am definitely not wasting 12GB's for a recovery partition.
I'm still very much open to procedural advice on this "operation" tomorrow. If anyone is particularly savvy with mixing SSDs and HDDs, and if the recovery can reside on the slave drive, I'd REALLY appreciate the input, and I'm sure a lot of other people would too. -
Great work! Very thorough details and warnings. You convinced me and I just ordered that slave caddy you linked to. Probably be here before the laptop, which is STILL sitting in production.
-
I am wondering if there is anyway to have the volume and brightness keys etc. work without pressing the fn button. Id rather have to press the fn button whenever i needed to press f1-f12 which is almost never. any ideas?
-
Be sure and follow the guides that Dell provides here. : Documentation. Good luck! By the way, what SSD are you going with? I did a lot of research into it and the Corsair GT is only 2nd to the OCZ in terms of performance, but seems much more stable than the vertex 3. I'm curious what others were thinking..
Anyways - I have all my parts! So I'm finishing up making the Recovery USB Stick and them I'm gunna install the Corsair SSD. I'll post pictures. -
It's an option in the BIOS. I forget exactly which tab it's on (I think the 3rd one) but it's with the USB settings. Should be under Fn Action or something like that, and you want to change it to "media" so that it defaults to the media keys and requires the Fn key for the function keys (F1 - F12). Also, of course, make sure you have the latest BIOS firmware too.
-
an easier option is to open windows mobility center. its just a switch in there.
-
Let me be clear: This upgrade is NOT easy.. But through extensive experimenting, I think I've got the process nailed. Stay tuned, and I'll post a detailed, comprehensive step-by-step tutorial. I'll either throw it in a .PDF or make several posts (I think the PDF approach is less spammy for the message board for those not interested). I'll keep ya posted. -
Got my 15z yesterday. Immediately swapped the spinner for the SSD (M4 128GB.) Other than the screws which seem MEGA easy to strip it wasn't too bad. Went ahead and repasted the CPU and GPU at the same time. The stuff that was on there didn't look horribad to be honest but at least now I know some quality stuff is there.
Pro tip: If you are installing Win7 from a USB key make sure to use the USB/eSATA combo port. The USB3 ports aren't native and require a driver to be loaded. Just use the combo port instead. -
Hi RaMMiT,
Could you explain what tools you used to remove the bottom cover of this laptop. I heard from others that removing screws and opening the bottom cover is bit difficult. Any tools and tips you have ?
Thanks -
I purchased a Crucial M4 a while back, read good things about it's stability even if it isn't the fasted on the block.
-
Hi BlueCreek,
I am also trying to get Crucial m4 128gb. Could you please tell me whether the XPS 15z using SATA III (6Gb) speed ?. What are your CrystalDiskMark benchmark results ?
Thanks -
With the updated firmware it's damn close. Regardless ANY SSD is a massive improvement over the spinners.
-
A jewelers phillips screwdriver is the easiest way. Most small phillips screwdrivers have too deep a point and risk stripping the screws. Find a jewelers version (or better yet buy a cheap kit at harbor freight or something) and you'll find that is grips the screws much better.
Don't forget the two under the port bezel. It just snaps right out. These are "normal" phillips screws btw. -
Well, the caddy came in yesterday and according to FedEx tracking, the laptop *should* be in today. So with any luck at all, this should be a very entertaining weekend.
Came in faster than I expected, so I won't have RaMMiT's guide to help me, but hopefully it won't be too difficult. I've always built my own desktops, but I've never opened up the guts of one of my laptop before. -
Absolutely true, which is why stability was much more important to me than advertised r/w speeds.
-
I'm very sorry I haven't posted my "official guide" yet ..the software end of this conversion/upgrade is a lot more complicated than I expected. The good news is I do have it all resolved though! And the guide is a work in progress; I hope to have it complete today now that the software end is FINALLy fixed.
Let me make some very important points though. First and foremost, if you plan on using Dell's Local DataSafe software to create recovery DVD's or a USB stick YOU WILL NOT BE ABLE TO USE THE RECOVERY TO RESTORE TO THE SSD. And it is through several phone calls to Dell tech support and hours of repeating the same story over and over and getting different answers, that I learned this.
Just to clarify, my 15z is a refurbished laptop so all it came with was the green (color is important) Windows 7 Home Plus DVD. It didn't have ANY of Dell's drivers or software installed when I booted it for the first time, I had to manually install them. So my first post on here was a request for someone to make available to me the recovery .iso, built with Dell's Local DataSafe software so that I could restore to the "as shipped" software state. This method will not work!
Well through enough b*tching and moaning with Dell tech support, they initially sent me the Resource DVD which is nothing more than the A00 Drivers; in other words useless. In addition, I wasn't able (and I'm still not able) to use smartsource.dell.com to download the 3rd party software that Dell includes. Finally, after literally 7-8 phone calls, they overnighted me a FULL SET of software DVDs which included a black Windows 7 Recovery DVD. It is only through using that DVD software set that you can truly restore the NEW hard drive to the as shipped condition. So let me reiterate:
YOU WILL NOT BE ABLE TO USE YOUR RECOVERY DVDs or USB DRIVE (made with Dell Local DataSafe) TO RESTORE THE COMPUTER ONTO ANY HARD DRIVE THAT WAS NOT SHIPPED WITH THE COMPUTER
Sorry for yelling, but I really want to drive that point home and warn people because it was through HOURS of installations and reinstallations and recoveries, all of which ended with either the restore being installed on the 2nd bay drive (which was insaaanely frustrating) or resulting in the "No Operating System Found" error when I absolutely forced the recovery onto the SSD.
I'll elaborate more in the guide I'm still working on, and if you have any specific questions, by all means feel free to ask. Otherwise, I'll post it up when I'm done, because I do have solutions for every scenario. -
Hi Rammi,
That is scary. If we can't able to use the recovery dvds to copy to new hard disc or SSD then what is the use of them ?.
Do you think cloning hard disc to SSD also have issues?
Thanks -
Well, I wasn't really planning on using a recovery image or any of the Dell software. I have an MSDN subscription, so am going to go with a fresh install. My plan was to:
1) Replace the HDD with the SSD
2) Fresh install of Win7 Ultimate (already ready to install from my USB flash drive)
3) Update Bios and SDD firmware.
4) Install dell drivers (already downloaded and ready to go)
5) Install the caddy & 750GB drive as slave.
I'll definitely check back later to see if you post the guide, but even if it's not ready, don't worry about it. I really appreciate the information you've already provided in your posts! -
In a nutshell, here are the options:
If you were lucky enough (or smart enough) to have purchased the DVD Software kit (I think it's a $20 option on a new purchase) with your order, then that's by far the best method. Just so everyone's clear, the DVD Software kit consists of 6-7 black DVD's which together provide all of the software included with a new purchase. Dell overnighted me the entire set because I made a big enough fuss that they finally relented and sent them to me for free. But I think they finally agreed to this (which was my original request of them) only after one of their techs took control of my computer, downloaded and installed Dell Local DataSafe (which was never included with my computer) - then we created a USB recovery drive (8GB minimum needed) and he assured me I'd have the option to recover to the SSD AND have drive control options, like the ability to format and create/manage/delete partitions, which I needed the ability to do because I was running windows from the 2nd bay drive at the time - so that needed to be formatted during the upgrade process of recovering and restoring to the SSD. THIS DID NOT TURN OUT TO BE THE CASE.
Dell's recovery is almost a completely automated process, and you have very few options. He told me I didn't need to worry that windows was already installed on the 2nd bay (which I correctly assumed would cause confusion for the recovery determining which hard drive I wanted to recover to).
So after going through the process, I immediately knew it was installing to the 2nd bay because I could hear it spinning, and of course, there's no way to stop it. After it concluded, I booted from the green Windows 7 DVD so that I could adjust the partitions, and format/delete them myself. Initially I deleted all partitions, then I recreated 1 partition on the SSD and 1 on the HDD. Figuring that now there wasn't any version of windows to interfere, I retried the recovery. Again it installed to the 2nd bay.
So after finishing again, I booted with the Windows 7 DVD and I again deleted all partitions, and this time I just created a partition on the SSD leaving the HDD as unallocated space. Tried recovery again. Same result: "No operating system found." After this happened, I booted with Windows 7 DVD again so that I could see what was going on with the partitions and I discovered that the HDD still remained as unallocated space, and there were two paritions on the SSD, one labeled OS and the other Recovery. So the USB drive did recover to the SSD, but I still was getting the No OS error. It was time to call Dell (AGAIN). And btw, yes of course I properly arranged the boot order in the BIOS.
So it was on this phone call that I finally learned that the recovery will ONLY restore to the hard drive from which it was made. Actually they explained that it would only restore to the factory harddrive, because my natural inclination was to just get a completely stipped copy of windows ON the SSD, then install Local DataSafe, again create the USB recovery, and vai la ..it would be recovering to the drive from which it was made. The techs told me no dice on that, and that they didn't even understand how Dell managed to deliberately prevent that from working, but bottom line is ..it wouldn't. It was at this point that I pretty much flipped on em, and demanded to know how they expected people to upgrade their harddrives and still be able to have all of the software the computer comes with. Their solution was to overnight me the DVD software set.
So there's most of the story. But if you're an astute reader you might be asking how I was using the DVD's after I'd replaced my optical drive with the 2nd bay caddy. And the answer to that is I bought a USB 3.0 optical drive enclosure, which wound up saving me even more hours of frustration. So if I were you, I would definitely be adding the optical enclosure to your list of required components for this upgrade. You're going to need it anyway, because there will be that time when you absolutely have to use a CD or DVD, so it's worth the investment.
Ok, I hope I've answered most of the questions. If you don't have the recovery set, which I assume most of you don't, then pretty much you're only option is to convert your Windows 7 DVD into a bootable USB drive so that you can access the drive utilities you need, and install windows on the partition you create. But believe me - you are starting from scratch with this method. EVERYTHING will need to be installed.
And you might say, well why don't I just make a windows backup of the current windows partition im running and restore that to the SSD. I think someone should definitely try that, because it will probably work, but I knew I wanted to start fresh. Hope this helps. I have a tendency to over explain though.
-
That's probably the best approach. Only issue with that is having to take the laptop apart twice, and so much of my frustration was rooted in the fact that I was trying to find a solution without having to first replace the HDD with the SSD (without installed the slave) - recover and get up and running - then take it apart again to install the slave. I knew that would be the path of least resistance in terms of 2nd bay conflicts, but like I explained, I was lead to believe that the USB recovery would perform exactly as I wanted.
The method you describe is absolutely that "path of least resistance," and I had done that the night I got the SSD. After the first recovery fail, I installed windows from the green DVD and I was up and running in no time - with the 2nd bay drive - all working exactly as expected. But it was my pursuit of streamlining the process so that you wouldn't have to go through the nagging task of starting at square 1 with a stripped version of windows. I just wanted to be able to factory restore to the SSD, and get a "factory result" as if the computer had been shipped in this configuration. Sadly, due to Dell's strict recovery drive options, it just didn't work out that way. -
With a fresh install and not using recovery disks, you could still do this with only pulling the machine apart once, couldn't you? Install both drives, then in BIOS, set the drive order as USB, SSD, HDD. Install a fresh copy of win7 from the USB device onto the SSD and you can boot from the SSD Win7 and format the HDD.
-
Yeah - you got the gist of it. Here's a quick step by step:
1. Go and print the sections of the Service Manual for the 15z that you'll need. The sections you'll need are: Before You Begin, Removing the Base Cover, Removing the Battery, Removing the Coin Cell Battery, Removing the Hard Drive and finally Removing the Optical Drive. Don't catch an ego, follow the instructions.
2. Make your bootable USB drive from the Win7 DVD image, and I would test it before you take everything apart and make sure you can successfully boot into Windows 7 Setup from it. Make sure you're plugging all bootable USB drives into the USB 2.0/eSATA port! The USB 3.0 ports need drivers to operate and you won't be able to successfully install windows from either USB 3.0 port
3. If you successfully make it into Windows 7 Setup from the USB drive test, I'd go ahead and format the HDD while you're in there and delete the partitions. This isn't completely necessary cuz you'll have the option to do this after you've installed the SSD too, but it's just better to start with both drives wiped to bar any conflicts from the existing windows install. Got me? For those that don't know how to get to the drive setup, once you're in the Win7 install, go ahead and click "Install" and then make sure you click "Custom." That will bring you to the drive utility section which allows you to choose where to install windows. Choose advanced down at the bottom, and delete both partitions (system and recovery)
4. After you delete the partitions, I'd just leave the drive as unallocated space. You'll fix that once you've got the SSD in. So after the HDD is unallocated space, cancel out of windows setup and exit, which will restart the computer, but just press the power button once the computer shuts down and before it starts to boot back up.
5. Go ahead with the installation - remove the primary hdd, remove the optical, install the hdd into the caddy, install the caddy, install the SSD into the (now vacant) primary position, and close 'er back up making sure to follow the reverse instructions that each section you printed includes.
6. Then just start at step 2 again by booting from the USB drive (I'm assuming from step 2 you know how to change boot order), get into setup, click install, click custom, and now you'll have drive 0 (which is your SSD because it's in the primary position) and you'll have drive 1 (which is your secondary). Both drives should be unallocated space. Create a partition on the SSD first because Windows will treat the first partition as the installation source and also set up a small 100mb partition that it needs for temporary system files and drivers. After you've got your SSD partition made, go ahead and allocate the 2ndary drive into its own partition. Once the 2ndary partition is made, I'd go ahead and click format on it. That step probably isn't mandatory but formatting is very quick, and it just ensures there won't be any problems with windows recognizing it.
7. Install windows onto the primary SSD partition, and you're pretty much done. Should be the fastest installation of windows you've ever seen.
And one last thing, after windows installs itself make sure and change the boot order on the first restart because if it boots from the USB drive again after its already installed windows onto the SSD, you'll go through setup alll over again, which ya don't want. That's why for me personally, I don't change the boot order, I just use F12 when I start up to access the boot menu, but by default, my primary is the first boot choice.
Once you're up and running in windows, you're going to need either the ethernet controller driver or the centrino wifi driver (i recommend ethernet initially). Otherwise you will not be able to connect to the internet to download them. So make sure you have the driver beforehand.
Ok that's it I think. Lemmi know if you got questions. -
All right, thanks so much for all the details. The laptop was just delivered, so I'm going to print everything up and kick off for home a couple hours early to get started!
Once again, thanks for all the help you've provided! -
Ok, didn't get a chance to start working on it until later than I intended and I'm a little frustrated at the moment. Performing an initial format of the HDD went fine, adding the SSD as primary and moving the HDD to the optical slot all went great. Did everything in about 30 minutes. Could probably do again in half that time now that I've done it once. Really not that difficult.
I booted from the USB, formatted the SSD and started installing windows. It copies over the files and expands them, reboots itself to start installing the windows features and then does nothing. It just has a blinking cursor in the top left and cranks away with the fan on high, but never does anything. Tried three times now with the same results each time. Everything looks like it is going well up until the point windows is supposed to start installing the features. -
Did you change the boot order and/or remove the USB drive after the initial install of windows? Honestly it sounds like it's trying to boot from somewhere else than the primary (SSD).
I'm sure a lot of people scoffed when I talked about the software part of this being a lot more difficult than I expected. But this is definitely not a beginner's mod.
Try and give more details. What DVD did u make your boot drive from - what SSD are you using, did you reset the partitions, etc. I'll do my best to offer assistance. -
I have an MSDN account, so I used an ISO file for Win7 Ultimate.
When I go into the bios, the only HD showing is the SSD (Crucial M4 128).
But when I run the Win7 install from the USB, both do show. The SSD comes up as Disc 0 and the regular HDD comes up as Disc 1. I deleted both then created a new partition for the SSD on Disc 0. (I left the HDD on Disc 1 unformatted.)
Like I said, it goes through copying the files and unpacks them, then reboots to start the windows installation and at that point kind of hangs. I let the last time run for about 45 minutes just in case, but it never did anything.
If I do run the install again, the SSD still shows up as Disc 0, but the HDD is split into two, Disc 1 Recovery and Disc 1 Unallocated.
What I think I am going to do is crack open the case and take out the 750 GB HDD so that there is only HDD and then re-try the install. But probably tomorrow morning since it's getting late now. -
Ok, decided to try it out tonight after all and that did it! Leaving the HDD disconnected allowed me to successfully install Win7 on the SSD. I'll hook up the HDD in the morning.
-
I think Rammit was on the right track...did you check the boot order? Even better, when your 15z reboots after stage 1 of the Windows 7 install, press (actually repeatedly) the F12 key to direct you to the boot menu, then make sure you choose the SSD to boot from.
You can also just remove the USB stick during the first reboot, too, as the Windows 7 install doesn't need it (you can plug it back in once the SSD starts booting, if you feel like it).
Since I don't have two "HDDs" in my 15z, I can't say, for sure, how the system treats the HDD connected to the DVD connector, make sure in the boot options in the BIOS that the hard drive sequence is correct. You want your SSD to be the first hard drive in the HDD sequence.
Set your boot sequence however you want, and use F12 to manually choose the boot device during Windows 7 install.
Good luck! -
The problem was that the BIOS did not see the second HDD, only the SSD. So the boot order didn't even contain anything but the SSD. The Win7 install saw both drives, but even though I selected SSD (Disc 0) as the install, I think it still kept trying to install on the HDD since Disc 1 was the one it kept creating the Recovery partition on. But once trying to reboot, the bios (and boot order) only displayed the SSD.
Anyway, it took me about 2 minutes last night to take the cover back off and unhook the caddy. I closed the case (but left the screws out) and installed Win without any issues. This morning, I plugged in the HDD and now have my secondary drive and all is perfect. I've already finished installing all the drivers, which I had downloaded and organized a couple days ago in anticipation, and everything is running smooth. I need to update the M4 firmware and go through all the necessary Windows updates, but so far all the devices are operational and I am not having any issues at all. So, other than needing to leave the HDD disconnected during the install, it has been a pretty painless procedure. The caddy fit perfectly for me and all the screws and connections lined up perfectly. -
hi BlueCreek,
I am thinking to update the primary hard disk to Cruical M4. I am not doing anything with optical drive. Can you tell me the procedure steps to install new SSD . Did you update the firmware 0009 before starting the OS install ?.
Thanks -
It really very straightfoward. All you need to do is remove the 8+2 screws and then hold your breath while you pry off the base cover...it's really not that bad and then swap out the drives. The dell site (linked many times here) has all the details you need.
Then just go through the normal win7 installation routine. I did the win7 install and all the dell drivers (all downloaded ahead of time) before I did the ssd firmware, but it doesn't matter. Since you're not getting rid of the optical drive I won't bother explaining the process for updating the crucial firmware with a usb drive, though that is a bit different if you do end up swapping out the optical.
Oh, one other thing, the firmware instructions include a step for setting the sata connection type not not be AHCI, you can ignore that. I read in a post somewhere that crucial confirmed with the poster that step is no longer necessary. So I left at AHCI when I updated mine and had no issues. -
Here you go (w/ firmware 009)
Attached Files:
-
-
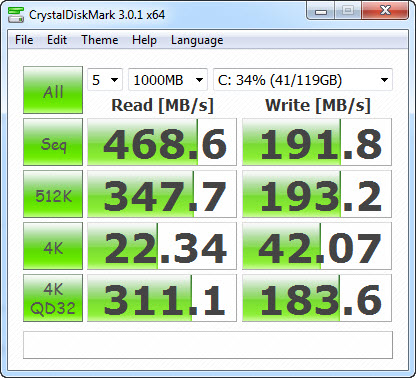
Pretty good performance from that Crucial Drive - better than mine in fact, which sort of surprises me. Here's my results:
![[IMG]](images/storyImages/SSD%20Performance.jpg) VS.
VS.
![[IMG]](images/storyImages/Crystal-Comparison1.png)
Don't get me wrong, this drive flyyyss. I have the facial recognition software installed now, and I can literally cold boot, log in with my face (lol) and have windows in a usuable state in 20-25 seconds. So I don't really have too much to complain about per se (especially since - knock on wood - the drive has not frozen up or crashed once) but my write speeds are waaay under par.
Anyways, anyone have any insight into why my write speeds are so low? Please check out this review on TheSSDReview.com (and click to page 3 to see CrystalMark Scores). My write speeds are lower than the Series 3! I have
not upgraded to the latest firmware, but that's mainly because they advise
not to if you aren't having any stability issues, which as I say ..this thing has been solid as a rock so far.
Would really appreciate any opinions on this.. -
Sorry, I wouldn't have a clue. The one I just put in was only the second SSD I've ever installed. I'll take stability over speed every single day and any SSD feels incredibly fast from a subjective standpoint. But I get where you're coming from, you still want to see the quantifiable results your expecting to.
-
Hi BlueCreek,
Could you tell how to pry off the base cover as it looks like hard to do it . Do we need to apply pressure at some position ? Or We just need to use force to fry off ?
Thanks -
( Allow me to give my advice on this...)
The trick I've used, about 6 times successfully, is to start where the ports are on the side. Gently (insert that term everywhere here) pull the bottom cover apart here. Then, starting at the back corner, as you are (gently) pulling the cover away, use a plastic credit card or plastic pry tool and apply pressure outward on the bottom cover as you also apply (gentle) pressure downward, pulling them apart. This helps to separate the plastic snaps that secure the cover to the palm rest.
Work your way across the back, and then along the side where the DVD slot is. Once you get it mostly done, you'll feel it "give". At this point, I lay the 15z upside down on a soft cloth, and lift the bottom cover up (gently), like the hood of your car, using the front as a hinge. At this point, the front should just come disconnected and requires NO PRYING.
When reassembling, work in the opposite direction, lining up the front first, and work my way around the sides, squeezing the top and bottom together. Ultimately, the front snaps will require a bit more pressure to get them to snap completely together. I use quite a bit of pressure, and haven't broken anything so far.
The first time is scary, but after that, it's not so bad.
Be careful prying off the port bezel. It's easy to snap the thin border plastic parts. -
I think I must have been just lucky considering how many people had issues opening the case. After I removed all the screws, it actually came off very easily without much prying at all. It stuck just a little along the back, but came up without much pressure.
-
Was your 15z from the Outlet or brand new?
New XPS 15z
Discussion in 'Dell XPS and Studio XPS' started by booboo12, May 23, 2011.