A couple weeks ago the motherboard on my XPS 17 stopped charging the battery so replacement was up and I figured what better time to re-paste the cpu and gpu.
Here is what was needed:
1. Small phillips head screwdriver
2. 99% Isopropyl Alcohol
3. Coffee Filters / Lint free cloth
4. Your favorite thermal compound. (There is lots of debate over which is the best to use. I used Arctic Silver 5 as it has served me well over the years)
5. An old card to spread the thermal compound. (I used an empty home depot gift card)
6. Patience
Before we get started, read the whole guide and make sure you are comfortable performing this task. While I don't beleive this will void your warranty (I don't know for sure), it will void your warranty if break it. I take no responsibility for your actions.
Dell provides excellent service manuals for all of their machines freely online. This is one of the things I like best about Dell support. The XPS 17 Manual is available at this link
The first thing you are going to want is a large clean work area. I have a piece of shipping foam with labels on it to keep track of the screws. Use what works best for you, but keeping them organized with make reassembly a LOT quicker.
I apologize for the lousy pictures, my camera seems to have disappeared and all I had was my blackberry.
Start by unplugging the A/C adapter and removing the battery. Leave the laptop upside down like shown here.
![[IMG]](images/storyImages/1backbatteryremoved.jpg)
Next, remove the any media card you may have installed or the blank in the slot. Now unscrew and remove the module cover over the RAM and hard drive bays.
![[IMG]](images/storyImages/3backdoorremoved.jpg)
Remove the memory modules by carefully pushing the side clips away from the module. It will spring up on an angle when released. Note this angle as that is the same angle you will need to re-insert it on. Carefully slide it out and repeat for all memory modules.
![[IMG]](images/storyImages/4ramx.jpg)
Next Remove the hard drive(s). If you only have one, remove the extra caddy, if you don't have an extra caddy then don't worry about this step. Remove the screw for the optical drive at the same time. Screws highlighted in red. When the screws are removed, grab the tab that says 'This side up' and carefully slide the drive away from the plug, once its out remove it. The optical drive should slide out the side now too.
![[IMG]](images/storyImages/5hddremoval.jpg)
Now, unscrew the 3 palm rest screws that are accessible now that the optical drive is out of the way.
![[IMG]](images/storyImages/6palmrestscrews.jpg)
Once the screws are out, find the clip in the HDD1 bay shown below. You will need to unhook that and then press it down. Now it gets tricky. You need to turn the laptop over and open the display while keeping that clip from re-attaching. Once the display is open, push up on the clip and the palm rest should come up a bit. Get your finger under the edge and slowly start working your way around. Be very careful. I think if anything is going to be broken, this will be it. Go slow, it took me about 10 minutes to get it off the first time. When its about to fully release, go slow as there are cables connecting the touchpad to the motherboard as well as another cable for the strip with the power button in it. Once out, turn it over and lay it down without putting any pressure on the cables. I didn't get a good picture of this, so take a look at the Dell guide if you don't understand.
![[IMG]](images/storyImages/7palmrestclip.jpg)
Here are the cables connected to the motherboard. You need to flip the little tab on top of each one up, then they should come right out. Set the palm rest aside. (see keyboard cables for an image with the clip up)
![[IMG]](images/storyImages/8palmrestcable.jpg)
The keyboard now needs to come out. Remove the 4 screws attaching it at the top then slide it towards the screen slighty to get the tabs at the bottom out, then flip it over.
![[IMG]](images/storyImages/9keyboardscrews.jpg)
Disconnect the cables. Mine is backlit so there are two cables to remove. Yours may only have one. These are the same as the palm rest cables, flip the tab up, then pull the cable out. Notice the clip on the keyboard is up in this picture.
![[IMG]](images/storyImages/10keyboardcables.jpg)
Next disconnect the antenna cables on the mini cards. I have the WLAN and TV Tuner in mine. Then unscrew the single and remove the card. Make sure the antenna cables move freely or taking the display off will be a pain.
![[IMG]](images/storyImages/11minicards.jpg)
Disconnect the display cable. Unscrew the screw in the top corner.
![[IMG]](images/storyImages/14displaycable.jpg)
Next remove the 4 screws on the display hinges. Note: Only one side shown.
![[IMG]](images/storyImages/12adisplayhinge.jpg)
Then close the lid and turn the laptop over. Remove the remaining two display screws. Then turn the laptop back over, carfully open the display then lift up. The display should slide out easily. Watch out for the cables.
![[IMG]](images/storyImages/13displayscrewsback.jpg)
Now, disconnect the bluetooth cable if equipped and then lift the card out.
![[IMG]](images/storyImages/15bluetoothcable.jpg)
Now flip the laptop back upside down and remove the 10 screws holding the top cover on. Note: RAM and HDD are installed in this image, they should already be removed.
![[IMG]](images/storyImages/16abottomscrews.jpg)
![[IMG]](images/storyImages/16bbottomscrews.jpg)
Then turn it back over and remove the 10 screws holding the bottom on. Also carefully disconnect the speaker and subwoofer cables. (Shown in yellow)
![[IMG]](images/storyImages/17topscrews.jpg)
Carefully separate the top and bottom and you will be left with the access to the heatsink. Now would be a good time to clean the fan if needed.
![[IMG]](images/storyImages/18heatsinks.jpg)
Now, remove the heatsink by loosening the screws following the number pattern written on it. There is a number beside each screw.
CPU with heatsink removed
![[IMG]](images/storyImages/19cpuheatsinkremoved.jpg)
GPU with heatsink removed
![[IMG]](images/storyImages/20heatsinkremoved.jpg)
Now we need to clean these up. It will likely be hard and crubmly, use coffee filter / lint free cloth to wipe off what you can, then start using the isopropyl alcohol to really clean it up. DO NOT SCRAPE IT OFF! Take your time as if you don't get it clean you've wasted your time. You want a mirror finish on these. If you look carefully at the next picture, you can actually see the blackberry logo from the back of my phone when I was taking the picture. It has to be that clean.
![[IMG]](images/storyImages/21cpuclean.jpg)
Also, clean up the paste on the heatsink. I was really disappointed with the quality of the heatsink. The surface was not near perfectly smooth and mine even seemed to have a gouge in the corner. Hence I felt it was absolutely necessary to tint the heatsink. You do this by applying a small amount of AS5 to a corner and then working it in with a flat edge (remember that gift card?) and once you feel all the cracks are filled, gently wipe off the excess. Do not use any more solvents on the heatsink once you have completed this step.
Next, apply a small amount (about the size of a grain of rice) to the corner of the cpu.
![[IMG]](images/storyImages/img00086201102042301.jpg)
Using your flat edge tool (gift card), carefully spread it out. It's very easy to use too much. Go very slow and don't add more, you want a very thin layer.
This is the only picture that turned out remotely well of this part.
![[IMG]](images/storyImages/img00088201102042306.jpg)
Do the same with the GPU.
Once the paste job is done, clean up any extra that is not on the die. This is not shown in the images. Use the same cleaner you used to remove the paste. A clean Qtip works best for this. I didn't have any on hand, so I tried my patience with a coffee filter a toothpick. Be careful and make sure not to get any solvent onto the paste that is on the die.
When you are finished, carefully replace the heatsink on top and tighen the screws in the order listed on the heatsink.
Now you are ready to re-assemble. Just follow the steps in reverse.
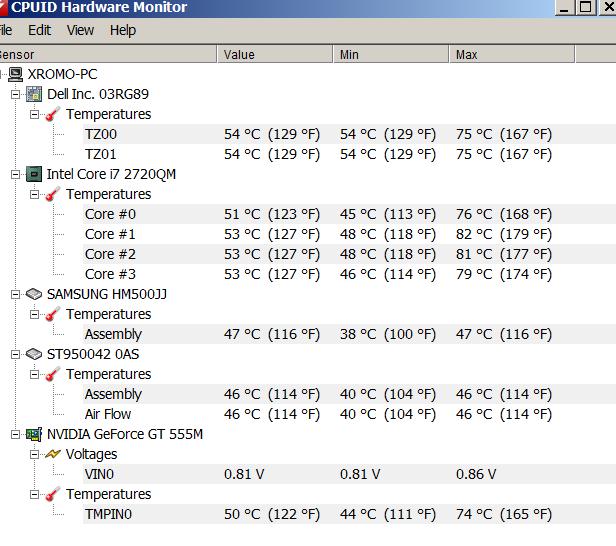
I'm sure some of you are wondering about temperature changes. Well this isn't an apples-apples comparison as the the whole motherboard was replaced so the gpu is different.
After about a week of break-in.
CPU:
Idle: 43-52C
Load: 62-64C
GPU:
Idle: 52C
Load: 63C
Previous Temps:
CPU:
Idle: 49-55C
Load: 69-73C
GPU:
Idle: 58C
Load: 69C
Load temps are a combination of 3DMark06 and Furmark 1.8.2.
I'm hoping to have some time to get some further temperature information as well as some overclocking info but it may be a little while as I'm quite busy these days.
-
Fantastic guide. Well written and just what I was looking for
I am surprised they are using only one copper part to transfer the heat away for each chip.
It's a shame the heatsink isnt smooth either but at least the paste is there to fill the larger gaps!
Thank you
Its probably a good idea to clean the fan as well if needed. May as well while you can")
-
wow, great work iron nerd, very professional guide! i confess that i'm little afraid to repaste gpu and cpu, for now my temps are fine
-
Nice!
Glad to see others posting up repaste guides, well done! -
You Rock!
Seriously, Nice work and great attention to detail. Considered this copied and in my favorites. I foresee this in my future from my playing around with Afterburner and the crappy job that was done in factory.
+1
Rooster
-
Amazing guide!! Very clear indeed!!
I am a little scared too, to do it, but I am VERY tempted...
-
Good point. Guide has been updated!
Thanks -
I wanted to say very thorough guide, just one small gripe with the thermal paste, its very messy on the GPU.
A little pro-tip from my many thermal paste installs put the dot of thermal paste in the center of the chip and spread outwards. If you get any off the sides of the chip use a CLEAN q-tip dipped in a little isopropyl alcohol (go to your drug store) and remove excess paste along the sides of the chip.Last edited by a moderator: May 8, 2015 -
I've updated the guide as this was a glaring omission. The image was the only one I had showing the spreading, but I missed the info about cleaning it up afterwards. I wish more of the pictures had turned out.
As for middle or side, middle means less cleanup (perhaps none if you are careful enough), but I find it always takes me longer to spread evenly that way.
I normally end up having to do cleanup regardless as I have extremely unsteady hands due to an essential tremor. It can be a real pain at times!Last edited by a moderator: May 8, 2015 -
Awesome thread! Thanks a lot for posting it in such details. I'm looking forward to doing it myself as well to get my XPS 17 to run cooler.
+1 on rep! -
Top notch guide now you have ironed out a few kinks. So glad you were not offended by a little nitpicking.
I seem to remember you said Dell sent you some sort of thermal paste sticker, If you still have it is there any chance of including a pic , I don't think I have ever come across such a thing.
TY.
MM -
I always encourage feedback, there's almost always room for improvement.
I still have it and will post a picture as soon as I can get a decent one! -
When ever you can get round to it, cheers.
I'm with you on the copper bottom heatsinks DELL supply, they are not smooth and shiny like a cleaned CPU. I hate it when the copper is raggedy.
The tinting in is so much more important.
I have thought about a smooth grinding on the copper but never tried it.
The guy who did the repaste on the XPS 15 guide said he had no disernable temp improvement with AS5 and did it again with something called liquid ultra.
I would say Patience is the key, as you mentioned.
A good repaste with a decent thermal compound is much better than a rush job with the best , anyway I still favour AS5.
MM
I had a beer or two before writing, hope it scans. -
so i want to test my xps for high temps.
i want to use 3dmark , but if i start 3dmark i cannot see cpuid.
how do i solve this? -
Bumping this topic up for all L701x users.
Also to note, L702x users can use this guide to repaste their machines as they are generally the same.
-
Ironnerd , thanks for that . I have never done anything like this . Is it something for experts only ( easy to make a grand mess of it all ) , or anyone can do it ( small chance of any problems ) ?
-
Repaste payoffs are huge on 702x systems. It is well worth doing even if you don't have to get in there.
I think the only stage where there is risk of damage/breaking something is when you are pulling the palm rest / top plate off because it is held by plastic clips. I followed the guide, but used a thick gift card (credit card) and worked around the edges, worked like a charm.
Everything else is mechanical, screws, zero force (not really) cable clips, etc. If you are careful there's no reason to have problems. But you should be honest about whether you are fat fingered or not, and are willing to deal with the consequences if you make a mistake. -
I've repasted a few systems in the past. Always used AS5 but I tried mx4 this time. Agree with what most of the previous posters have said. Original paste pattern was good, meaning it was applied properly. Heatsink copper surface is rough, not much you can do about that tho...
In my case, temp drop was a degree or two, IF that. -
Flac, what were your temps?
I took the mesh over the intake fan grill off, used AS5. I also found the factory job to be ok, no glaring flaws, all clamp screws were OK, not exactly sure they were all to the same torque but none were loose and all were seated.
My temps may have been on the high side going into it but the effect was dramatic. Before I had CPU over 92C, GPU over 80C. After CPU never exceeds 80C, GPU never exceeds 60C (even with OC). These temps are all at peak loading... not regular use.
I suppose if you have the low temps from the factory, leave well enough alone. But for me the results were dramatic and there is no doubt it was worth the effort. -
Great instructional post!
Thank You. . .
Dell must have did right on mine 42c - 60c typical use ; ) -
Depending on the paste you use (especially IC diamond or MX-3) you are better off leaving the amount in the middle of the chip and allowing the pressure of the heatsink to spread it out.
-
ironnerd, many thanks for the guide. I am quite surprised to see that Dell actually plastered the thermal paste manually onto the cpu and gpu. It is strange as my gpu and cpu are not plastered manually as it comes with a gpu+cpu fitting thermal paste.
I do have one question. When I tried to install the hard drive, I have accidentally drop two screws and they are now somewhere on the laptop and I could not find them although I have removed the whole chassis again to look for them. What am I going to do? I hope that those screw will not heat up the capacitors or stuck onto the fan or something.... I'm scared.
Another problem is that I could not remove the screw on the Intel 1030 card as the screw has lost its shape (from the shape of a cross to a shape of a small round circle) and the screw driver no longer be able to unscrew it. Oh dear... What am I going to do? -
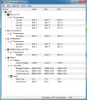
I also removed the fan grill. Here are the temps after running prime95 and furmark for a few minutes
Attached Files:
-
-
I just replaced the Wifi card in my L702x and when I removed the keyboard there were no screws holding it in like in the picture here
Maybe it a new dell thing? this laptop is only 3 weeks old or so. -
More like a Dell boo-boo here. Call Dell support and report the fact that there are no screws holding your keyboard. This is obviously a mistake on the assembly line.
-
Bump to the top!
Mod, can we sticky this pleaaaaaase?
-
Good idea, very useful what with Dell's apparently inconsistent paste jobs. If only they would make heatsinks with good surfaces...perhaps I should get some good sandpaper for mine. It has a giant scratch down the center. Probably would only get me 1-2C though, not worth the trouble. Anyone who has cleaned up the heatsink have some results?
-
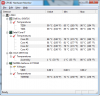
For info on those considering a repaste etc and what gives the greatest benefit to temps, as already known with removing the mesh.....
I thought I'd run some temp max tests out of interest!
-with stock paste
-after a repaste
-and then repaste + mesh removal.
Paste used = Arctic MX-4
All tests we run with prime 95 blend + furmark for 30mins. As you can see from the results overwhelming for removing the mesh! very little difference if any after a repaste. I will note that removing the mesh does increase the fan noise / pitch slightly due to more airflow.
see screenys below
cheersAttached Files:
-
-
Don't think so, mine (L702x) had no screws either. I didn't notice if those holes exist on the top of the keyboard.
-
Thanks siroldvolks! +rep.
Great comparison there, shows what I have seen after 2 repastes, my temps didn't change much, if anything a touch higher (???). Now I must really consider the mesh removal and just religious dusting out of the vent! My mesh is pretty clogged after only 2 months of light use too...I get similar peak temps on GPU, about 5C lower on CPU, but that could be all in the testing method used (mine was Prime blend, which I know isn't the hottest generator, but it is at least consistent enough to draw conclusions). I would love a 10C drop for when I game for 1 hour+. -
no probs
Im sure there would be some benefit to a repaste keeping idle temps lower a little ? sadly I didn't think of that before to test too!
My next test will be more so real world to compare gaming with mesh and without , and see the difference in temps. plus audiable fan noise, and whether having better airflow will make the fan spin a little slower (due to lower temps). will report back when tested ! -
I would love to re-paste, but I get scared thinking about ripping this new laptop apart.
-
Yeah that's tough to do, but the whole process is fairly easy. I labeled my screws in order on post-it notes. That way I knew exactly how to reassemble. I took my time and it took about 1 1/2 hours start to finish. I could do it again in 10 mins.
-
I'd love to do it. Crysis has shut down after about an hour of play on me twice in the past few days. And thats with my GPU overclocked and I can definitely feel it get warm. Judging from those pictures, the GPU is to the left of the trackpad and that is exactly where it gets pretty warm.
-
I thought it would be risky, turned out to be very straight forward. I upgraded my CPU and did a GPU repaste at the same time.
-
Is your machine a L701x and if so, what CPU can you upgrade to with this motherboard.
I wouldn't mind upgrading too
-
Depends upon your board, I bought an L701x which originaly had an i5 430m CPU. I upgraded to i5 560m (wanted vt-d for virtualisation), there is a faster i5 CPU, the 580m but the only difference is the turbo - 3.33 instead of 3.2 (not really worth the premium). The fastest i7 CPU for my board is the i7 640m
If you already have an i7 740QM now then I believe thats probably as far as you can go. -
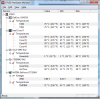
OK I did a bit of gaming tonight to test mesh vs no mesh and the difference in temps - only have BF2 which is anything half taxing , sorry
anyways, another confirmed winner for mesh removal, a good 4-6c drop in temps on both the cpu and gpu. The plam rest does feel slightly cooler with mesh removal, a the expense of some increase in fan noise / pitch. Anyways heres the results !Attached Files:
-
-
Very useful again siroldvolks. I think I might do this. Have you done an idle temp comparison? My CPU tends to idle around 50C, so the fan likes to spin then which is annoying. It need not be that hot at idle. Maybe cleaning the vent out helps even...
-
I'm thinking about doing it. I might order a tube today from newegg incase I decide to do it.
What would be the best thing to re-paste with? AS? -
AS 5 or MX-4 are the ones people seem to like the best. I used AS Ceramique since I had it and I didn't do anything to my temps, but they were close to what most people get after a repaste to begin with. The real win appears to be removing the intake mesh, though I imagine that requires a lot more consistent dusting out.
-
tbh at idle temps the difference is minimal if any, I did try to test but my temps seem to jump anywhere between 45c -50c at idle so difficult to gauge. it's more the flow of the air when the fans running seems to affect the temps better under load with the mesh removed. Mine seems to idle at around that too , lower temps is where i assume a repaste has better affect to aid passive cooling.
Have a look at this thread if you want to minimise idle temps, turbo boost does has quite an affect and stopping it kicking in does work !
I don't think you can go wrong with some like Arctic MX-4. AS5 is always a reliable product, however MX-4 does pip to post under some reviews (very slightly lower temps) and one benefit MX-4 only needs up to 20 hours to cure where as AS5 needs something like 100hrs. Plus it's cheap! I don't think you can go wrong with either ! -
Getting close to the bottom of the page.
BUMP! -
I already have some MX-4 and I'm very tempted to do a re-paste tonight on my L702X, but I'd like to know what the average temps are after doing the re-paste + mesh removal.
I'm hoping it would net me 5-10C in lower load temps. I'm a comp tech by trade but even still I have reservations about stripping apart a brand new $1200 laptop for only slight temp drops. If removing the mesh and using MX-4 will net decent drops, then I can see it being worth it. -
You will see a 5-10c drop Overall the laptop doesn't really feel that much cooler (IMO) but the reported temps are lower.
-
With the Mesh Removal, is there anything I should be aware of? I guess I'll have to air dust it out a lot more often...
-
What are the threshhold temps for the L702X ? Or rather the norm to be expected/safe temps?
On the desktop side, if your CPU runs at 70c, it's time to call the fire department lol... I'm coming from a watercooled desktop that ran at 24C idle, but even still without hte water and stock heatsink, it ran at 45c Idle. -
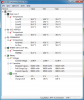
I installed Coretemp last night and ran through Cinebench twice, also had a few smaller apps running the backgroung. With Cinebench loading the
CPU@100% for 2 runs, both core's never exceeded 75C. This is also with Turboboost running, so I guess 75C isn't too bad. I'd still like to get a better idea what they are during an hr of GTA4, I'll have to try that out. -
75C is fine at full speed/loading. Prime95 will generate the most heat, but mine hits close to 80C in games under load anyway...time for mesh removal methinks.
-
I can imagine how removing the fan intake mesh can help with the air flow, but do you guys think that removing HDD and RAM meshes would make any sense too?
XPS 17 Repaste Step by Step
Discussion in 'Dell XPS and Studio XPS' started by ironnerd, Feb 12, 2011.
![[IMG]](http://img832.imageshack.us/i/1backbatteryremoved.jpg/)
![[IMG]](http://img840.imageshack.us/i/3backdoorremoved.jpg/)
![[IMG]](http://img687.imageshack.us/i/4ramx.jpg/)
![[IMG]](http://img511.imageshack.us/i/5hddremoval.jpg/)
![[IMG]](http://img251.imageshack.us/i/6palmrestscrews.jpg/)
![[IMG]](http://img528.imageshack.us/i/7palmrestclip.jpg/)
![[IMG]](http://img59.imageshack.us/i/8palmrestcable.jpg/)
![[IMG]](http://img691.imageshack.us/i/9keyboardscrews.jpg/)
![[IMG]](http://img109.imageshack.us/i/10keyboardcables.jpg/)
![[IMG]](http://img717.imageshack.us/i/11minicards.jpg/)
![[IMG]](http://img716.imageshack.us/i/14displaycable.jpg/)
![[IMG]](http://img148.imageshack.us/i/12adisplayhinge.jpg/)
![[IMG]](http://img109.imageshack.us/i/13displayscrewsback.jpg/)
![[IMG]](http://img706.imageshack.us/i/15bluetoothcable.jpg/)
![[IMG]](http://img573.imageshack.us/i/16abottomscrews.jpg/)
![[IMG]](http://img200.imageshack.us/i/16bbottomscrews.jpg/)
![[IMG]](http://img46.imageshack.us/i/17topscrews.jpg/)
![[IMG]](http://img593.imageshack.us/i/18heatsinks.jpg/)
![[IMG]](http://img823.imageshack.us/i/19cpuheatsinkremoved.jpg/)
![[IMG]](http://img560.imageshack.us/i/20heatsinkremoved.jpg/)
![[IMG]](http://img638.imageshack.us/i/21cpuclean.jpg/)
![[IMG]](http://img151.imageshack.us/i/img00086201102042301.jpg/)
![[IMG]](http://img535.imageshack.us/i/img00088201102042306.jpg/)