Techifan1 and OneCool,
I have gone through the manual and have a few questions on removal of different items I am doubting are needed to be removed do the copper shim mod. Some may come as stupid but I will ask in advance so I am more prepared.
Here are the questions:
1. Do you have to remove the Coin-Cell Battery?
2. Did you remove the power button board or let it hooked up?
3. I assume you did not mess with the camera assy.
4. Did you have to remove the speaker assy?
5. Did you remove the BT card?
6. Did you remove the Express board card?
7. Did you remove the AC Adaptor connector assy?
8. Did you remove the sub woofer assy?
9. Did you remove the USB connector assy?
Thx in advance for all your help!
-
- Do you have to remove the Coin-Cell Battery?
No - Did you remove the power button board or let it hooked up?
No. Let it hooked up. The power button is part of the display body. There is a wire from the power button to the motherboard. Just disconnect it from the motherboard. - I assume you did not mess with the camera assy.
No - Did you have to remove the speaker assy?
No need to remove the speaker - Did you remove the BT card?
Yes. Need to removed the bluetooth - Did you remove the Express board card?
The dummy card? No. The express card board is connected to the motherboard by two cables. Just disconnect both cables from the motherboard. - Did you remove the AC Adaptor connector assy?
No - Did you remove the sub woofer assy?
No - Did you remove the USB connector assy?
No. The USB port on the right side, near the AC adapter port, is connected to the motherboard with a cable. Just disconnect the cable from the motherboard.
On the motherboard, there is one extra screw which the service manual did not mentioned. The location of the extra screw is at the fan/heatsink (top-left). This is true at least for me. - Do you have to remove the Coin-Cell Battery?
-
Kizwan,
Thanks!! I will look for the extra screw next to the heatsink.
Looking much more managable now after knowing half the stuff is not to dismantled.
Anyone else has any input much appreciated. -
@techifan1 I can obtain uncut copper plates (1mm thick and another of 0.8mm thickness). I plan to use the thicker one for GPU and the 0.8mm for the Video RAM. Am I on an ill-fated mission? Kindly advise. Thanks in advance.
-
Unfortunately I can not guarantee that using a slightly thicker shim for the GPU will work without causing other problems.
Please read my post 83.
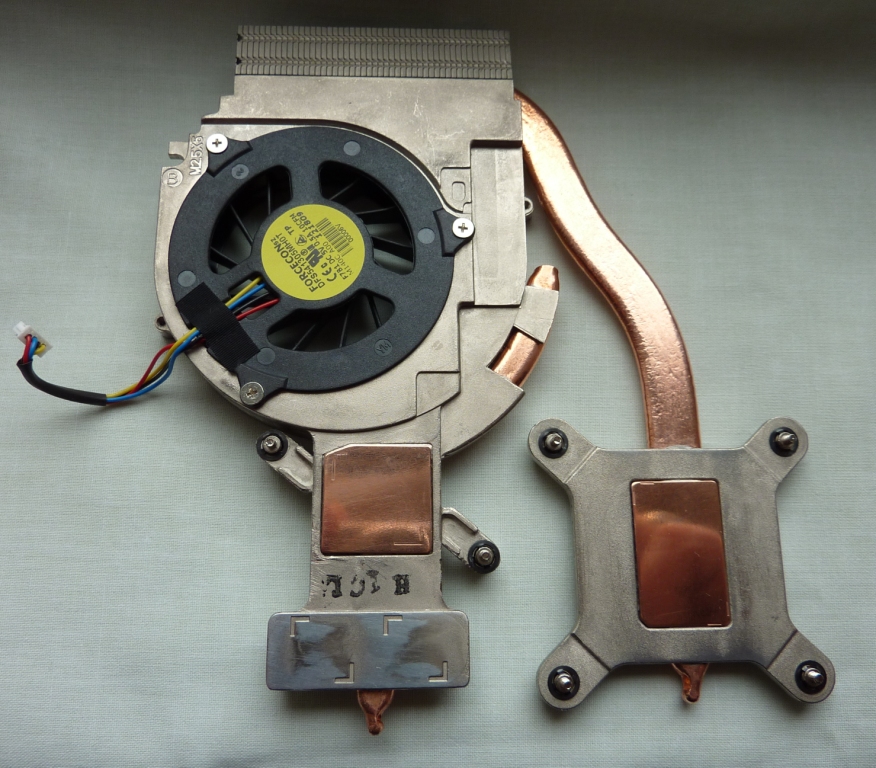
Also, note that the GPU heatsink is part of the fan assembly which is also connected via a heatpipe to the CPU heatsink. (See attached JPEG)
As this is a fairly rigid unit it is possible that as you increase the GPU/Heatsink gap that this would have the effect of possibly reducing the downward force being applied to the CPU which would be undesirable.
With the GPU heat sink screwed down it would normally compresses the GPU thermal pad down to about 0.6mm thickness, however after fitting the recommended 0.9mm thick GPU copper shim and taking into account the thickness of the thermal compound applied to both sides you get a total thickness of around 1.1mm, an increase of 0.5mm. If you use a 1mm shim this would increase the gap to around 1.2mm, making the gap twice as wide as it would normally be. Obviously, there is a limit as to how wide you make this gap and using a 1mm shim may be getting close to that limit.
Having said all that using a 1mm shim for the GPU and a 0.8mm shim for the Video RAM may be OK, the thickness ratio between the two shims is correct.Attached Files:
-
-
Hello,
Thanks a lot for all the tips and explanations. Anyway i've got two questions : i can't find any rectangle copper shim (videoram) ; is it possible to make a rectangle with two copper shim square ?
Also, on others forums i saw that the size for the gpu copper shim is : 0.7mm x 20mm x 20 mm and 0.9mmx35mmx14mm, here you are recommanding 0.9mmx10mmx10mm for the gpu and 0.7mmx25mmx10mm for the videoram ; which one should i buy ?
I'm using the del 1557 with the 1558 motherboard.
Thanks a lot for all the work. Hope this will help reducing the temp of my laptop, who reach 90° when i'm using flash and shutdown with three VM
-
Yes, after the mod you should find that the laptop will run cooler.
-
OKay so i'm buying 0.9mmx10mmx10mm copper shim for the gpu and two 0.7x10mmx10mm for the videoram.
A really big thank you for your answer. You're the saver of the dell 1557 users.
http://cgi.befr.ebay.be/Copper-Shim...ponents_Fans_Heatsinks_SR&hash=item1c1297b6dc -
just got the 2 shims from John. They are smaller than I was thinking. Not much surface for heat transfer but I guess GPU and Vram are small these days.
Plan to start on it this weekend.
Putting the thermal compound will be key. I have heard many people do it wrong so need about it first. -
If I'm not mistaken the GPU size on 1557 & 1558 are similar. They are small. You can use the tip off of a mechanical pencil & put it on the thermal paste tube. This can prevent you from putting too much thermal paste.
-
Btw, do you spread the thermal compound on the shim or the GPU. Once the shim is on the GPU did you spread the thermal compound on the shim or the heatsink and then put the heatsink on the shim?
So no thermal compound between pads and shimm? Again same question once the shimm is on the thermal pad do you spread the thermal compound on the shimm or the heatsink before putting it all together? -
techifan1,
I am starting to work on it and noticed that you do not mention anything to do with the removing the display in your write up? Did you remove it? Also did you remove the WLAN card or left it. To remove palm rest it asks to remove a bunch of things including the dispaly and the WLAN etc. -
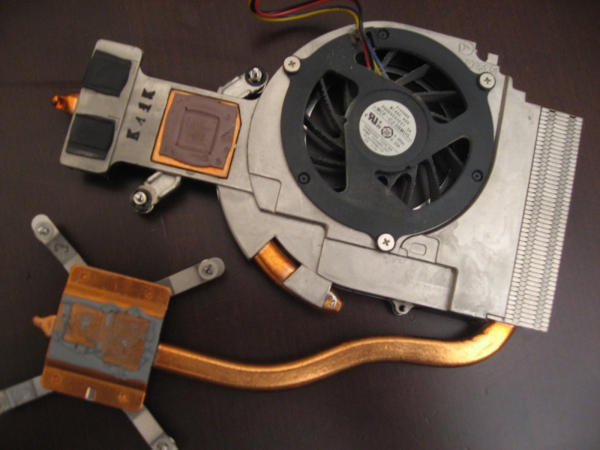
OK finally got to the heatsink. The GPU thermal compund is in good condition although my CPU has gone to 98-100C range when I play games on it. Surprsingly the CPU thermal compound is destroyed even though I have not seen it go over 85C.
It seems it will be tough putting the heatsink on top of the three things at the same time with thermal compound. Hopfully shims will not move around. I will give it a try tomorrow.
Really a pain to to remove the white connectors. Any trick to it?
Damaged the speaker connector but hopefully I will be able to still insert it still.Attached Files:
-
-
No need to remove the Display, just take care to protect it as you dismantle the laptop.
Yes, you will have to remove the WLAN card.
The cables are colour coded from left to right, White Grey and Black. See attached JPEG Titled Bottom Case (WLAN Cable Routing) in my post 33
You do not need to follow Dells service manual word for word to carry out this mod, I merely suggested referring to it to help identify and provide a better understanding of the parts that need to be removed. -
Looking at your attached photograph I assume you meant to say that the GPU thermal pad is in good condition. It may be intact (some disintegrate in time and also when disturbed.) but the thermal conductivity is much less than the copper mod you are carrying out.
Also, your CPU should benefit from applying a decent quality thermal compound as dell tends to use inferior (cheaper) compounds.
First, apply the thermal compound to the surface (die) of the GPU, then place the shim on top applying a little downward pressure and making sure that the shim does not slide out of centre. Then, apply thermal compound to the top surface of the GPU shim. At this point do not forget to apply some thermal compound to the CPU die and attach the Video ram thermal pads to the Video Ram Shim before screwing down the heatsink. Try not to slide from side to side the heatsink when aligning the screws as it could move the copper shim from the centre of the GPU die.
The small white plugs can be a little tight to remove but should free if you carefully apply enough force. You can use a very small watchmakers screwdriver to ease the plug out of its socket.
When you remove the Keyboard note that the ribbon cables are retained in a latch mechanism and must be released by carefully rotating the latch upwards. The same applies to the Touch Pad Connector ribbon cable. -
Thanks again for your input.
took me 3 hours to remove everything so I am going to start applying the shims tonite.
A couple of quetions:
1. I have not tried but was it easy to remove the GPU and Vram thermal pads? What did you use?
2. I am planning to leave the Vram thermal pad attached as is, just put thermal paste on Vram and put the shim on it? Why did you remove the Vram thernam pad? I think you wrote not to apply theraml paste on thermal pads, only between shim and Vram.
3. Since heatsink is one assy, if we put the shims on GPU and Vram will it not raise the CPU side a little higher?
I may have to use the dot method for applying the themal paste as I thinkg shim will slide off if I try another method once on top of GPU. For Artic silver they recommend use of spread method over dot or line method.
Btw, I did not take the WLAN card out. just disconnected the two blk and wht leads off it. Also left the memory in it although to be safe I should have taken it out.
Yes those rotating latch connectors were the easy one for me oince you have the hang of it. I assume to put them back just sllide the ribbon cable and totate back on top of the connector. -
1. Yes, it is relatively easy to remove the GPU and vram thermal pads.
Having said that you will probably find that the GPU thermal pad disintegrates when you try and remove it but thats ok as you are going to replace it with a shiny piece of copper that will be much more efficient. Be careful removing the vram thermal pads as you will need to reuse them. They are made of a different material and are more flexible than the GPU pad and tend not to disintegrate.
This is a quote from my post 98: Do not use any type of metal scraper.
To avoid scratching the surfaces use something softer like plastic
or wood to remove any stubborn bits that stick to the surfaces.
Finally, clean with Isopropyl or Isopropanol alcohol as it works well and is
likely to be cheaper than using so called specialized cleaners.
BTW, I thought you were going to use the ArctiClean Kit.
2. No, I have never said that thermal paste should be applied between the shim and the vram chips.
The preferred/best method is to carefully remove the vram thermal pads from the heatsink then apply thermal compound to the cleaned heatsink then press on the vram shim and finally reattach the vram thermal pads. This is a fairly easy process and avoids having to apply any thermal compound directly onto the vram chips.
3. As discussed in previous posts if you use the recommended 0.9mm shim for the GPU there should be no problem. Remember that the CPU heatsink is screwed down using four spring loaded screws so there should be enough downward force to overcome the slight increase in thickness between the GPU and its heatsink. -
Understood I am not using anything metal, I plan to use a crdit card.
Maybe I mis wrote as far asVram is considered. I will use the larger of the shim there. put the thermal compound on Vram and then put the shim on it. My questions was if is it worth making the effort to remove the two Vram thermal pads? Why not leave them attached? If you remove them I guess I have to put some thermal compund between the pad and the heatsink but I was wondering if it is worth it. Also if you only put thermal compound between the Vram pad and heat sink and not put the thermal compound between pad and shim then is there really a point to do put it on one side of pad and not both.
I think I missed it but you are saying above that NO thermal compound between Vram and shim. Can I ask why? as I was planning to do that
OK I agree on the CPU due to the extra flex it should be OK.
I am using the artic clean kit. Since i am spending so many hours a few more bucks is worth it to get it right. -
Remember in effect what you want to achieve is to make the existing heatsink thicker without compromising its thermal conductivity and thats exactly what the shim will do.
-
OK I get it, so the shim is actually going above the pads, I was going to put it between the vram and pads and that is why I wanted to add the thermal compound. You are just trying to keep the contact intact due to added thickness of the GPU shim. So in reallity hat dissipation for vram should remain the same as there is not much improvement made just made sure it does not get worse.
when I took the scres for the CPU and GPU off they were actually quite lighly tightened. Did you find the same? I guess you have to be careful not to put too much pressuer as the die is very small. -
Hi Techifan,
Refference to your post 29. I removed the heatsink for north/south bridge chip. Also removed the rubber thermal pad. cleaned and put the thermal paste and found that there is a gap. I could not remove the nylon spacer as I did not want to break it or the screw it is on. It does not want to come off. So I ended up putting the thermal pad back with the paste. Not sure if paste and pad can mix though. -
OK finally got done with the mod. Thanks techifan1 for all your support during this.
I have only run the laptop for only 30 mins and will do some more testing this evening.
Result are not very prmosing but I am hoping it will improve as I used Artic Silver 5 that needs a few hours of burn in time to show best results.
My CPUs temps look good, idle mid 40s, surfing the web low-mid 50s.
MY GPU temps looks good for idle around low 50s. playing HD vide file the go up to 60 or so.
The bad stuff. I did the mod mainly because when I played a game like SC2 the temps were around mid 90s and if you play for an hour or so they would hit 99 or 100C. 100C was the max I have on record after playing over an hour.
After the shim mod I ran SC2 for 3-4 mins and saw temps spike to 102C. That does not look good but I am hoping the thermal compound will cure in a few hours. One thing I did notice that temps would drop to 60s or 70s C within a few secs if I stopped playing the game which is puzzling how it can drain the heat so fast but not able to do it enough during gaming.
A couple of reasons I may have done it better possibly.
The Vram pads are no even (formed grrove sitting on the chips) they may be pushig the heatsink up more than it should be and so the GPU may not get full pressure on it due to the extra height. Also I did not clamp the GPU screws to a point where you cannot turn them any more. I stopped when I felt them get tight although even though I may have gone half a turn more unitil you cannot go any further.
I am just hoping I do not have to go in again as it took me around 10 hours for me to do the whole thing. -
OK some update and good news!
I found the problem as I made a big booboo. I forgot to take the plastic protective covering over the shims. No wonder my GPU temp was spiking as there was a thing layer of plastic on both sides of it. On the other hand my CPU was perfect since no shim.
Anyway I did the whole thing again. Tightened the screws where they would stop turning.
Now as a result I have about 5-6C lower temps across the board.
My GPU idles around 56C used to be 60C. Highest I can take it playing SC2 is 94C used to be 100C
My CPU idles at 38-43C used to be 45-50C. Depends on fan sometime I have seen it idle as low as 35C. Highest I can get it playing SC2 is 67C but used to get to around 74C before.
This is with room temp of 27C (atleast that is what one of the sensor says)
Since I have used Artic Silver 5 for thermal compound I expect to see about 5-10C improvement in about 100-200 hours of use as that is the cure time so I will be very happy with 10-15C over all improvement.
Thanks to techifan1 and all others on their suggestions and time. -
Yes, the thin plastic covering acts as a protective coating and should be removed from the shims before fitting.
Glad to hear everything is now OK and your temps are lower.
-
what did you do with north south bridge heatsink? I removed the existing pad off as it was in bad shape and put the GPU pad there which was intact in my case when I removed it.
Now I feel that that area on the bottom side below the touch pad is hotter than before. To me it makes sense as more heat is being conducted to the heatsink and thus plastic next to is hotter but I think you mentioned yours was colder after the mod? I am not sure how the heat can get out there as even if the heat sink can get good conduction there is not much air circulation. -
Yes, I carried out the mod to the North South Bridge Heatsink as per my post 29.
What you want to achieve is to improve the thermal conductivity between the north south bridge chipset and its heatsink. If you end up making the thermal conductivity worse (Thermal pads tend to be relatively poor as regards to their thermal conductivity properties) then the excess heat from the chipset will be dissipated by the surrounding area of the motherboard which is obviously not a good thing to happen. -
I kind of agree but I noticed the bottom part being warmer near the heatsink so I am assuming that more heat is not being passed to the heatsink so that I observe more localized heat at the bottom. Before it was more spread out since it iwas going to the board more than heatsink. As you know there is not much circulation for that heatsink. Original thermal pad broke (brown color one) so I used the GPU light colored one there. I assume it should be more conductive than the other one as it came from the GPU.
BTW I am starting to see the impact of AS5 thermal compind curing
Before shim mod Max temp recorded duing gaming 100C
After Mod max temp recorded duing gaming 94C
3 days after shim mod (and curing of AS5) I only saw max temp reach 90C duing gaming. So 10C improvement and I am hoping that I can still get 5C further improvement from some more time for thermal compound to do its trick.
Btw, I removed the fan and cleaned the metal filter that was quit dirty and so that may have helped with a couple of degrees as well. -
Hi there, Just want to say, Ive attempted many forum based guides, on a whole range of things in my life and have never posted my own findings. I felt the need to do so with this as the information provided here from start to finish was so easy to follow even for those with no previous experience in this sort of thing.
This was my first laptop that I have ever taken apart and modded and I was indeed terrified, but following all the advise I read on this forum I can tell you it has all been a massive success.
Before applying this mod, I was getting anywhere from 70 - 90 degrees,
immediately after however the laptop hasn't once crept above 60 and that's in the most intensive uses.
I just want to say thanks to all those that contributed, especially techifan1, I picked this laptop up for £450 and with £20 spent on shims and paste, I reckon Ive still got myself a bargain. Even after all the worries with over heating.
Thank you so much. -
Appreciate your kind words and pleased to hear that you are happy with the results of the mod.
-
Hi,
I've just found this forum page. Great advice. Where can i get the shimms from? -
Well its only been a few days with the new mod and some problems have started creeping up on me, Ive noticed while playing a few games that my laptop has started freezing and the screen has gone blank, My only way out of this problem is to hold down the shutdown button.
Has anyone else encountered this issue? I assume this is the GPU over heating I was really hoping this issue was cured, I even have a cooling pad.
For those thinking im trying to push my laptop, one of the games I play is portal 2, which I can agree maybe putting the GPU under pressure, however the other game in which it frequently fails is Terraria, which is very low on the graphic side of gaming.
I know this may not be the best place to ask, but as this is all to do with cooling the GPU I thought someone could help, And I could not find a definitive answer after any of my research online, most point to over heating.
Any help would be greatly appreciated. May even help others with the same issue. -
Please run GPU-Z in the background. Make sure in Sensors tab, set "Log to file" & "Keep refreshing". Play any games until problem occurred. Later you can check in the log file, what is the GPU temperature when it happen.
To get the best result, lapped both heatsink & shim surfaces until you can see reflections on them almost like a mirror. -
Ok so after a bit of research, reading through BSOD dump files and other forums, My problem may have been related to the ATI Catalyst Control Centre. I un-installed all drivers and software related to ATI and allowed Win7 to do its magic, so far no crashing, However my GPU-Z log is showing 80 degrees centigrade while playing portal 2, Is this a normal temp, or am I still running a little hot? It doesn't take much time at all to cool, which is good.
-
80C is acceptable temperature. No doubt you did the shims mod correctly.
-
80C is very decent. I play SC2 and my temps were reaching 100C, after the copper mod they go up to around 88-93C max range.
-
Ok Im glad Ive done it right at least, now to try and tackle this dam BSOD problem with the atikmdag.sys file.
-
I'd like to share some small report a year later after the shim mod.
Temperatures are still ok, however around 5 degrees C higher that what they were after the mod. I think the cause for that is the dust accumulation in the heat sink but the disasembly is a pain in the .... I am using compressed air now and then to clean the visible parts but I don't think it is of much help.
A couple of months already I am running on 3 cores as I mostly use the laptop for office applications and browsing recently. Using only 3 cores (set from windows msconfig advanced boot options, looks like the 4th core is disabled, and thats the core with poor cooling) reduced the temperatures considerably while no affect on the performance is detectable.. there is a lot more power in that chipset that is still in excess. Maximum temperatures rarely exceed 74 degrees C on heavy load with ambient temperature of 35+ degrees C (yes I took it on vacation For example this morning the max temp 73 degrees, at the moment 65 degrees with mozilla with 15 tabs open including flash apps and 3 office appliccations, and acrobat reader, and some music ( so arounf 16-26% load). Low temp for the morning in idle was 45 degrees C.
I still find the temperatures a little bit on the high side so I want to reopen it and clean the heatsink. I guess I wil lalso have to change the termal paste. Do you have any suggestions for something else but not ICD7?
The reason for the change is that I recently openned the mobo chipset heatsink (under the touchpad) as I was in desperate need for some excess thermal paste to put in an older laptop before the thermal paste for that one had arrived. I was not pleased to find the ICD7 layer extremely dried out, almost like very dry clay. I believe it is in the same condition in the CPU and GPU. I guess it is not an issue unless the dryness doesn't case also cracks in the thermal paste layer which will reduce the conductivity. Anyways I will change it just in case, and I am looking for something good to replace it. -
Awesome Post !! Thank you guys for all the great information, im getting everything ready for this mod, i was about to give up on my laptop
after not being able to play SC2 more than a couple of games whit a external fan
, i just have a couple of questions.
Ill be using ICD7 and i understand how to apply it to the GPU, my question would be in how to apply it to the Shim for the VRam, i sow a picture in this post, but i believe that was the application for AS5, on the ICD7 site they sugges using a single application of the size of a bb, anyone care to share some of his experience using ICD7??
Thank you in advance for all your help and Above all for this Awesome Post!! -
Hi I did the shim mod 2 months ago and used AS5. I got the temps down by about 10C after the mod. I also had heating issue playing SC2, it seems SC2 really does a number on the GPU. Anyway I was getting around 99C before the shim. After mod I was able to getting high 80s and sometime to 91C. But for last few weeks I have been starting to hit around 93-95C consistently. I think the AS5 compound has dried and lost its effectivity and I may need to repeat it. Not looking forward to opening it again as it is very time consuming.
I have ATI 4570 which I am afraid is not meant to handle SC2.
I wish I can undervolt the GPU somehow so it does not get too hot. I get 40 to 50fps playing SC2 which is an overkill and I can easily be happy with 30fps.
If someone knows how can limit the GPU voltage to 1.1V rather then 1.2 I think I can get the temps to be 5-10C lower. -
Getting good thermal paste is quite essential for this mod to work. Actually considering the very high temps the GPU and CPU keep it is also recommended to change the paste every 6-8 months or at least every year. I don't know why laptop producers decided that thermal pads are the solution for the aging of thermal pastes... the pads were "baked" and cracked after a year of usage when I applied the shim mod and ICD7 paste to substitute them.
At the moment after reading some experiences with AC5 and ICD7 I am afraid I will have some had times removing the old paste and reapplying new one. The good thing about ICD7 is that it has very high diamond content so less stuff to age and get baked. As I said the ICD7 on the mobo chipset looked like dry not-baked clay, but at least not solidified. -
Id like to know if anyone is having the issue with the Dell 1557 freezing during gameplay? I know this isn't the best place to ask as its all for the shim mod, but I thought Id see if anyone had experienced this, as Ive done everything suggested on other forums to fix the issue and none have worked, usual stuff, update all drivers, monitor temps, different dated drivers, burn in test...Pretty much everything. The only thing I found that kept it going for a longer period was the Riva Tuner O/C method, however, still failed. What is everyone else running driver wise? or are you all using some software...or do any of you actuall even have this problem?
-
Mine has never really BSODed of froze, only once but it was a newly installed driver issue, despite warning while installation. If temperatures seem ok when it is freezing ( 90ish is also ok) then it is very probable that it can be a driver/OS/software issue. Is it always the same game, the same level, the same spot? Are there any warning messages from the OS before or while you play? Maybe a fresh install of the windows can solve the issue?
I am running, since recently, the latest video driver from Dell, works good but keeps the GPU notably hotter. I might downgrade to a previous version soon as this one recognizes the GPU not as HD4570 but as HD 545v. By the way the video driver install failed from the setup program so I manually updated it, maybe I shouldn't have done that.
PS: Oh now I remember one freezing but it was related to the game crashing when I Alt + Tab-ed during autosave which rendered the saved game useless after the hard restart, lost all the progress and deleted the game
PS: But if you think about it, the laptop is just hardware, in most cases simialr hardaware is sold badged with different brands such as Dell or HP. Often the mobo producer is the same... If you cannot directly link the freezing with extreem temperatures, or at least temperatures when the CPU starts automatically decreasing speed and load, it is most probably a driver-software related problem. Of course driver problems can be related to not properly functioning hardware. The way to check that is to try to create some logs for example or change drivers.
(and most importantly Studio 1557 is not a gaming laptop, cooling is mediocre, GPU is low mid class)
Edot: Sorry, I just read your posts from last couple of pages It has already been suggested
-
does any1 know if the copper shim for video ram is supposed to have thermal paste on both sides?
-
Between the copper shim & heatsink, use thermal paste, while between the copper shim & VRAM, re-use the VRAM thermal pad.
-
Thank you. I realized that after the laptop was all closed up.
-
So the actualy gpu heat sink... whats it made of? aluminum? could we make a better one? like copper?
-
The main body of your previous post talks about the chipset heat sink and this is made of aluminium.
The GPU heat sink is made of copper but there is a thermal pad between the copper heat sink and the GPU surface.
This pad is replaced with a more efficient copper shim. -
Hi all,
I followed techifan1's copper shim mod instructions (except that I used a different (cheaper) thermal paste) way early in the post and my idle temperatures went down by about 10 degrees C as measured by coretemp. Temperatures while running heavy graphics (mostly photography) applications have gone down by more... and peak temperatures have dropped by about 15. It used to regularly hit 90C+, but is much improved now.
Sorry for the estimates, but that's as specific as I can get. Very happy with the results. Thanks much for the detailed info! -
Thanks for the comments.
Pleased to hear that you are happy with the mod.
Thermal paste is a personal choice so whatever works best for you is fine.
Actually things have moved on since I used ICD7 with other brands claiming better results.
Apparently Shin-Etsu G751 thermal compound is very good although I havent used it so can not confirm how it performs with the copper mod. -
Hi All,
I would like to _thank_ the people on this forum for the posts about copper
modding a Dell Studio 1557. I had experienced the last two month or so,
increasingly often, a freeze of my ubuntu system under (heavy) load (compiling with a multi-threaded make command) and/or using some video codecs.
After having applied the copper shims, the temperature has dropped on average by 15degrees, which pushes the machine back into a `modest' temperature regime (40-50C idle, up to 85-90C under heavy load), also the
area right to the touchpad is no longer so hot, as it was unpleasant to
touch.
May I add, that I use the Dell Studio 1557 since 2 years, partly under heavy load (using lengthy heavy computer algebra computations, often in the background) and had till recently not experienced any overheating problems (OK it got hot, but it still worked well, no freeze). When I removed the heat-sink it appeared to me, that the thermal compound on the processor was brittle and seemed to be broken, so it may not only be the video parts (GPU, VRAM) which cause the problems, but also an aging thermal compound on the processor?
Anyhow, once more thanks to all the people on this thread which provided enough information for me `to do the trick'
Cheers
H.
Studio 1557 copper shim dimensions/thickness
Discussion in 'Dell' started by pp02442, Jan 16, 2010.