im afraid so yes, but i have read that some people have managed to undo the bottom right of the palm rest and slipped the module in that way, but thats risky as you might break the plastic.
-
Ergh... I was afraid of that. Well, I suppose it'll be a good learning opportunity.
") I've already had a swell, if tedious time taking apart the keyboard (key by key, switch by switch) to clean out all the cat hair the previous owner of my FX left dwelling underneath. Anyway, thanks for the uber-prompt reply! Fun times ahead!
I've already had a swell, if tedious time taking apart the keyboard (key by key, switch by switch) to clean out all the cat hair the previous owner of my FX left dwelling underneath. Anyway, thanks for the uber-prompt reply! Fun times ahead!
-
Well if you follow the guide, then you shouldn't have a problem, plus you can thoroughly clean out your laptops vents and fans, and maybe apply some better thermal paste to your CPU and GPU.
-
I might do that, though judging by the guide it seems messing with the HSF can be a sensitive matter... which leads me to something I forgot to ask: does the CPU/NB HSF need to be removed during the disassembly? I can't really tell from the pictures (at least in the order they're placed in the guide), since some of the pictures following its removal instructions still show it as attached.
If the HSF doesn't need to be removed, I suppose I can leave it alone when installing the bluetooth module, and wait until a later time to glob on better thermal paste since it's easily accessible. -
I think you can leave it on, but then again i have never done a full disassembly, but i dont see why you cant leave it on.
-
Awesome guide Azrickster!!! I have been looking for a dis-assembly manual for my 7800FX forever
Glad to see someone decided it was time
-
I had to send my P-7805u in for repairs and when I got it back, they had replaced the motherboard. There is an apparent bulge in the media bar, creating a crack that exposes the hardware underneath a little bit. The peak of the bulge is at about the Insert/print screen key. The crack goes from the F5 key all the way to the end of the right side of the laptop. None of it really pushes down much. Any idea what could be under there? I'm a little afraid to attempt to take the media bar off.
-
I've run into this a few time when putting my 6860 back together, not completely sure what it was. My guess is that it happens when part of it isn't lined up or clipped in right. I usually just take the media bar back off and try again, which works, but sometimes it takes a few tries.
Be careful when removing the media bar, the ribbon cables can rip easily, I just ripped the power button cable (which was already replaced once) but this time the bar got caught on my sleeve. -
When you take the media bar off and try again, do you push up on the motherboard or something like that, or do you merely just put the media bar back on and hope it goes on right? Also about the cables, do I need to worry about them ripping as I pry it off or is it that I should worry about where they are as I put the media bar back on? Thanks for your help.
-
When putting the media bar back on I try and keep the front pushed in while I push the back down. By "in" I mean towards the keyboard and by front I mean the half with the orange.
You shouldn't have to disconnect the cables to try and fix the media bar, but be careful when you lift it up not to pull on the cables too much. My power button cable ripped when pulled at an angle, so I don't think you should have too much worry about if you accidentally pull up on it a little, which I had done before without it ripping. -
I just finished reassembling my Laptop and I am glad I finally went through with it, just because of the amazing experience taking the machine apart piece by piece.
I learned a lot from this but most of all I am simply shocked beyond belief at the improvement in temperatures that has been achieved!
Before taking apart the Laptop I was reaching 90-95 degrees while playing Crysis on 1920x1200 with my custom configs. Now I just tested it and I imagined the temperatures would be lowered somewhat, maybe 5 degrees, 10 at most.
My initial response was not even "wow!", it was "...wth!?". I have went from 95 to 70 degrees max temps while gaming! Haven't changed the clocks at all and I logged it with GPU-Z.
I just can't believe what a difference applying some Silver compound TIM (bought it at Best Buy, it's made by Dynex) to my GPU made! I made sure to apply it to the Memory Chips as well.
I applied a fair amount of the gooey paste, slowly and carefully making sure all of the surface was covered. I tried not to overdo it and thus went slowly barely pushing the syringe while applying it.
Reapplied the TIM to the CPU as well in the same manner and cleaned out all the vents and fans properly.
I am so glad I went through with it and finally got to see the motherboard that has been entertaining me for so long.
Thank you so much azrickster for a GRADE A+ guide
Attached Files:
-
-
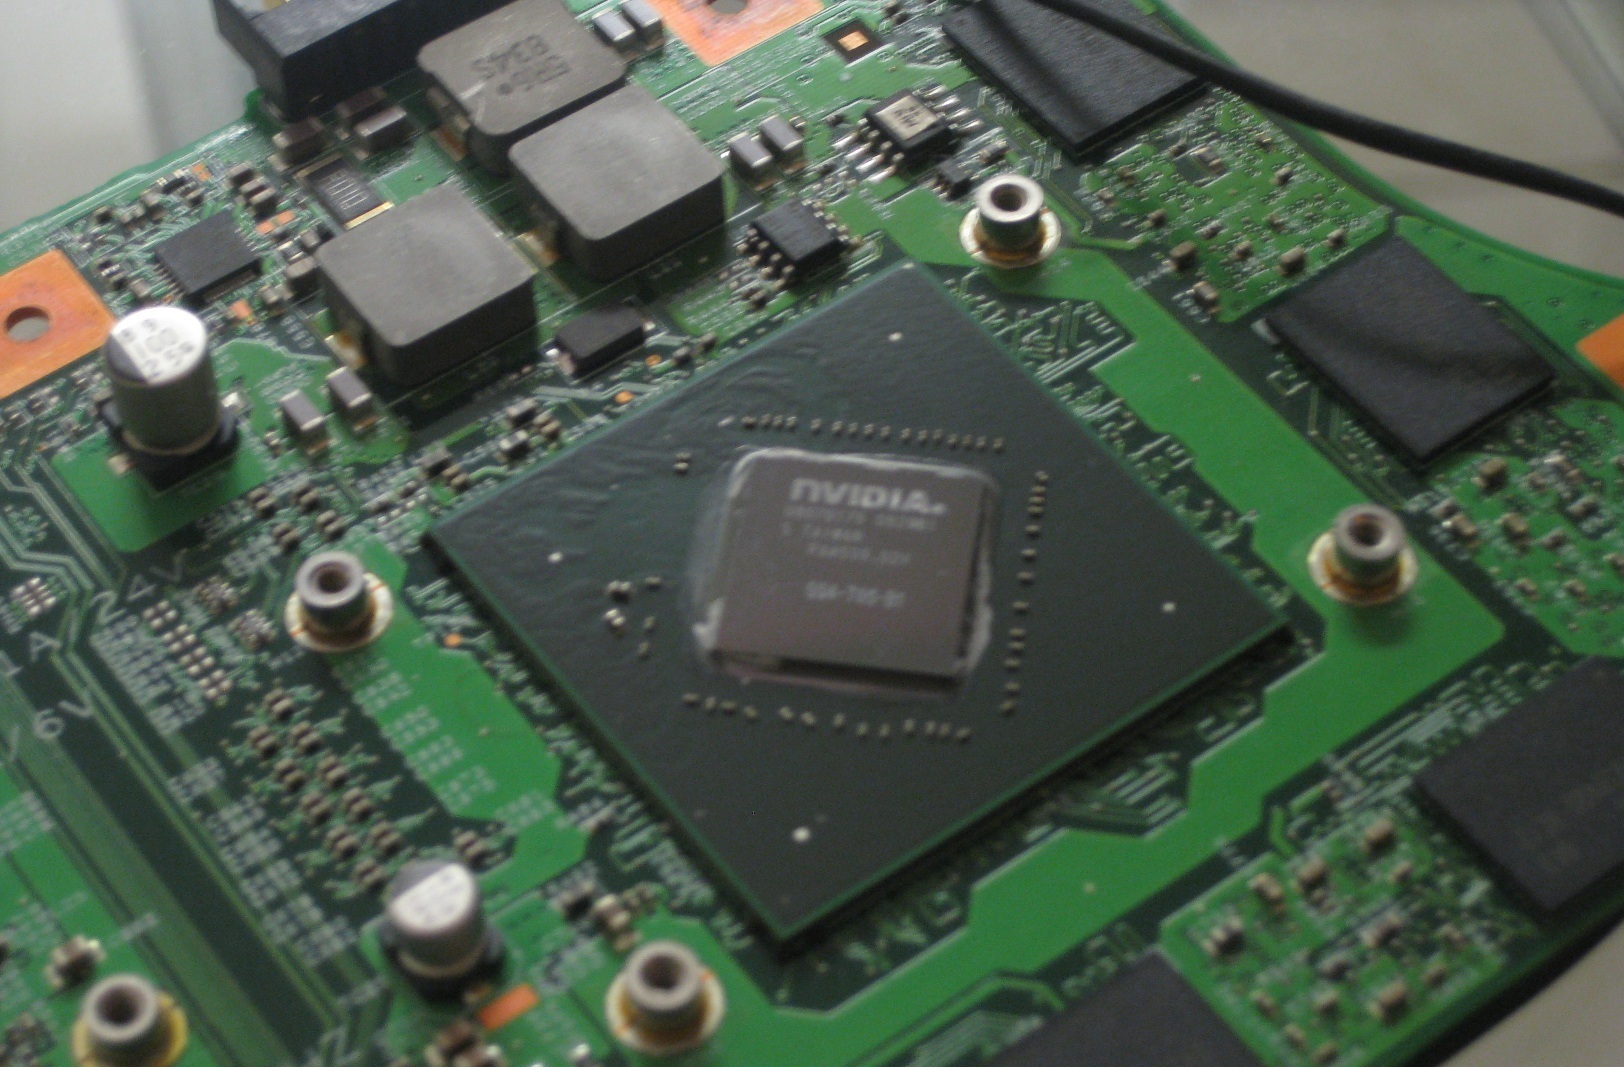
How small did the heat sinks have to be for the GPU memory?
-
I don't get what you're asking for, care to rephrase your question?
-
You said you put thermal paste on the GPU memory modules, but what did you attach to them?
-
Well if you look at the disassembly guide then you can see how big the gpu heatsink is. It also covers the memory. But I don't think that there is any stock paste or pads on the memory.
-
Yea, refer to the pictures on the OP to see how big they are and yes there is no stock paste on the memory (sadly). It reduced my gaming temperatures DRAMATICALLY as shown on my post above by applying it. 90+ to 70 max is very nice and should help give my GPU a longer lifetime.
-
Oh yeah sorry I shoulda read the whole guide before asking questions. It is surprising though that the heatsink is made to be glued to the memory yet it isn't.
-
Wait so... you put enough silver thermal paste on the memory chips to fill the gap between them and the heatsink? Isn't that actually a little... dangerous? Since silver is electrically conductive and could eventually get onto the board and there would be no way to easily access nor to check this. I thought the reason ICD was ideal for this was because it is very thick/solid and not electrically conductive, as diamonds are not electrically conductive?
-
Quote:
Not Electrically Conductive:
Arctic Silver 5 was formulated to conduct heat, not electricity.
(While much safer than electrically conductive silver and copper greases, Arctic Silver 5 should be kept away from electrical traces, pins, and leads.)
It should not be a problem. -
Exactly why I used the ICD on my P7805 when I followed this guide.
I may have even over did it on the GPU memory chips, but the ICD7 is non conductive. My temperatures are just a bit lower than what Andros posted, so there's even more proof that ICD is the stuff.
EXCELLENT guide on disassembly O.P. Took me about 1 hour start to finish, including applying the ICD. Would definitely do again for the loss (gains? =P) I've received in temperatures. -
Is your GPU overclocked @ my settings? I don't doubt that ICD7 might be slightly better than AS but do some tests and post your results to show proof... (GPU allows you to log your temps over a period of time and save it to a .txt file, like I attached in my previous post).
-
The quality of the compound is just not about instant drop in temps after fresh application. Its with how long it gives you such good drops. There are a few that shows good drop soon enough, but say after a week or two the temp rises. So what i suggest is take your time and keep reporting how things are. If you are forced to apply frequently then i suggest try a different one.
-
if my temps ever go over 70c on the gpu i will put some icd 7 on my my gpu. my gpu never goes over 65c when overclocked and with no cooler.
-
yea I might have to reapply TIM sooner than with ICD7, but I just didn't have any at hand at the moment and I was getting sick of the high temperatures that were causing my games to crash due to overheating. As a temporary solution this is working wonderfully, on the long run I will probably put on some ICD7.
--Update:
My Temps are now even lower after a couple of days of settling in. My max temps are reaching 67 degrees now. -
hey guys do you know what the heating vent in the side of this gateway cools?is it the gpu or cpu or another component?
-
Really nice stuff.
Needed this to clean out my fans etc
-
Hey guys Im new here but im wondering about upgrading my Gateway P7805u FX with an Intel Core 2 Duo P8400 to a Quad Core Q9000 or a Q9100. I researched the quad processors and found out they needed more wattage compared to the P8400 (25 to 45 watts). Can these additional watts be supported on this Gateway? or is it too much power to handle for both the ac adapter and the battery? I'm just wondering if I could safely use the quads without any crashing, overheating etc problems.
Thanks -
Quad-Core processors are restricted by the motherboard, or so it is believed, on the P-7805u. It is most likely true considering that we use the same BIOS as the quad-core version of our laptop (P-7808u). Though I believe we have the same chipset as the p-7808u (PM45) which supports quads aswell as the same socket (Socket P) quad core processors the system will not POST with one installed. The best upgrade you can get is a high-end C2D. The best price is generally the T9600 at 2.8 GHz, but the fastest you could get would be a T9900 or an X9100 which are 3.06 GHz at stock. The X9100 being believed to be slightly hotter and often more expensive and not yet able to be used to its potential because our systems can't take advantage of the unlocked multiplier through the BIOS. (even though they should)
-
Has anyone tried replacing the NB pad with a copper penny?
-
I don't know what you are talking about but pennies haven't been copper for a while now.
-
The idea being instead of a big glob of ICD, you put a copper penny in there. Pennies before 1982 are supposed to be 95% copper, right?
Edit: I mean American pennies. -
Okay, not having access to dental tools, I thought I'd try this but am running into a problem. I can pop the hinge covers easily enough with the LCD closed, but to remove the media bar, the LCD needs to be open, which at once pops the hinge covers back in. Also, how did you pop the first tabs the OP popped (under the media bar, to the left and right of hinges)?
-
Yes you are right. Sorry for my ignorance. I figured that pennies hadn't been copper since the 60s or earlier.
-
Okay, so I figured this out: you can just take a flat head to the sides of the media bar and wiggle it loose.
I disassembled (and reassembled) today, and things mostly went fine. Of course, it did not go entirely smoothly. The Bluetooth cable was extremely stubborn, and I managed to break off a plastic bit, so everything was done with the motherboard still attached to the Bluetooth module. This caused difficulties with testing (I was doing the GPU reflow fix). I managed to not attach the power ribbon properly (this is a P6860), so it slipped out while the battery was in place. The end of the ribbon touched the metallic bit on the bottom of the media bar, which must have shorted it, causing a minor flame and some smoking. Let this be a warning Fortunately, the media bar has another power button, kind of.
Like others, I'm also noticing a bit of unevenness in the fit of the media bar. I suspect this might be due to a less than optimal arrangement of wiring (the wifi antennas?) under it. -
To lift the media bar I've always just pushed the screen back flat, the slid a flat head under the hinges and popped it up.
By unevenness with the media bar, do you mean it bulges out towards the center? I'm not really sure what I do when that happens, besides taking it back off. Try pushing the center down with your thumbs, after you slide the front in, then push the hinges down. I usually push down along the back of the media bar until I hear a few more snaps/clicks.
I've done this at least 6-7 times, but don't really remember exactly what to do, just try 'til you get it right. -
Anyone know of a bios update that will fix the gpu fan issues...either stop it from fluctuating or be able to set it at a static speed...half the time my gpu fan doesn't know when to speed up or slow down and my temps hit over 100c b/c the fan won't run full blast all the time...since the bios controls the fans, rivatuner etc...will not work for adjusting the fan speeds. Can anyone help?
-
If your gpu is hitting that high then you need to seriously figure out how to clean it out. Your gpu should never be getting that hot.
-
Absolutely, if your GPU ranges higher than 80-85 then it's time to follow this guide and clean your GPU vents and possibly apply some TIM to your GPU and memories. It dropped my gaming temps from a max of 96 degrees to a max of 70 degrees or lower. Currently playing Dragon age Origins, and my GPU is running @ 54 degrees after 2 hours of play. Applying Thermal Paste to my GPU really made a difference and the benefits have not waned over the 3-4 months that have passed since I applied it.
-
ok i took the whole thing apart and cleaned the vents/heatsinks and put new thermal paste on the gpu and cpu. this helped and my fan seems to be running correctly now...not sure why it decided to fluctuate like that and act up and get so hot. it maxes out at 62 degrees now...its nice!
-
can anybody tell me how to remove cmos battery with pic?
-
Okay, i recently had to open up my laptop to clean out one of the vents. and now one corner of my keyboard is slightly raised higher than normal. If i remember correctly, theres no screws that need to be removed to take off the media bar. Is this right?
-
this thread is really amazing
thanks for all your hard work azrickster -
I thought there were 2 media bar screws in the battery compartment.
-
Great thread, but I need some help >.<. I've been getting 90-105C heat coming from the GPU while playing games (even in TF2, which isn't supposed to be a very demanding game...) and I get huge fps drops while playing when it reaches high temps. I suspect that it may be a thermal compound problem (as in, that it's not there or that it wasn't applied properly). I've bought it refurbished about a year ago yet I'm only starting to be concerned now as I found out that these are very dangerous temperatures.
I'd need help in knowing exactly WHERE to apply the thermal compound, and I would probably apply some on the CPU if possible, since I get around 50-60C idle. Also if it means anything, the GPU idles at 50-65C.
tl;dr: I don't know where the thermal compound would go for the GPU and CPU. -
Has anyone had an issue with some of the keys not working when they put their laptop back together. My ctrl, alt, home, Pg up, up arrow & left arrow key don't work. I tried reinserting my keyboard cable a couple of times but no luck.
Did I damage the cable from my keyboard? -
Hi can I go all the way to the gpu whitout removing the cpu and NB heatsink?
Thank you. -
This guide is going to be awesome when I go in to apply some new arctic silver 5 to my CPU.
Big thanks! -
Don't post often, but just wanna say this guide really helped and I appreciate it a lot. Big thank you goes out to the OP. Following your guide allowed me to pull out some huge dust werewolves and apply come ICD7
-
I followed this guide and I'm having problems with the power brick not being recognized. Someone a few pages back also had this problem, but nobody replied to him. I just looked up the tech support on Gateway and I'll start trying that tomorrow. Any ideas?
Thanks for the great guide btw! -
Sorry if this has been asked before, but I just want to clean the dust off my 7805: how far should I go in the guide? how much should I disassemble?
Gateway FX Disassembly Guide (Covers all 17in FX Notebooks)
Discussion in 'Gateway and eMachines' started by azrickster, May 18, 2009.