Could someone make a guide that easier to understand? I'm sure it would be much appreciated. It can get difficult to follow so many pages and make sense of it all.
-
-
yeah i would also like a comprehensive guide... mr KRAVIS i know u could help the curious guys in here

-
No real stablity here as now the big stumbling block is ram timings which need to be relaxed to at least 8-8-8-24, but can't bring myself to buy Thaiphoon Burner...
![[IMG]](images/storyImages/283.jpg)
-
Why don't you use the free trial version?
You get 15 days which should be enough.
http://www.softnology.biz/download.html -
Maybe I'm wrong, but doesn't memset do the same thing?
Tweakers.fr -
memset wont let you change the CAS, but you could try spdtool.
-
Thaiphoon Burner says that the spd write feature isn't available with the trial version -
It used to work with an older trial version, maybe try to find one.
-
6.3 works - thanks.
-
hey can anyone please, whether its kravis or lesterp66, give us the pictured guide to overclock the p8400..?? i really wanna do it,, but i dont have any references
-
Remove keyboard, and palmrest to do step 1
![[IMG]](images/storyImages/7811.jpg)
If you want more vcore then do this:
![[IMG]](images/storyImages/vid-1.jpg)
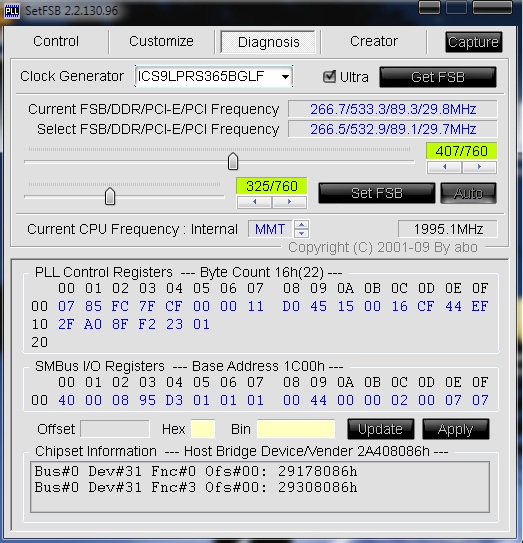
Then use SetFSB to overclock making sure PCI-E is 89mhz by sliding the bottom slider to 325/760
![[IMG]](images/storyImages/setfsb.jpg)
-
Thanks for the guide. I don't quite understand what to do, but I'm not ready (including skills wise) to perform the operation right now any way.
-
thats cool! thanks mate! ill try it out later this week! thank u very very much!!
-
does it work for you guys? i am going to try as soon as i get back from vacation. p8400 user on 07805u
-
kravis - any chance you could make your modified setfsb available - PCIe speed when overclocking the fsb on my 7811 is a big mystery. at 333mhz fsb, i can't overclock the 9800m gts at all.
-
Hi Lesterp66,
If you keep your PCI-E speed to around 89 MHz in SetFSB while the CPU is overclocked, you should be able to overclock your GPU to similar levels that you would get if you didn't overclock the CPU.
Have you tried overclocking the GPU and comparing the result with and without a CPU overclock?
Anyway, I managed to write another version of the modified SetFSB application that doesn't use the .Net framework and just runs as a command line app. You can just create a shortcut to the app on your desktop, give it a FSB to set in the shortcut and it'll try to set it. Not sure if it'll work on your 7811 but you can give it a try.
E.g. ... \SetFSB.exe -s 333.4
View attachment SetFSB_P7805u.zip
WolfFX likes this. -
*order's soldering gun*
-
I'd order a soldering iron with a digital/dial set and get a pcb tip, and some desoldering thread.
-
I managed to make Throttlestop work on the P-7805u now
-
Very nice
How did you do it? -
Holy crap that is a high overclock. I always thought by how much my P8400 could undervolt that they were great processors, just held back. Sorry if I could find this info elsewhere but is the northbridge running at the default voltage?
Edit: Did you have to do anything to turn off EIST? Mine is stuck on.
-
I second that.... I would love to know how you pulled that off!
-
How stable is it at those speeds?
-
The temp's look nice for the OC 0.0 *eagerly awaits soldering iron shipment*
-
A couple questions on the pic guide......
Resisitor - Once the resistor is removed should the pads be bridged or remain open?
Pin 11- I assume by the picture that it's okay to ground to the screw head pictured?
I just want to make sure to get all of my questions answered by someone experienced with this mod before breaking out the soldering iron. Thanks in advance. -
Once you remove the resistor, it's possible to leave it like that and SetFSB will work fine like I have done, however for some people, leaving Pin 11 open (not connect to ground) can sometimes cause problems.
To resolve this, you can connect medium resistance resistor (e.g. 10K Ohm) from PIN 11 to somewhere that is connected to the ground plane, which is usually where you see a screw covering a wide area of a copper PCB track. I haven't verified this but you can check for a GND connection by checking for a near zero resistance with a multimeter to the chassis of one of the connected peripherals e.g. the CDROM.
-
Hi there, no I haven't changed the voltage of the northbridge. Do you somehow know how to do this? By default, the voltage is 1.05v but I haven't found a way to change this.
Yes, I took iATA's 9C.17.00 bios and modded it to remove the sections of code that locks in the EIST lock bit and *luckily* it didn't cause my laptop to die at the moment of truth . I did have a Crisis Bios recovery disk prepared so I was kind of prepared for disaster but I have heard of others a having their system not boot up from the Crisis Bios recovery disk at all so I was taking big chance here.
I do have a copy of the modified bios with the EIST lock bit off but I'm not sure if I should post it here.
-
It can bench on HyperPI for short periods or run the Final Fantasy benchmark fine, but to be honest it's not 100% stable as it can still randomly crash over an extended length of time with general use. I'm still checking some settings to see if I can get some more stability, otherwise I'd clock it down a bit.
-
Is there any chance you could guide me through how you did the EIST BIOS mod?
My BIOS is here:
http://download2.msi.com/files/downloads/bos_exe/1651_114.zip
(It's an AMI BIOS)
I've tried doing it myself based off what nando4 said, but I can't find the code. -
Thanks guys for taking the time to figure out how to make this possible and for posting pics on the process. I have successfully completed the mod and I now have my first overclock on this system. Granted it's not much, but its a good start. Thanks again!!
-
-
I've used MMtool to decompress it, then I opened the 1b module with HxD hex editor.
Should I be looking for a hex value "1a0"?
1a0 comes up about 45 times within that file. -
@Kravis - If I PM you my email address will you send me your modded bios with EIST disabled?
@Lesterp66
Which corner is this in reference to? I have included a pic of the socket if you would just tell me the correct number. Thanks.
-
hey guys.. im back! actually my laptop that's been back. Its been broken for 2 months and it took 1,5 months for gateway to find that the mainboard must be replaced. It hurts my wallet.
So now i think i should try this overclocking since my upgrading money is now empty. My only problem now is im too scared to perform the solder-desoldering step, im horrified by my bad experience.. Then i dont get the grounding thing on VID..
Please anyone tell me how difficult the process is? and how did u do the grounding to get 1,2 volt?
Any kind of reply and help would very appreciated. Thanks guys
-
I found the answer to my question about the cpu socket... I still don't see how you are getting such massive clocks Kravis. I can't even get up to 333 before I crap out. I think its my stock ram that's going kaput. What is the best way to find out if it is my ram thats slowing me down?
-
Hey bus_driver,
I had to relax my memory timings to get greater clocks. You might want to take a look at Memset and play around with some of the settings there to see if you can boost your overclock.
You can also try flashing your ram SPD with something like thaiphoon burner to adjust the timings there too but beware that if you set values that don't work, your system will not boot up with that ram module and you may need to do a *hot flash* of your SPD to restore it.
-
Removed resistor,didn't ground, computer booted normally, no luck with overclocking, perhaps its my .25c bios?
-
Downgraded to 9c.17 and still no luck, only thing different that I notice is that if I unplug my computer, take out the battery, press the power button to empty the charge then restart my computer, setfsb reads my pci bus at 100mhz instead of 89.9.
When I try to set it to anything different it then reverts it to 89.9
Any ideas? [And sometimes SetFSB Gives me a PLL Byte error 0.o?] -
Can you open setfsb, click on diagnosis, hit getfsb and take a screenshot?
-
This is after I try to change my fsb, except on startup it shows 100mhz for pci-e, but registers remain unchanged after applying a new clock.
Attached Files:
-
-
Looks like bit6 of byte 9 is still 1.
Try connecting TME to GND. -
Don't have the proper tools for that nor would I for some time.
I can change bit 6 of 09 to 0 and it doesn't revert back to 01000101 and stays at 01000001. If I remember correctly it used to revert back? But changing this still doesn't allow for overclocking. -
01000101
76543210
_^______
That's bit 6.
You're looking at it backwards. -
oh whoops -.- no I can't change that\
___
Curious as to why just taking off the resistor doesn't work for me and works for Kravis and Bus, perhaps because mine is a quad core model? -
It's almost always a read-only bit.
Good luck for when you get the tools needed to GND the pin.
I have no idea why it's still 1 when you removed the resistor.
Did you remove the CMOS battery when you did the mod? -
No I didn't. If I remove it and put it back, perhaps it would work?
-
Worth a try.
BTW, anytime I try any mod like this, I remove the CMOS battery while I do the mod, just feels safer that way.
But in your case, maybe removing the CMOS battery will somehow reset the PLL registers and change bit 6 to 0. -
No luck, TME is still enabled.
Any comments bus_dr1v3r or kravis? -
Hi there. Your best bet is to try and ground the TME pin with a resistor, otherwise you could possibly try to clean the area where you desoldered the resistor. Maybe some residue is causing the floating TME pin to register a logic high reading?
-
I already tried cleaning the area and I did a very very careful job desoldering so I don't believe residue is the issue.
Has anyone successfully overclocked p7805u CPU?
Discussion in 'Gateway and eMachines' started by andros_forever, Aug 21, 2009.