That could work really well. Please make sure to locate and mount the fan somehow to the heatsink, so that the air passes through it.
I went overkill on my coolers. Each of my Dynatron A86G coolers is rated for up to 175watt TDP processors, but with my upgraded EBM Papst S-force 60mm fans, it can cool up to 200 watt cpu's
Which means that my 75 watt AMD Opterons peak at 116F even when the fans are on low. I kinda wish I got thinner heatsinks, cause those are the tallest part of my build. At least I dont have to worry about overheating")
The biggest problem is cooling the GTX295 you have and that core i7. Just make sure everything can get enough air
K-TRON
-
-
Overkill is always better than burnt components
The GTX295s I've selected have adequate cooling built into them (moreso than the standard GTX295s), just as long as I have adequate airflow through the chassis (which should be doable thanks to your recommendation on the fan array).
If I only vent behind the CPU, from the GPU vents, and from a vent near the power supply, the interior pressure should keep adequate airflow over the critical components. The only downside I can see to that strategy is that I'll have to make sure the chassis is very well sealed everywhere else.
Wow, I think I'm nearly done the research phase. Time to order components soon
-
I did wind up calling him about the heatsink. And yes, they are very helpful there (I placed an order with them). It's somewhat a shame they don't set up an online store, as they have some very good product that isn't really available anywhere else. I haven't really seen anyone else that offers such a large chunk of copper that would still fit into a server or htpc.
edit: So they just called back to say they're out of JACBBO5C, but they apparently have a copper version of JACBBO6A, which is even better lol. But it's going to be a fairly tight fit. -
Thats like what I am using. I have a 2U all copper cooler. Its a bit tall but it definitely gets the job done better.
Cooljag and Dynatron do not really sell to individuals, because they sell direct to the giants like supermicro, tyan, hp, dell and so forth for server grade cooling units.
K-TRON -
That's really weird to me. I expected to see as large a market in the server realm for hardware enthusiasts as in the consumer desktop realm. Maybe we'll see more movement in that direction as technologies converge and things like carputers and htpcs become more popular.
I've ordered the majority of the components, but held off on the motherboard and chip. The chip largely because a 7 day return policy would make it difficult to test everything else unless they all arrive first (everything else has 30-day/standard stuff). The motherboard because the original one I was looking at is currently unavailable. And depending on how the sizing works out, I may be able to fit a larger one in there. -
dang sounds liek i need to get ktron to build my next laptop what ya think ktron
-
You may think that way know, but your DV7 is more upgradeable than you think
On another note, I got my brand new ST75F power supply in yesterday from Silverstone, and it is working great. 8 cores
sironin, you made a good move not buying the cpu yet.
Before you go building, you should set the components out and see what combination you can come up with. I originally wanted mine positioned one way, but I keep changing my mind based on airflow and wire length
K-TRON -
Congrats on getting the replacement power supply!
I've done quite a few layouts, but there's nothing like having the components sitting in front of you. For this very reason, I haven't ordered the flexible riser cables yet. They come in varying lengths, but ideally I would want the shortest possible lengths to avoid unnecessarily adding latency to the video cards.
The monitor arrived last night, it unfortunately only has one visible external screw. So I'm going to have to dig up a service manual before I can safely attempt to take it apart. I'm having a hard time finding one though. I know there's a lot of weight I can shave off this thing, even if only in the universal mounting bracket (usually used for wall mounting).
Once I have a final weight, I can order the hinges. Interestingly, the monitor comes with friction hinges to adjust the tilt. I could possibly use these, but I'd have to cut out the stops they came with so that the hinge could travel a 90 degree arc rather than the 20 or so degree arc they are configured for.
One thing that is still leaving me puzzled is how I'm safely going to route the cables from the monitor panel to the component case.
Also I was looking at backpacks to carry this thing around in. I could probably use any of the strap setups for tower cases, but that tends to leave the device a bit more exposed than I'd prefer. This backpack seems to be similar to what you were talking about using. -
I am running straight DVI to the screen. I will run the cable just up along side the hinge. However make sure you leave excess so that when you open and close the screen their is no pressure.
I was thinking about using two C clamps to hold the cable down so that it doesnt move. One inside the laptop before the hinge, and than another back up behind the LCD.
I dont think I am going to mess with my current screen it cost way too much for me to mess up, and it has an integrated power supply in the back, so I cant really make it much thinner.
K-TRON -
Well I still haven't had much luck in obtaining a service manual or instructions on how to open up the monitor. This is somewhat a problem. If I damage the exterior front bezel too much in removing it, I'll have to make a new one. This would be fairly time consuming, but possible. Acer support seems somewhat slow in responding. But I suppose this is understandable as one of their pre-built machines apparently caused a house fire.
On the plus side, the majority of the components should finish arriving tonight, with the rest friday night. This will give me the weekend to play around with arrangements and make sure everything works. Then I can order the flexible riser cards and begin work on the bottom portion of the case.
I was thinking of reusing the backplane from an old steel tower case as a base, if only for the premade standoffs. From there, everything else can be bolted or welded to it. I'm basically trying to make sure I don't have any torsion anywhere near the motherboard. I'd hate to put this thing together, stuff it in the backpack, and have something short the board next time I turn it on.
I'm also looking into using toolbox liner on the interior of the case as a means to absorb small shocks, some vibration, and some noise. -
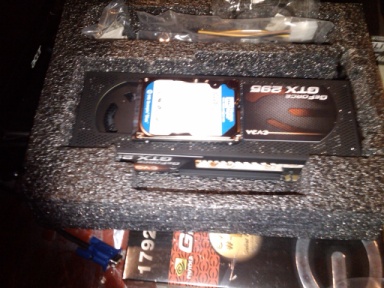
For lols, I thought I'd show a picture of a laptop hard drive compared to the video card. It's not easy to tell, but that's the drive sitting on top of the card.
Attached Files:
-
-
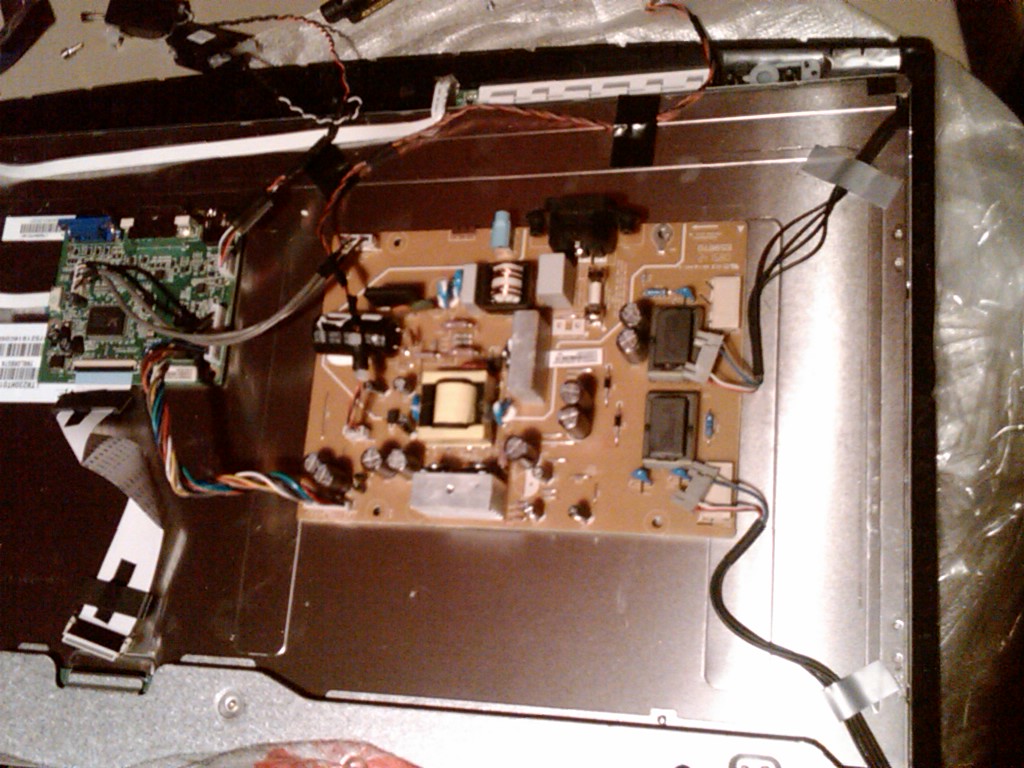
Okay, so I FINALLY got the back panel of the monitor off. I never did get a service manual out of ACER. I suspect getting pigs to fly would be easier than convincing them to take my money. Anyway, I'm excited. It looks like I'll be able to do exactly what I wanted for the monitor.
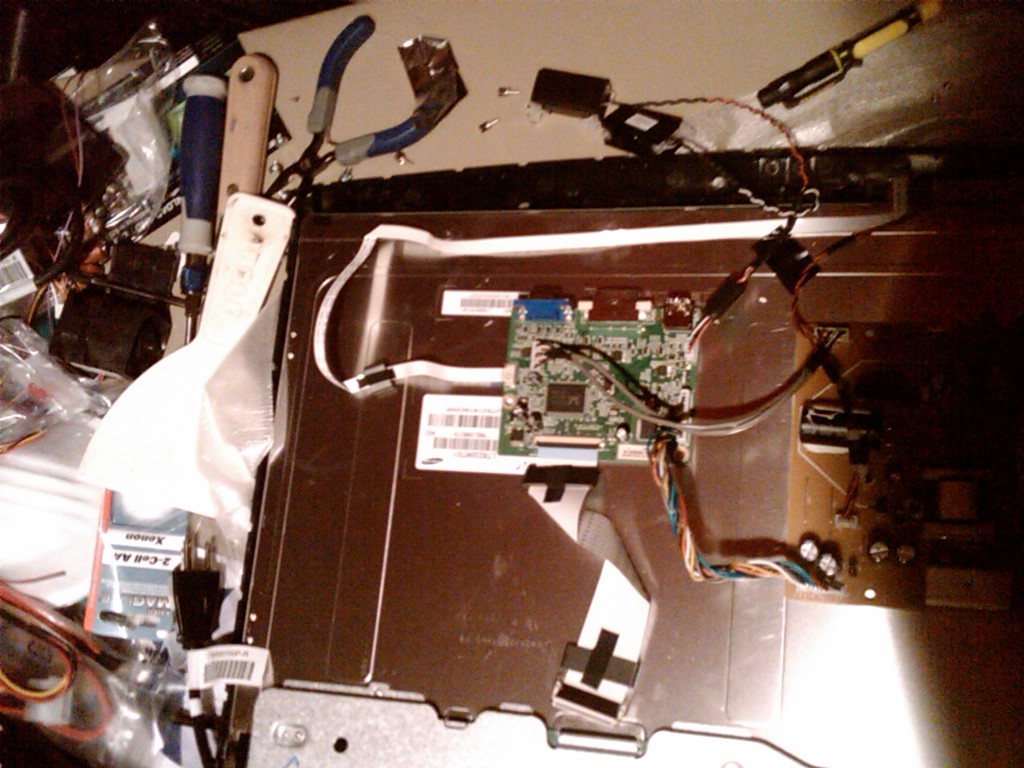
Check out the pictures real quick. I've removed the back panel and shielding and flipped the boards over so you can see them (sorry the pictures aren't too good).
Anyway, the first picture shows the inverter/PSU board. It has two power connections to the panel itself (on the right). It has an audio passthru (top left part of PSU board) for the audio jack (top middle of the board, just to the left of the AC plug socket) that goes to the interface board on the left. It also has a 4 wire connector for the power button in the middle left of the PSU board. And at the bottom left is the DC supply and volume control that goes to the interface board.
The PSU board supplies the interface board with 5vdc. So basically all I need to do to power the panel via the desktop's main PSU is build an adaptor and connect it to an unused 5v connection. This should provide it enough amperage (to be certain, I can test it with an unused older PSU).
The second picture shows the interface board and my messy workspace. Clearly I have the panel sitting on some packing foam to protect the screen. You can see the plastic putty knife I tried to use to open the case sitting on top of the metal putty knife that worked. Along with the pliers and screwdriver I needed to remove the shielding (the VGA and DVI ports had the standoffs holding them to the shielding). That reminds me, I need to take the masks down to the workbench so I can start on the chassis effort.
Anyway, the interface board houses the VGA, HDMI and DVI connections. I don't want to screw with this board due to its lack of labelling and the delicate nature of the wide cable and thin cable that attach to the panel. If I've screwed up at any point in this process, it would be when I had to disconnect those two cables from the interface board in order to flip it over for a picture.
The panel itself is a happily self contained unit. This means that I can build a new, smaller housing for the interface board along with a new thinner chassis for the panel. The original width of this thing was over 3" and I'll be able to cut it down to under 2". The inverter really takes up a ton of space.
I'm not overly worried about the audio part of the panel. The keyboard I'm using has built in controls, so I won't miss that when removing the inverter board (which also included volume controls). In addition, I'd rather use slightly better speakers than the included 1.5w jobs that you can see at the top of the image between the pliers and pen-shped screwdriver on the right.
In the future, if I just order a panel that uses a power brick and doesn't include any speakers, this process will be MUCH simpler. As it would just involve mounting hinges to the panel chassis. Of course, this way I do get to make my own chassis, which should be fun.
Also, I've finished measuring the potential placement of the cards and gotten my flexible risers ordered. I had to order a backplate for the heatsink, as I forgot to earlier. Of note, holy crap risers can be expensive. Everything else has arrived and works just fine (didn't have to have anything RMA'd). I'm actually posting from the new computer.Attached Files:
-
-
The flexible risers and backplate have arrived. I finally got the heatsink installed. It is considerably better in terms of performance compared to the default, and is also quite a bit shorter as well. Once again, a solid mass of copper proves more efficient than aluminum with copper heat pipes.
I finally finished splicing the wiring on the monitor's inverter board so that I can relocate it into the bottom part of the chassis. Wow that was a lot of splicing. I may have to redo some of the earlier stuff, as I got better as I went.
I wound up going this way, because if I screwed up the wiring anywhere, I will still have the option of circumventing the inverter board. The reason I'm not doing that from the get-go is that I haven't been able to find a schematic on the interface board. There's just too much going on there to make a guess on how much power I should be pumping where.
Next I have to make sure it still turns on and accepts a signal. Then I can start in on dremeling and welding my scrap metal into a workable chassis. Once I have a weight figure on the top portion (that holds the monitor panel), I can order the proper friction hinges. From there, all I'll need to do is make it presentable.
I was thinking of making it look vaguely like a metal briefcase. That way I can attach a handle and shoulder strap to it without needing an extra large backpack to move it from place to place.
I've investigated using an existing metal briefcase as a base for the chassis, but it just wouldn't be cost-effective. Many of the ones I researched are simply the wrong dimensions. The ones that are large enough often split in the middle, which would be an ineffective use of space for me. And I'd have to do significant modifications to make room for fan vents anyway. The ones that are the right size also tend to be insanely expensive. So it'll be a lot cheaper and not much more work to just build it from scraps. -
It looks like 90% of my splicing worked. I have to redo my earliest splices, which were apparently the backlight. Basically, my screen was coming up normally, then immediately going dark a few seconds after being turned on. Shining a bright light on the screen showed that it was working, just not doing the backlighting properly. So I think I'll have to resplice that part. It was the first splices I did, so I'm not overly surprised they didn't work out as well as the later stuff (the video and audio).
Building a laptop from scratch
Discussion in 'Hardware Components and Aftermarket Upgrades' started by sironin, Mar 2, 2009.