Don't compare RTV Silicone Gasket Maker with Super Glue.
-
-
Exactly. I could easily see this damaging the PCB if the user isn't careful. Idk what kind of super glue they used, but the Loctite gel stuff I've used is nowhere near as difficult to remove.
RTV silicone is much easier to remove than super glue, you can scratch all of it off with just your fingernail.jaybee83, NIGHTMARE, Falkentyne and 1 other person like this. -
my liquid metal applications have evaporated, what did id do wrong?
-
Did the temps "rise" at all before you checked this?
LM gets "partially" absorbed by copper due to a battery effect, leaving a hardened material outside. It does NOT degrade the copper or destroy its structure like it does aluminum.
This effect can be circumvented by applying *more* LM than you are supposed to. This will allow the LM to do its thing and have it partially absorbed by the copper, and the remaining LM will remain outside when the battery effect is stabilized. You need to apply a bit of "extra" LM for this to allow for this. LM is VERY VERY thin, like water, so if even a micronnanometer layer of it gets absorbed, if you tried to apply the bare minimum to get by, it could leave none left on the CPU")
Another secret is to 'force' LM absorption into copper at the very beginning by 'tinning' the heatsink with LM. Take your applicator and rub LM *vigorously* into the copper right above where the CPU or GPU will sit and do a lot of strokes and rubs. This will 'begin' the battery effect early by causing part of the LM to begin working its way into the outer layer of the copper. Then attach the heatsink.
This method also works very well with IHS delids. People have tested and confirmed that "tinning" the inner side of the IHS when doing cpu delids, with liquid metal, lowers temps than just only applying LM on the core by itself. Because a tiny bit of LM also works its way into imperfections in the nickel layer as well (just not as much as into copper).
BTW, copper doesn't completely absorb all LM deeply. it only gets absorbed into the very outer layer. You can actually clean this layer with 3000 grit sandpaper and Isopropyl alcohol and have the copper look like new again.
Also make sure the CPU/GPU surface and heatsink is fully flat. A fully flat surface keeps good contact with any LM that may have gotten absorbed, and if you used enough to make up for this absorption and tinned the heatsink, you will be good to go after even 1 year.
Like seen here:
http://forum.notebookreview.com/threads/after-1-year-of-thermal-grizzly-conductonaut.799343/
Convex/concave heatsinks will fare far worse.pressing likes this. -
After one year and maybe a couple months, here is the heatsink of a Toshiba L50-A, BIOS "modded" to allow for more than 30Amps into the CPU, before it was neutered to 30Watts TDP max, CPU side was lapped, GPU left as-is, because on this laptop I never use the GPU, its for work, running CAD software and a couple VM's.
It was getting very loud under light loads, and today I verified that it was hitting almost 70ºC with 8Watts of package TDP..

-
Call me crazy, but after having so much evaporate it became hard to spread the LM around. So this time i'm going to mix it with regular paste to see if i can get it to spread and make better contact. Also may need to order a shim, but what size for my p377 sm-a?
-
Why would it be harder to spread? You're supposed to use polishing sandpaper (2000+ grit, 3000 is best to avoid any sanding of the copper) to remove the hardened LM and any tiny artifacts from the stain remaining (the stain itself is fine as long as its perfectly 100% flat). If you are putting new LM on top of hardened oxidized LM, that's very bad because you will instantly have bad contact.
-
there wasn't any hardened LM that I saw except along the edge, the rest created a light film that was microscopic. NO REASON,that the LM should've stayed in a ball form. Plus my idle temps differ by 2c between the TG-7/TGC and just TGCLast edited: May 14, 2018
-
Beautiful guide! Well done
-
N
#1:
LM will remain in a ball form if there is any residue of isopropyl alcohol or any other foreign liquid on the CPU or heatsink surface. Isopropyl alcohol causes the LM to fail to be attracted to the surface and the attraction to itself remains stronger, so there must be no wet residue on the surface or applicator. Make sure your applicator is 100% clean! Do not reuse any dirty applicators!!
2) This is the absolute best applicator of LM I have ever used:
https://www.amazon.com/gp/product/B00Q3BG6Y4/ref=oh_aui_detailpage_o03_s00?ie=UTF8&th=1
3) The MAIN LM application should be applied to the CPU or GPU surface directly and spread there, NOT to the heatsink (EDIT** I did not say do NOT apply LM to the heatsink. I said do not make this the MAIN application! You "Tin" the heatsink (apply a thin layer and rub it in extremely well and hard to make it begin to react with the copper. That's what I mean, sorry for any confusion). You spread it until it is fully spread around the CPU or GPU. Make 100% sure that the spread leaves an equal amount of LM around the entire silicon without any "barely any there" parts! That is because LM will attract and try to adhere to itself, so its possible any "barely any there" parts can be 'sucked' into the "more here" parts when applying the heatsink, causing hot spots, premature oxidation (absorption of part of the LM into the copper, leaving a hardened residue behind), and core temp differentials. I have found it is better to use a little too much LM than too little!!! But you must exercise care! To use a little too much, use nail polish coats around all SMD resistors around CPU or GPU, then for more OCD protection, you can cover even that with Super 33+ tape (note: you only need to do either the super 33+ method or the nail polish coat method, not both) and finally, since you went with the "little too much" method, finally, you use a very very highly compressible, cutout, and THIN (even if you have to trim the foam thickness) foam dam barrier, to trap any excess LM from ever escaping the area, in case of a bump or shock. The tape or nail polish doesn't prevent this at all--that only stops shorts or dead hardware from LM touching the SMD's right next to the chip. The foam dam protection stops LM from getting on the main PCB, permanently.
That foam dam must be compressible with NO EFFORT, using your fingers, to the width of a human hair.
Once you are done spreading the paste on your CPU or GPU fully, then you take the remnants remaining on your applicator and you "Paint" that on the heatsink, in the shape and size of your CPU and GPU area Rub it in well; this accelerates and begins the LM "absorption" from that coat right away, rather than having it begin from the layer on the CPU or GPU.
This is my method. And I enjoy it.
My method makes the LM look more like spreading honey on something, rather than a super ultra thin later like some repasters here tell you to do. This gives a bit extra room for any absorption and helps longevity.
LM is best done with a perfectly fully flat heatsink! If you have >4C core temp differentials with REGULAR PASTE using a fully 100% all thread balanced load like prime95 (AVX disabled), you are going to have problems with LM--it means you hae either a convex or concave or imbalanced heatsink, and may need to take sandpaper to it with a sanding block or kit (which requires removing the springs and screws; some may be impossible to take a sanding kit to).
Avoid any items with COTTON. Avoid Q-tips for that reason. Even $1 'white foam' type swabs (for eyebrow/eyelash care) from the 99 cent store will work, but it will be hard to control proper LM spread with precision because they will be a bit too "thick" and round. The applicators (also for eye care) I linked are much thinner and allow far more precise spreading and are even reusable as long as you store them in a dust proof ziploc type pouch (the old LM should not harden on them).Last edited: May 27, 2018pressing, oSChakal, jaug1337 and 1 other person like this. -
@Falkentyne If I read this correctly, you are saying not to apply any LM to the heatsink at all before applying it? I've been doing LM on the CPU die and a thin layer on the heatsink but am questioning how well I am lining up the heatsink to where the actual die is when I "paint" on the LM.
-
I actually completely worded my sentence wrong. My fault and no intention to confuse you.
Yes you must apply LM to both surfaces. But the heatsink is not the main (thick) application part for it. The heatsink has to be 'tinned' and 'rubbed in' to start the Copper to LM battery reaction directly on the heatsink, rather than the heatsink reacting and absorbing the LM on the CPU. That's why I recommend buying lint free swabs like this:
https://www.amazon.com/gp/product/B00Q3BG6Y4/ref=oh_aui_detailpage_o00_s00?ie=UTF8&psc=1
Then you can rub that LM around the heatsink (where the CPU touches) as strong as Hercules rubs his finger around the Grand Canyon without any fear of lint or particles getting off and ruining heat transfer. That's basically what I meant. -
I also recommend scratching the heatsink part slightly with a very fine grain of sandpaper / finishing paper.Mr. Fox, Papusan and Falkentyne like this.
-
Or even you can clean it with 5% HCL(Acid) an it gives you such good results you can see the results in video linked from Der8auer he try to clean the IHS and i repeat "IHS top" but for the heatsink I'm sure Acid will shave the GaCu complexe that the mean th Copper from the heatsink will lose thickness over time that's the problem.
As chemist i have a suggestion is using ELECTROPLATING PROCESS to plat copper(heatsink) with nickel for exemple or some other metals this process guarantee the even surface plating if we respect some conditions of course no sand paper no other thing just plat your heat sink before using LM in theory of course LOL . -
i also saw that clip from der8auer on YT (great channel btw, i really recommend checking it out for his in-depth hardware analyses, goes way beyond most other channels )
what surprised me though was that he was using acid to clean off the LM residues. you can actually get better results by using 100% isopropanol! thats what i do and so far ive always gotten the writing etched onto the top of the IHS back
Mauserk98 likes this. -
I think becuase he use extreme condition both(Xtreme temps and reusability with repastig each time) to test his CPUs this make the LM to make a harder complexe and why not an 5% acid is a very weak acid concentration it'll not affect the IHS after all the problem is if we use it with copper.
@jaybee83 do you use LM on the GPU also ??? I wonder how it affect the copper heat sink & temps ? -
I had no luck using isopropanol or hydrochloric acid to clean dried LM off the copper heatsink on my previous P650SG.
-
I told you guys already. Use Alcohol with 3000 grit sandpaper to clean the LM without wearing down the heatsink.
Comeon people. You can't just ignore my advice because some "pro" overclocker has more "credibility" than a random person.
Sometimes those random people do things other people don't know about. -
After how long in use you tried to clean it ?
-
A little over 1 year after application.
-
lol we didnt ignore u there, its just two different things were trying to address.
on one side we have the heatsink which is naked copper. its true that ull end up with a silver-ish coloration even after removing as much LM as possible with isopropanol. that coloration doesnt hamper with temps though, its just a visual imperfection.
as for the CPU IHS, the etched specs are naturally important for resale value and/or warranty purposes. plus, were not talking naked copper here, but rather nickel plated copper. so in that case, the LM doesnt "flow" into the material but rather stays on the surface, thus u can remove it more completely
and yes, the only way to remove the discoloration of LM on naked copper is to grind it down with sand paper!
in my case it doesnt make sense to use LM on the GPU, since it already stays super cool (were talking about low to mid 70s absolutely MAXXED out in a hot humid environment such as we have here in SG) the CPU on the other hand cannot get enough thermal headroom if u ask me!
-
GPU's have a bigger surface area so heat transfer off a heatsink is more effective than off a tiny BGA or LGA CPU with an IHS, even if the GPU is using more wattage overall (over my head here, but its clearly using less volts but more amps).
But Pascal needs all the help it can get, with its unavoidable temp throttling.jaybee83 likes this. -
yes thats true. pascal is different in that it just turbos all the way up until it hits thermal limits (at least in most systems, especially laptops, ull hit the thermal limit way sooner than the absolute max clock limit)
-
What Xtreme temps? Nothing will be more extreme than 100C from the Coffee lake BGA in the new Alienware's. Aka Boiling temp.
![[IMG]](images/storyImages/ZlsNn56.png) Mind you, You can't use Liquid metal below 10C or in subzero temps, if this is what you meant with Xtreme temps.
Mind you, You can't use Liquid metal below 10C or in subzero temps, if this is what you meant with Xtreme temps.
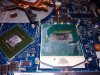
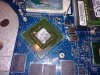
Another way to remove Liquid metal.
This one work very good as well. Indigo Xtreme Clean ™ thermal surface cleaner. Will continue to remove even more dirt after you finished cleaning up with 99% isopropanol. Data sheet indigo-xtreme Cleaner/page-dea.pdf
And I haven't problem with removing +1.5 years old Liquid metal...
![[IMG]](images/storyImages/idBdwyv.jpg)
OEM*s put more attention on the GPU cooling. They look all too much on Intel's stated 45W TDP for mobile BGA. Or better say, not more space for proper cpu cooling in todays thinner and more flimsy laptop chassis after puting a good enough heatsink/cooling for the graphics.Last edited: May 29, 2018pressing, Mauserk98, Mr. Fox and 1 other person like this. -
-
yep, its like der8auer is playing around with stuff ten gens ahead of us while were super happy with our sticks and stones
-
https://rockitcool.myshopify.com/products/lga-1366-delid-tool?variant=2388025671693
One could delid soldered CPUs without an oven via this method. He should make this for Ryzen and Threadripper cpus ( A device to hold two mini torches? )
https://rockitcool.myshopify.com/products/copper-ihs-for-lga-2066
Copper IHS for LGA 2066jaybee83 likes this.
Liquid Metal Explained: How it works, why it fails (and how to use it)
Discussion in 'Hardware Components and Aftermarket Upgrades' started by margroloc, Sep 27, 2017.


