That. Is. Awesome. I'd love to hear more about how you did this, definitely will be looking into trying this once my last couple weeks of school are over. Quick question: what size paper did you use to print out the template?
-
Thanks Chaosrl!
Quick reply (for now): I created the template in OpenOffice Draw on a legal-sized page, and it barely fits at that. Printers will vary on the width of stock they can handle and the maximum margins they'll print to, but I found with my Canon Pixma inkjet that it could handle 8 5/8" wide stock, so I cut out an 14 x 8 5/8" sheet of Contact paper and printed directly on the backside of it. The extra 1/8" gives me a bit of wiggle room in case the sheet is fed through on a slight angle (which happened more than once).
My printer won't print out to the page width so it did cut a bit of the margin off, but nothing I couldn't deal with when cutting it out. Once I converted to .pdf you lose control over where the image is placed within the page, so if your printer doesn't like it I'll be happy to provide the original OpenOffice document so you have full control over the template.
I'd also highly recommend printing directly on the Contact paper backing like I did if at all possible. I had cut out the touchpad piece from a template taped onto the paper, and it was less accurate and more difficult to deal with overall.
When I get some more time later I'll post some things I learned about cutting out and applying the Contact paper. -
Hi all,
I have Ubuntu happily running on my 5310m and it is working well.
I do have two questions that I would appreciate hearing from others about.
1) How snappy and responsive is Ubuntu on your 5310m? I find that while the operating system runs well and that processor intensive tasks (e.g. ripping a DVD) run well, overall system responsiveness is slow. For example after boot it can take over 15 seconds for Firefox to launch.
2) Has anyone been able to assign the Quicklook key to a shortcut in Ubuntu? I have no problem assigning the Quickweb key to launch the browser but have been unable to allocate the Quicklook key to a shortcut.
Overall I am happy with the machine running Ubuntu. I just wish the system felt more responsive and snappy when launching programs.
I would love to hear from others about your experience with this set-up.
Thanks in advance,
James -
Hello,
How do you find the build quality of the 5310m?
My unit has lots of quality defects: cover is warped at the center, it's not centered to the bottom part and when the cover is closed left side hangs on air.
But thats not all: aluminium sheets/parts mounted on wrist rests and over the keyboard are not straight. If you feel the wrist rests, they feel lumpy and if you look them from side view (with light in front of you) you'll see that they are not straight, they look more like someone had installed them with their thumbs and also left air pockects between the sheet.
So are these all like this? -
1) Very. My machine takes 48 seconds from pressing the power button until Firefox is running on 9.10. (That marvel Windows 7 needs another 10 seconds.) Never sensed any delayed responses, and I run pretty heavy programs (Eclipse, Firefox, Thunderbird, Photoshop). The laptop often responds much faster (opens menus and Nautilus windows, minimising, launching programs) than my desktop with similar specs but better GPU, running a recently installed XP.
2) Just as you, I've not managed to assign any command to the QuickLook button. I'm sure it's possible though, so try the official Ubuntu forums. Me, I just learned to live with it for now..
You're not running 10.4 right? It's still in beta so it's not really meant to work, if you are..
Otherwise very happy with my Ubuntu/HP fusion. The drive is very noisy, but through laptop mode I keep it off for as much as possible. If you're bothered by not being able to disable the touchpad when typing, have a look at this: https://help.ubuntu.com/community/SynapticsTouchpad#Disabling the Touchpad Temporarily While Typing -
Hi. Certainly there have been others with similar complaints. In these forum pages I recall a few others who had the cover overhang the edge when closed. The arch in the center of the cover seems to be more common - mine is like this as well, and I wonder if it's because I always pull the cover open by the top center and have caused it to warp? I don't recall anyone else posting an issue with the wrist rests.
But by and large I'd suggest the greater majority of units do not have these flaws, except for perhaps the arch in the top of the cover. Yours was probably built on a Friday afternoon by guy who just lost his life's savings on the stock market. Can you exchange? -
I'm really hoping that this unit is unique and that the same assembly line worker did not assemble all 5310m's that my dealer gets... There was also a loose plastic part inside the bottom of the case, it fell out when I opened the bottom panel.
I'm getting a replacement unit next week.
I also checked build quality of a Probook 4320s and it was superior to the 5310m, I didn't notice any problems. But it's a little too heavy and thick... -
Hi there,
Thanks for the reply. I'm glad to hear that you have Ubuntu running smoothly.
I am still running 9.10 and have decided to hold off on the upgrade until the end of the month (given that we are so close).
That sounds great. It also sounds like you have Firefox running automatically when the machine boots. If you do not run Firefox automatically, but wait until the machine has booted before running Firefox, then how long does Firefox take to load. For me it is over 15 seconds which can feel like an eternity.
One other question, what filesystem are you using. I'm using EXT4 with LUKS crypto. Overall it runs well but every now and then there is a slight pause with heavy HDD activity and the machine freezes for a second or two. It continues after the HDD write without a problem, but it is a bit of an annoyance.
Personally my older machine (DELL Inspiron 6400) which had a far lower spec than the 5310m was much more responsive. The only difference that I can think of was that on that machine I had EXT3 selected as the filesystem and did not have any swap space allocated.
I'd love to hear any others' experiences with Ubuntu on the 5310m for while it is running ok on my machine, it does not have the snap that I was expecting.
Thanks again.
James -
Will try this tomorrow. The boot test I did by enabling auto logon for my account and configuring Gnome to autostart Firefox, same for Windows.
You make a fair point about file systems. I went with ext3, and did not choose to encrypt my home folder. Only set up one partition for Ubuntu as well (swap aside).
During these brief pauses, is there always a lot of drive activity? There are tools for showing processes by hard drive activity, and which sectors are accessed..
I've noticed this myself - the lid is a little convex, and there is a bump in the palm rest by the right (middle) speaker. Will try to shoot a few closeups tomorrow. Nothing I'm too bothered with though. -
I returned a 5310m awhile ago and received my replacement this week.
From a build perspective, I couldn't find a single flaw with the one that I returned--the corners lined up perfectly and though there was some arch to the screen when shut it sounds like every screen has some arch, which leads me to believe that it is by design.
The replacement is slightly less perfect--it has <~ 1mm of underbite on the right corner and the same screen arch.
Both machines have smooth/straight aluminum--I am not exactly clear what you mean by "not straight" here but there are def no air bubbles--and very good battery fit.
So I have noticed some variation in build quality; but I have been happy with the build quality of both the 5310ms that I have seen. I think you can expect better luck with your replacement. -
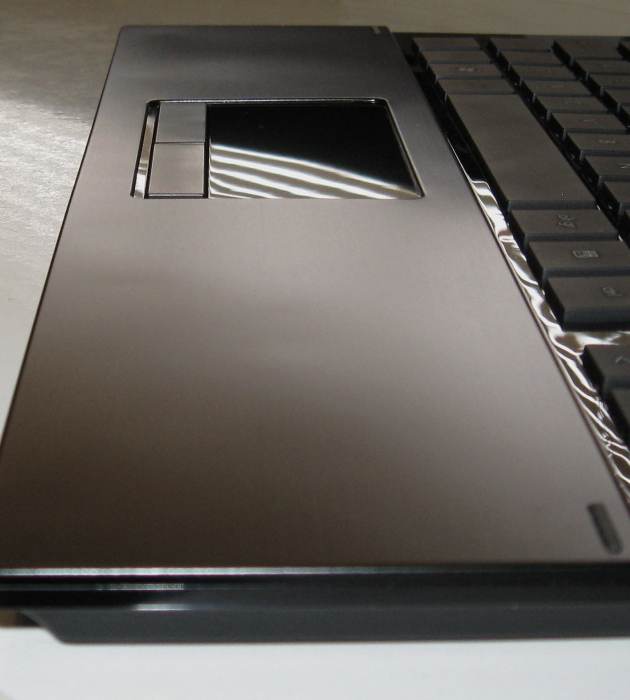
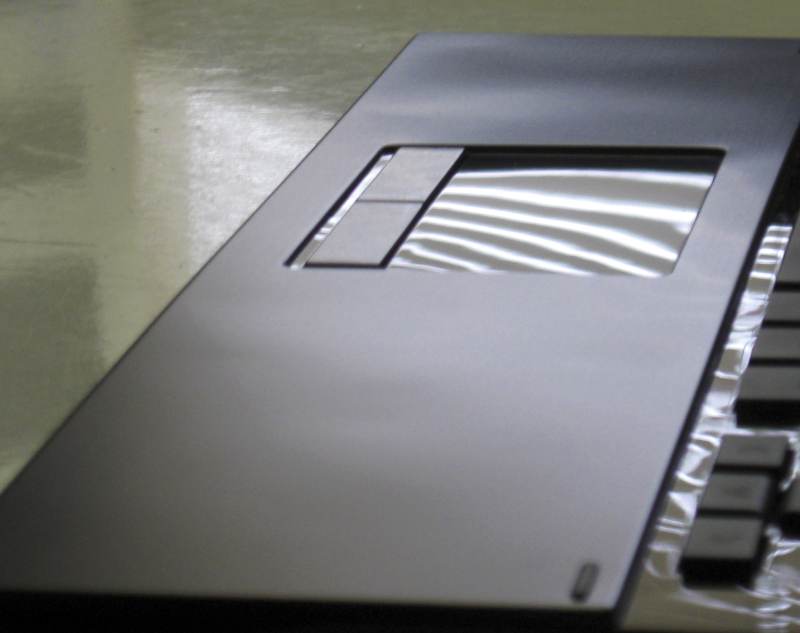
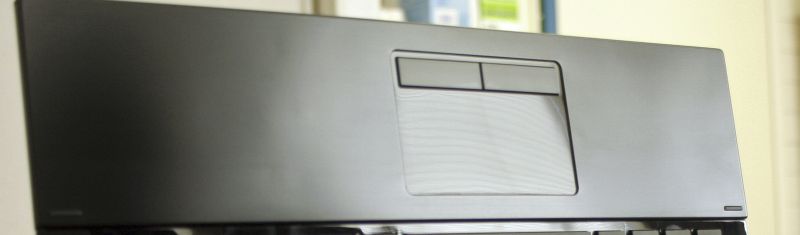
I have attached few pictures but it's very hard to take a picture that clearly shows the problems. All those surface problems (that you may or may not see) are in the aluminium sheets, the panels were wiped clean of grease stains before I took the pictures. Left hand side has that larger air bubble (sheet is not flat) and right hand side and power button panels have thumb marks.
Attached Files:
-
-
I'm running Ubuntu 9.10 as well, and I haven't experienced any slowdowns as compared to my previous machines. Firefox does take a while to start, but only the first time after boot. Also, I've switched over to Chrome, opting to use Firefox only for specific applications.
As far as HDD activity, I haven't noticed any problems with it. This could be due to a couple of reasons: 1) I'm not as perceptive, and I just don't notice, or 2) it doesn't occur on my machine. I'm using it formatted with EXT4 with a 4GB SWAP (yes, overkill, I know...).
Honestly though, I've felt like it's been really quite fast, definitely up to what I was expecting.
I can see a little bit of what you're saying in those pictures, and can verify that none of the issues exist on my machine. The aluminum panels are very straight here. I would say that you got a bad unit -- see if you can get it replaced? -
10 seconds is the amount of time FF needs to start and load a fairly heavy page for the first time after startup.
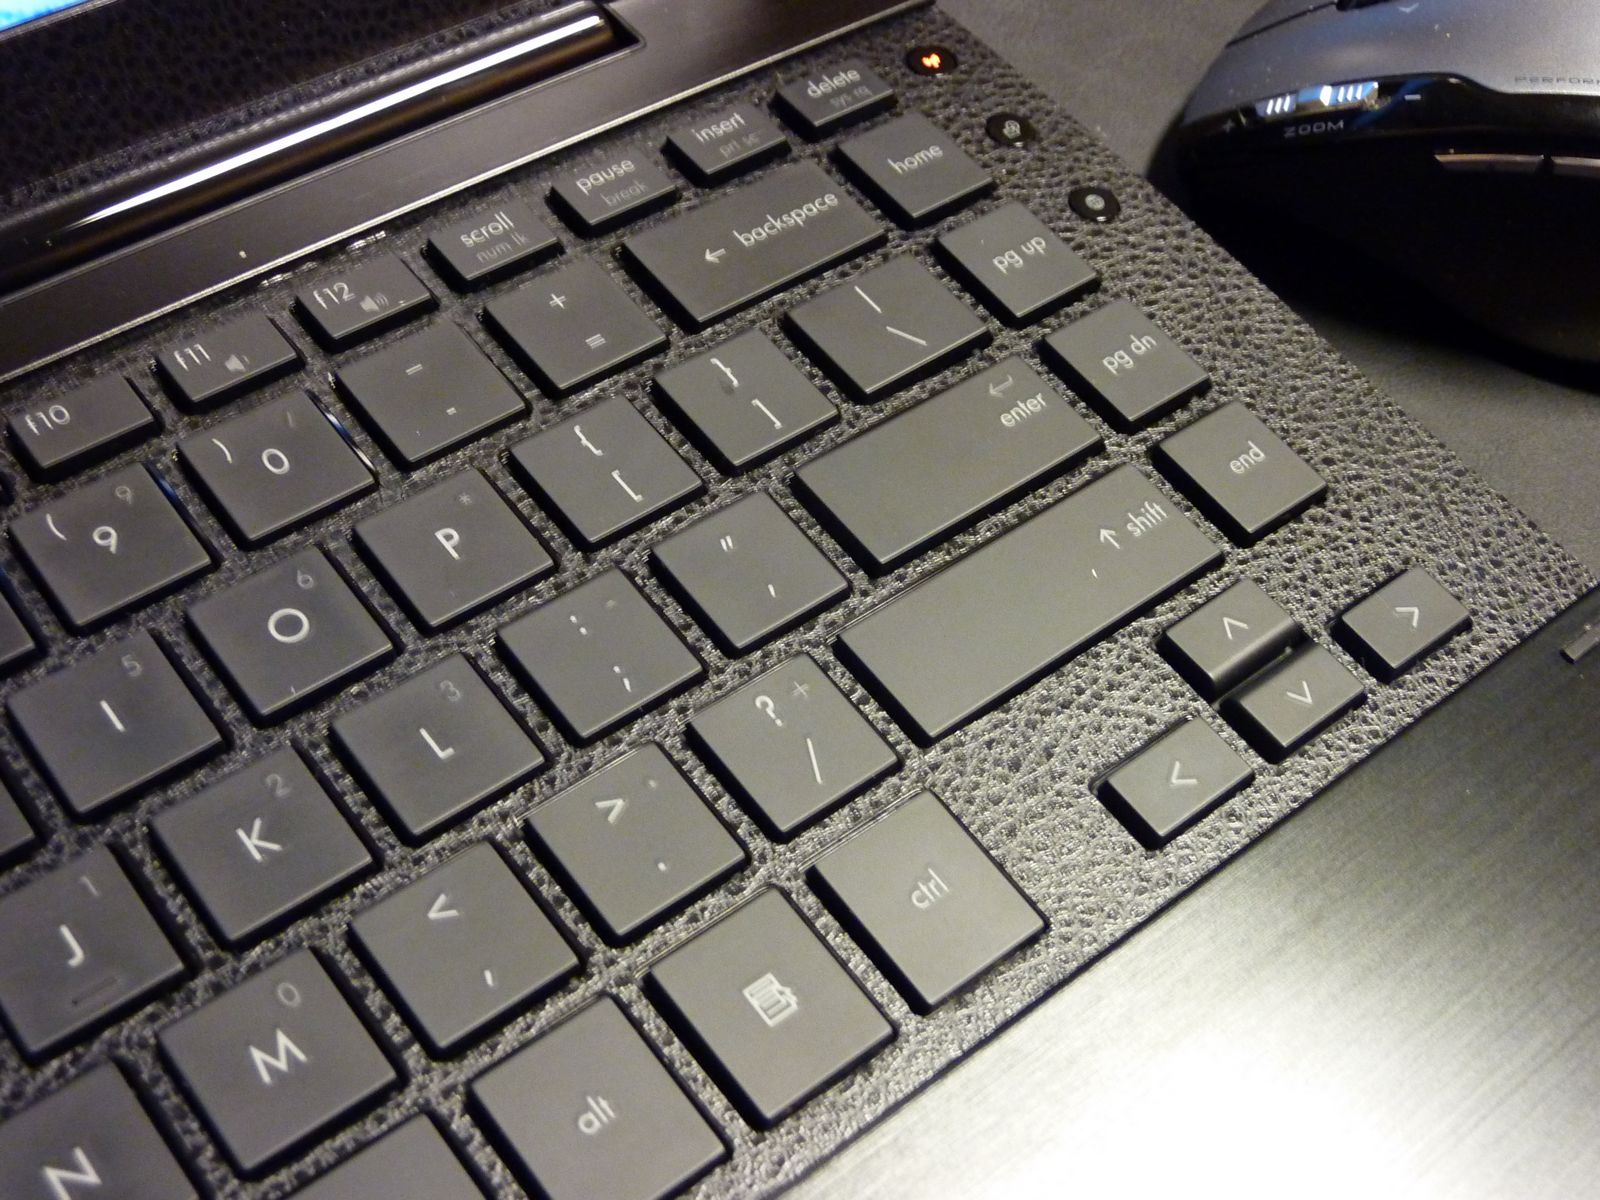
Demonstrating the slight bulge of the palm rest at the right channel speaker..
![[IMG]](images/storyImages/84518610.png)
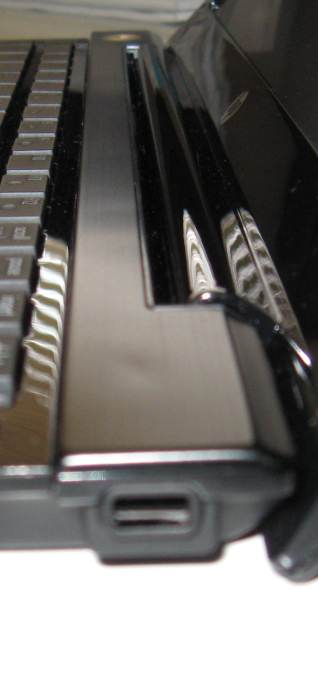
..and the warp of the lid, the rubber foot does not fully contact the palm rest:
![[IMG]](images/storyImages/63520252.png)
No other quirks - hinges and corners line up, and certainly no aluminium 'bubblyness'. -
I got the replacement today. This unit is a little better: the lid closes correctly. It's not correctly aligned at the right front side but it's much better than the previous one. And the lid is, of course, warped at the center.
Power button panel is now free of thumb marks but at one point there is black finish missing at the the aluminium panel's edge.
Wrist rests are better but still both sides have similar problems that the previous unit had.
Battery's front edge has a punch mark.
So I guess they are all like this, maybe I was expecting too much from HP's quality control at this price range. -
Yes, I see some slight variation in the aluminum panels. Using your pics as a guide I took a really close look at my 5310m and could not find any such variation--it's flat flat flat.
Mine too has a slight warp here: the left foot just doesn't quite touch... -
I can also verify my machine does not have any bubbles or defects in the aluminum.
The display lid is arched in the center, everyone seems to have it; a few of us came to the conclusion that it might have been done to make the lid stronger. I think having the arch shape makes it more difficult to press the lid down and therefore makes the notebook slightly stronger. -
I'm very interested how you applied it.
I installed a piece of vinyl tape called Avery Dusted Glass. After the tape settled over night, the touchpad now looks and feels almost like it was originally made of matte material. I now just need to make (I have access to a vinyl print/cut machine) a full size piece and figure out how to install it. That is, if I can still remove the tape I already installed...Attached Files:
-
-
New BIOS is posted on the driver site. F.09, same one as some people already have. Unfortunatly no mention of anything interesting like fixes for fan noise or battery life, so I won't update.
-
Are any of you guys using an external DVD burner with this machine? I was looking for a slim usb powered external dvd writer and was wondering which ones work well with the 5310m.
-
I haven't heard of "dusted glass", but sounds like it's an industrial product not readily available for us mere mortals? If it's intended use is for window advertisements I assume it's meant to be removable?
I owe ChaosRL some ideas on installing Con-Tact paper, so I'll get working on that now. -
Hi everyone. For those who are interested, earlier I posted a template you can use to print, cut-out, and apply Con-Tact paper to the bezel and touchpad of your 5310m. You can find it here.
Now I want to add some things I learned about the process of applying the Con-Tact paper (hereafter known as "vinyl" because it's easier AND they're not paying me commission), because there are some things I'd do differently.
PRINTING:
First, printing the template. When working on the touchpad I had printed the template to paper first, then taped it over the vinyl sheet to cut it out. This works, but I found when doing any small detail bits (like the rounded corners), the paper would rather be pushed out of the way by the knife blade rather than be cut and didn't leave the best results. Also, as you get to the end of the job, all the tape holding the template to the vinyl gets cut away as well, and the paper can slip on you. Therefore, I highly recommend you print directly to the back of the contact paper!
I used a Canon inkjet printer and printed the template on the largest paper width my printer would allow, which in my case was 8 5/8". I used the manual feed tray to get a "straight-through" paper path because I wasn't sure how the printer would like running the vinyl through the rollers. Finally make sure the printer driver and/or your .pdf reading software doesn't attempt to scale the template to fit the paper size (which should be set to Legal landscape).
I did not attempt printing with a laser printer, and wouldn't recommend it. The printing process uses a lot of heat, and typically the paper path is more convoluted.
CUTTING:
Once printed, I used a X-Acto knife (with a brand new blade), metal-edged ruler, and plastic cutting board to cut the template out. I did the circles and rounded corners free-hand, but to make them turn out nice I did each circle in quarters and rotated the template 1/4 turn each time so my hand was always in a comfortable position. And took it sloooow.
If I were to do this again I would probably not cut out the window for the "ProBook 5310m" label. It just doesn't look quite right, like it's a clue there is a surface applied here rather than a factory finish.
Also, I didn't add any lines to the template to mark the outer edges of the screen, and this is because I trimmed it to size after it was applied. There are two small "flaps" on either side of the hinge cutout area, and I just left as much length to the flaps as I could.
The keyboard template has rounded corners for every key. You may choose just to use a 45 degree angle in each corner, or simply square out the corners as these would both be easier ways to cut the template out. Me, I went the difficult path and made rounded corners by using one of those adjustable hole punches, the kind you'd use for making new notches in a leather belt. Painstaking work, but the best result IMHO. I couldn't get the keyboard template 100% accurate as it always seemed to print out about 1 millimetre shorter than the dimensions on the template, however it's close enough to survive a not-too-close inspection.
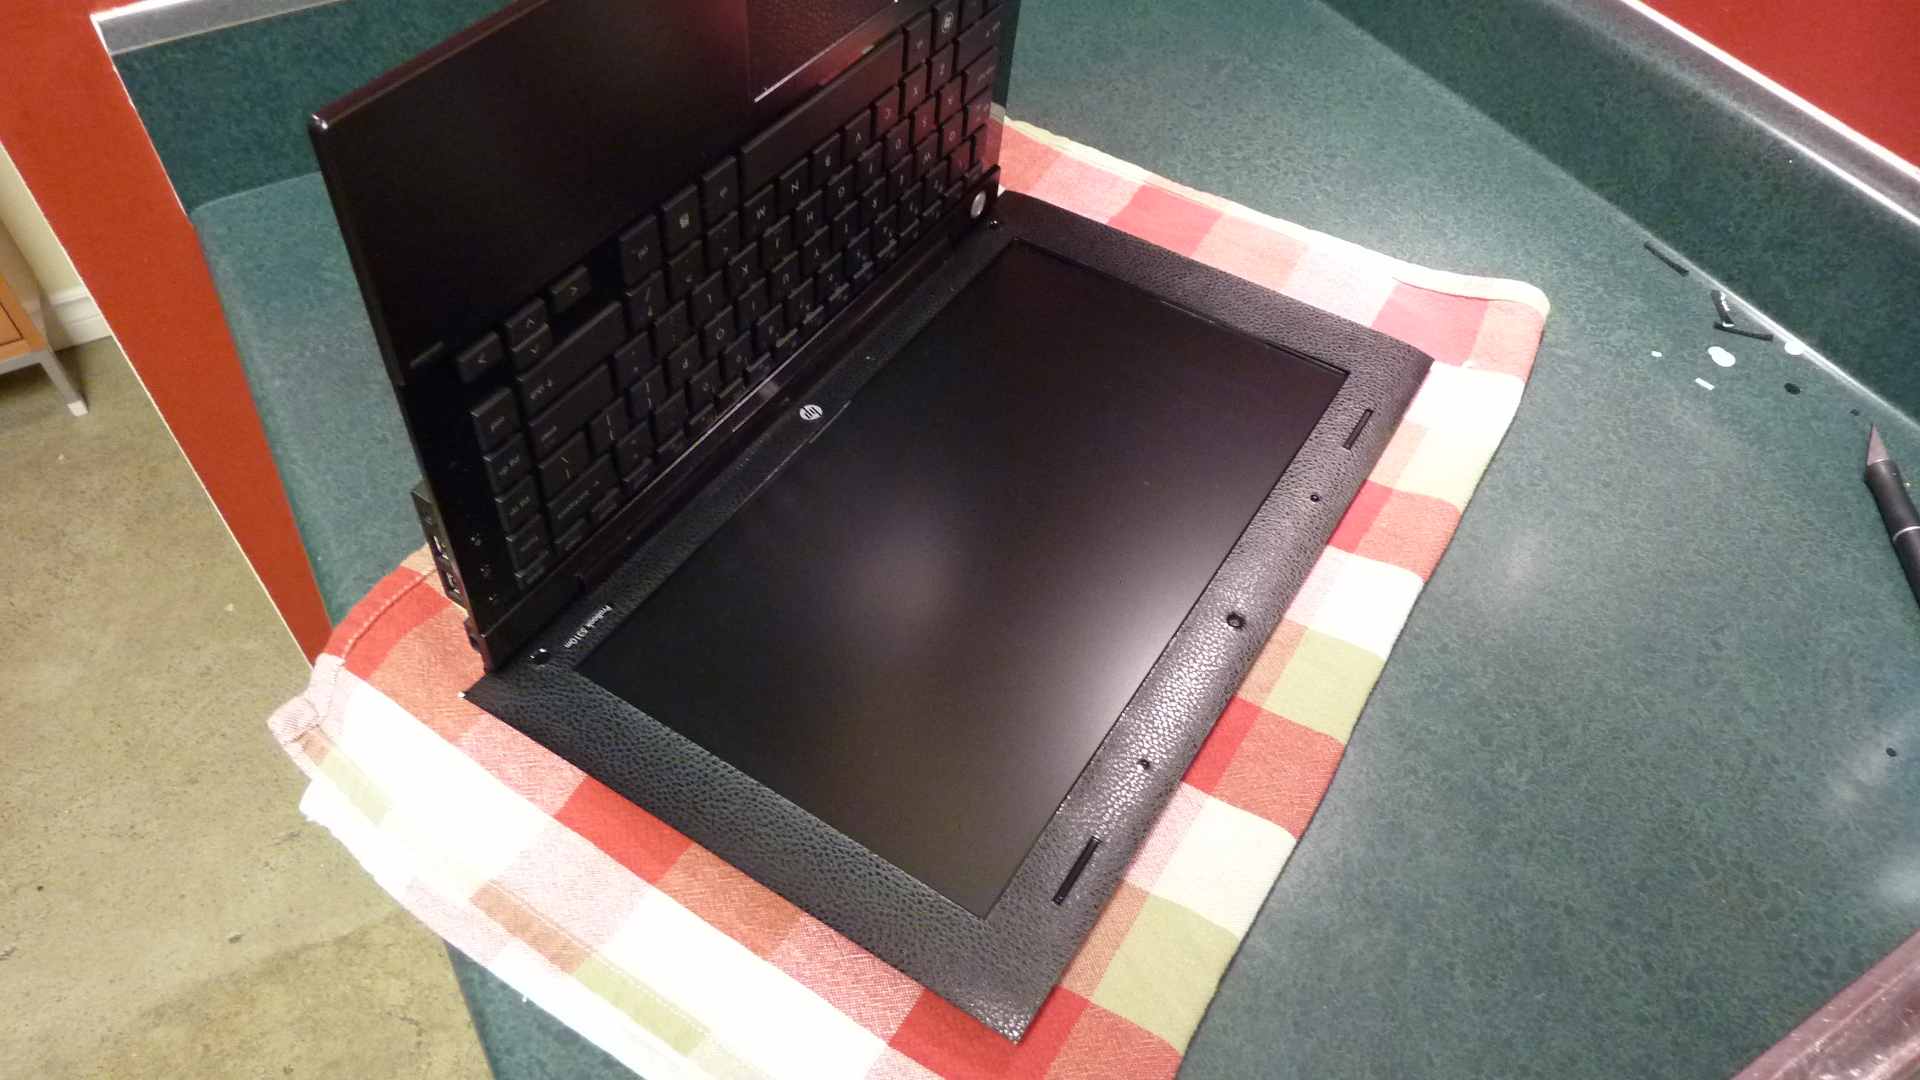
APPLYING TO THE BEZEL:
I removed the battery and laid the laptop screen-side down on a teatowel to get a nice flat working surface (see picture). Dry-fit the vinyl sheet first to make sure all the cutouts are lined up properly. I taped it down to keep it from shifting until I could get part of the template good and anchored. You want work slowly and only remove the backing paper in small areas at a time.
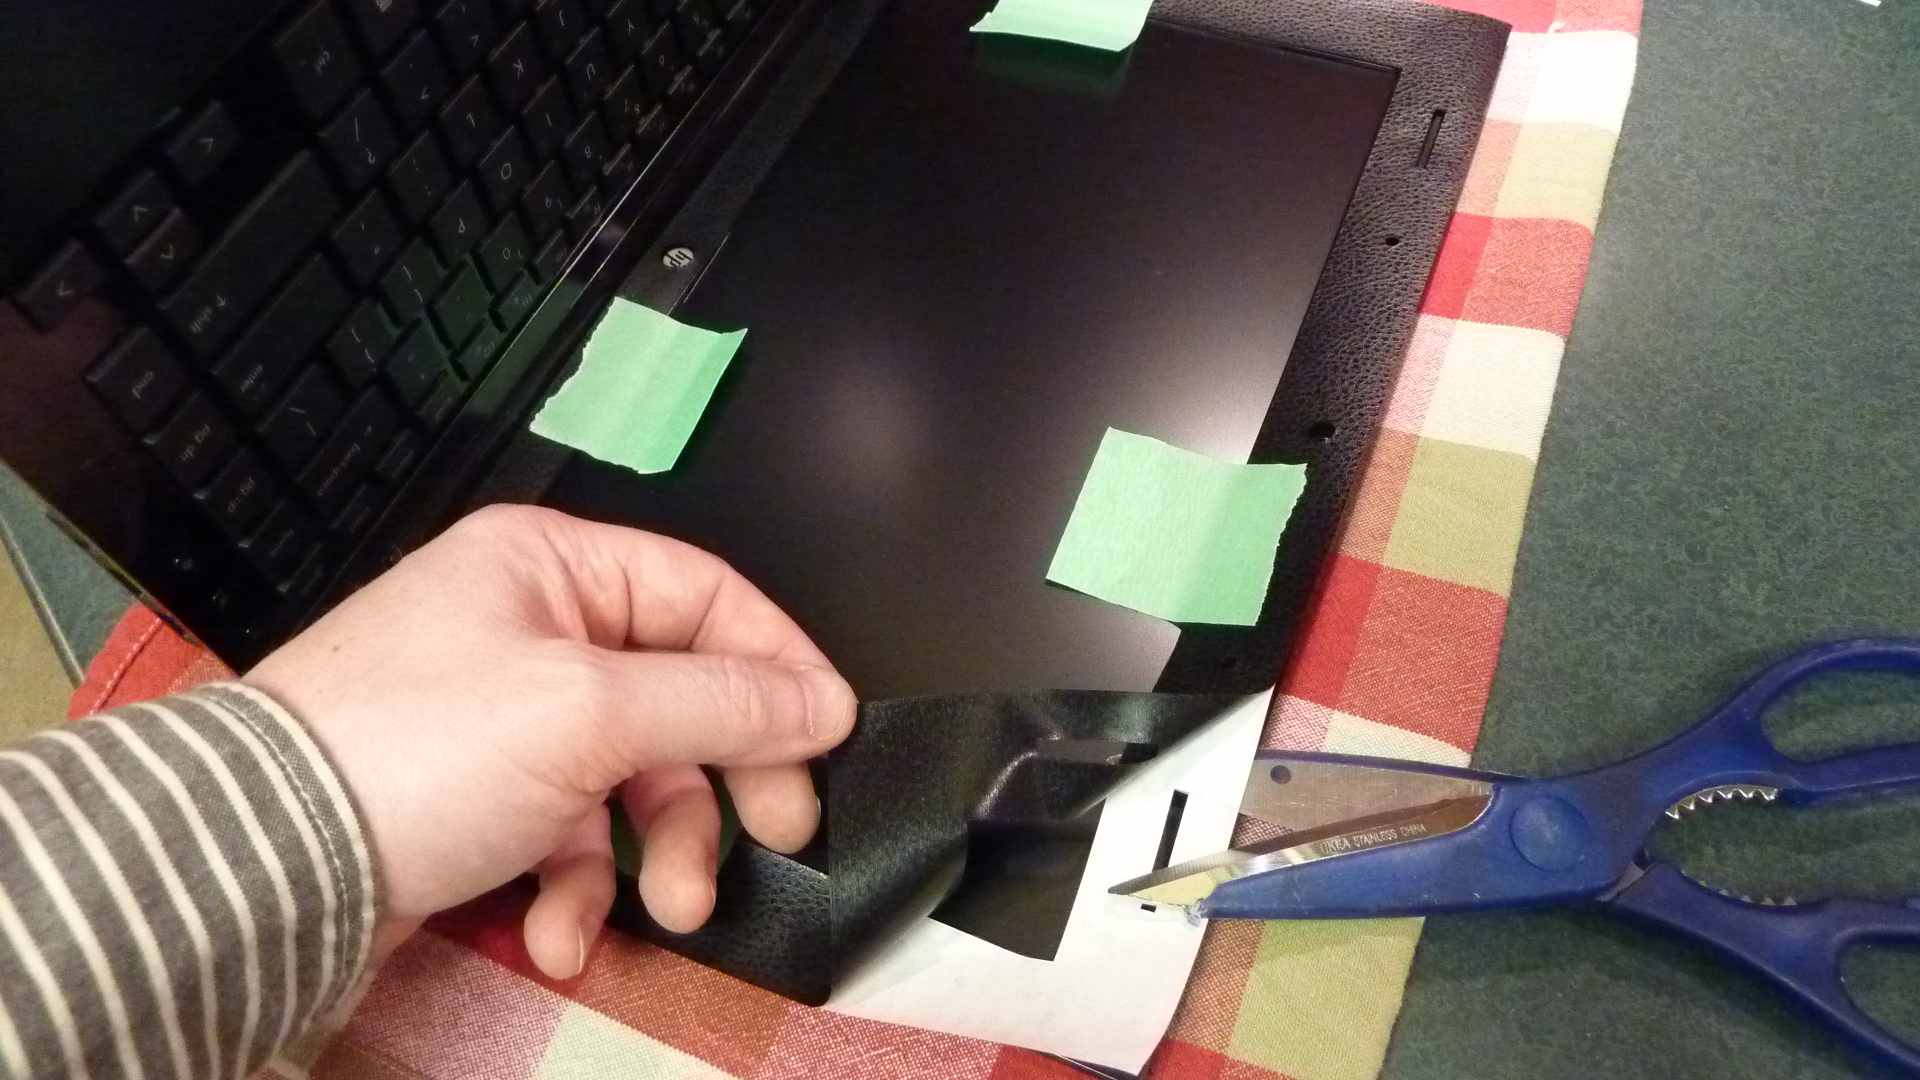
I started at the top right of the screen and worked my way around counter-clockwise, but as I later discovered there are some problems with my method. First, the vinyl can stretch a little bit if you pull on it too much, and the more linear length of vinyl you're working with the more chance it will stretch. Second, I attempted to get each flap on either side of the hinge in place as I came to it, and it was made more difficult because the not-yet-attached vinyl was fighting me. I had to peel back the vinyl a couple of times to reattempt each flap, and that resulted in a bit of stretching. The end result of starting top-right was the circular cut-out for the HP logo is a little bit off as well as for each screw cover on lower left and right, although the cutouts up top are all bang-on perfect.
Instead, I think it would work better to start with the HP logo in the lower center. To get the backing paper off you will probably need to get it started at a corner then run the tip of your finger to the center, seperating just the edge of the backing paper from the vinyl sheet. Once at the center carefully remove a couple inches of backing paper on either side of the HP logo and cut it off with scissors. To apply this section, hold the vinyl taught (but without enough force to stretch it), align the bottom edge to the hinge and centre the cutout over the HP logo, then press into place on either side of the logo and gently smooth the rest down from the logo and outwards towards the edges. If you don't get it aligned perfectly the first time, then gently peel the vinyl off and try again.
Once it's good and anchored the rest will go easy. After the bottom centre is done the rest of the bottom should be next (although I'd leave the flaps on either side of the hinge for the very last), then a couple inches up each side.
Before finishing the sides I'd suggest anchoring around the camera and the centre top. You don't want to end up at the camera, because if the vinyl is not applied perfectly everywhere else then it may want to bunch up a bit and you will have bubbles or wrinkles to deal with. If you anchor the camera area first and then work outwards to the corners (left and right from the camera and up from the sides) then the vinyl sheet will be able to adjust and any bubbles that may want to form can usually be pushed off the edge of the screen and be eradicated.
To finish, I took the X-Acto knife and, working from the back (better than from the front as shown in the picture), trimmed around the edge of the screen. Then working from the front I beveled the edge of the vinyl on a 45-degree angle to remove any overhang. The end result of bevelling the edge is that I can't feel the vinyl at all when I run my finger along the corner edge of the screen, which is what you want. When trimming the vinyl this way, make sure your knife is at a very shallow angle to the screen edge so it wants to run along the edge rather than bite into it.
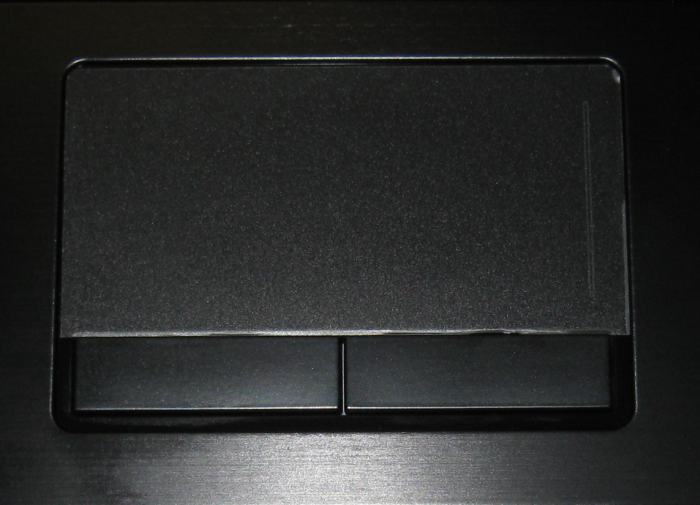
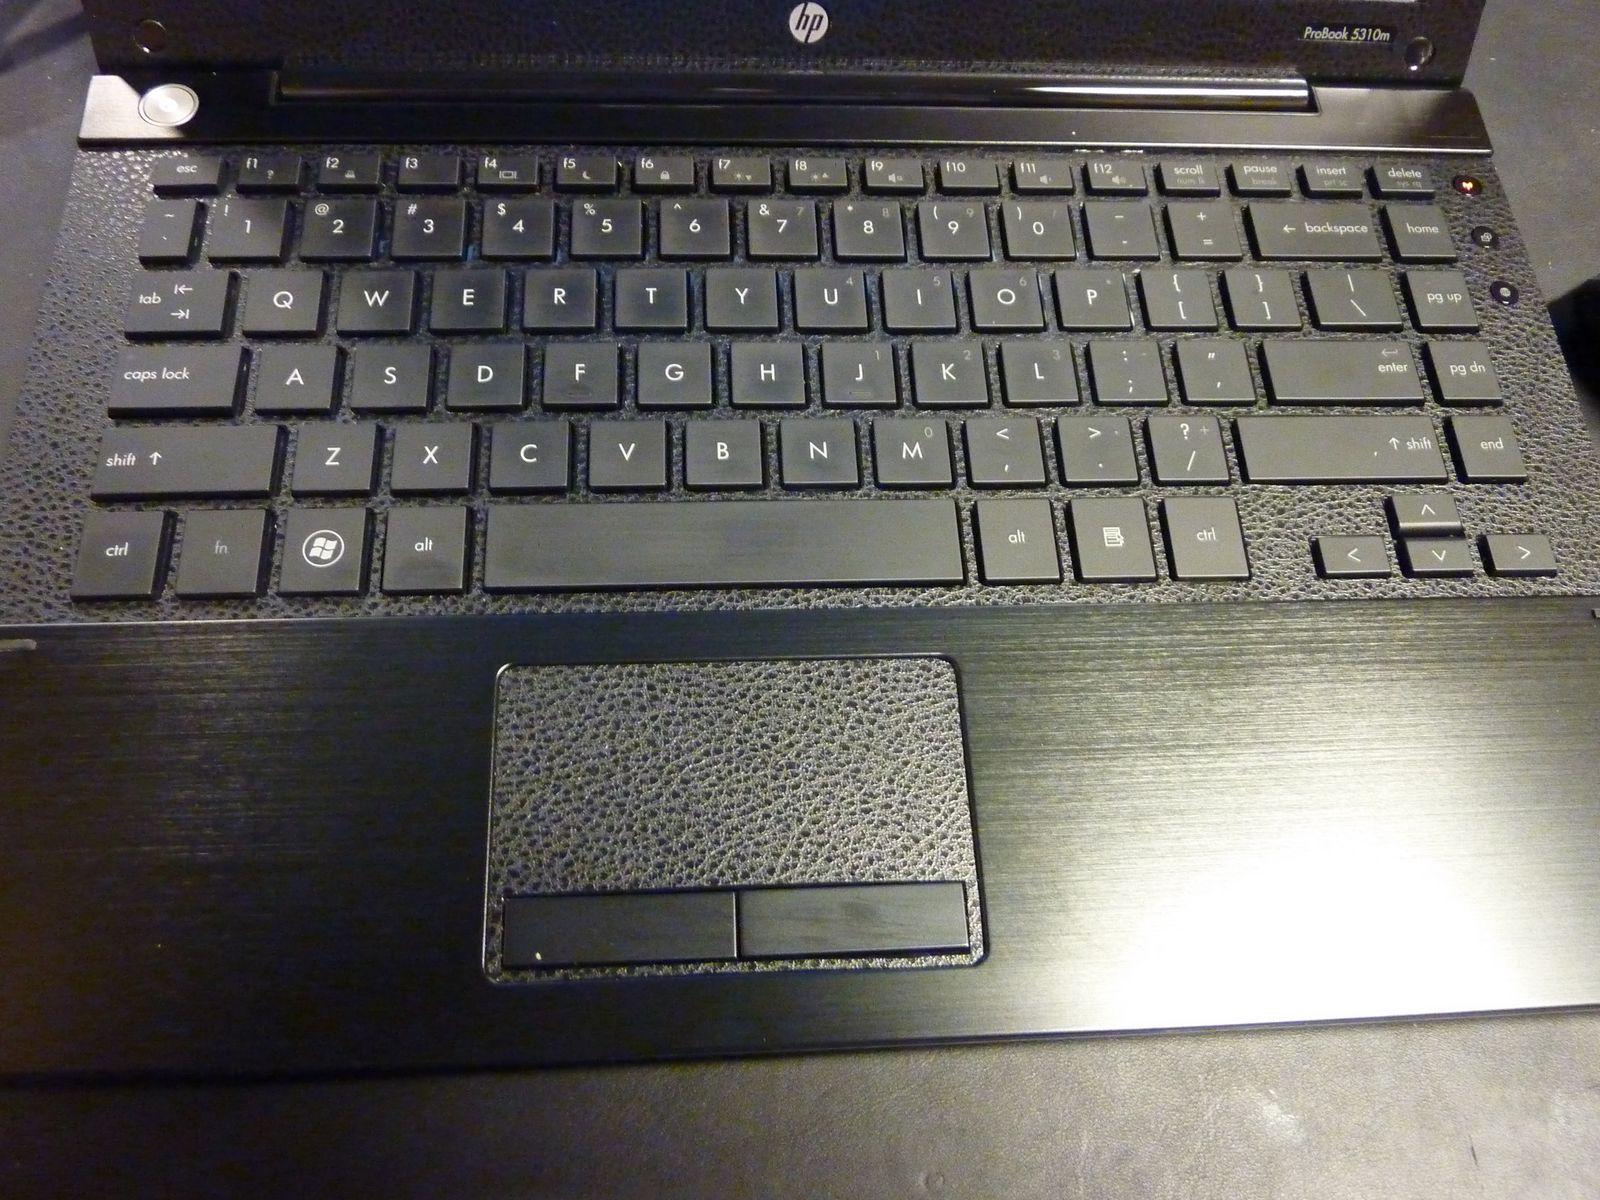
APPLYING TO THE TOUCHPAD:
Easy compared to the bezel. Align it perfectly then tape one side down and remove the backing from the opposite corner. Get it nicely anchored then work at the rest. The thin bits around the buttons will tend to fight you and stretch. I ended up cutting the touchpad template out three times before I was satisfied with the final result.
APPLYING TO THE KEYBOARD:
Surprisingly not too difficult. I positioned the paper the way I wanted it, taped down the right side, then removed one inch of backing paper on the left side and fixed it in place. I worked left to right, removing the backing paper a couple of inches at a time with scissors and then easing it into place between the keys. I used a q-tip to smooth everything down as I went.
How the h-e-double-hockeysticks did this become so long? Apologies for the extreme length, I intended to post "quick tips" and ended up with "The Stand". Please don't quote the whole thing if you reply
Attached Files:
-
-
Wow. Thanks for that reply, I have yet to read it thoroughly, but at first glance it seems quite capable of walking me through the entire process. I won't have time to do this for a couple weeks yet (I'm in final exam period >.<), but I'll definitely post up my results when I do it. I'm not sure if I'll do the bezel yet, but definitely the touchpad!
Thanks again! -
It's available, at least here in Europe, but maybe you need to buy a whole roll... Maybe you could find a dealer that installs those tapes, they probably have extra pieces. Looks like 3M may also have a similar tape.
It's used on windows to block direct view, for example office doors etc. I think it's removable but may need some heating, I'll have to ask about that and do some tests (but not with 5310m). Then again, in the specs it says permanent adhesive... It was still removable the same day I applied the film but I'm not sure what happens now.
Here's a link to the specs:
Avery dusted glass film | Products | Robert Horne -
Awesome work on the cosmetic mods. The glossy bezel is my least-favorite aspect of the 5310m; no matter how well I clean it, something always shows up.
I like the Con-tact paper idea much better than the Invisible Shield ideas we were discussing a while ago; it looks easier to apply and also probably more cost-effective.
----
I convinced someone I know to buy a 5310m, they are really liking it so far. Theirs has the intermittent spacebar issue, I guess Cost Central had some older stock; a lot of members in this thread have received 'revised' models that do not show the issue (HP fixed it by taking out the screw under the spacebar). I will have to fix that for them soon. -
No kidding. I swear you don't even have to touch the plastic for it to pick up grime. Someone else earlier (maybe you, Charles) made a point earlier about the plastic bits being easy to scratch. I attempted to clean the narrow bits between keys with a q-tip and ended up putting small scratch marks in the plastic. A q-tip!
So between the fingerprints and scratches I'm now thinking about doing a template for the keyboard, but I have to find a new method. Making manual measurements and then trial-and-error adjustments just ain't gonna work. All I've thought about so far is to remove the keyboard, scan it, then somehow convert the scan into a usable template. Anyone have any ideas?
(Anyone new reading this - don't get the wrong idea. The 5310m is one of the best bang-for-buck deals out there and I'm really happy with it overall.) -
That's awesome! I was thinking about doing the same with my dm3t since I have a vinyl cutter. I usually get FDC vinyl though. In their sampler the clear matte finish is still a bit smooth though, but black has just the right texture.
-
Interesting project, dgris. (I am getting a bit tired of the regular cleaning myself.) I have three ideas:
1. Take a photo and perspective correct with Photoshop.
2. Look through the online manual for an illustration of the keyboard. (Unfortunately I found only a low-res photo in the service manual here http://bizsupport2.austin.hp.com/bc/docs/support/SupportManual/c01888801/c01888801.pdf)
3. Fire off an email to HP asking for an image. The chance of success is low here but so is the required effort.
Good luck! -
Thanks for the input! I tried scanning yesterday, but wasn't able to get a usable image. The keys showed up fine with some gamma correction, but I couldn't find a magical setting that would differentiate between the glossy plastic and the deep shadow in the gaps.
Your first idea definitely has promise, especially if I can light the keyboard in such a way to reduce shadows. I've never used perspective correct, but if that works then all I need to worry about is the scale. I'll give it a try.
There is one last resort: physically remove the glossy plastic top on the keyboard and use that as a template. Doing so would destroy the keyboard, though, so I'd have to order a new one from HP and have it on standby. -
I work in IT for my company, and just received another 5310m for a co-worker. I'm setting it up for him now and the difference between the new touchpad and mine is like night and day.
On the factory touchpad when I lightly touch it and scroll back and forth my finger grips and releases, and often stutters after the release. The cursor on the screen jumps a bit at each stutter.
I think anything you apply to the touchpad will improve this. Heck, you could stick a post-it note on the touchpad and it would be miles better. I have two types of contact paper, clear and the black faux leather. The clear is okay, but still feels a bit too grippy for my liking. The faux leather surface is without question the best I've tried, and as you've noted it's because of the textured surface. -
Yeah, that glossy plastic around the keyboard way too easily, mine has tons of scratches. Strangely enough the glossy plastic screen bezel has not picked up any scratches yet even though I clean it in the same manner.
Applying something adhesive to the glossy keyboard surround would be a challenge; maybe a better way to do it would be to apply an adhesive to the keyboard surround itself and then put on some kind of material (cut to match, of course). -
I don't necessarily disagree, except to say since the contact paper comes off and leaves minimal residue behind there's always a way back. If you apply an adhesive first then you're pretty much committed, and if it doesn't work out you've got a real mess on your hands.
But yes, once I figure out how to make a template I think it has the potential to be a real sonofa... to get in place. -
Well, my Gateway laptop of 4 years bit the dust several weeks ago. I struggled with the decision to buy a new notebook. Spent a couple weeks researching just the right machine. Finally decided on the HP 5310m last week and placed an order through eBay. Got it for $740 shipped and that included an external DVD drive.
Received the notebook on Wednesday. Reformatted Wednesday with a fresh install of Windows 7 and updated drivers. This morning, the thing would not boot past the HP screen. Checked bios to look at boot options, no HDD listed. Tried removing HD, RAM and battery and reinstalling. No dice. Ran the HDD Self Test under bios, runs through Quick Test but hands on Comprehensive Test. Spoke with HP support and they're sending me a new, replacement HD.
Really pleased with HP's support/service. Not too happy about this thing lasting 2 days. -
To my knowledge you are the first person in this thread to report a non-functioning 5310m (for one reason or another). I hope the new hard drive gets you back up and running - that's a shame. What hard drive came with it - a Seagate 7200.4?
-
Has anyone else tried SRS Audio Sandbox? When correctly adjusted and with a little Winamp EQ tweaking (soundcard's own EQ does not seem to work with SRS) this application makes a major difference in mp3 audio quality and stereo separation when using 5310m's build in speakers.
Try it out:
https://www.srslabs.com/store/store/comersus_viewItem.asp?idProduct=6Attached Files:
-
-
Hello everyone!
I have got 5310m yesterday after long research.
(Actually I was originally targeting for much lower segment but HP pot 5310m to sale here (Czech) with really nice price tag (when I sorted all laptops with 12-14' screen by price list of used processors was Atom Atom Celeron Core2Solo Celeron C2D-SU9400 /Acer 3810t/ Celeron C2D-SP9300 Celeron C2S.... So in final round I choose HP for build quality and I have to say I am really happy with my choice!
Now I am waiting for 80G X25-M SSD to be delivered and I will swap it with the Seagate 7200.4.
I was checking partitions on original drive and found following:
1) 200M - Primary (probably boot loader?)
2) approx 300G partition (C drive)
3) hidden 15G partition "RECOVERY" (I suppose complete install is here)
4) 2G E drive HP Tools (according to folder names web view is here and some other stuff)
Because my new disk will be just 80G I would like to save some space while not missing functionality. Do you think following setup will be OK?
1) 200M - Primary - // I will not touch this
2) approx 77G partition (C drive) - // Will shrink this while cloning in Acronis
3) //will remove this from drive
4) 2G E drive HP Tools - // Again will not touch this
Can you see some issue in this new setup? (ofc - recovery function will not be possible - I will do backup of the RECOVERY partition so it will be possible to do recovery if something happens in future).
Thanx for any comments
-
I also swapped to an Intel 80GB SSD. But I didn't clone the partitions, instead I installed Windows 7 from an OEM version of Windows 7 Pro disk (HP did not ship any disks with the machine) and made just one partition to the SSD. I copied the DVD to an ISO file and made a bootable USB memory stick version of it using Microsoft's Windows 7 USB/DVD Download Tool. I used the serial that is used in the default installation and imported oem-cert that I found from the recovery partition. Windows 7 autodetected and installed drivers to almost everything. I just installed utility software for 3G modem, quick launch, touchpad and Intel drivers for graphics. Everything is working fine.
-
It did come with the Seagate.
Literally the last thing I did before this issue was install Office 07, downloaded 1 Microsoft Update and transferred roughly 50GB of data via external HD via USB. I was downloading Office via digital download, which was going to take about 40 minutes (satellite internet). I adjusted the power settings so it would not roll into Standby while downloading Office. When I woke the next morning, the download had completed and I finished the Office install. It seemed the 50GB of data finished transferring, but what was odd was that I couldn't get the external HD to disconnect from the notebook while using the disconnect option down in the task bar. It kept giving me a message the the device was still in use. At this point I performed a reboot thinking that may be what it would need to disconnect the USB device via task bar. Now...I have no idea if this is related to my issue or not. -
Seems the culprit was a bad driver. Couldn't do a system restore, so I had to reformat again. This go around I installed the drivers via the driver disc that HP ships instead of downloading from hp's website.
All in all, very impressed. The spacebar issue is a bit annoying, but may just take some getting used to. -
I was thinking about this kind of migration too, but I want to keep webview functionality ...
-
Spacebar issue? Do you mean if you press the spacebar on either end it doesn't always register a space?
If yes, then HP fixed this issue on some laptops manufactured after a certain date, and they did it by removing a screw from the underside of the laptop. I guess the screw was causing some flex in the space key and causing it to not function properly.
An earlier fix was to remove the space bar and add some electrical tape to a couple of points underneath.
Search the forum and you'll find much more detail on either fix. -
If you mean QuickWeb, I think it should still work. It's available to download from HP's site, I think it just needs that 2GB FAT32-partition called HP_TOOLS for the installation. Just create that extra partition at Win7's partition select/setup screen.
Here a document about the hp tools partition:
http://bizsupport1.austin.hp.com/bc/docs/support/SupportManual/c01951773/c01951773.pdf -
TY
I already did it my way.
X25 arrived so I removed 320G Seagate - put it to desktop - created backup via Acronis True Image - swapped it with X25 - recovered 3of4 partitions and re-sized main one from 290 to 72 and inserted X25 to 5310 Easy peasy
I really like startup speed of my new laptop
-
Have you checked that the partition alignment is correct for SSD? Previously True Image did not keep it correct. That is also one reason why I did a clean install of Windows 7, it creates correct partition alignment for SSD.
Read this thread and check your values with the spreadsheet or the online version:
Guide RAID / Non-RAID Partition Alignment for max performance -
You are right it is misaligned
Well it seems I will have to do reinstal.. -
Yeah, the not always registering space bar issue. Guess I'll live with it as I don't feel like cracking open my brand new laptop.
On another note is my battery performance. It seems that when I initially reformatted my notebook, my battery icon in my icon tray would display close to 5 hours on full charge. After reinstalling HP's drivers via OEM disc, the max it will display now is about 3 1/2 hours. Something else really odd, when I first powered up my notebook just now with a full charge, it displayed 2 1/2 hours as I began to type this.
UPDATE: 30 seconds after typing the above, it shows 4 hours and 53 minutes. Weird. -
Finally got the keyboard template made. Check out the pics!
I'll do my best to add the template to my original post soon.
EDIT: keyboard template finally added to original post (see link above)Attached Files:
-
-
Wow, awesome job on the keyboard. The glossy keyboard surround is impossible to keep clean as-is.
-----
I am interested in getting an SSD for my 5310m. Looking at some 64GB models now. I wouldn't mind if I could squeeze a bit more battery life out.
-----
On the other note, someone I know bought a 5310m at my insistence and love it. I was going to fix the spacebar issue for them until I realized I did not have a hex screwdriver. :-\ -
I've bought a 5310m with SU2300 processor, because I don't need it as my primary machine. I like the machine, but I have a few problems with it regarding quality. I've bought a ProBook, because it's a business-class laptop and right now it doesn't seem so. My unit has:
1. Too wiggly (shaky) power jack. I know it's supposed to be a little like that (I've seen Dells, EliteBooks, etc. with a jack like this), but I think mine is too much. It moves about 6 mm vertically where the cable starts and connector ends.
2. I have a 2x1 cm surface scratch on power adapter. It's not deep at all, but it's there.
3. I've had this laptop for 24 hours and there is some kind of crack on the top layer of alluminium above the pause key. It looks like it would have plastic foil as a top layer and it is coming off.
4. The second most irritating is the fan noise. I've read numerous reviews and posts which all stated that the 5310m is audible if you're in a really quiet room or if you concentrate. That's fine, but my unit's fan drowns all HDD noises even on medium speed. That's also not too much, but the problem is that the fan doesn't emit a humming sound, but it is too high, like squealing.
5. And the winner is a switcher PSU, which is easily audible from the fan and nearby holes. It is audible when doing normal work at a desk if I concentrate a little and yesterday in the evening when I was browsing the net and it was really quiet I could clearly hear it from 80 cm distance.
I think that I have a faulty unit or maybe a refurbished one?
I've bought it from a reputable online store here in Slovenia. I've recommended and set up numerous HP laptops before and they never let me down, but right now I'm considering buying a laptop from another brand. I really like the idea of 5310m: affordable, stylish with business-class case (I really don't want a completely plastic laptop).
I've bought the SU2300 version, because I got a good offer and it is enough for my travelling needs. I'm satisfied with the performance, but right now I'm also wondering if the processor isn't the only difference between 5310m versions. I know there are also some minor differences in components (Wi-Fi...), which I knew of, but I want a laptop with good build quality, that's something I cannot overlook.
I have an option to return it which I will most certainly do. But I'm deciding whether to ask for a new unit or buy another brand. I'm also yet again disappointed in 13"-class laptops, not long ago they were way too expensive and now this.
So, what is your experience with build quality and noise of this laptop? What do you recommend me to do? -
I purchased a 5310m from a forum member and wanted to wipe out the previous owner's data on Windows 7 and get a fresh install. The notebook came with all the Restore discs.
1) When reinstalling Windows 7, I get the option to format the Partition1 (System) where Windows7 was previously installed. However, when I click format, it seems like it formats it in 10 seconds before I can click "Next." Is this normal? I would have thought formatting a partition would have taken a lot longer.
2) Also, Partition 1 has a Total Size of 296.1GB and Partition 2 (Primary) has a Total Size of 2 GB. That totals to only 298GB. The Hard Drive is 320GB's, so what happened to the remaining 22 GB's? There is no other partition showing up in the Windows Install. And definitely no Recovery Partition which is understandable since the unit came with Recovery discs.
3) The HP_TOOLS partition shows the following folders: BIOS, QuickLook, QuickWeb, SystemDiags, WWAN. When using the Applications and Drivers Restore disc, it's showing that the QuickLook and QuickWeb are not installed, even though they are installed to the HP_TOOLS partition. They are also running fine as I tested it. So do I need to install them again, and will it install it to the Partition1 (System) where Windows is installed? I'm just trying to avoid installing duplicate files and unnecessary bloatware.
The HP ProBook 5310m Owners' Club
Discussion in 'HP Business Class Notebooks' started by cubone, Oct 28, 2009.