The instructions are in the first post...
1. There are 3 black stickers on the bottom of the screen. Take all 3 off and save them.
2. Unscrew the screws holding the hinge covers on. Take hinge covers off.
3. Unscrew any other screws on the bottom of the screen. I think there's 2 of them.
4. Pop the clear plastic off. the rubber surround is part of the clear plastic, so get something in between the metal case and the rubber surround to pry the top off
-
Thanks eafd.
It is this which is the most useful to me:
My panel arrives in a few days so I can take some photos when I put it in.
Cheers,
Mike -
Hey, please update us as to how it goes.
I am also one of the unfortunate (admittedly it was entirely my fault) and have a broken Radiance screen so I'm currently looking at my options.
Thanks Mike! -
How to: Replace an HP Envy 14 Radiance LCD Panel (1600x900)
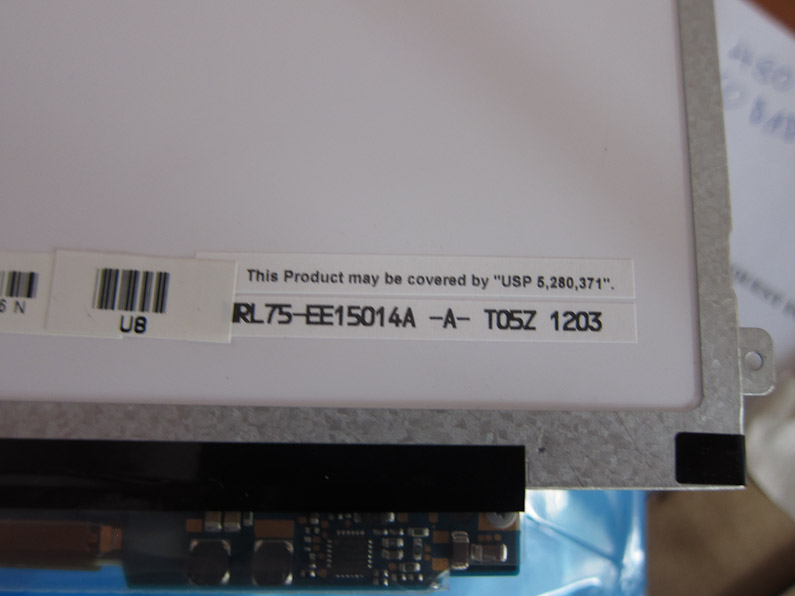
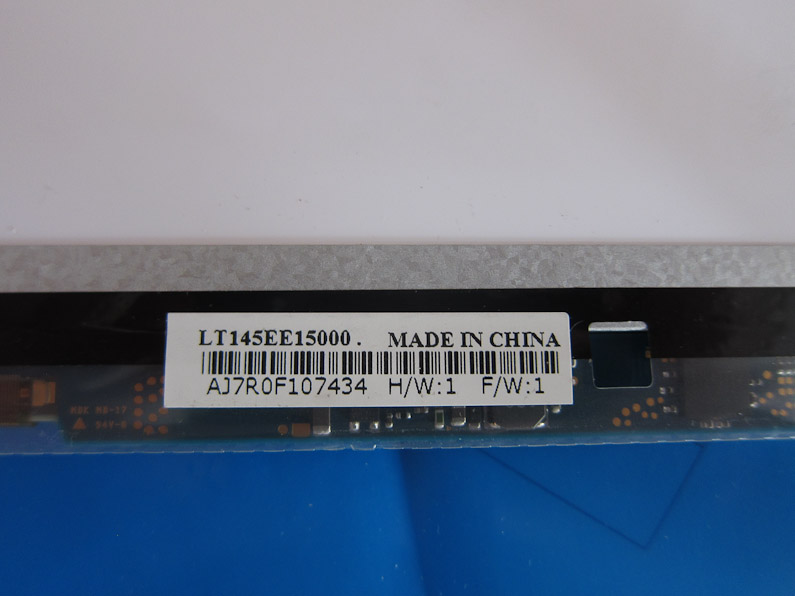
My ENVY 14 Radiance screen recently broke and so I had to replace it. I have attached two images showing the LCD model number and serial number (this is the dead screen). This panel can be ordered from eBay for around $200USD. I got mine from a UK seller who was very good and very quick. They even got my panel to Livingstone, Zambia in less than a week with DHL and extremely well packed. Be aware that earlier in this thread people have mentioned that there are two panels which share the same model number but with different resolutions. My advice is to ask the seller to confirm the resolution before shipping.
Panel Number: LT145EE15000
Other Detail: NRL75-EE15014A
Resolution: 1600px x 900px
Detailed Steps:
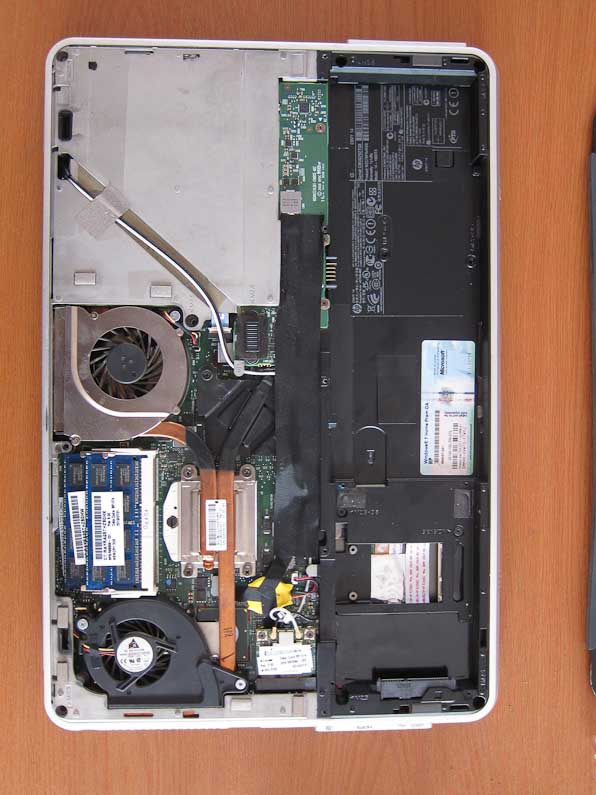
Step 1 (Image 1): Take the bottom covers off and take out battery and hard disk. Disconnect the WiFi mPCIe adapter so when you undo the screen you have a bit more play in the wifi antenna cables (which run into the monitor). You can leave the antenna connected to the wifi card.
Step 2 (Image 2): Undo the 2.5mm screws (I think there are 8 long ones and 4 short ones) then you can turn over and pop off the cover. There is actually a spot where you can push from underneath (somewhere where the battery sits) so you can easily get the top cover off. Be careful though as there are four connectors: one for the trackpad, one for the ports on the right (HDMI, etc), one for the keyboard and one for the power button. Do it slowly and carefully.
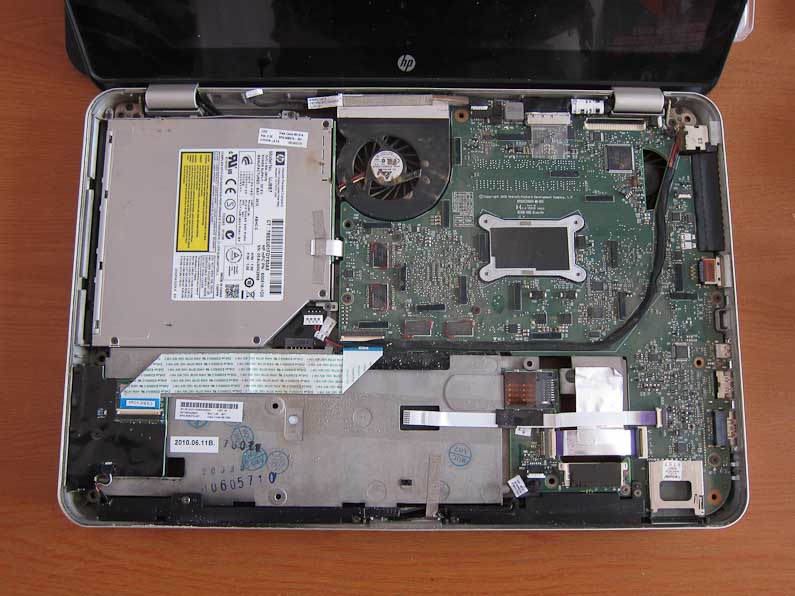
Step 3: Undo the screws which hold the hinges to the core case(4 screws). No image but you can see them in Image 4 or 5.
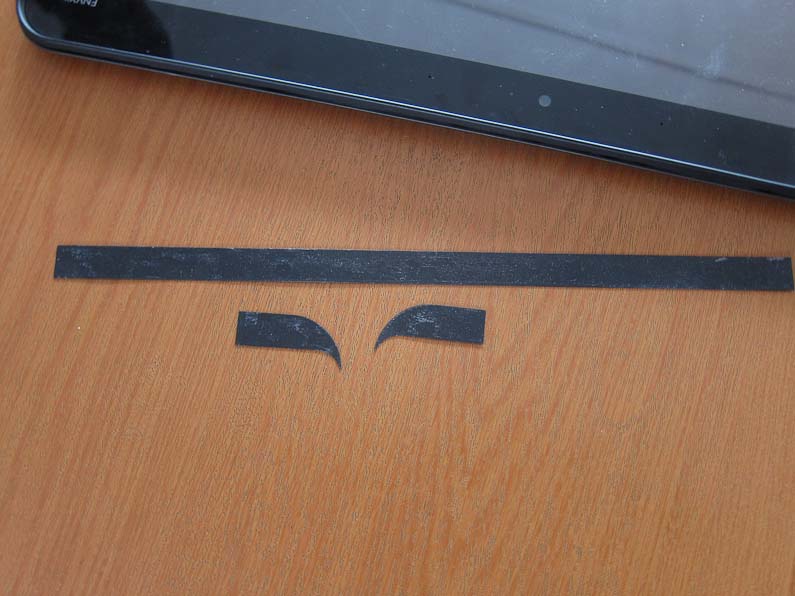
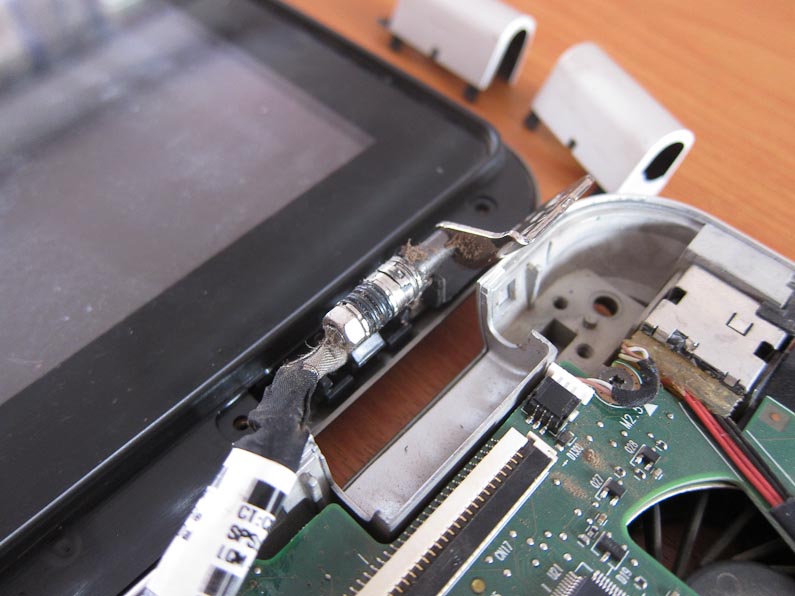
Step 4 (Image 3 and 4): There are three stickers which cover up the area of the screen below the rubber surround (i.e. next to and between the silver hinge covers). Take them off and you will see a whole lot of screws (I think there were six).
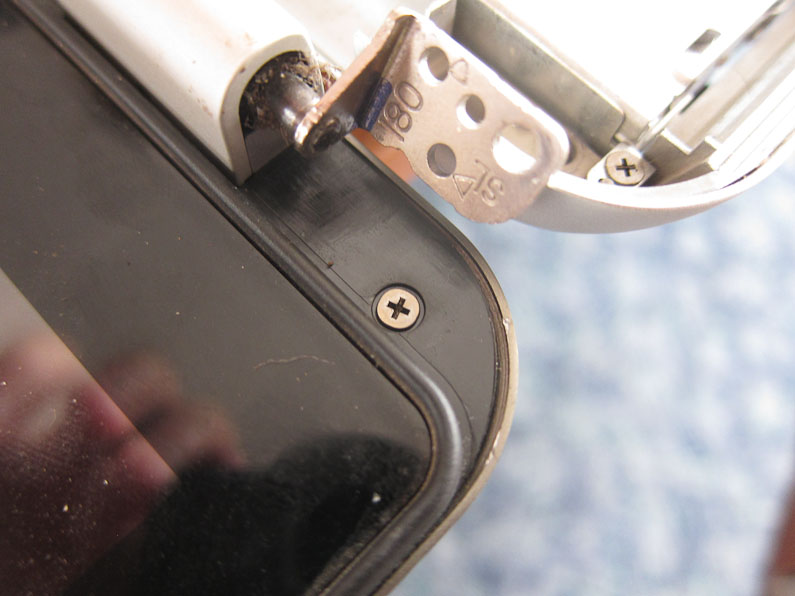
Step 5 (Image 5): Undo all those screws and you will be able to pull off the two silver hinge covers.
Step 6 (Image 6): Use some plastic levers to get between the rubber screen surround and the metal lid. I found that plastic cards like credit cards worked well. The image is a bit wrong because I did this step before 4 and 5 but the steps above should be done first.
Continued in next post...Attached Files:
-
-
Continued...
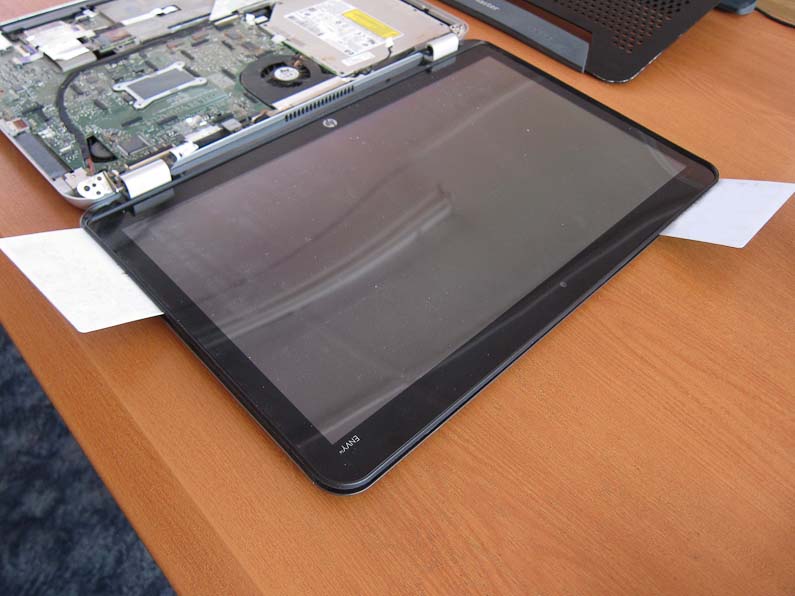
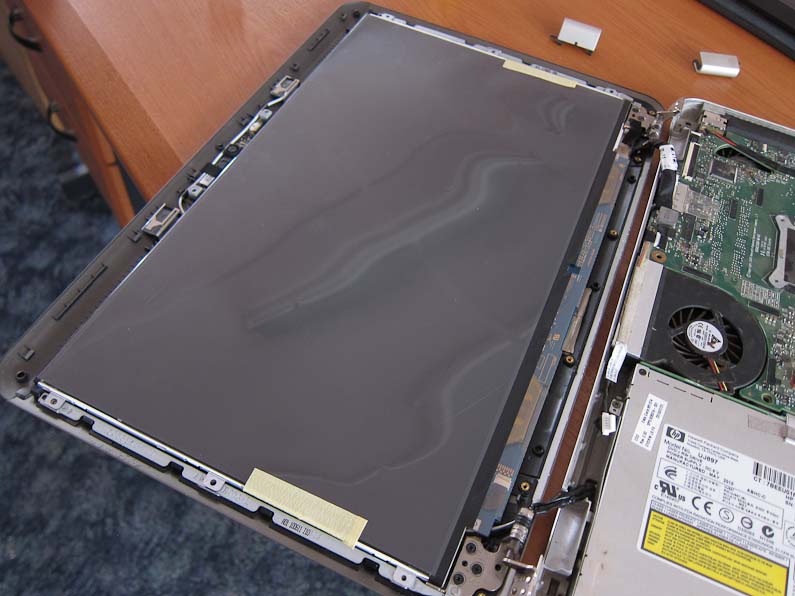
Step 7 (Image 7): Take off the plastic screen cover and you should see the four screws which hold the panel in.
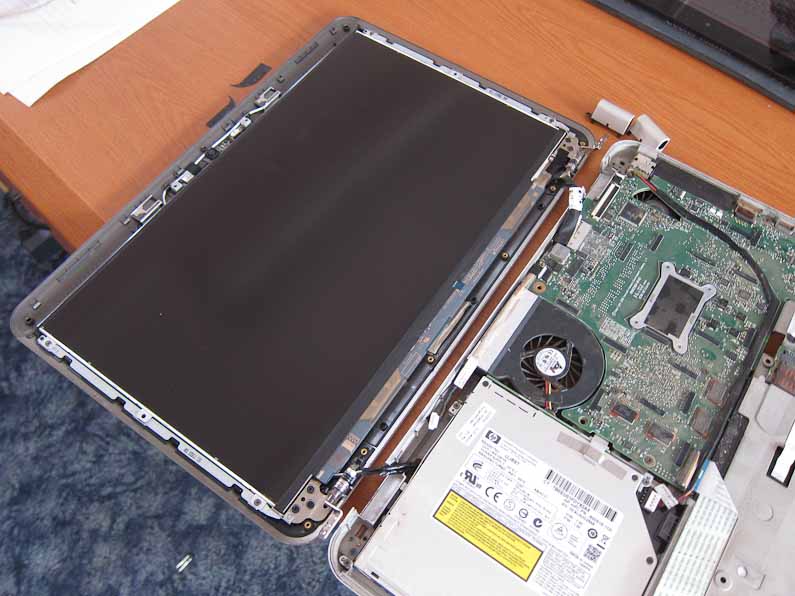
Step 8 (Image 8): Undo them so you can slowly (very slowly) lift up the panel. I found it was helpful to have a second pair of hands here to slowly disconnect all the things that are stuck to the bottom of the panel. That is: connectors for the webcam/microphones (top) and the connector for the panel (bottom). You will then be in a position to install the new panel.
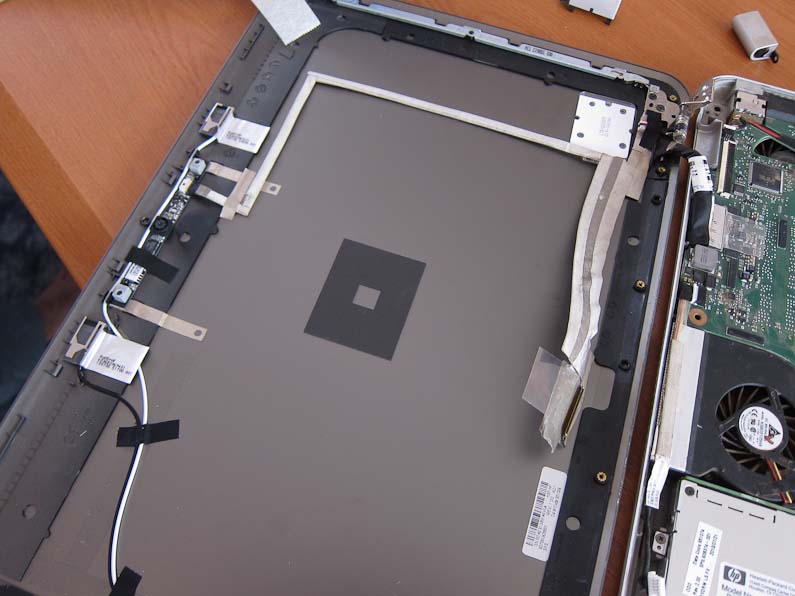
Step 9 (Image 9): Carefully, carefully install the new panel leaving the screen cover on if possible. If you have a helper then you can delicately reattach the connector (bottom) and sticky bits back into their original locations. Then put the four screws to hold the panel back in place.
Step 10: Basically just put the computer back together. Do it slowly and carefully and make sure the top panel connectors are done.
NOTE: When you put it back together you will find out that the trackpad connector is almost impossible to put in before closing the top cover - there is a reason for this as if you look at the bottom where the battery goes you will see a little plastic cover that allows you to plug in the trackpad from the bottom. I had pulled the whole thing back apart before realising this...Attached Files:
-
-
I would just like to thank Relentless again for the instructions. I was able to replace my broken Radiance using his instructions (I already had a broken radiance).
Other tips that may help:
1) When lifting the keyboard cover, be extra careful of the front as you will very likely risk ripping the touchpad cable. I would suggest that before you attempt taking off the keyboard cover, you should look for a little black flap where the battery was and disconnect the touchpad cable from the convenient- but hidden- hole.
2) Some of the the cables are attached to latch-like connectors on the motherboard. If you only have experience with desktops and their snap-on-like connectors, this could be surprising.
3) When you are attempting to disconnect the video cable from the laptop display, it is much easier to have two people. Have one person hold on to the cable and another person hold on to the monitor. The person holding the monitor should gently lift the monitor up and they should easily come apart.
Hope this helps! -
i am looking for one Radiance Display for my Hp envy 14beats
-
Thanks, this guide worked great and the model number worked.
Issue is the new Toshiba screen I purchase with the same model number is noticeably worse with viewing angles and color. The screen is NEVER fully in view with the corners always inverting a bit with darker colors especially. -
Wow! I missed this thread. Great info!
BTW, later I was trying to find a good ICC for my Radiance, and found that there are two versions of the display: one is bluish (the original one and most reviewed), and the other is redish (a later one).
I wonder if the later is the LT145EE15000 mentioned earlier.
(BTW, anyone having a ICC for the later, please contact me )
)
-
My original was bluish and had that model number. Bought around July 2010 I think
-
Thanks Mike. Then, my panel is yet another one!
I bought mine December 2011 or late November. On Feb/May 2012 the panel got replaced with a new one, also redish. Since then I noticed a slight banding using the Intel drivers, but is so subtle that I can't be sure the old panel was better on it. Also, I can see some FRC using the ATI drivers, and I'm starting to doubt this panel has an internal 8-bit. Seems to be a stock TN with a better backlight. -
Does leaving the screen cover on when installing the screen lead to any of it being blocked when the computer is put back together? On the images there seems to be tape that would bleed into the monitor space.
Thanks -
I need help in getting my laptop screen edge to edge plastic removed since I got a dead ant in the it. I have waited for over an year wishing that it just disintegrate into particles from the heat however this didn't work. Can the HP Envy 17 (1000 CTO) screen plastic be removed without removing any screws or opening the main body of the laptop.

Envy 14 Radiance Display model number - not HP part number
Discussion in 'HP' started by eafd, Jan 11, 2011.