
No, I haven't tested HDMI. I can give it a shot when I get home. Will be a couple hours probably.
-
That'd be great. I get 2560x1600 from my power draining dock via dual link dvi output converted through the Apple mini display port adapter connected to the dock. So for some scenarios clearly it works fine. I suppose HDMI connected directly to the port on my dock would work as well (I don't have it with me so I cannot test that right now).
But the direct HDMI connection physically found on the laptop and connected to a TV via direct cable connection just seems to be blue screening constantly. -
I just hooked up a TV real quick to test it out, worked fine in 4K and 1080p, tried mirror, extend, and external only all three seemed to work fine. The TV I used is a Sony XBR-49X800D.msintle likes this.
-
I just upgraded to the latest driver manually and then ran the full Intel setup so I'd get the whole suite.
Good news - blue screening gone.
Bad news - display is totally not detected now.
:/ -
Are you still running off your custom Win 10 install or did you restore back to the one that comes with the laptop? Do you have another TV or HDMI monitor you can try to make sure it's not some weird incompatibility with your TV?
I would perhaps consider engaging the store you bought your unit from and request a replacement as it seems to be unstable. I haven't had mine crash once since I got it.msintle likes this. -
In other news, I TOTALLY FORGOT i have a 5V 0.5A 4 wire PWM fan left over from my old 2014 Razer Blade 14. It's a little more power hungry than the existing fan, but I do know that it definitely moves more air, and is super loud as a consequence. Wonder if it would work.
I was also considering that maybe I could do something like this..
Here's the fan:
![[IMG]](images/storyImages/Tpnqaa8.jpg)
Here's a really bad not even sure to scale photoshop of what I think might be able to be done by using the second heatsink I bought and modifying it. Next time I open up my unit I'll see how I might be able to get the fan to fit in that empty spot.
![[IMG]](images/storyImages/KLfHbQe.jpg)
Here are some parts from coolerguys.com that might be needed.
One is a two way 4 wire fan splitter, supposedly it takes the tach sensor from one of the fans only but still controls speed of both fans with both having PWM wire. THIS SOUNDS NICE! The other is just a USB->4-wire, but to be fair it might just be easier to tap the USB port with two wires. The downside here is the fan speed is not able to be controlled, its 100% or nothing. Don't like that for a loud fan.
![[IMG]](images/storyImages/i5jB9rC.jpg)
I'll have to think on this.Last edited: Apr 3, 2019msintle likes this. -
I never did a custom install (maybe I should have). I have always used the stock OS that shipped on the unit.
I will check if I can find another TV.
I got it from Amazon, so the virtual store I got it from may not be able to replace it very easily. -
Well I suppose if it's within the window you could just outright return it as defective and buy another one. Amazon is pretty good about that if I recall correctly. But I suppose trying another TV might be in order first.msintle likes this.
-
To get a matte screen I installed a matte display protector. Of course I messed up but maybe the bubbles will go away in a few days. Where there are no bubbles, it looks absolutely glorious. I used the matte protector from celicious and the fit is quite good and they have a nice application method, I just don't have a dust free environment it seems.
That razer fan looks like it could fit. I did look at razer blade pro fans and wondered whether they might fit thickness-wise. Those pwn splitter cables use the large connectors found in desktops and won't fit the small connector found in the lg gram 17. I suspect the fan in the gram 17 could move more air. In my opinion it is not running at full speed ever, but is held back by the controller/software.msintle likes this. -
I was planning on just using it for the wire, cut the wire to the existing fan and solder it all together. When the metalpad arrives and I have a chance to install that I'll do a little recon to see if it's even worth trying to get that fan to fit in there.msintle likes this.
-
If you need to solder anyway, why do you need the wires? Just solder the existing fan wires together. I would be a bit worried about the power draw from two fans though. I guess we'd be fine moving from the 0.31 A fan to one 0.5 A, but using two fans would almost triple the power draw.
I am looking hard at the fan/heat-pipe assembly of the razer blade stealth 13.3'' i7 8550 model... it looks like it might just fit the gram 17 case quite nicely if the CPU mounting could be modded. It has a stronger/larger fan, larger fins and dual heat pipes.msintle likes this. -
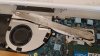
Btw.. for future buyers of the model. Below is the amount of heat paste that was originally present in my system, so a re-paste is the first thing to consider after getting the gram 17.
What's really nice about the gram 17 is how easy it is to access all these components.
-
With all the configuration experiments I must admit the return window has already expired :/
I'll just carry around the dock - I must again admit I have come to be able to work around the machine's limitations - it is flexible... -
I posted the factory paste job in mine as well some posts ago. It wasn't great but it was a little better than yours.
http://forum.notebookreview.com/index.php?posts/10885473
Seems they are lacking a bit of consistency.
I'm not too worried about the power draw of the fans, it can probably handle it. Were already talking about constantly running the CPU at a wattage that LG never planned on. It seems like it's designed to throttle to 15W or even less due to heat saturation based on the factory build scenario.msintle likes this. -
Right. It is also designed to run about 20 seconds on a higher wattage for short burst turbo, so in my opinion the only issue that can crop up from running longer on these levels is overheating of some parts. Maybe I need to invest in a flir cam to find the hot spots. If we can get the fan to move more air at some point without additional holes in the chassis, we'll also get more cooling for these parts.
-
I'm a little worried about the VRM phases, could probably just throw some small heat sinks on them or something. I'm pretty sure these are the chokes (they probably don't need cooling) and MOSFETs for the CPU and RAM VRM, might even be SSD VRM in there as well.
There might be something hiding on the backside revealing some truth, but my gut says it's probably just 8GB of RAM back there. I could be way off tho.
msintle likes this. -
Yes, I already added thermal pads to the chokes, so the heat can go to the heat spreader I attached to the base. There are two more similar chokes outside the pictured area. Once the CPU heat goes somewhere else, that should be enough cooling. I'm in an auction to get a flir one for cheap next week, if I win it, I'll certainly make pictures of the board under load and under charging to see what gets hot. The backside is a concern. I'm searching the webs to find the backside of this motherboard, but so far no luck. I'm not eager to pull it out. There's probably a higher chance of getting a picture of the gram15 2018 board which is the same and I've seen auctions on ebay, just not with backside pictures.
Today my extra heat pipe did arrive. I installed it today and will let the glue cure overnight so tomorrow I'll be able to share some results hopefully.Last edited: Apr 5, 2019 -
Here's my result: The extra heat pipe does help, but it's not enough as the fan is just pathetic. I built in my extra 150*12*1 heat pipe on top of the original one using thermal grizzly kryonaut between the pipes and chinese thermal glue around them (+ some pressure while the glue was curing). I had to modify the fan a bit (remove a raised corner) so the straight new heat pipe would fit.
This is what it looked like after initial installation. I then added graphene tape on top of the fan and my extra fins as well as a 1 mm thermal pad to get to this end result:

Then I ran some tests and the results were mediocre. I went to bed a bit frustrated, but this morning as I tested again, things looked much better. I guess that thermal glue which inevitably mixed with the kryonaut needs its 24h to get solid.
Now my machine reaches 1740cb in Cinebench R20 when limited to 25W. The CPU manages to stay at 3.3 GHz with only very little thermal throttling. At the end of a run, the CPU temp is 80 celsius and toward the end where some cores sometimes throttle the wattage is 23 W.. almost the 25 W I'd like to reach. In fact I'd like to reach maybe 30W somehow so I can limit to 25W and make sure my CPU never gets very hot. I'd love to be able to keep my CPU at 75 degree celsius.
Afterwards I ran some tdp-unlimited tests and finally was able to reach the full 3.7 GHz/30W potential of the CPU. What it took was adding a 120mm fan blowing at the bottom of the laptop where lots of heat now gets dumped to thanks to the graphene heat spreaders and the thermal pads I installed. The best cb score I managed that way was 1896 cb... which I think is crazy considering the machine did just 1293 cb in stock configuration. Of course running at 30W would also half the battery runtime and maybe fry some internals in the long run.
I believe it was possible to raise the multi-core turbo ratio to the same value as the single core turbo ratio on the matebook x pro somehow and maybe my cpu will at some point do 4.0 ghz on all cores. Unfortunately I don't remember how it was done, but it would be interesting just to see how far things can be taken.
To take things further in any case I think the fan needs to be replaced. It's just too weak. I ordered this assembly (from a razer blade stealth 13.3) and I think I will be able to make it fit.. we'll see once it arrive and hopefully its fan will be stronger - the heat pipes for sure look much more beefy. Even better would be to have a much larger fan, but so far I haven't seen one that is flat enough.
Another area where things could be improved was fan control. The fan ramps up once 75 celsius is reached and that's just too late - I'd like it to run at full tilt at that point and start at the 60 mark or so. It's a shame LG does not give us better tools to control the thing. -
Oh and here's a bonus post. I found out by accident how to control the keyboard backlight via EC registers.
It's EC register 0x72 and it takes three values:
off: 0x80 low: 0xa2 high: 0xa4
Maybe I'll use that in the future to code a little backlight timeout utility for those late night movie sessions. Right now the backlight just stays on forever which is ridiculous.
Another thing I quite dislike is the trackpad enabled indicator. Why is it lit when the trackpad is on??? That's so terrible. I wish I could just get rid of it (maybe I'll put a sticker on it).hfm likes this. -
Ok problem solved. It's easy to lift the keys from the side using a flat screwdriver. I lifted right right side of the F5 key to get this:
Then I added some vinyl tape to the underside of the key to close the indicator gap and now it does look like this with the touchpad on:
nalim likes this. -
That's amazing. The only thing I'm going to dislike about that is the fact that the fain noise on the Blade Stealth fans is higher.
I'd really love to fit another fan in that empty space and have the both of them run at a lower RPM for the same CFM.
I got the extra heat pipe I ordered from the Gram 13, definitely looks IDENTICAL to the one in the Gram 17. It's going to take me a while to get around to doing any work on this, I might start week after next, by then hopefully the metalpad will have arrived as well.
Good work on the keys! I leave it disabled 95% of the time so it hasn't bothered me yet.
I also have to say this keyboard is SO MUCH BETTER than the one on my 2017 MacBook Pro 15. That isn't saying much though. -
Yes I love the keyboard. I'm a programmer and usually very picky. I sold my 12'' macbook because I hated those butterfly keys so much and am sticking to 2015 Macbook Pros just for the much better keyboard (and the right ports....). I used the matebook x pro before and I think it has very nice keyboard and Apple should steal back from Huawei in that regard. That's why I was worried the Gram17 might be a disappointment keyboard-wise, but it's definitely not. The only gripes are that touchpad light and the half-useless keypad, but typing is a pleasure.
-
How are you dual booting linux?
I'm trying to get a Manjaro boot USB to work and have tried every permutation of writing it using rufus and etcher but I can't boot off it. I looked in the BIOS and I don't see a way to disable secure boot, which is probably the issue.
How did you manage to install it? -
btw about the fan noise. I for one would not mind some more fan noise for top notch performance. Fan noise is extremely low and I find odd satisfaction in hitting F5 for compile and then getting some fan noise in response.
hfm likes this. -
So I found the updated BIOS on LG's korean site and took a huge chance updating my US unit. Worked fine, although I don't see any further option to disable secure boot as I was expecting.
 msintle likes this.
 -
Did it work well? Any enhancements/downgrades? What is the download URL?
-
I have not seen anything at all different. There would need to be some type of release notes to know that, and since it doesn't seem to be an official download for the US model I doubt we'll ever see any, unless of course they decide to release it in the US at some point.
Obviously you do this at your own risk, I have no way of knowing if this will work for everyone else with a US unit, it worked for me.
Download Instructions:
- Go to this URL and turn on Chrome's translate for the site. https://www.lgservice.co.kr/download/selectSearchView.do
- Search for "17Z990"
- You'll see two 17Z990 models in the results, just click one of them and you'll see the firmware download.
- File name is:
Code:
1.15.1902.1501_1xZ990_W1ZD1180.zip
msintle likes this. -
Did the BIOS language change?
-
Nope, it's all still in English.
Your screen will go black when you execute the file you extract from the zip. Don't be alarmed it'll eventually reboot and start applying the update. Just plug in AC to be safe.msintle likes this. -
That's the exact same bios I have. Btw. on bios mods someone is requesting an unlocked bios for the lg gram 15. It'll be interesting to see what options can be unlocked. Follow here: https://www.bios-mods.com/forum/Thr...Phoenix-Secure-Core-Bios?pid=152590#pid152590
-
Like you said you have to disable secure boot in BIOS. In BIOS, select the 'Security' tab, then 'Secure Boot Information' and disable 'Secure Boot Option'. Then you should be able to boot from the USB stick.
My BIOS version is W1ZD1180 X64 01/29/2019Last edited: Apr 7, 2019hfm likes this. -
Wow I feel like an idiot, I thought that Secure Boot Option was a header not a menu item. SIGH. I've been using Ubuntu and signing my own kernels. lol..nalim likes this.
-
Just curious, did you have to set a kernel parameter to disable ACPI in order to get Fedora 29 to boot on your Gram 17?
I'm getting a ton of ACPI kernel error messages unless I turn off ACPI for a lot of the linux kernels. I noticed starting at 4.20 series that there is a new LG_LAPTOP driver module, I tried compiling a new kernel making sure this flag was on but it didn't seem to help the situation. -
No, I don't have any special kernel options, this is my /etc/default/grub:
GRUB_CMDLINE_LINUX="rd.md=0 rd.lvm=0 rd.dm=0 vconsole.keymap=us $([ -x /usr/sbin/rhcrashkernel-param ] && /usr/sbin/rhcrashkernel-param || rd.luks=0 vconsole.font=latarcyrheb-sun32 rhgb quiet resume=UUID=a9898dbc-e69c-40d2-a1c2-141b9aa8bfe0"
and I also have no ACPI related kernel error messages in system journal. I have stock fedora 29 kernel (currently 5.0.5-200.fc29.x86_64), lg-laptop module is already compiled in, so I can use majority of LG keys (keyboard backlight etc) under fedora.hfm likes this. -
In most of the kernels I can't even boot without turning off acpi for pci. It's just a relentless spam of ACPI errors likeI created a Fedora 29 live USB and I can't even boot from it. I do have Manjaro installed though. Probably a problem with my boot config conflicting with it as I don't even see any errors on the console it just hangs thereCode:
ACPI Error: no handler or method for GPE xx
I tried two different programs to create it. I can get to grub menu where I can pick the options for the Fedora boot but it doesn't get past picking one. Turning off "quiet" kernel parameter displays no output.Last edited: Apr 10, 2019 -
I'm waiting on my new fan. I did another install of another matte screen protector and this time it's finally almost perfect. The big surface makes things really tricky, but in my opinion it is worth the effort to get a matte screen.
I really would like to get full fan control, so I looked some more at EC stuff and ACPI tables. In the EC I located two temperature sensors. At 0xC8 is something related to CPU temperature and 0xC9 is something like motherboard or case temperature. These just seem to be celsius temperatur values. It looks like the second one is used to control the fan and as it takes quite some time for this value to rise at full CPU load we get the very late kick in of the fan.. in stock config it happens after thermal throttling has kicked in.
Using RWEverything it's possible to dump the ACPI tables and there is a fan related section. Does anyone know how to read this:
Scope(\_SB.PCI0.LPCB.H_EC)
{
Device(TFN1)
{
Name(_HID, EISAID("INT3404"))
Name(_UID, "TFN1")
Name(_STR, Unicode("Fan 1")})
Name(PTYP, 0x04)
Name(FON, One)
Name(PFLG, Zero)
Method(_STA, 0, NotSerialized)
{
If(LEqual(FND1, One))
{
Return(0x0F)
}
Else
{
Return(Zero)
}
}
Method(_FIF, 0, NotSerialized)
{
Return(Package(4) {Zero, One, 0x02, Zero})
}
Method(_FPS, 0, NotSerialized)
{
Return(Package(14)
{
Zero,
Package(5) {0x64, 0xFFFFFFFF, 0x3A98, 0x01F4, 0x1388},
Package(5) {0x5F, 0xFFFFFFFF, 0x39D0, 0x01DB, 0x128E},
Package(5) {0x5A, 0xFFFFFFFF, 0x33F4, 0x01C2, 0x1194},
Package(5) {0x55, 0xFFFFFFFF, 0x319C, 0x01A9, 0x109A},
Package(5) {0x50, 0xFFFFFFFF, 0x2EE0, 0x0190, 0x0FA0},
Package(5) {0x4B, 0xFFFFFFFF, 0x2BC0, 0x0177, 0x0EA6},
Package(5) {0x46, 0xFFFFFFFF, 0x2904, 0x015E, 0x0DAC},
Package(5) {0x3C, 0xFFFFFFFF, 0x238C, 0x012C, 0x0BB8},
Package(5) {0x32, 0xFFFFFFFF, 0x1D4C, 0xFA, 0x09C4},
Package(5) {0x28, 0xFFFFFFFF, 0x1770, 0xC8, 0x07D0},
Package(5) {0x1E, 0xFFFFFFFF, 0x1004, 0x96, 0x05DC},
Package(5) {0x19, 0xFFFFFFFF, 0x0C80, 0x7D, 0x04E2},
Package(5) {Zero, 0xFFFFFFFF, Zero, Zero, Zero}
})
}
Method(_FSL, 1, Serialized)
{
If(\_SB.PCI0.LPCB.H_EC.ECAV)
{
If(LNotEqual(Arg0, \_SB.PCI0.LPCB.H_EC.ECRD(RefOf(\_SB.PCI0.LPCB.H_EC.PENV))))
{
\_SB.PCI0.LPCB.H_EC.ECWT(Zero, RefOf(\_SB.PCI0.LPCB.H_EC.PPSL))
\_SB.PCI0.LPCB.H_EC.ECWT(Zero, RefOf(\_SB.PCI0.LPCB.H_EC.PPSH))
\_SB.PCI0.LPCB.H_EC.ECWT(\_SB.PCI0.LPCB.H_EC.ECRD(RefOf(\_SB.PCI0.LPCB.H_EC.PENS)), RefOf(\_SB.PCI0.LPCB.H_EC.PINV))
\_SB.PCI0.LPCB.H_EC.ECWT(Arg0, RefOf(\_SB.PCI0.LPCB.H_EC.PENV))
\_SB.PCI0.LPCB.H_EC.ECWT(0x14, RefOf(\_SB.PCI0.LPCB.H_EC.PSTP))
\_SB.PCI0.LPCB.H_EC.ECMD(0x1A)
}
}
}
Name(TFST, Package(3) {Zero, 0xFFFFFFFF, 0xFFFFFFFF})
Method(_FST, 0, Serialized)
{
If(\_SB.PCI0.LPCB.H_EC.ECAV)
{
Store(\_SB.PCI0.LPCB.H_EC.ECRD(RefOf(\_SB.PCI0.LPCB.H_EC.PENV)), Index(TFST, One))
Store(\_SB.PCI0.LPCB.H_EC.ECRD(RefOf(\_SB.PCI0.LPCB.H_EC.CFSP)), Index(TFST, 0x02))
}
Return(TFST)
}
}
} -
I also found a shot of a LG Gram motherboard from the bottom. It's one model earlier than the Gram17, but it looks very similar and there are a few chips there which might need inspection.
nalim likes this. -
From where did you get the protector?
Sent from my Pixel 3 XL using Tapatalk -
celicious matte screen protector (bought on ebay, shipped from the UK).
nalim likes this. -
I looked at the ACPI specs and AML language definitions and also found the complete EC ACPI table and it seems like the fan methods above are a dead end unfortunately. If I read the AML correctly, the _FSL method (Fan Set Level) writes to EC registers B0-B6 and these just stay at 0 always on my machine and seem to do nothing at all. My best guess is that these fan methods in the ACPI tables are unused in the Gram 17.
The register that does control the fan sometimes (0xC2) is defined as FMOD in the tables, but not really used anywhere else in the tables. -
Over on BIOS mods, thanks to the work of Lost_N_BIOS, it became clear what options are hidden from us in the BIOS.
https://www.bios-mods.com/forum/Thr...Phoenix-Secure-Core-Bios?pid=152590#pid152590
There are files available that show all the locked settings. There is a fan control that toggles between automatic and on. Maybe On would allow us to control the fan always using that EC register as the automatic stuff would no longer interfere. Or maybe it's just unclear and what it does is turn the silent mode "on".
Apparently it's possible to change the hidden setup variables using a special version of grub to get the shell we are missing in the bios, but I've never done anything like that, so I'm still building up the courage to try.
Another option would be to flash a patched bios, but the most reliable way to do that is to use a hardware bios chip clamp and it's really annoying to repeat that everything a new bios comes out.
There also seem to be most of the settings we get in the LG control center app for battery/usb charge/etc. as well as a setting to switch FN and Ctrl that some people might like and would be a good one for testing. -
I'd rather see LG add the feature so we don't have to continually patch the BIOS every time they update it. I doubt that will ever happen though. What we need to do is use a social angle and figure out the right person to ask about it. They really are holding this thing back.
Oh btw @nalim, I tried the test release of Fedora 30 and that worked fantastically. Not sure why Fedora 29 was giving me issues. If I get the gumption I might try to figure out what drivers/kernel options they are using there so I can maybe replicate building a kernel for any distro.
Sent from my Pixel XL using Tapatalk -
The method using Grub to launch an EFI Shell would not require patching the BIOS. I allows to directly write to the hidden bios registers and those values would be persistent on updates, just like the regular visible values.
What does require constant patching and reflashes is making the hidden fields visible - which makes them probably safer to tweak, but even then the settings would stay on an update, the unhidden fields just would get hidden again. It's possible the ability to flash a regular update is lost once a patched BIOS is in use.
I do have an EEPROM reader + a bios chip clip and the next time I open the machine, I'll try to extract my bios so I can start experimenting as this will give me a good backup to flash back in case things should go wrong.hfm likes this. -
Just bought the Costco version (only 256 GB drive) and loving it so far. I know I'll eventually want to upgrade the hard drive as I've read its slow and obviously small. What type of drive should I get for the best speeds? NVMe M.2?
How hard is it to replace the existing drive? It sounds like adding to the existing drive is more trouble than its worth so I'm imagining just replacing it entirely. Is that possible? Years ago on my Sony Vaio, I swapped out the internal SATA disk drive with a Samsung EVO SATA SSD and it was a pretty simple process with the included software. Is opening up this case and doing this difficult?
Thanks! -
I'm using the stock drive right now coupled with another SATA m.2 I threw into the 2nd slot. I usually don't notice much the speed difference as I don't copy super large files around much. If you aren't seeing any problems with your system's IO speed I wouldn't really bother replacing it. The only gripe I have about the drive being a SATA drive is at the $1700 price it should at least be a lower tier NVMe. The excellent deal on NVMe right now is the WD Blue SD500, it's only a PCIe 2x drive but they are faster and extremely price competitive.
Oh.. it's really easy to replace. Just carefully pop the feet and the screw covers off (they will stick back on just store them sticky side up while you work). The two m.2 slots are easily seen, there's pictures I posted of the internals in this thread. You might want to just read all of the posts in this thread to get some general info about the unit as well.
You can either use Macrium Reflect Free Version to clone your drive (I posted someone else some instructions here) or slap the drive into the 2nd slot and use macrium to clone it that way. It might cause some boot issues with two drives with the same GPT id so you might need to perform some trickery there to reformat the old one after you boot. It might be MS solved this already, I recall having issues in the past with this. I haven't had to clone a drive lately.Last edited: Apr 13, 2019 -
I think I might have just had my first undervolt blue screen. Seems according to the dmp it was intel wifi drivers being blamed, but I am pretty sure it was probably the undervolt. If it happens again I'm going to back that off just a tad.
It happened near the end of a macrium reflect backup of my OS drive, which is compressed and AES 256bit encrypted. So there's a modicum of CPU strain there. It's also the first time I'm backing up this entire SSD with my linux partitions included, so maybe we'll see if it just random happens again near the end. Maybe it's some bug with ext parts and macrium in windows. -
I found an annoying driver issue on windows. The audio drivers for the Synaptics Smartaudio thing are applying a filter to reduce distortion on the speakers, but the same filter is also applied to the headphone output which makes it sound crap. It's possible to disable it in audio device settings, but for some reason it keeps being re-enabled if the headphones get plugged in again. Even with the "disable all enhancements" checked, the filter gets applied and only unchecking and rechecking of the setting fixes the sound.
I now got rid of the Synaptics Smartaudio Driver and am using the microsoft hd driver instead - windows update will probably revert that at some point. This has fixed the headphone audio, but now more bass is coming through the speakers leading to distortion at higher volumes. No sure how to go on from here with this :/.
Something else I'm wondering is the max charging speed possible over usb-c. With the chargers I tried so far, it seems to be limited to 30 Watts. This can be checked using the free BatteryInfoView during charging. Has anyone seen higher charging speeds over usb-c? -
With the barrel plug charger I get up to 33.5 W of charging, but that seems to be the limit.
-
This might explain why @msintle was seeing battery drain when there were devices connected that require power. I'll boot into windows and see what I find regarding the audio drivers and edit this post.
EDIT:
Are you perhaps talking about this when you hover over the headphones in the app:
![[IMG]](images/storyImages/dlsM4Qc.png)
I also see this option in the device settings:
![[IMG]](images/storyImages/WH5c4GX.png) Last edited: Apr 14, 2019
Last edited: Apr 14, 2019 -
Yes the problem is the "Disable all sound effects" it works when you click it, but the next time you use headphones you get the bad sound again.. So something seems awry with the settings and speakers vs. headphones. Anyway the MS stock drivers appear to work well and as the speakers sound crappy anyway, I'll stick to these.
Or is your sound fine? I am getting lack of bass and some weird phase stuff going on on headphones with the default drivers/settings.
New LG Gram 17
Discussion in 'LG' started by vvb8890, Jan 16, 2019.


