
I would emphasize the custom GPS plus mapping and Office software, and start around $395. Maybe add free shipping and/or Best Offer (ignore the lowballers) after a while if it doesn't sell. Units with factory GPS get a $50-75 premium, and your custom GPS has better performance so include a picture of Winfast Navigator showing all the satellites - get the lockup outdoors, then disconnect but leave the display so you can take a picture indoors.
-
-
My guess is the touchscreen went dead, just a coincidence it happened to be at the same time you were loading SP3. Perhaps member Sadlmkr can do a repair, if you ask nice and he doesn't have too many ranch chores to do.
-
Thanks - I'm starting to think that way too, sadly. I'm in the UK, so thanks for the contact re repairs, but I'll have to find someone over here to look at it I guess - much appreciated though.
Tris -
Tristan...,
Linux Speak: In terminal.....
#watch the capital letters and see if your system "sees" the touchscreen components. You may come up with a PS/2 driver on the touchscreen, possibly Fujitsu. Report back and PM if I don't answer.Code:dmesg | grep Touch
Meanwhile start shopping for a 18/19 touchpanel. The new style will not quit on you and the screen will be pretty. annnd I'll tell you how to replace it if you need.:thumbsup:
EDIT I had trouble with injecting an image here so here is a link to my post in Toughbooktalk: http://toughbooktalk.com/viewtopic.php?p=12141#p12141 END EDIT
-
Excellent, I was thing $400 so I am in the ball park. Thanks for the advice. I will be posting up on eBay in a few days.
-
Thanks - I will report back here later for the benefit of others, but in the meantime I will PM you for some more details if that's okay?
-
For completeness, here is the outcome: I installed Xubuntu 12.04 alongside XP Pro SP3 and for some reason during the process of doing that, the touchscreen started working again. It has worked fine for the last week, and all I have had to do is re-calibrate the touchscreen.
So I would imagine the answer is that the screen is on the blink somewhere alone the line, but for so long as it is working, I'll just roll with it. No doubt it will stop working again at some point!
Thank you for all your kind help, those who responded to my pleas for advice and suggestions. It's very much appreciated. -
I don't do likes....but I do like this. Namely letting us know. We are glad to be of service.
Jeff -
GRUB = GRand Unified Bootloader.
-
Hello, folks. I'm new here. I recently acquired a CF-18NHHZXBM. I'm kind of confused on whether I have a digitizer or regular touchscreen. My model number seems to indicate that I have a plain touchscreen, but I also have a serial port, and OP's guide says only the digitizer model has a serial port. And this model came originally with XP Pro, not Tablet PC Edition. I've installed the touchscreen drivers on a clean install of Windows XP Pro, but I have no touch capabilities. I see in OP's post that there are digitizer drivers somewhere, but I can't seem to find any apart from the regular touchscreen/mouse driver.
Any help would be greatly appreciated. -
Also, I checked the BIOS and the touchscreen is enabled. So I'm kind of at a loss.
-
Model Number: CF-18NHHZXBM
Status: DISCONTINUED
MSRP: $3,783
Description: Intel Pentium M 753 1.2GHzULV(Centrino), 10.4" Touch Screen XGA, 60GB, 512MB,Intel 802.11a+b+g, Dual pass through, WIN XP SP2,TPM1.2, No Drive -
Yes, that's what I gathered reading about the model number. However, OP's guide gave some contradictory information.
So the most likely scenario is that my touchscreen is just dead then, yes? -
Are you getting the model number from the BIOS?..Compare the model numbers from the bottom and BIOS
How long is the storage slot for the stylus pen?
Are you comfortable using a screwdriver to do an investigation?
It's an older model and hard to tell what parts have been swapped around...You may have a digitizer model that someone replaced the base plate with a touchscreen plate. Does your stylus have a button on it? -
When you loaded the new OS did you install ALL the drivers. Shawn is right...we need your model number from the bios.
-
Let me double check that info as it should say touchscreen has the serial and the Digitizer models don't as they use the serial inside for the digitizer. ....................
"There will be a rubber seal flap on the rear left of the case for the serial port. Tablet do not have serial ports"
I guess I need to go back and word that better so anyone else won't get confused.
"There will be a rubber seal flap on the rear left of the case for the serial port on standard touch model. Digitizers do not have serial ports"
How does this edit sound before I drop it in? -
That sounds great...
-
BIOS reports same model, CF018NHHZXBM.
Looks about a half-inch.
I'm comfortable disassembling computers, and that's actually how I got this Toughbook. Some friends of my parents needed some work done on their newer notebooks, which I did for them. Later they were getting rid of a bunch of older gear and gave it all to me for free. They are not tech savvy at all, and they buy new, so it's unlikely this Toughbook would be patched together from non-original parts.
Yes, all the ones listed on the Panasonic site, as well as other sites that provide the same drivers. And I followed the instructions for each driver carefully. Everything else works perfectly.
Ah, yes, that's where I was confused, because all indications point towards my model having a touchscreen, except I thought that having an external serial port indicated a digitizer model.
So it seems like my touchscreen hardware probably just doesn't work. I've heard you can buy new touchscreen overlays. Anyone have experience with this? -
CF-18NHHZXBM, rather.
-
ok i have one here with a weird peripheral add-on of banana plug jacks either as a volt meter or audio out......i'm at a loss here as to what its for....
-
Post a photo please
-
sorry figured it out it was a PCMCIA multimeter that had been securely attached at the factory with a bracket and screws and made it look as though it was part of the toughbook...... sadly it had been tamperd with and only the socket remained the card was not in there as in it was there to finish the outside as it no longer has the PCMCIA door
-
Hi does anyone have the drivers for the cf-18 mk1 and is it possible to get all drivers to work with win7 and does anyone have the touch screen driver for cf-18 mk 4 running windows7 pleaseeeee
-
Did you try direct from Panasonic?
http://business.panasonic.com/support-computerstablets-downloads
Win7 on a CF18 mk1.
Search results
http://forum.notebookreview.com/threads/howto-install-windows-7-on-a-cf-18-mk1.418424/#post-5319252
http://forum.notebookreview.com/search/15177576/?q=cf+18+win7&o=relevance&c[node]=1012 -
Welcome to the Panasonic Toughbook forum
I did this upgrade many years ago and it was very slow and if you tried to watch a movie it would freeze up. -
I understand that you have the CF-18's in hand but...CF-19Mk1's and Mk2's are so cheap it's not funny,coupled with an SSD they will run circles around an 18 period. And Windows 7 on a CF-18Mk1 with the 900mhz CPU will put you in a coma waiting on it.
toughasnails and Shawn like this. -
Hi I went on the Panasonic web site select everything I need click search and nothing happens. I only want to use these toughbook for car diagnostics. I thought when I bought them they were all mk4s but 4 were mk1 3 of them are xp1 and 1 is win 2000 I just want to get the touch screens working and is it possible to upgrade the win 2000 one to xp and have the touch sreen working. I will gladly pay someone who can email me the drivers. Thanks for all your reply's
-
It is impossible to make it any simpler than this ......
Other than send me the CF18 and I install Win7 for you. Yes I will, for a fee of $75 per hour. Estimate 6 to 8 hours for a custom OS install on a CF18 or CF19, so figure $450 to $600 USD. You pay shipping both ways.
You really just need to do some reading on the forum and then follow the instructions. It is not simple to install an OS on a CF18 or CF19. Let alone one that was not on it originally. I use restore disks for the specific model Toughbook.
I will cut a paste the thread I linked to a few posts ago. It is step by step instructions.
http://forum.notebookreview.com/threads/howto-install-windows-7-on-a-cf-18-mk1.418424/#post-5319252
It looks like the drivers he used are for a CF19 mk3.
They MUST be installed in the correct order.
Once again: Download those from the Panasonic site.
http://business.panasonic.com/support-computerstablets-downloads
Direct links
Win7 CF19 mk2
ftp://ftp.panasonic.com/computer/software/19fgh-mk2-7x86.exe
Win7 CF19 mk3
ftp://ftp.panasonic.com/computer/software/19kl-mk3-7x86.exe
Once you download all of the drivers, you must open the downloaded exe files with a program called 7zip.
This is because the downloaded exe files are designed to run on the CF19 mk3 only. The 7zip program gets around that issue.
_____________________________________________________________________________________________________________
Now, the steps--
Disclaimer: These instructions are geared for a digitizer model with a fairly basic set of hardware options. Under Microsoft Windows 7, a digitizer is required for Tablet PC. To quote Microsoft's Tablet PC Hardware Requirements page:
- Tablet PCs must include a pen-based stylus ("Digitizer")
Prepare to Download Drivers
- Please refer to the stickied thread "The Ultimate Toughbook Resource Thread" for a current, active list of driver download sites.
- Use 7-Zip to extract: If you have trouble extracting the drivers (e.g. you get an error message when attempting to run the downloaded self-extracting executable), try using 7-Zip, which is Open Source software. Open the downloaded *.exe in 7-Zip the same way you would load any other zip/archive file, and then 7-Zip will show you the files that downloaded self-extracting executable contains
- This is only a subset of the Windows 7 drivers that are available for the CF-19 K/L. While there are some forty downloads or so, a number of the ones not listed are incompatible with the CF-18 hardware.
Download Drivers
- Intel Chipset/INF Update Utility
- Download the latest version for Windows 7 32-bit from Intel's Download Center
- NOTE: Unfortunately, as of the time of this writing, Intel's Driver Update Utility is out-of-sync with what actually works. When visiting Intel's Driver Detection webpage while running under Windows 7, it has shown me that the chipset driver is outdated, but the driver link provided is to an XP-based version in the version 6.* series that won't install under Windows 7. From the Release Notes for 9.2.0.1030, this update covers the Intel 800 Series Chipsets. So, just manually find and download this driver instead of trying to let the driver detection tool find it for you.
- Panasonic Windows 7 Drivers for the CF-19 K/L (yes, nineteen):
- Panasonic common components
- Touchpad driver
- Panasonic misc driver *
- Hotkey driver
- Hotkey appendix application
- Hotkey settings application
- Tablet button manager
- Tablet buttons driver
- Panasonic notification utility *
- Concealed mode utility *
- Loupe utility *
- Battery recalibration utility *
- Wireless switch utility *
- Wireless connection disable utility *
- Display rotation tool *
- Port replicator LAN driver
- Bluetooth stack driver
- PC info viewer application *
- NOTES:
- For other Toughbooks or CF-18's with different configurations, you may need to download additional drivers
- All driver noted with an asterisk (*) depend on the Panasonic Misc driver. If you completed an earlier driver installation without the Misc driver, you can install all items marked with an asterisk (*) in order without having to go back and redo the entire installation.
- Panasonic Vista Software for the CF-19F/G/H (mk2):
- DMI Viewer
- If you have a newer CF-18 with a SigmaTel audio device, you may need the following (thanks to David O. for the report on CF-18's with a SigmaTel device):
- CF-19C/D/E (mk1) SigmaTel driver for Windows Vista
- Realtek Driver for Windows 7:
- If the system has Intel 82852/82855 graphics, you will need the following:
- Download the latest 82852/82855 drivers from Intel's website
- The driver version I used was 14.19.50 for XP
Verify the BIOS is at the Latest Version
- On the same Panasonic website used to download drivers, check the latest BIOS version for your specific hardware model (i.e. don't install a BIOS update created for a different hardware model)
- If the BIOS version listed is newer than the current version, follow the BIOS update instructions for that version
Perform Initial Windows 7 Setup
- Install Windows 7 to an empty partition (clean install)
- Go to Control Panel > System and Security > Windows Update
- Run Windows Update after the installation completes
- Verify that you are connected to the Internet
- Go to Start > Control Panel
- Click "Windows Update"
- In the list of options along the left column, click "Check for Updates"
- You will likely see text that "important updates are available" and/or "optional updates are available"
- Click either of those to view a list of the individual updates (drivers are usually listed as optional updates)
- Select the updates to install
- Click "OK" (in the lower-right corner) once you have selected the updates to install
- Click the "Install Updates" button to begin the update process
Install the Toughbook Drivers
- Intel Chipset/INF Update Utility
- Run infinst_autol.exe
- Panasonic Common Components
- Run Setup.exe
- Panasonic Misc Driver * (thanks to Slammer111 for information on the Misc driver)
- Open the Device Manager
- Expand the "System Devices" category
- Right click on the Microsoft ACPI-Compliant Embedded Controller device and select "Update Driver Software"
- Select the "Browse my computer for driver software" option
- Select the "Let me pick from a list of device drivers on my computer" option
- Click "Next"
- Click "Have Disk..."
- Select the folder that contains the file newmisc.inf from the Panasonic Misc Driver download
- Click "Next"
- An "Update Driver Warning" message will appear saying (among other things) Windows cannot verify that the driver is compatible with the hardware and that the hardware might not work correctly if the driver is not compatible.
- Click "Yes" to continue installing this driver
- Sound
- For models with an Intel 82801DB/DBM AC '97 Audio Controller, skip this step
- For models with a SigmaTel device, install the SigmaTel audio driver (thanks to David O for the report on CF-18's with a SigmaTel device)
- Run Setup.exe for the Windows Vista SigmaTel driver
- If that does not work, download and run the Windows XP version of SigmaTel driver for your particular CF-18 model
- Touchpad Driver
- Open the Device Manager
- Expand the "Mice and other pointing devices" category
- Right click on the PS/2 device and select "Update Driver Software"
- Manually select the driver using steps similar to the following:
- Choose to browse your computer for driver software
- Click "Let me pick from a list of device drivers on my computer"
- Click the "Have Disk..." button on the next screen
- On the "Install From Disk" dialog, click "Browse"
- You will want to use the folder containing driver fidmous.inf
- Hotkey Driver
- Open the Device Manager
- Find the section that includes the "unknown" devices
- Right click on one of the unknown device and select "Update Driver"
- This unknown device is typically the first of of two unknown devices that will be listed
- If you select the wrong unknown device, the install will fail. No worries, just pick the other unknown device.
- You will want to use folder containing the driver hotkey.inf
- Hotkey Appendix Application
- Run Setup.exe
- Hotkey Settings Application
- Run Setup.exe
- Tablet Button Manager
- Run Setup.exe
- Tablet Buttons Driver
- Open the Device Manager
- At this point, there should be just one "unknown" device
- Right click on the unknown device and select "Update Driver"
- Manually select the driver using steps similar to the following:
- Choose to browse your computer for driver software
- Click "Let me pick from a list of device drivers on my computer"
- Click the "Have Disk..." button on the next screen
- On the "Install From Disk" dialog, click "Browse"
- You will want to use the folder containing the driver MeiTBtn.inf (found in the top level of the driver archive file extract; do not use the one in the amd64 folder)
- Wait for the driver installation to complete; if the install fails, try the other unknown device
- Manually copy meitbrc.dll to C:\WINDOWS\system32
- Run MeiTBSet_STANDARD.reg to update the registry
- Panasonic Notification Utility *
- Run Setup.exe
- Concealed Mode Utility *
- Run Setup.exe
- Loupe (Magnification) Utility *
- Run Setup.exe
- Battery Recalibration Utility *
- Run Setup.exe
- Wireless Switch Utility *
- Run Delay.reg to update the registry
- Run Setup.exe
- Wireless Connection Disable Utility *
- Run Setup.exe
- Display Rotation Tool *
- Run Setup.exe
- LAN Driver for Realtek 8139
- Run Setup.exe
- Port Replicator LAN Driver
- Run Win32\Setup.exe
- Bluetooth Stack Driver
- Run Setup.exe
- PC Info Viewer *
- Run Setup.exe
- DMI Viewer
- Run Setup.exe
- Video Driver for Intel 82852/82855 GM/GME Devices
- Preparation
- Be sure there are no other video drivers installed (you will want to start out with just the standard VGA driver)
- Extract the Intel 82852/82855 video drivers somewhere, but do not install anything
- Turn Off the Digital Driver Signing Check
- Create a shortcut on the desktop to cmd.exe
- Right-click on the shortcut and select "Run as administrator"
- When the command window opens, execute the following commands:
- bcdedit /set nointegritychecks ON
- bcdedit /set loadoptions DDISABLE_INTEGRITY_CHECKS
- Reboot
- Install the Video Driver
NOTE: This bit of rigmarole is necessary due to the Intel 82852/82855 device present in the CF-18 mk1; if your Toughbook has a video device that is better supported out-of-the-box in Windows 7, you will likely be able to skip these video driver steps. Without the right video driver setup, though, you won't be able to run the full display resolution.- Open the Device Manager
- On the menu, go to Action > Add Legacy Hardware
- Acknowledge the initial dialog screen
- Select "Install the hardware that I manually select from a list (Advanced)"
- Click Next
- Select "Display Adapters" and click Next
- Click the "Have Disk..." button
- Navigate to the path where you extracted the Intel drivers. The ialmnt5.inf file will be in the Win2000 folder
- IMPORTANT: Do not select the 82852/82855 GM/GME drivers, select the 945GM driver (yes, this is counter-intuitive)
- If prompted to reboot, DO NOT REBOOT
- If told the 945 device might not work right, acknowlege the error, then run Action > Scan for Hardware Changes
- "Intel(R) 82852/82855 GM/GME Graphics Controllers" and a "Mobile Intel(R) 945GM Express Chipset Family" devices should now be listed under "Display Adapers
- Wait for Windows to finish doing its thing installing the drivers in the background. The first time through, there will be a tool tip from the system notification area stating that the 82852/82855 device has been installed, providing a visual indication; on subsequent runs, though, that tool tip might not appear, so watch the system notification area and give it time.
- Disable the 945GM device
- IMPORTANT: If you do not wait for Windows to complete the driver install process going on in the background prior to disabling the 945GM device, I have seen Windows 7 re-enable a 945GM device that had just been disabled. If the system is rebooted with the 945GM device enabled, Windows 7 will roll the driver back, and you will have to repeat the step.
- Reboot
- Verify the Video Driver Installation
- Upon rebooting, Windows 7 may roll back one or more of your display devices to Standard VGA
- Open Device Manager
- Check the Display Adapters
- If there is only one 82852/82855 GM/GME device, or if there is a new "unknown" device, precisely repeat the above driver installation section (include the instructions for disabling the 945GM device); in the case of an unknown device, run the "Update Driver" action for that device instead of running the generic "Add Legacy Hardware"
- When everything is working, you should have "Graphics Properties" and "Graphics Options" menu items in the pop-up menu when you right-click on the desktop
- The "Graphics Option" item should have sub-items for display rotation
- Reboot and verify that Windows 7 no longer rolls back your display drivers after rebooting
- Protect the Video Driver Installation
- Go to Control Panel > System and Security > Windows Update
- Windows will likely tell you that an important update is available
- Click the "important update is available" link (do NOT click "Install updates")
- Right-click on the "Intel Corporation - Display - Mobile Intel(R) 945 Express Chipset Family" update
- Click "Hide update" from the context menu
- If the display driver gets updated to what is currently on Windows Update, the system will revert back to the Standard VGA driver.
- NOTE: When using a driver install hack different from the method described here, I have read reports that a system might Blue Screen when using Windows Media Player to play DVD's; however, alternate media players, such as VLC, reportedly do not exhibit this issue. I do not know if this method will have this same problem, but I thought I would mention this workaround in case someone does experience this issue.
- Preparation
Run Windows Update
NOTE: Be sure you have protected the video driver as noted in the "Install the Video Driver" section above
- Verify that you are connected to the Internet
- Go to Start > Control Panel
- Click "Windows Update"
- In the list of options along the left column, click "Check for Updates"
- You will likely see text that "important updates are available" and/or "optional updates are available"
- Click either of those to view a list of the individual updates (drivers are usually listed as optional updates)
- Select the updates to install
- Again, remember to exclude the Intel 82852/82855 display adapter
- As of the time of this writing, the latest version of Realtek's RTL8139 Fast Ethernet driver is not available on Windows Update, so you may want to deselect this driver update if Windows Update still shows the update Publish date as 10/6/2008
- Realtek
- Driver Date: 7/23/2009
- Driver Version: 6.111.723.2009
- Windows Update
- Driver Date: 3/31/2008
- Driver Version: 6.108.331.2008
- Realtek
- Click "OK" (in the lower-right corner) once you have selected the updates to install
- Click the "Install Updates" button to begin the update process
Configure and Customize Tablet PC Buttons
Tablet PC Buttons can be configured by going to Start > Control Panel > Table PC Settings dialog > Buttons tab, but I wanted to do more than what that dialog provides.
Turn Off Display - I wanted to set the press and hold action for the display rotation button to turn off the screen. Unfortunately, the Tablet PC Settings Control Panel Dialog only allows you to associate the "Turn the display off" action with press and release events. A little registry hack took are of that--
* Press and Release - Rotate screen
* Press and Hold - Turn off display
The simplest way to make these changes is to either download and run the "TabletPCButtonMappings.reg" file that is included in the attached " TabletPCButtonMappings.zip" file or perform it manually as follows:
* Create a text file and give it a *.reg name (e.g. ButtonConfig.reg)
* Open the file you just created in a text editor (e.g. Notepad)
* Copy and paste the contents of the "code" section below in the file
* Save the file and close the text editor
* Double-click the file to load the settings into the registry
* In all likelihood, a permissions prompt will appear - allow permission
Code:
Windows Registry Editor Version 5.00
[HKEY_CURRENT_USER\Control Panel\TabletPC\ButtonMaps\0]
"ButtonID"=dword:00000001
[HKEY_CURRENT_USER\Control Panel\TabletPC\ButtonMaps\0\PrimaryLandscape]
"DefAction"=dword:80000006
"DefHoldAction"=dword:80000002
"DefHoldActionData"=hex:00,00,00,00
[HKEY_CURRENT_USER\Control Panel\TabletPC\ButtonMaps\0\PrimaryPortrait]
"DefAction"=dword:80000006
"DefHoldAction"=dword:80000002
"DefHoldActionData"=hex:00,00,00,00
[HKEY_CURRENT_USER\Control Panel\TabletPC\ButtonMaps\0\SecondaryLandscape]
"DefAction"=dword:80000006
"DefHoldAction"=dword:80000002
"DefHoldActionData"=hex:00,00,00,00
[HKEY_CURRENT_USER\Control Panel\TabletPC\ButtonMaps\0\SecondaryPortrait]
"DefAction"=dword:80000006
"DefHoldAction"=dword:80000002
"DefHoldActionData"=hex:00,00,00,00
Lock Workstation - Then, I wanted the the press and hold action for another button to lock the workstation
- Select "Start a program" as the action
- Enter "rundll32.exe user32.dll,LockWorkStation" (without the quotes) as the program location
Manage Display Rotation
There are several different ways to manage display rotation.
- Video Driver Context Menu
- Right-click on the desktop
- In the pop-up menu, navigate to Graphics Options > Rotation
- Select another rotation setting
- Video Driver System Notification Area Icon
- Click on the Intel Extreme Graphics 2 for Mobile icon in the System Notification Area
- In the pop-up menu, navigate to Graphics Options > Rotation
- Select another rotation setting
- Video Driver Hot Keys
- Test without other programs running to verify that another program does not intercept these hot keys
- Default hot keys are as follows (think of the arrow as pointing to the TOP of where the screen would be if in Notebook mode):
- <Control><Alt><Up>
- <Control><Alt><Down>
- <Control><Alt><Left>
- <Control><Alt><Right>
- To Enable/disable and/or customize these and other display Hot Keys, go to Start > Control Panel > Display > Change Display Settings > Advanced Settings > Intel Extreme Graphics 2 for Mobile tab > Graphics Properties > Hot Keys
- Tablet PC Buttons
- To configure, go to Start > Control Panel > Tablet PC Settings > Go to Orientation (link toward the bottom of the dialog)
- Choose the orientation sequence and click OK
- Press the screen rotation button on the front panel of the computer
- Each time the screen rotation button is pressed, the display should rotate to then next rotation angle specified in the orientation sequence
- Automatic Display Rotation Tool
- To configure, Right-click on the Display Rotation Tool icon in the System Notification Area
- Click Settings
- Select the default angle for both laptop mode and tablet mode
- Click OK
- Flip the screen from notebook mode to tablet mode and vice-versa
- As long as "Keep Angle" has not been selected, the display should automatically rotate to the specified angle
Normally, the Automatic Display Rotation Tool is already running on boot; however, if it is not, it can be launched from Start > All Programs > Panasonic > Display Rotation Tool. This program will not actually rotate the screen; it will simply launch the utility and load it in the System Notification Area.
Calibrate the Digitizer
Some users may have problems with the digitizer's edge action--for example, the mouse pointer won't go all the way over to the right edge, causing problems with the close button, scrollbars, show desktop, and anything else that might be along that edge. One trick I was taught by a WalkAbout (now DRS) tech was to offset the calibration click for the Wacom digitizer.
NOTE: These steps assume the right edge is the problem edge.
- Go to Start > Control Panel > Tabelt PC Settings dialog > Display tab
- Click the "Reset..." button if it is not disabled (need to be in "full" calibration mode [16 calibration points])
- Click the "Calibrate..." button
- On the four right-most calibration targets, do NOT click in the dead center of the target; instead,
- Click the tip of the left line--vertically, your click will still be centered, but horizontally, your click will be offset to the left
- Click the other 12 calibration targets the same as you normally would
Picking the optimal offset distance to click can be an inexact science, but for me this calibration method has greatly improved pointer accuracy along the right edge.
Customize the Windows 7 System Properties Screen
Special thanks to db04p71 for this tidbit.
- Download the attached OEMLogo.zip file
- Copy the included OEMLogo.bmp file to the \Windows\System32 folder
- Run the included OEMLogo.reg file to update the registry
Customize the Desktop Wallpaper
Need a desktop wallpaper to put the finishing touches on your new install? Check out the posts in this thread for some Toughbook-themed wallpaper. -
Ok thanks is it possible to get the driver for the non digitizer models I have installed win 7 on all the toughbooks but the mk1's are very slow. I can dismantle and rebuild no prob but not too up on software. Thanks for your help
-
"Picking the optimal offset distance to click can be an inexact science, but for me this calibration method has greatly improved pointer accuracy along the right edge."
this is also known in broadcast engineering/rf building-repair as "tune for drift" .
yeah ... i agree , these units are not the easiest to load a more up-to-date OS on (ie : not factory original bios and such) .
and just like on a couple of other models , the install sequence is of paramount importance . -
Try a stripped down version of win7. Win7 lite or maybe evn win7 starter.
-
What's the full model number of all your 18's?
-
cf-18KHHEBBE, 18BHAFXKE, 18BHKFXDE, 18BHAFXKE, 18BHAFXKE, they are all in excellent condition I bought them at an auction they belonged to the revenue I live in I reland
-
If you are determined then go with the ide to sata adapter,60gb solid state drives and Windows 7 starter edition,honestly XP sp3 is the best choice,the restore discs are available for them. Or XP on the Mk1's and 7 on the Mk3. They are gonna be slow with regular drives.
toughasnails and Shawn like this. -
Hi is the cf-18 kh a mk3 then. do you sell the restore discs for them if so how much thank you for your help
-
The 18 K is a MK4. The restore disk might be hard finding since its very old. Panasonic does not have them. Someone here might have a link to where to find them.
-
Just a heads up. The restore disks for a mk1 and mk4 are both WinXP. I do have them.
PM me for details -
I picked up a CF-18EHLZZX* (actual configuration. sticker says CF-18EC2BXS) a few weeks ago and would like to share some mods in progress. Feedback is welcome and I can post pictures or better howtos upon request.
Wifi:
I added an intel 2200bg mini pci card and it works fine. As my machine has no built in antennas, not even the antenna junction board, I am using a pcb strio antenna from an old dell optiplex pc. with some electric tape on both sides it fits snugly in the space between the hard disk and the battery compartments. I plan to add a proper antenna to the screen soon, and possibly put an sma connector in the circular hole at back right. I assume this hole is for an external 3g or gps antenna if the factory option is installed. If I am satisfied with overall performance (I use this machine for wireless troubleshooting) I will swap out the intel card for an ubiquiti card with better sensitivity and more antenna connectors.
3g:
I noticed that the antenna connector of a sierra wireless aircard 850/860 placed in the lower pc card slot matches one of the holes in the alloy cover of the card slot compartment. If I can find or make an appropriate rubber plug, I will cut away the plastic to expose the hole and use a straight pigtail with an external antenna.
GPS:
I have a hp navigation fob, a roughly egg-sized bluetooth gps receiver which I might be able to modify into an internal rs232 based receiver. I have an ftdi usb-rs232 dongle I (mostly) dont mind cutting open. The gps receiver has a jack for an external antenna.
Antennas:
I have been trying to design some sort of bracket that can hold multiple external antennas behind the screen. I havent built anything physical yet but I have some ideas. It will be attached with velcro and will probably resemble a miniature pool cue rack, maybe with pigtails attached along the bottom.MasterBlaster2039 likes this. -
Good ideas
please keep us informed -
Back again after a series of distractions.
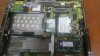
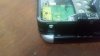
This is what I had done as of last month. I have since confirmed that I can in fact screw an sma jack into the hole in question, however it might interfere with the GPS/WWAN boards if I install one of those. I also need to find another cable as the one I have is too short.
On that note, is there a compatible board with 2 available usb ports instead of GPS + 1 free port (the customtoughbooks board)?
I have also looked into putting a TNC jack into where the modem jack currently is. I havent done it yet as it would be a permanent mod with metal cement. I dont foresee ever needing a modem anyway.
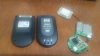
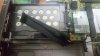
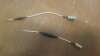
The battery in my hp GPS is getting a bit fat, so a good time for surgery. Top to bottom in the pic is antenna, GPS processor, bluetooth serial board. I assume the 6 black wires bundled together are rs232 but I havent tested yet. The price of the customtoughbooks kit is a bit more than I am happy to pay, and I also value the DIY aspect of this. I can make reasonably durable plastic parts from recycled styrofoam but the 'snot green' color isnt very nice. If I cant successfully do my own internal gps mod I can use a serial garmin unit, so this more for the DIY experience.
More updates soonkode-niner and toughasnails like this.
Panasonic Toughbook CF-18 Thread/FAQ
Discussion in 'Panasonic' started by ADOR, Mar 15, 2012.


