
I have another PC, an HP TX2620es (I am Spanish) tells me I have two slot and there are two actually ...
In the case of CF-C1 strikes me that CPU-Z says that two SLOT
In PC I've found everything from ACER, MEDION with a single slot Sony Vaio, Toshiba HD with two holes (which comes in handy to have a SSD as HD pickup and mechanic stock)
Is there no photographs of a CF-C1 removed? to see what's under the hood
It is also possible that plate, there is only two and a third SLOT SLOT visible without mounting util RAM (ACER me a step that)
-
-
I can assure you the C1 has exactly 2 (TWO) RAM slots, I have it taken apart almost completely, and I can clearly see the first (accessible) slot, and the 2nd one (covered by a plastic tab). I'll post pictures when I get home.
Also, I find it very hard to believe that there is such a laptop with 3 RAM slots. It doesn't make any sense technical wise: i.e. dual-channel memory controller needs 2 or 4 slots, or particular cases where the first DIMM is soldered to the MB, and there is one slot available. -
Gear- so after you ground down that pesty screw and removed WiFi card- how did you finally get it apart to add your RAM? Pictures/ yes!
-
Ok, thank you very much -Gear6- (and I hope these pictures will help me) now I have 4 gigs of RAM 2 +2, so I'll go ask the 8 gigs of RAM (CPU-Z and Everest Ultimate tells me that swallows 8 gigs, hopefully the chipset on the motherboard say the same)
-
better late than never...
")
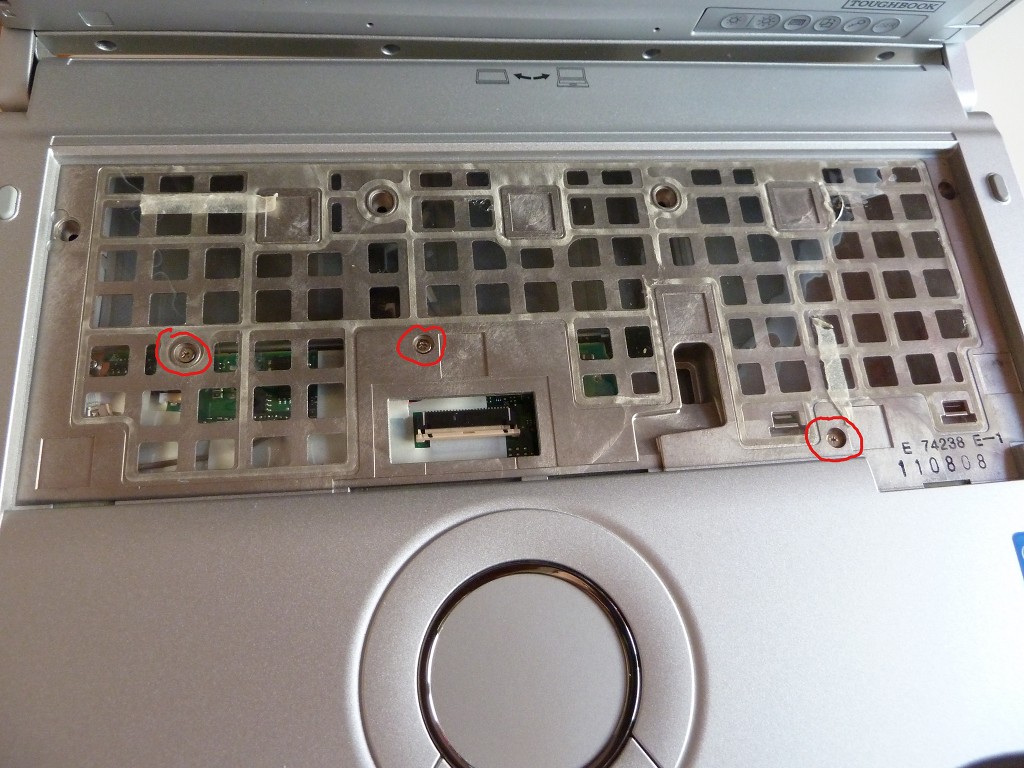
there was no screw under the WiFI slot, but rather 3 under the keyboard holding the 2 halves together: see P1040302s.JPG
after that, it came off easily.
But first, you need to remove the keyboard:
this is the ugly part of the story:
the KB is glued with a few thin double sided tape strips to the plastic foil underneath. That plastic foil is there to keep the water out of the batteries and drive bays, and more important out of the MB area. As you can see, there is a drainage channel, and also the KB connector had an adhesive cover over that hole (P1040305s.JPG).
I had to use the edge from that battery blister to pry out the KB, and then one or two credit cards, to remove it bit by bit. ugly...
WARNING: after putting it all together, I'm uncertain it's still waterproof. I made some dents and creaks in the foil, the sticky tape doesn't stick as good anymore, and until I will find some kind of thin double-side tape, the KB doesn't sit entirely flat, because of the bending required to unstick it.
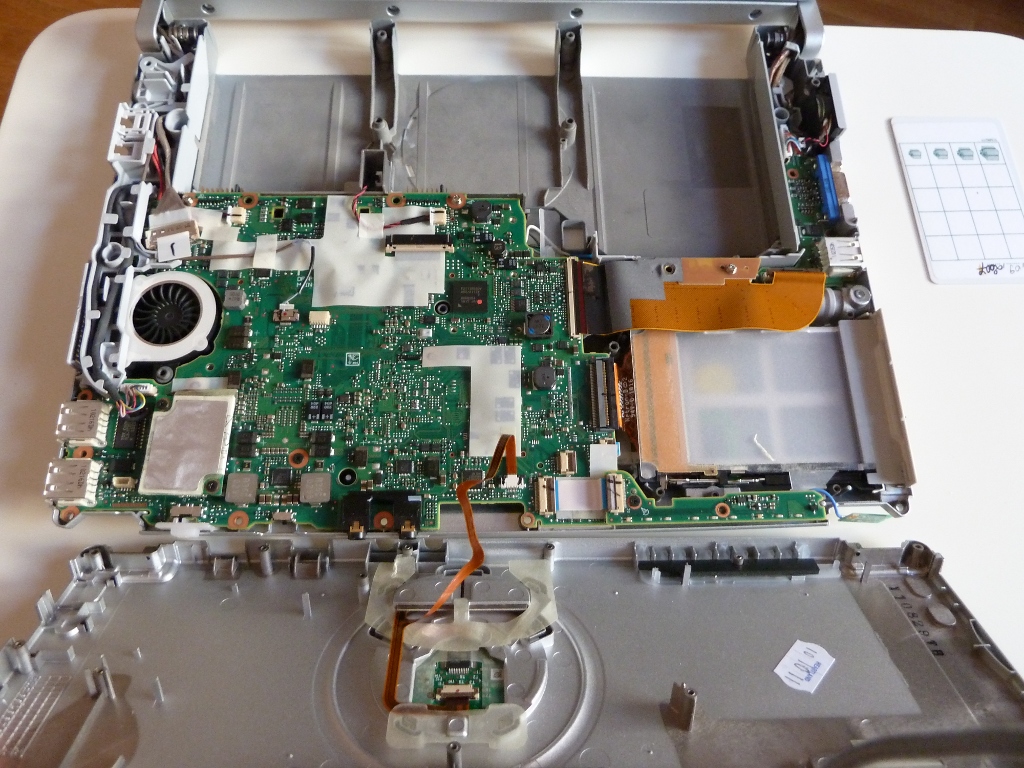
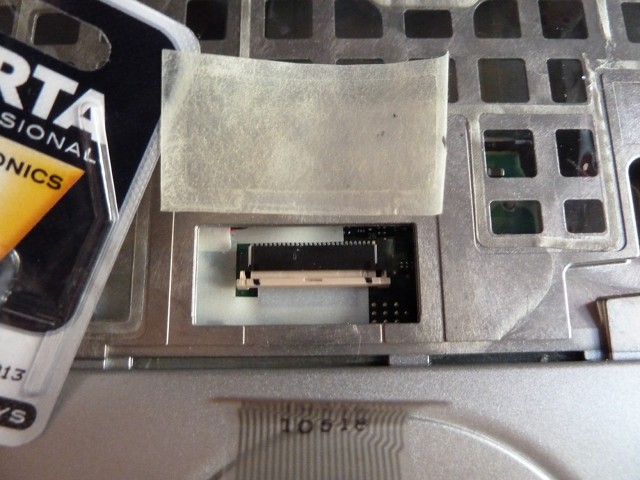
As you can see after removing the MB, the 1st memory slot is covered by a plastic tab screwed in at one end.
I now have 4GB+4GB working, the memory test from the diagnostic utility ran fine.
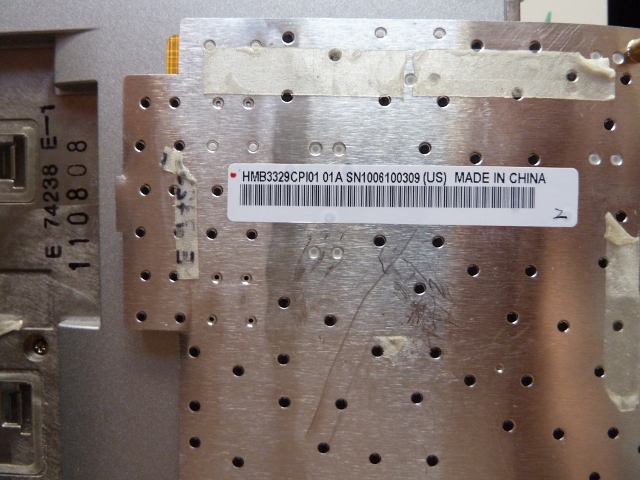
I found a sticker on the inside with Heartland 10 10 11 written on it. It seems my unit was refurbished by them, in Oct'11.
The BIOS battery is located under the PC Card slot.
There were quite a lot of ribbons and connectors to disconnect before I could
remove the MB and gain access to the memory slot.
Also, during and after reassembly I had issues with the screen. A few seconds after powerup, visual artifacts appeared, mostly vertical colored lines.
It seems the opening and closing of the lid (which I did carefully) when most of the bottom half was dismantled deranged the layout of the lcd cables inside the hinges. I checked with an external LCD to be sure it's not the video part.
In the end, after closing the lid a few times, and rotating it in tablet mode once, it finally was OK again, the artifacts disappeared.
This was the most laborious and eventful memory upgrade I have ever made.
Hope it will be useful for others. I have more pictures (full res) if anyone is interested, but my advice is this:
if you really want 8GB on this machine (mk1), either buy one with 4GB from the factory, or send it to Heartland or another authorized repair center.
P.S. I replaced the stock Intel WiFI 6200 card with Intel 6250 + WiMAX (bought for $40 off ebay).
So far so good, I'm in the process of finding a good signal for one of the 2 wimax networks around here.
Also, I bought one PC-Card to Sata/eSata adapter (AKE BC188) that sits flush on the slot. The controller in it is a VIA 6421, only Sata1, and it managed to read at 45MB/s from an attached HDD.Attached Files:
-
-
Very good job...this should help the next member do this mod
-
Gorgeous!!
-
Kindof disappointed in Panasonic on this one; all that double-faced tape makes me think maybe they've caught the Apple Engineering disease. I've come to expect much more service-friendly designs from them.
mnem
*Not sure if I'm still waterpoof either* -
it wasn't only double-sided tape. there were 4 screws, from the underside of the laptop, right up to the keyboard alu base plate.
i think it's the same situation with all the light business-rugged models (W, Y, T C1, S series). See the recent thread on the W7. -
I was referring to the whole "double-faced tape abuse" thing making it harder and harder to service equipment without damaging the device in question. It is a practice pioneered by Chinese phone mfrs, embraced and turned into an art form by Apple, which now seems to be infecting all aspects of technology.
Bleaargh.
mnem
*Imagining the engineers at Apple stuck to the wall with their own double-faced tape and beaten with hoses* -
I finally managed to do some WWAN tests and ... voila, my best speed yet:
12Mbps download, 3.8Mbps upload
that's almost 1.5MB/s download, on the HP branded Ericsson F5521gw HSPA in my C1 wwan slot.
this was indoors, on a 3.5G network, with speedtest.net on Chrome 17 and still, only on Linux (3.3.4).
these are the maximum manufacturer speeds this modem is rated for:
D/L 21M bps U/L 5.76 Mbpspierro78 likes this. -
Tested it here and with a so-so signal I get 8.0mbps down. Thats not bad, considering I'm on a 3G network, and the maximum speed in my contract is 7.2. I could go up to 14,2 but it would double the cost and I still only have 500Mb per month
4G on the f5521gw is never gonna work in Holland, those governemental monkeys decided to go with 2600MHz, when the rest of the world did go with 2100MHz for 4G. -
Hi
can you send me Bios mod for my CF-C1 for use HP branded ericsson F5521gw and driver of HP branded ericsson F5521gw for CF-C1
thanks -
I don't have non standard bios.
I used the gobi_unlocker tool (an DOS EXE program in a ZIP file, found on the thread about CF-52, read that thoroughly).
At that time I had a Gobi2000 installed (lenovo branded) and it worked out fine, showing the WWAN option in the BIOS, afterwards.
The trouble with the drivers (at least for me) is that Panasonic only has drivers for F5521gw for C1 mk2 (CF-C1B***) and they won't install on a mk1.
I've tried drivers from HP, didn't install, neither the lenovo ones.
Didn't have enough time to try to extract the drivers from installer files, or something like that.
In Device Manager I only have one device (hp hs2340... hpa ...) - the 'loader' device used to load the firmware. It should be 3 devices (and associated COMs), the modem, the GPS, and another one.
So, all the tests and usage were done on Linux (F16). -
Did you remove the keyboard? There are a couple of screws holding the backplate on. Maybe 3 screws
-
welcome to the forum
yes, I did (have to) remove it.
If you read up to the half of page 11 http://forum.notebookreview.com/panasonic/640836-my-first-tb-cf-c1-mk1-11.html#post8487101 you'll see my post about it, with pictures included.
there are 3 screws accessible after removing the KB, holding the 2 halves together, and before that, 4 screws holding the KB tight, accessible from the bottom.
Are you sure you want to do this ? the double-sided adhesive tape is not meant to be used twice, you can easily bend the keyboard while trying to detach it from the tape; or scratch or cut the transparent foil underneath the KB that keeps water out of the inside of the laptop (batteries, hdd) and guides it to the drain hole.
It basically means taking apart almost every component, and trying to put it back together same as before, without schematics/instructions available.
If you can live with 6GB (2+4), it'll save you a lot of trouble.
My C1 has got an ugly problem after rebuild, that at first seemed to solve itself out. Vertical lines on the screen, then later, all kinds of artifacts (not visible on external display). Didn't have the time/disposition to open it up again, but I think I may have routed the LCD video cables not loose enough for the hinges to work properly, I guess.
If you really want to do it, snap pictures before every phase, note to position of screws and their type, get a mobile phone case plastic tool in order to gently pry the KB away. If you want it to be as waterproof as before, you may need to order that specific type of double-sided tape, and the tape that covers the KB flat cable connector opening, new from Heartlands.
That is if you manage not to bend the KB too much. I have a few more pictures, if you need it.
is yours mk1 or mk2 ?pierro78 likes this. -
anyone using windows 8 on c1?
-
hi Gear6,
How did you get the mPCIe slot to work???
is there something to enable it??
I am trying to attach an External GPU to my CF-C1 mk1 using the PE4H connected to PM3N, slotting into the mPCIe slot that you connect your wwan to.
PE4H (PCIe passive adapter ver2.4)pierro78 likes this. -
PE4H (PCIe passive adapter ver2.4)
my PE4H works fine on my other COMPAQ NOTEBOOK using the ExpressCard Slot with EC2C but using the PM3N on the mPCIe slot on my PANASONIC CF-C1 mk the device is not detected at all.pierro78 likes this. -
sorry for my late response...
I think the 2nd (full-size) mPCIe slot only accepts WWAN cards, Panasonic branded with no issues.
I got my gobi2000 card working with the wwan enabler utility (spgobi2.zip), even tough it was a Lenovo branded one.
I remember that I read about external graphics using miniPCIe slots in that hundreds of pages thread (is it here on NBR, or another forum ?).
I'm not sure it would work on that slot, but electrically both slots are MiniPCIe 1x (not sure which version).
You can try using the WiFI half-length slot (I have a generic Intel 6250 one in it, so it seems there isn't a whitelist on that in BIOS);
or if you want to keep the wifi, try to enable WWAN using that tool (see the links for the WWAN Retrofit thread a few pages before this one) having a WWAN card inserted,
and if it's ok, then insert the PE4H adapter.
It goes without saying, this is at your own risk
good luck. -
Hello guys,
I just upgraded my CF-C1 MK2 to 16GB RAM.
So there is NO BIOS issue or anything like that. I will post pictures later...
But there is no way to avoid the disassembly procedure. It took me about 1.5 hours for 2 notebooks.
regards -
Welcome to the Panasonic Toughbook Forum
The CF-C1 MK2 is a very nice Toughbook. Been looking at them for some time now. -
Yes it is. I now have an MK 1 for sale. 8GB RAM, Webcam, Fingerprintsensor, Modem, 256 GB SSD, English Keyboard.
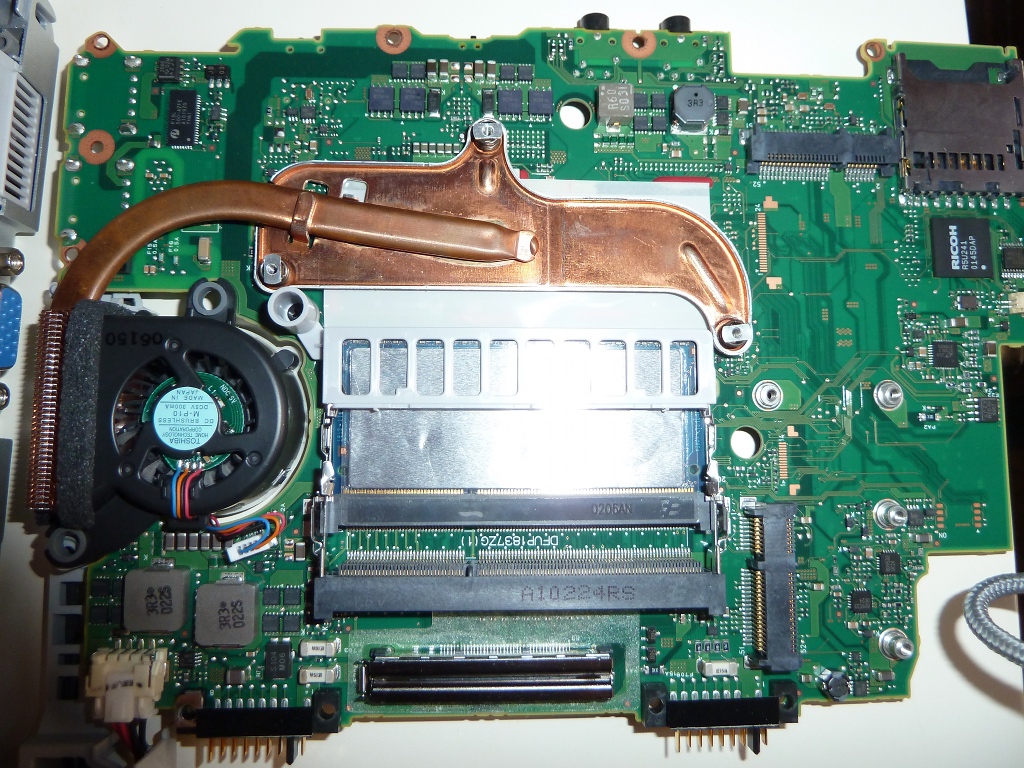
Anyway, find the picture attached. 16GB ram - yehaaa

Attached Files:
pierro78 likes this. -
-
welcome to the forum Xavier, there aren't many C1 users here, so any new owner is a valuable addition to the forum.
the i5-2520m should handle all that 16GB properly - it's listed as max ram on intel's site; you can also run memtest86+ if you like. that way you'll also find out the speed & timings it runs at.
I'm curious, what's the memory model you've used ? 8gb sticks are still expensive.
glad to know it works well.
I have 8GB (4+4) on my recent mk2, but I'm not keen on doing the upgrade any time soon.
that was a fast assembly/dis-assembly process :thumbsup: (45min)
did you have any issues with prying out the keyboard without bending it too much ? I think I should buy some of that tools used for repairing mobile phones...
that double sided tape is pretty strong, and you also risk some tear on the transparent membrane that waterproofs the components below the KB.
also, if you've read my experience/photos, do you have any comments on whether the(my) upgrade procedure could be improved upon ?
thankspierro78 likes this. -
Thanks for your questions.
Yes the double sided tape is strong. But I carefully warmed it up with a hot air gun, so it was a bit better to handle.
I use two Kingston 1,5 Volt 8GB PC3 12800 SODIMM KVR16S11/8 modules. You can also find ECO modules with work on 1,35 Volts but I guess more expensive.
I paid 150 Euro for 2x 8GB as I bought it in a computer shop NOT online.
Speedtest with 100MB:
mbw 100
Long uses 8 bytes. Allocating 2*13107200 elements = 209715200 bytes of memory.
Using 262144 bytes as blocks for memcpy block copy test.
Getting down to business... Doing 10 runs per test.
0 Method: MEMCPY Elapsed: 0.02243 MiB: 100.00000 Copy: 4458.116 MiB/s
1 Method: MEMCPY Elapsed: 0.02475 MiB: 100.00000 Copy: 4039.588 MiB/s
2 Method: MEMCPY Elapsed: 0.02515 MiB: 100.00000 Copy: 3976.617 MiB/s
3 Method: MEMCPY Elapsed: 0.02428 MiB: 100.00000 Copy: 4119.295 MiB/s
4 Method: MEMCPY Elapsed: 0.02485 MiB: 100.00000 Copy: 4023.983 MiB/s
5 Method: MEMCPY Elapsed: 0.02488 MiB: 100.00000 Copy: 4019.131 MiB/s
6 Method: MEMCPY Elapsed: 0.02408 MiB: 100.00000 Copy: 4152.651 MiB/s
7 Method: MEMCPY Elapsed: 0.02374 MiB: 100.00000 Copy: 4212.122 MiB/s
8 Method: MEMCPY Elapsed: 0.02492 MiB: 100.00000 Copy: 4013.002 MiB/s
9 Method: MEMCPY Elapsed: 0.02529 MiB: 100.00000 Copy: 3953.663 MiB/s
AVG Method: MEMCPY Elapsed: 0.02444 MiB: 100.00000 Copy: 4092.072 MiB/s
0 Method: DUMB Elapsed: 0.01789 MiB: 100.00000 Copy: 5589.402 MiB/s
1 Method: DUMB Elapsed: 0.01901 MiB: 100.00000 Copy: 5261.220 MiB/s
2 Method: DUMB Elapsed: 0.01676 MiB: 100.00000 Copy: 5964.808 MiB/s
3 Method: DUMB Elapsed: 0.01754 MiB: 100.00000 Copy: 5702.230 MiB/s
4 Method: DUMB Elapsed: 0.01908 MiB: 100.00000 Copy: 5242.189 MiB/s
5 Method: DUMB Elapsed: 0.01872 MiB: 100.00000 Copy: 5340.454 MiB/s
6 Method: DUMB Elapsed: 0.01801 MiB: 100.00000 Copy: 5551.546 MiB/s
7 Method: DUMB Elapsed: 0.01736 MiB: 100.00000 Copy: 5761.032 MiB/s
8 Method: DUMB Elapsed: 0.01856 MiB: 100.00000 Copy: 5388.221 MiB/s
9 Method: DUMB Elapsed: 0.01688 MiB: 100.00000 Copy: 5925.926 MiB/s
AVG Method: DUMB Elapsed: 0.01798 MiB: 100.00000 Copy: 5561.550 MiB/s
0 Method: MCBLOCK Elapsed: 0.01780 MiB: 100.00000 Copy: 5617.662 MiB/s
1 Method: MCBLOCK Elapsed: 0.01770 MiB: 100.00000 Copy: 5650.037 MiB/s
2 Method: MCBLOCK Elapsed: 0.01787 MiB: 100.00000 Copy: 5595.345 MiB/s
3 Method: MCBLOCK Elapsed: 0.01810 MiB: 100.00000 Copy: 5525.778 MiB/s
4 Method: MCBLOCK Elapsed: 0.01740 MiB: 100.00000 Copy: 5748.778 MiB/s
5 Method: MCBLOCK Elapsed: 0.01714 MiB: 100.00000 Copy: 5835.668 MiB/s
6 Method: MCBLOCK Elapsed: 0.01766 MiB: 100.00000 Copy: 5661.232 MiB/s
7 Method: MCBLOCK Elapsed: 0.01744 MiB: 100.00000 Copy: 5734.931 MiB/s
8 Method: MCBLOCK Elapsed: 0.01703 MiB: 100.00000 Copy: 5873.370 MiB/s
9 Method: MCBLOCK Elapsed: 0.01727 MiB: 100.00000 Copy: 5789.717 MiB/s
AVG Method: MCBLOCK Elapsed: 0.01754 MiB: 100.00000 Copy: 5701.287 MiB/s
with 1000MB :
mbw 1000
Long uses 8 bytes. Allocating 2*131072000 elements = 2097152000 bytes of memory.
Using 262144 bytes as blocks for memcpy block copy test.
Getting down to business... Doing 10 runs per test.
0 Method: MEMCPY Elapsed: 0.23957 MiB: 1000.00000 Copy: 4174.110 MiB/s
1 Method: MEMCPY Elapsed: 0.21705 MiB: 1000.00000 Copy: 4607.212 MiB/s
2 Method: MEMCPY Elapsed: 0.22950 MiB: 1000.00000 Copy: 4357.374 MiB/s
3 Method: MEMCPY Elapsed: 0.22738 MiB: 1000.00000 Copy: 4397.847 MiB/s
4 Method: MEMCPY Elapsed: 0.22217 MiB: 1000.00000 Copy: 4501.058 MiB/s
5 Method: MEMCPY Elapsed: 0.21641 MiB: 1000.00000 Copy: 4620.794 MiB/s
6 Method: MEMCPY Elapsed: 0.21199 MiB: 1000.00000 Copy: 4717.315 MiB/s
7 Method: MEMCPY Elapsed: 0.21262 MiB: 1000.00000 Copy: 4703.182 MiB/s
8 Method: MEMCPY Elapsed: 0.21720 MiB: 1000.00000 Copy: 4604.052 MiB/s
9 Method: MEMCPY Elapsed: 0.21465 MiB: 1000.00000 Copy: 4658.682 MiB/s
AVG Method: MEMCPY Elapsed: 0.22085 MiB: 1000.00000 Copy: 4527.866 MiB/s
0 Method: DUMB Elapsed: 0.15737 MiB: 1000.00000 Copy: 6354.653 MiB/s
1 Method: DUMB Elapsed: 0.16037 MiB: 1000.00000 Copy: 6235.736 MiB/s
2 Method: DUMB Elapsed: 0.15585 MiB: 1000.00000 Copy: 6416.344 MiB/s
3 Method: DUMB Elapsed: 0.16518 MiB: 1000.00000 Copy: 6053.818 MiB/s
4 Method: DUMB Elapsed: 0.16408 MiB: 1000.00000 Copy: 6094.588 MiB/s
5 Method: DUMB Elapsed: 0.15472 MiB: 1000.00000 Copy: 6463.163 MiB/s
6 Method: DUMB Elapsed: 0.15703 MiB: 1000.00000 Copy: 6368.129 MiB/s
7 Method: DUMB Elapsed: 0.15792 MiB: 1000.00000 Copy: 6332.200 MiB/s
8 Method: DUMB Elapsed: 0.16183 MiB: 1000.00000 Copy: 6179.477 MiB/s
9 Method: DUMB Elapsed: 0.16370 MiB: 1000.00000 Copy: 6108.661 MiB/s
AVG Method: DUMB Elapsed: 0.15981 MiB: 1000.00000 Copy: 6257.611 MiB/s
0 Method: MCBLOCK Elapsed: 0.15225 MiB: 1000.00000 Copy: 6567.972 MiB/s
1 Method: MCBLOCK Elapsed: 0.15295 MiB: 1000.00000 Copy: 6537.999 MiB/s
2 Method: MCBLOCK Elapsed: 0.15064 MiB: 1000.00000 Copy: 6638.343 MiB/s
3 Method: MCBLOCK Elapsed: 0.15046 MiB: 1000.00000 Copy: 6646.417 MiB/s
4 Method: MCBLOCK Elapsed: 0.14831 MiB: 1000.00000 Copy: 6742.588 MiB/s
5 Method: MCBLOCK Elapsed: 0.16188 MiB: 1000.00000 Copy: 6177.492 MiB/s
6 Method: MCBLOCK Elapsed: 0.15543 MiB: 1000.00000 Copy: 6433.599 MiB/s
7 Method: MCBLOCK Elapsed: 0.15144 MiB: 1000.00000 Copy: 6603.232 MiB/s
8 Method: MCBLOCK Elapsed: 0.14899 MiB: 1000.00000 Copy: 6711.725 MiB/s
9 Method: MCBLOCK Elapsed: 0.14997 MiB: 1000.00000 Copy: 6667.956 MiB/s
AVG Method: MCBLOCK Elapsed: 0.15223 MiB: 1000.00000 Copy: 6568.874 MiB/s
with 5000MB:
mbw 5000
Long uses 8 bytes. Allocating 2*655360000 elements = 10485760000 bytes of memory.
Using 262144 bytes as blocks for memcpy block copy test.
Getting down to business... Doing 10 runs per test.
0 Method: MEMCPY Elapsed: 0.98268 MiB: 5000.00000 Copy: 5088.116 MiB/s
1 Method: MEMCPY Elapsed: 0.99130 MiB: 5000.00000 Copy: 5043.887 MiB/s
2 Method: MEMCPY Elapsed: 0.98349 MiB: 5000.00000 Copy: 5083.951 MiB/s
3 Method: MEMCPY Elapsed: 0.97554 MiB: 5000.00000 Copy: 5125.387 MiB/s
4 Method: MEMCPY Elapsed: 0.97501 MiB: 5000.00000 Copy: 5128.147 MiB/s
5 Method: MEMCPY Elapsed: 0.98483 MiB: 5000.00000 Copy: 5076.998 MiB/s
6 Method: MEMCPY Elapsed: 0.99758 MiB: 5000.00000 Copy: 5012.129 MiB/s
7 Method: MEMCPY Elapsed: 1.01849 MiB: 5000.00000 Copy: 4909.252 MiB/s
8 Method: MEMCPY Elapsed: 1.00873 MiB: 5000.00000 Copy: 4956.723 MiB/s
9 Method: MEMCPY Elapsed: 0.98986 MiB: 5000.00000 Copy: 5051.219 MiB/s
AVG Method: MEMCPY Elapsed: 0.99075 MiB: 5000.00000 Copy: 5046.679 MiB/s
0 Method: DUMB Elapsed: 0.74985 MiB: 5000.00000 Copy: 6667.974 MiB/s
1 Method: DUMB Elapsed: 0.76678 MiB: 5000.00000 Copy: 6520.809 MiB/s
2 Method: DUMB Elapsed: 0.77539 MiB: 5000.00000 Copy: 6448.376 MiB/s
3 Method: DUMB Elapsed: 0.76996 MiB: 5000.00000 Copy: 6493.852 MiB/s
4 Method: DUMB Elapsed: 0.75492 MiB: 5000.00000 Copy: 6623.210 MiB/s
5 Method: DUMB Elapsed: 0.75802 MiB: 5000.00000 Copy: 6596.115 MiB/s
6 Method: DUMB Elapsed: 0.75223 MiB: 5000.00000 Copy: 6646.939 MiB/s
7 Method: DUMB Elapsed: 0.74851 MiB: 5000.00000 Copy: 6679.964 MiB/s
8 Method: DUMB Elapsed: 0.77360 MiB: 5000.00000 Copy: 6463.247 MiB/s
9 Method: DUMB Elapsed: 0.75636 MiB: 5000.00000 Copy: 6610.591 MiB/s
AVG Method: DUMB Elapsed: 0.76056 MiB: 5000.00000 Copy: 6574.086 MiB/s
0 Method: MCBLOCK Elapsed: 0.72460 MiB: 5000.00000 Copy: 6900.368 MiB/s
1 Method: MCBLOCK Elapsed: 0.71075 MiB: 5000.00000 Copy: 7034.862 MiB/s
2 Method: MCBLOCK Elapsed: 0.69445 MiB: 5000.00000 Copy: 7199.911 MiB/s
3 Method: MCBLOCK Elapsed: 0.69061 MiB: 5000.00000 Copy: 7239.987 MiB/s
4 Method: MCBLOCK Elapsed: 0.69845 MiB: 5000.00000 Copy: 7158.698 MiB/s
5 Method: MCBLOCK Elapsed: 0.69264 MiB: 5000.00000 Copy: 7218.778 MiB/s
6 Method: MCBLOCK Elapsed: 0.69291 MiB: 5000.00000 Copy: 7215.892 MiB/s
7 Method: MCBLOCK Elapsed: 0.69272 MiB: 5000.00000 Copy: 7217.882 MiB/s
8 Method: MCBLOCK Elapsed: 0.68922 MiB: 5000.00000 Copy: 7254.630 MiB/s
9 Method: MCBLOCK Elapsed: 0.69018 MiB: 5000.00000 Copy: 7244.445 MiB/s
AVG Method: MCBLOCK Elapsed: 0.69765 MiB: 5000.00000 Copy: 7166.883 MiB/s
fast enough and plenty enough ram for 2-4 virtual machines running parallel.
Your instruction is fine. About the water problem of the keyboard: I just used some new double sided tape for the ribbon cable so I hope it is water proof now. Probably I will never test it.
I have a lot experience fixing laptop's, consoles etc. and i have the right tools.
That's why it was so fast for 2 notebooks.
If you need any more info, just let me know.
regards -
nice speed test, thanks for the tips
-
Just bought a CF-C1 MK1 on eBay. Came with Windows 7 pro, the dock, 2 genuine chargers and a Lund car charger for 370 bucks. Good buy.
I'm very impressed so far. I've already cloned the hdd to a 250gb ssd I had in one of my cf-19s and this thing is fast!
Next up is the dreaded tear down so I can throw 8gb of ram in it.
I'm happy!pierro78 likes this. -
Welcome to the Panasonic Toughbook forum
So you have W7 64bit installed in the C1 ?
Gear6 likes this. -
-
yeah ...
subtle as a tank .
-
Hi folks,
some new infos about wwan card in toughbooks.
I guess all toughbooks have the password protected
optional kit configuration OPC
option in BIOS.
The password is: toughkit (you can google it, the password is public)
if you want to enable any wwan card, input
01
as parameter.
I just got my second Cf-C1 MK2 upgraded it to 16GB RAM again, and again I am very happy with this laptop.
regards
Xavier64Last edited: Jul 29, 2015pierro78, UNCNDL1, toughasnails and 1 other person like this. -
Lastest Bios for the CF-C1 MK2
2.00L14
http://www.pmuk.net/Toughbook/Forms...D&View={99E249B4-B39B-4770-A94E-C80CEA9254FC} -
very nice...
thanks -
The Update works only on 32bit Windows. I had to install XP to upgrade...Shawn likes this. -
Sorry this tip was not correct. The biosupdate needs a MSDOS boot disk. It can be an USB stick like this:
http://www.biosflash.com/e/download.htm?id=25&dl=bios/ubbe.zip
make a bootable usb stick and put the BIOS files also on this disk.
Now you are able to make the upgrade.
regards -
WWAN card Ericsson Firmware Update 5521gw latest firmware:
http://support.toshiba.com/support/viewContentDetail?contentId=4002405
flashable via Windows XP, 7 etc. -
Hi, guys, need a driver for Qualcomm Gobi 2000, the device installed in cf-c1 mk2 is: 2417c-gobi 2, I'm using win7 64bit sp1
-
Do you live overseas and is this a Toughbook card ??
-
Hi, you can give the original BIOS for the CF-C1 MK2 ver. 2.00L12, I have updated with the latest version but with it the laptop is not working properly, thank you in advance.
-
Before we blame the BIOS update, Tell us what operating system and what the problem is
Thanks -
I am using windows 7 SP1 64-bit, after updating the BIOS, system utilities () stopped working, I tried to reinstall windows, but I can not install most of the drivers. Before that, they were installed from the driver package automatically after starting the exe file. Now I can not install them manually. And I was wrong, earlier BIOS version was v2.00L11. Can anybody give it ?
-
What is your full model number? Screen shot of the first BIOS info page would be great.
Does it still boot?
Does it boot into the BIOS?
Do you mean system utilities in Windows or system utilities in the BIOS?
Are you using the driver bundle for 64bit?
ftp://ftp.panasonic.com/computer/software/c1bl-mk2-7x64.exe -
To warm up an old thread: is there a site where the newest Bios for the CF-C1 MK2 - 2.00L14 can still be downloaded? The official Panasonic site only lists the MK1 Bios and the Panasonic UK Sharepoint folder has been emptied with regard to the CF-C1.
I have a branded Bios with a very unpleasant boot splash screen and want to see the original "Toughbook"-logo splash screen at boot. -
pm ME AN EMAIL ADDRESS.
I will see if I have it at home.
all future "me too" requests will be ignored.
Ask nice and with full sentences. This ain't kindergarten.Last edited: Nov 3, 2016
my first TB - CF-C1 mk1
Discussion in 'Panasonic' started by Gear6, Jan 24, 2012.


![[IMG]](images/storyImages/c4f10961f6b4f871764541a76012987f.jpg)


