The Notebook Review forums were hosted by TechTarget, who shut down them down on January 31, 2022. This static read-only archive was pulled by NBR forum users between January 20 and January 31, 2022, in an effort to make sure that the valuable technical information that had been posted on the forums is preserved. For current discussions, many NBR forum users moved over to NotebookTalk.net after the shutdown.
Problems? See this thread at archive.org.
← Previous page

    P150EM Upgrading from 675M to 680M!

    Discussion in 'Sager and Clevo' started by hackness, Jun 28, 2012.

  1. Bejeebus

    Bejeebus Newbie

    Reputations:
    0
    Messages:
    6
    Likes Received:
    0
    Trophy Points:
    5
    Working in software as a test engineer this made me lol! Breaking stuff is my life. As we like to say:

    “A great tester, has the heart of a developer…” pause
    “…in a jar on their desk.”
     
  2. simbeane

    simbeane Notebook Geek

    Reputations:
    0
    Messages:
    99
    Likes Received:
    0
    Trophy Points:
    15
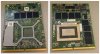
    Can you use gtx 675m heat sink on the gtx 680m? I see the 675m chip is wider than the gtx 680m
     
  3. hackness

    hackness Notebook Virtuoso

    Reputations:
    1,237
    Messages:
    2,367
    Likes Received:
    427
    Trophy Points:
    101
    Die on the GTX675M is wider but the heatsink can be installed on the GTX680M without any fitting problems as both MXM boards' design is very similar.
     
  4. Silverfern

    Silverfern Notebook Deity

    Reputations:
    96
    Messages:
    955
    Likes Received:
    1
    Trophy Points:
    31
    one question, when upgrading from 675m to 680m, is it just plug and play or do i have to mod bios or something?
     
  5. sirana

    sirana Notebook Deity

    Reputations:
    267
    Messages:
    748
    Likes Received:
    329
    Trophy Points:
    76
    Lol missing 12 pages ?
     
  6. hackness

    hackness Notebook Virtuoso

    Reputations:
    1,237
    Messages:
    2,367
    Likes Received:
    427
    Trophy Points:
    101
    It's just plug and play, nothing further except installing the driver.
     
  7. Prema

    Prema Your Freedom, Your Choice

    Reputations:
    9,368
    Messages:
    6,297
    Likes Received:
    16,481
    Trophy Points:
    681
  8. Silverfern

    Silverfern Notebook Deity

    Reputations:
    96
    Messages:
    955
    Likes Received:
    1
    Trophy Points:
    31
    says nvflash is not a command...
     
  9. hackness

    hackness Notebook Virtuoso

    Reputations:
    1,237
    Messages:
    2,367
    Likes Received:
    427
    Trophy Points:
    101
  10. aeneas1

    aeneas1 Newbie

    Reputations:
    0
    Messages:
    4
    Likes Received:
    0
    Trophy Points:
    5
    hackness - i just received a 675m with an x-bracket which, like you, i would like to remove. i read that you accomplished this feat but that it wasn't an easy task! would you mind telling me how you went about doing this, the x-bracket on my card seems to be attached very firmly. thanks for your help!
     
  11. hackness

    hackness Notebook Virtuoso

    Reputations:
    1,237
    Messages:
    2,367
    Likes Received:
    427
    Trophy Points:
    101
    Press on where the screws are secured at until the corner at the backside of the bracket raise up a little, then grab something like a tweezer/forcep with the tip shape like slightly curved, insert it between the PCB and the x-bracket and give it some force like in the following picture:

    [​IMG]

    And work your way to the center, do this for all 4 corners with care and it should come off.
     
  12. aeneas1

    aeneas1 Newbie

    Reputations:
    0
    Messages:
    4
    Likes Received:
    0
    Trophy Points:
    5
    to be clear, we're talking about removing the x-bracket pictured below, right? your instructions are great, i'll give it a stab... btw, what's holding the bracket in place... glue, two-sided tape? thanks again!

    GTX.jpg
     
  13. aeneas1

    aeneas1 Newbie

    Reputations:
    0
    Messages:
    4
    Likes Received:
    0
    Trophy Points:
    5
    hackness - mission accomplished, went a lot easier than expected, just pulled carefully, firmly and evenly once i got a foothold! knowing that it could be successfully done, thanks to your post, was a great help, thanks again....
     
  14. Meaker@Sager

    Meaker@Sager Company Representative

    Reputations:
    9,426
    Messages:
    58,171
    Likes Received:
    17,882
    Trophy Points:
    931
    The type of adhesive depends on the manufacturer, some are a complete nightmare to remove!
     
  15. aeneas1

    aeneas1 Newbie

    Reputations:
    0
    Messages:
    4
    Likes Received:
    0
    Trophy Points:
    5
    yeah, the adhesive on my card was pretty burly, very thin double-sided tape in the shape of the x-plate, very impressive grip. btw i managed to pull off the thermal ram tape in the process, by accident, which tore, it's now unusable. is this stuff readily available? is it called ram tape?
     
  16. Meaker@Sager

    Meaker@Sager Company Representative

    Reputations:
    9,426
    Messages:
    58,171
    Likes Received:
    17,882
    Trophy Points:
    931
    Thermal pads are pretty common, you just need the right thickness.
     
  17. hackness

    hackness Notebook Virtuoso

    Reputations:
    1,237
    Messages:
    2,367
    Likes Received:
    427
    Trophy Points:
    101
    No problem, and yea it's 2 sided tape.

    By the way is that a dell card? Its x-bracket looks a bit different unless Clevo has changed the x-bracket they are using...

    For thermal pads, 2mm thickness works well in mine. Not sure about dell though, might want to take one of the thermal pads that came with the card and measure its thickness.
     
  18. Meaker@Sager

    Meaker@Sager Company Representative

    Reputations:
    9,426
    Messages:
    58,171
    Likes Received:
    17,882
    Trophy Points:
    931
    The thickness is the same across the brands in terms of component height, it's only the heatsinks they use in the system that will introduce differences.
     
  19. Ajfountains

    Ajfountains Notebook Deity

    Reputations:
    700
    Messages:
    923
    Likes Received:
    139
    Trophy Points:
    56
    How difficult will it be to swap out a 675mx for the 680? What will I need other than the new card, a screwdriver, and some thermal paste?
     
  20. Meaker@Sager

    Meaker@Sager Company Representative

    Reputations:
    9,426
    Messages:
    58,171
    Likes Received:
    17,882
    Trophy Points:
    931
    Same card physically so very, very easy.

    Yes just everything you need to remove it and some paste.
     
  21. Ajfountains

    Ajfountains Notebook Deity

    Reputations:
    700
    Messages:
    923
    Likes Received:
    139
    Trophy Points:
    56
    So hardware side, just the tools for the job. On the software side, apart from the drivers for the 680, will i have any issues (Bios, etc)
     
  22. Meaker@Sager

    Meaker@Sager Company Representative

    Reputations:
    9,426
    Messages:
    58,171
    Likes Received:
    17,882
    Trophy Points:
    931
    680m is an older card so your bios will be fine.
     
  23. goussama

    goussama Notebook Consultant

    Reputations:
    0
    Messages:
    261
    Likes Received:
    1
    Trophy Points:
    31
    What do you mean by thermal ram tape btw?
     
  24. jaybee83

    jaybee83 Biotech-Doc

    Reputations:
    4,125
    Messages:
    11,571
    Likes Received:
    9,148
    Trophy Points:
    931
    hes talking about the thermal pads on the vram chips.

    Sent from my Galaxy Nexus using Tapatalk 2
     
  25. goussama

    goussama Notebook Consultant

    Reputations:
    0
    Messages:
    261
    Likes Received:
    1
    Trophy Points:
    31
    ah ok thanks buddy
     
  26. Meaker@Sager

    Meaker@Sager Company Representative

    Reputations:
    9,426
    Messages:
    58,171
    Likes Received:
    17,882
    Trophy Points:
    931
    Yes thermal pads, and any will do so long it's the right thickness.
     
← Previous page