That would be ok ,but they wanted me to send the whole laptop back so they could look at the heatsink dent when I found that. I understand to an extent of why it would need to be sent in. But I need minimal down time with my job and I use this Laptop for my job along with Warframe lol. And after some discussion with them, not only with the dented heatsink, but a date label being on the bottom of the CPU.. and pieces of the label being in the pins, then me being told that the laptop would not function with said paper stuck in pins ( which is an absolute lie as I have repaired CPUs that people have tried to delid and torn the substrate, and repaired bent pins that still allowed use of the PC) I've lost all faith in this seller. I shall name no names. But I would rather fork out that 400 bucks for the motherboard and CPU fan and install myself with a piece of mind that it was actually done correctly. with that said, new mobo ,CPU fan will be here Thursday. And will be ordering another vapor chamber heatsink to replace the dented one that " no dent was visible" my self.
-
oh man thats brutal.
btw i also checked my 870tm cpu heatsink, only the center portion is making good contact, a lapping maybe required. either that or im thinking of soldering shim similar to what mr fox did but if im gonna do that much work i might as well go all the way to increase heatsink capacity, which 870tm cpu heatsink is harder to work with than 870dm/km.
first i'll grab the tools then find smaller laptop cpu heatsink with 1 pipe and see if i can get them to fit. if only CC worked with OS 2012 then i wouldnt need to do this, all for the sake of quiet laptop with huge heatsink temp capacity, on auto fan.Donald@Paladin44 likes this. -
Solder the shim. The benefits of that are phenomenalDonald@Paladin44 and ole!!! like this.
-
you already solder the shim right? how is it compare to no shimDonald@Paladin44 likes this.
-
My max temp at 4.8ghz is +-60c 5.1ghz @ 68c max under aida64 with fan set to automatic. Lolol this is when it ran though lol before last night
But that's with a .50 mm shim and deliddedPapusan, ole!!! and Donald@Paladin44 like this. -
did u test it prior to shim soldering? that result is rather crazy lol. also whats your voltage at 4.8 or 5.1? unless you got fan profile set up, my fan doesn't even spin after like 15-20 sec of heavy loads at 90-95c
-
I apologise as I can't find the screen shots of the temps before hand. But do remember I was testing soldering the shim in place in a vacuum to get the air out of the soldering paste. Only voltage I can currently tell you is that I have -121 as a negative offset on adaptive. And I also binned out a few 8700ks I have here at the house too.
But hey, lol these temps and all could be why I am having to replace a motherboard lolol. That and the pins being full of sticky paper upon arrival probably has something to do with it lolol -
when you have time, do you mind showing me at 48x, adaptive with C1E turned on (throttlestop, or bios cstate on). i wish to see the voltage in hwinfo and a screenshot of max voltage (not load voltage) if you dont mind, its best to use the computer for few hrs with that setting, then go browsing/gaming etc then afterwards take a screenshot of the max voltage value, need it to compare to something.
edit: also what is the load wattage for AIDA 64 test and for how long?Last edited: Mar 6, 2018kfxsti likes this. -
Just as soon as the motherboard is delivered and I get it installed I'll grab you some screen shots. (Hopefully around Thursday lunch time-and enough time to get it installed)
I tried a few minutes ago. But I can't keep the thing on long enough to get to do anything lol.ole!!! likes this. -
what did you change to make that beeping thing lol. maybe one of the fan port isnt picking up fansen (usually pin 3). even though you have them all plugged in, wire may have been disconnected/lose on fan end or pin head end. i have had 3 clevo laptops this being the 3rd and they all do this, if a fan isnt connected it'll beep like crazy and shut down.Donald@Paladin44 likes this.
-
All fans are plugged in. The slight burnt smell of the CPU fan kinda hints that something is wrong. I also have tried a different fan on that port and it does the same thing. Fan spools wide open , beeps like unholy hell, yellow light on the front flashes, and it shuts off.
Also btw !! You know the 4 pin that currently has no power to it ? I can plug a 3 pin fan into it and it's working right now lol but it still beeps and shuts down. Tried a new 3 pin fan in the 3pin CPU header same problem(beep-shutdown) Also tried a 4 pin fan in the 4 pin. And a 3 pin in the 3 pin = same thing. Something with the CPU fan port is jacked up.... HorriblyLast edited: Mar 6, 2018Donald@Paladin44 likes this. -
primary cpu fan port only has 3 pins, the 2nd port has 4 which doesnt need a fan. primary cpu fan will spin with just pin 1 and 2, vertically looking from above its top and middle pin, the 3rd pin bottom most is the sensor pin. the replacement fan you tested, 3rd wire might not be a sensor thing which is why it beeps, unless you're using an ADDA fan designed for clevo.
older fans with 3 pins, like my dell xps m2010 control via 3rd pin/wire so 5v/grnd is strictly for power, but clevo on these DTR control via 12v/grnd by lowering 12v to like 6v or something, 3rd wire is for sensor reading only apparently. if replacement fan you used to test this, it's 3rd wire isnt for sensor then it could still very well beep even if its connected. its hard to think mobo will need a replacement for it, maybe try buying a fan first and replace it see if it fixes the issue? CPU fan can still be disassembled and taken out just needs more work, you'd need to pick up a p870dm3 or KM1 CPU fan that is 12v, take off the lid and mount it onto p870tm1 cpu fan and it SHOULD work/fit.
honestly im no expert in this area, just guesses.kfxsti, Papusan and Donald@Paladin44 like this. -
That's what fan I tried was the one from my km1g. Still the same thing. I have no clue man. It's just odd, it probably wouldn't have pissed me off as much had it been any other night. But my game time is my down time, when the husbandly and fatherly duties are done-And after a bad day at work gaming is where I turn to sometimes. I spent way to much time messing with it that night and yesterday morning lol.ole!!! likes this.
-
It just dawned on me... When the motherboard gets here from Eurocom.. will there be a bios on it? Or will it be a locked version ?
-
Hey guys soon I'm going to buy P870TM-1
Only have few queries:
1- Which RAM should I choose currently selected Hyper X 2400 MHz 16x2= 32GB
2- Do you guys used laptop cooler this type of machine?
3- Backpack suggestion
4- Anyone can post pic of Vapor Chamber Dual GPU Heat Sink
5-And I still prefer win7 so it will be a disadvantage?
6- Currently I choose 4K display but I'm thinking the games will struggle.
Sent from my iPhone using Tapatalk Pro -
Guys How do i change the led color on the back of the lcd?? Control Center only lets me do it on the keyboard and every time i try to change something combokeys closes out. I want it red please and thanks
-
@kfxsti @Papusan @Mr. Fox
gonna be a headache. look at the paste, center cpu doing great contact but top and bottom have quite a bit more paste, especially the top. a 0.5mm shim solder job will probably fix this thanks to mr.fox's video however that would raise the heatsink by a tiny bit, so far the VRM in the first red circle, are already not contacting with heatsink that well.
if i take heatsink apart, it shows 1 side VRM has great pressure into thermal pad while rest are barely any marks in the pads.. clevo at its finest LMAO.
will need solder job for both VRM and cpu heatsink. im thinking of using 7700k heatsink and add additional pipes /radiator from older cpu heatsink but unsure if it'll fit. @Johnksss iirc you mentioned of 870TM heatsink will be a bit too high, would 870km/dm3 cpu heatsink fit in this mobo?
-
-
I know this is going to sound bad. But- try and level the heatsink. I had to take the clips off the screws and was able to lay the heat sink flat on a piece of glass. Then I slowly and gently pushed down until I was able to straighten up the heatsink with the heatpipes and fan . Once that was done and I soldered the shim in place I increased the size of the vrm thermal pads by .5 mm.
Do notice when installing the heatsink back on the board to try and keep it as flat while screwing down as possible.
One corner will try and raise up. So tighten while applying slight pressure to the heatsink screw with your fingers as you tighten the adjacent screw until you have all 4 started. Then do X pattern tightening until all 4 are snug.Donald@Paladin44 likes this. -
i dont feel too well about bending it because everything else seems to fit just fine if u know what i mean. how does your contact look after shim and everything else? the temp is already pretty good even with this issue, but i know it can be improved more. usually core1 would be lowest temp because most outer core however in my case its the hottest core and usually 3C hotter than other cores, same as core 4/5 at times.
@Papusan yep looks like that tooLast edited: Mar 8, 2018Donald@Paladin44 and Papusan like this. -
From where you purchased the system ?
Sent from my iPhone using Tapatalk Pro -
I don't use a cooler on mine and it runs fine temp wise.
I started with everki titan rucksack but this beast is a lot heavier than my old laptop so I switched to the everki titan trolley which is great. -
I would check how the heatsink contact/fits without the pads. Only use a thin soft paste/cream and screw down. Use what you have in hands.kfxsti, Falkentyne and Donald@Paladin44 like this.
-
Do you use in your lap ?
Sent from my iPhone using Tapatalk Pro -
I'm not going to tell any names here. I just know that I'm not happy to say the least.Last edited: Mar 8, 2018
-
I do sometimes but the weight is certainly there and you do need to get it sit just right to not cover the vents.kfxsti likes this.
-
Yeah sometimes, it's not too bad if the rests are sat on your knees
") . I find it quieter than my old one so the wife doesn't get annoyed by the fan noise.
kfxsti likes this.
. I find it quieter than my old one so the wife doesn't get annoyed by the fan noise.
kfxsti likes this. -
Because while watching tvshow i put my current laptop on lap but this one will be twice heavy so better to ask brick user
Sent from my iPhone using Tapatalk Pro -
Hi,
Can anyone post pic of normal heatsink and double chamber heat heatsink for the GPU which HIDEVOLUTION offers
Sent from my iPhone using Tapatalk Pro -
probably not very good. the pads are so thick yet barely any pressure i'd think if i remove it theres zero cooling for them vrm. also im currently waiting for 12v fan and jst connector and splitter. dont have any plans to disassembling it and redo thermal paste again. next time i take that down will probably be soldering shim and pipes!
is the p870km cpu heatsink good contact? i wanna try getting one and adding pipes/radiator to it see how it fairs against p870tm1. tm1 is stuck with 4 pipes max where as dm/km can go above it, only disadvantage is a lot of extra work, and thicker contact from IHS to pipes. -
Wasn't meant as you should use your laptop without the pads. Only to check the thermal paste spread on IHS. Aka HS fits on IHS without the pads.
The P870km Cpu HS has a different shape than for Coffee. Can't be used. Standoff (nut on backplate) for the screws is in wrong length.
Last edited: Mar 9, 2018kfxsti, Donald@Paladin44 and ole!!! like this. -
it looks like it'd fit, the screw length i can get that replaced, as long as screw hole matches and radiator would fit it should be no problem, what do u think?
-
I wouldn't use the not orginal Heatsink.
If it was possible I would remove the cold plate on the TM1 Heatsink and replace with a thicker and better quality one. A goldsmith could roll out a better and more accurate plate in pure silver. Aka no use of a shim.Donald@Paladin44 and kfxsti like this. -
cold plate?
-
The part of the HS who touch the IHS. Sorry, it’s my good English
-
tm1 with that shim is very thin so transfer to heatpipe is quicker and better than km/dm. problem is looking from below the tm1 there are no more room to solder additional pipes to increase capacity, even with the shim removed and replaced with larger one. on the other hand km/dm seems alright and a lot more room to work with, IHS to pipe transfer may not be as good as tm1 but bigger area for additional heatpipes soldering.kfxsti likes this.
-
Adding the shim will also allow for a greater mounting pressure as well.ole!!! likes this.
-
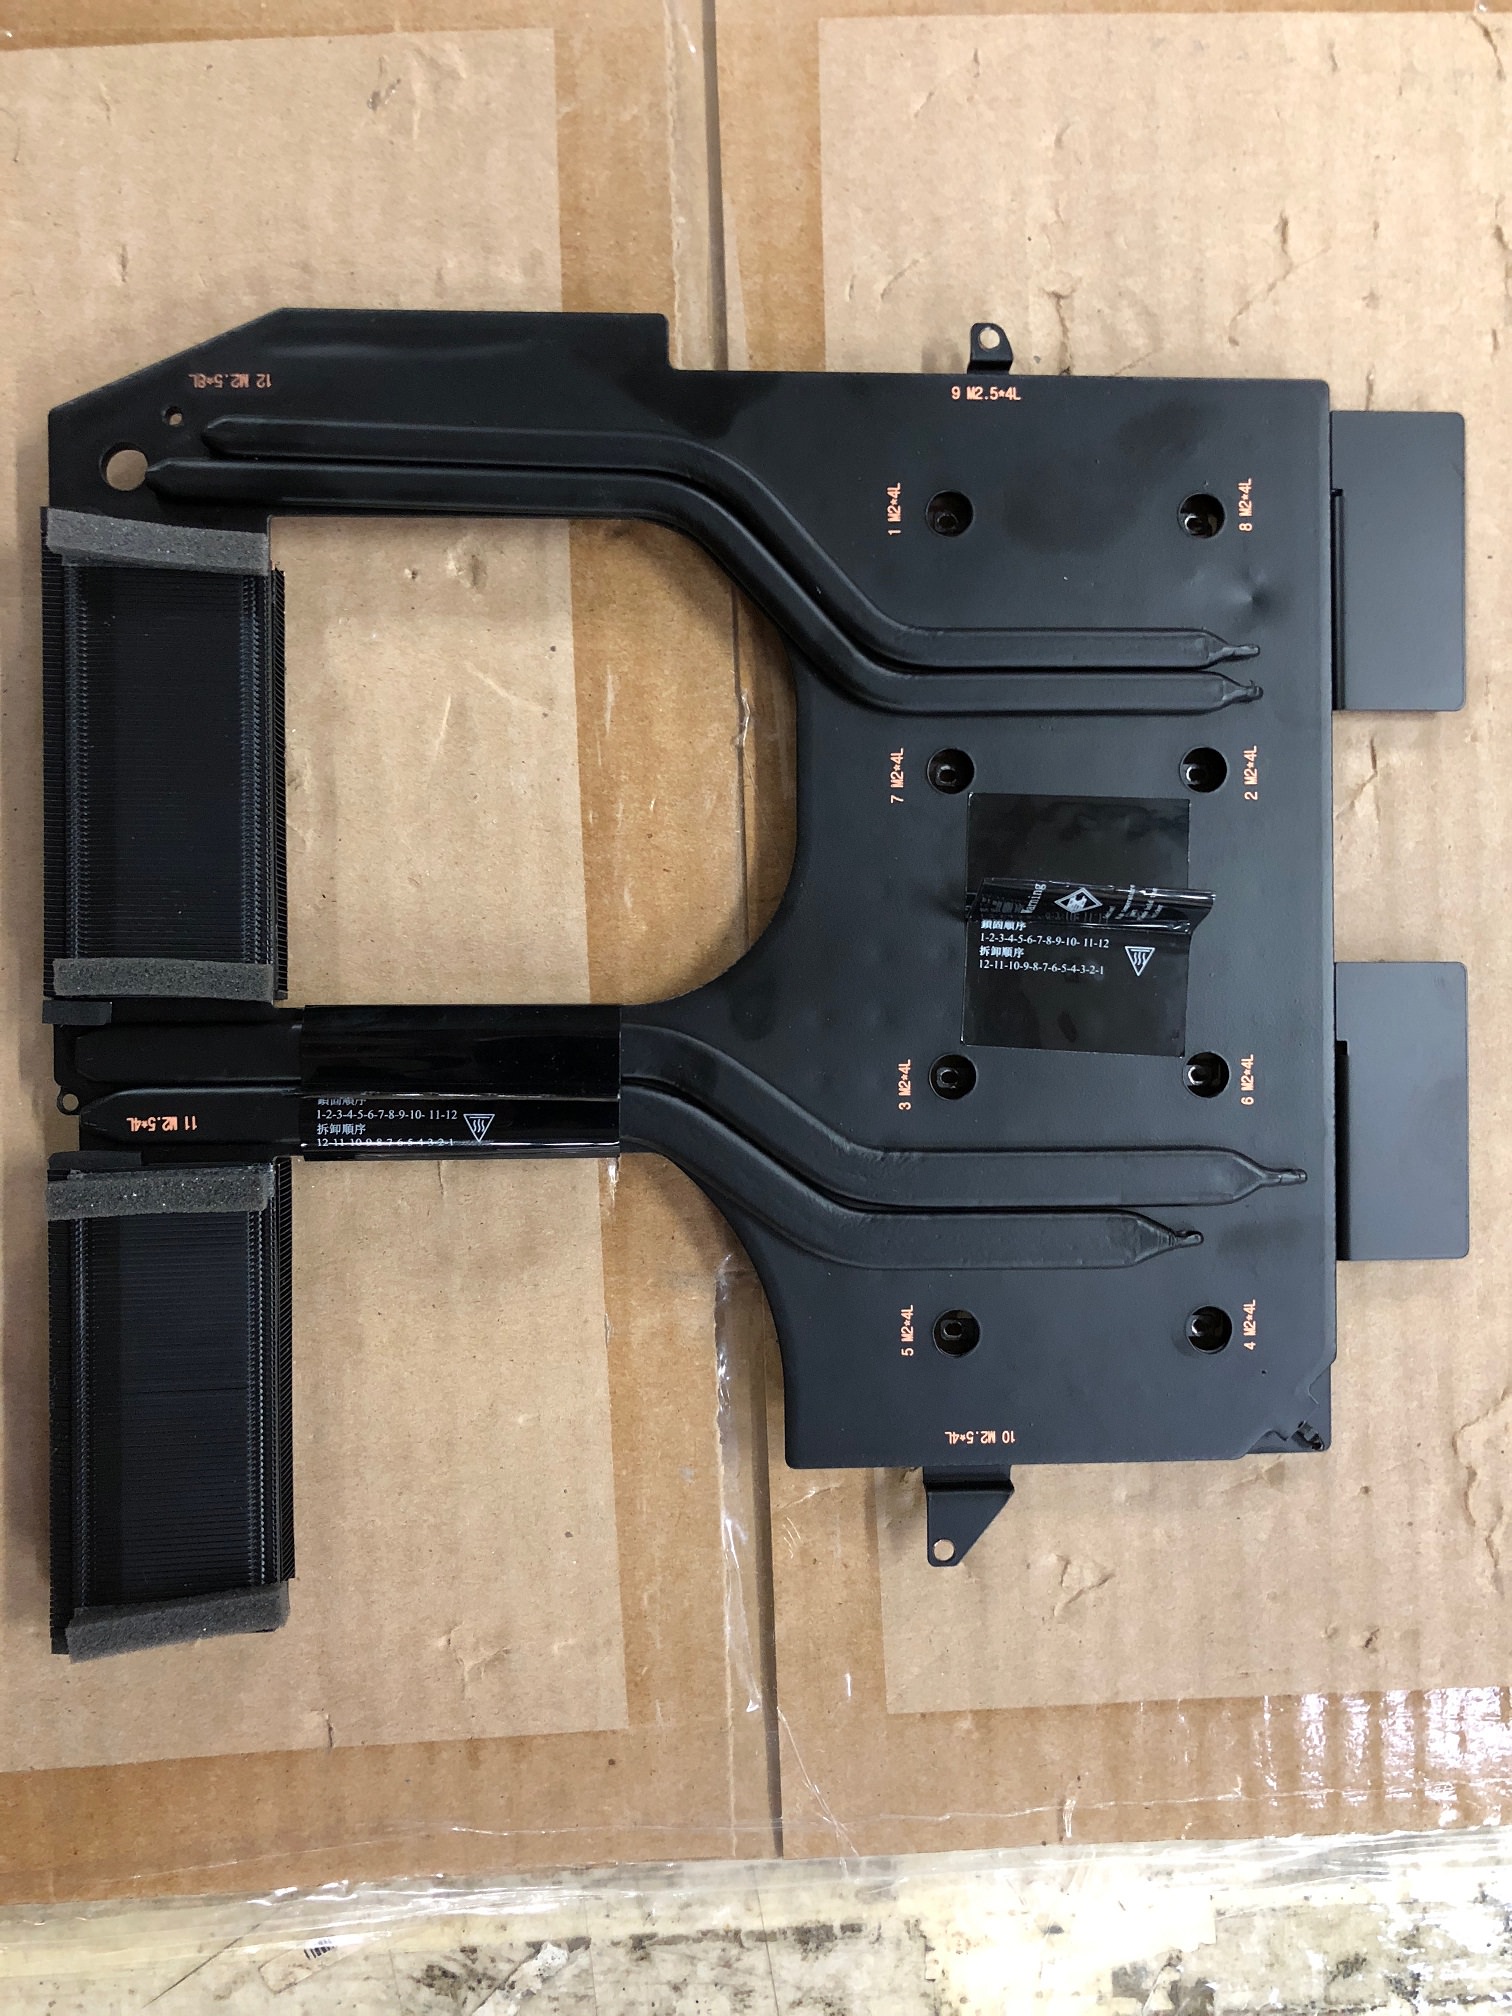
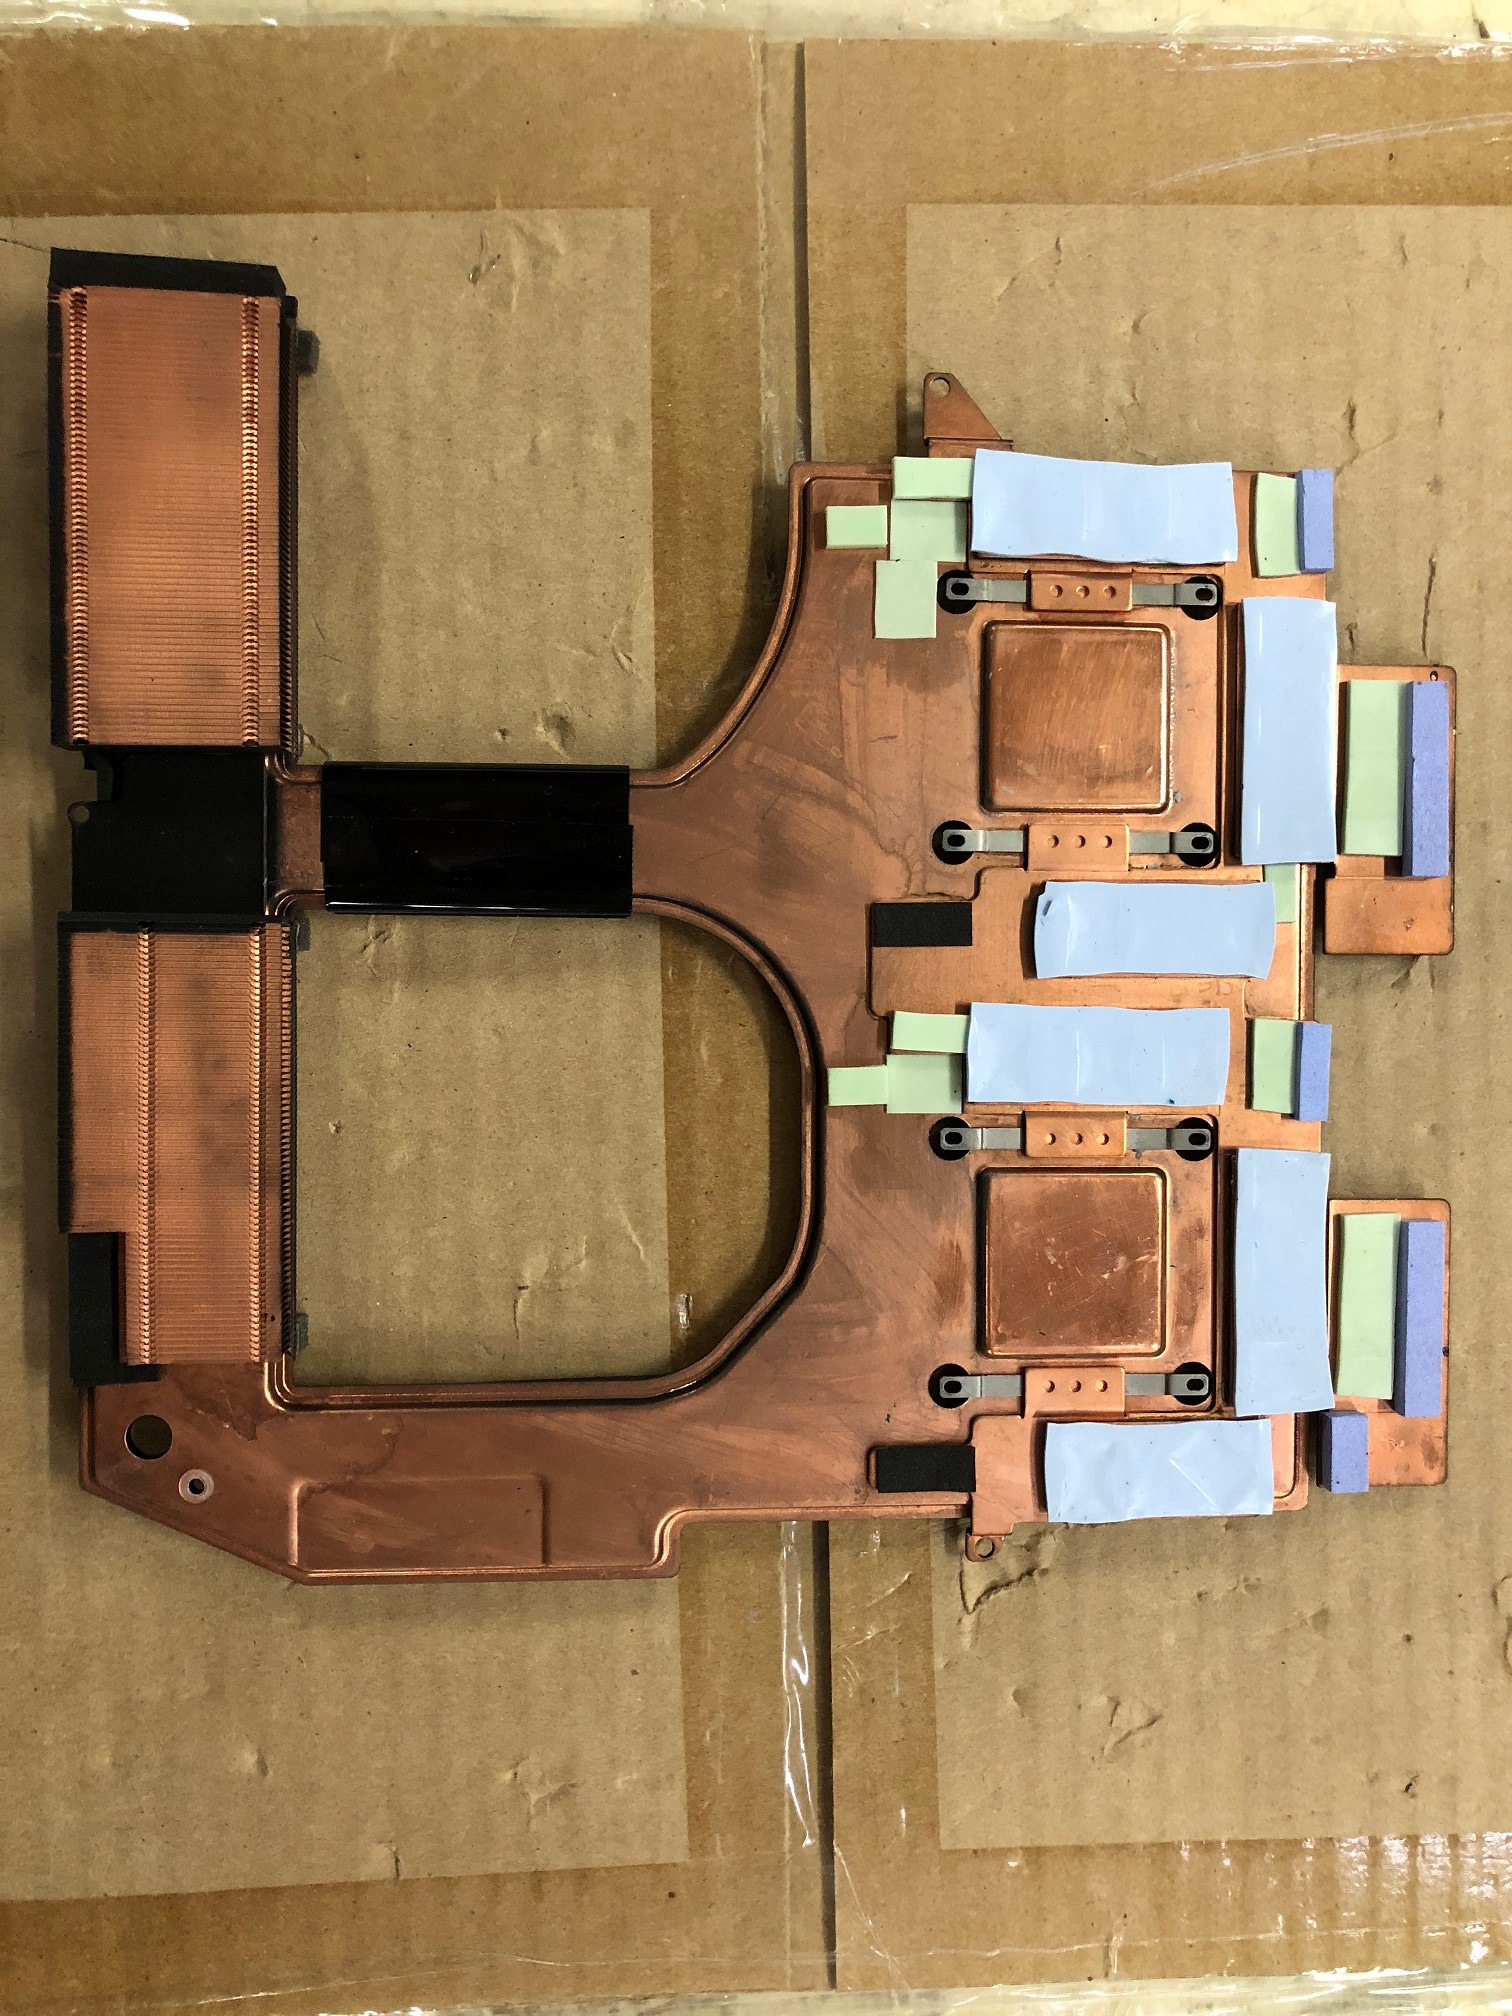
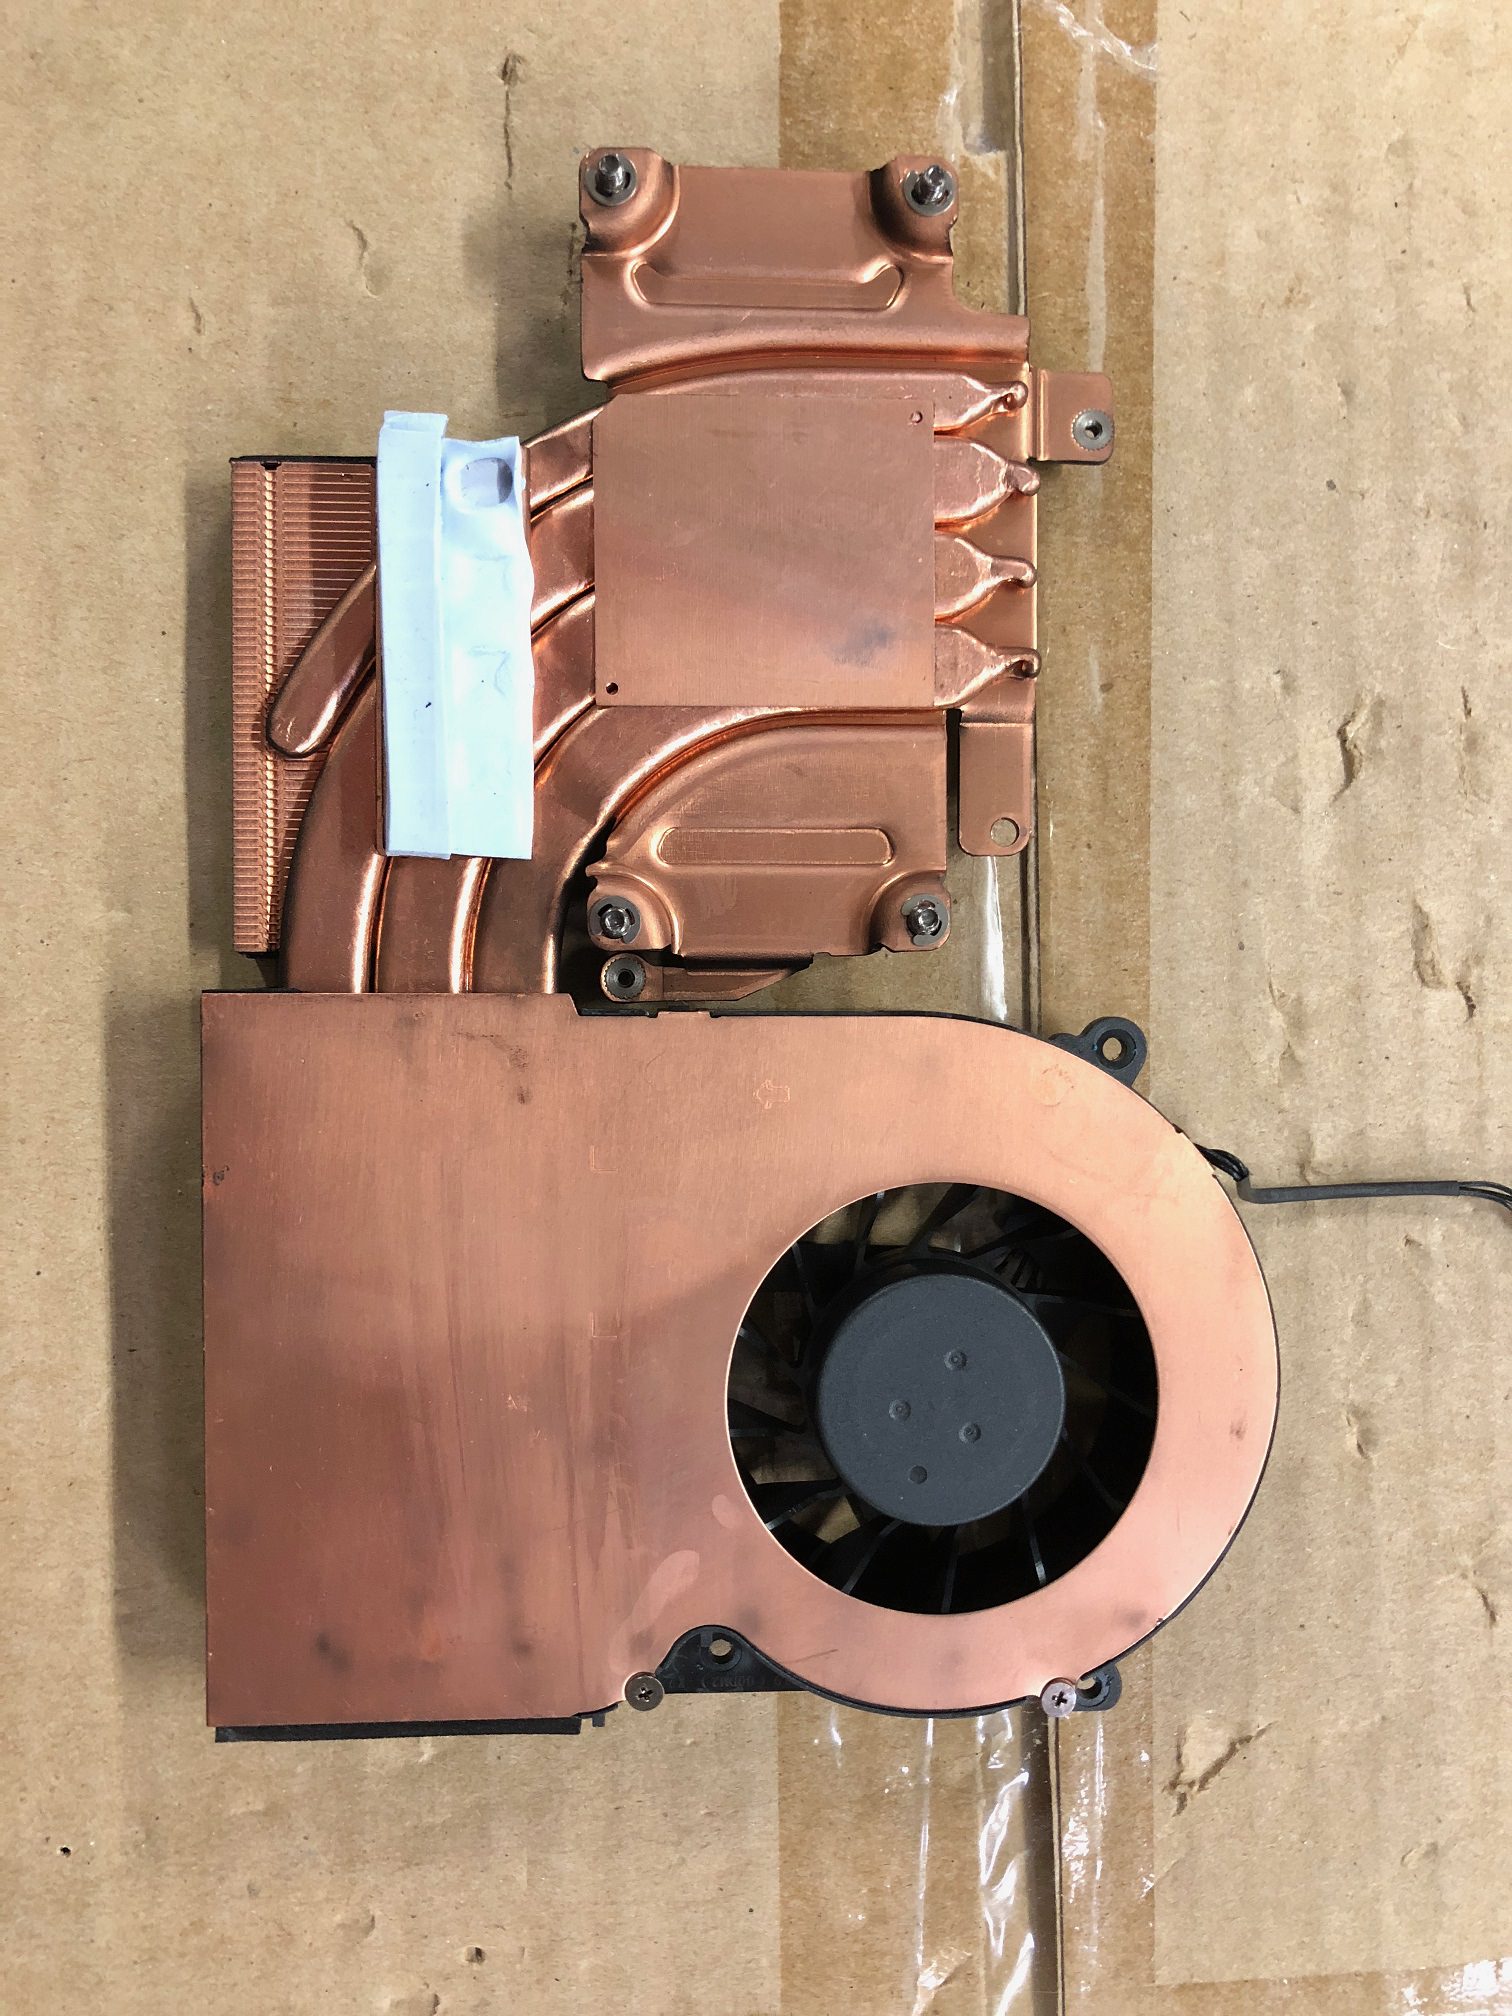
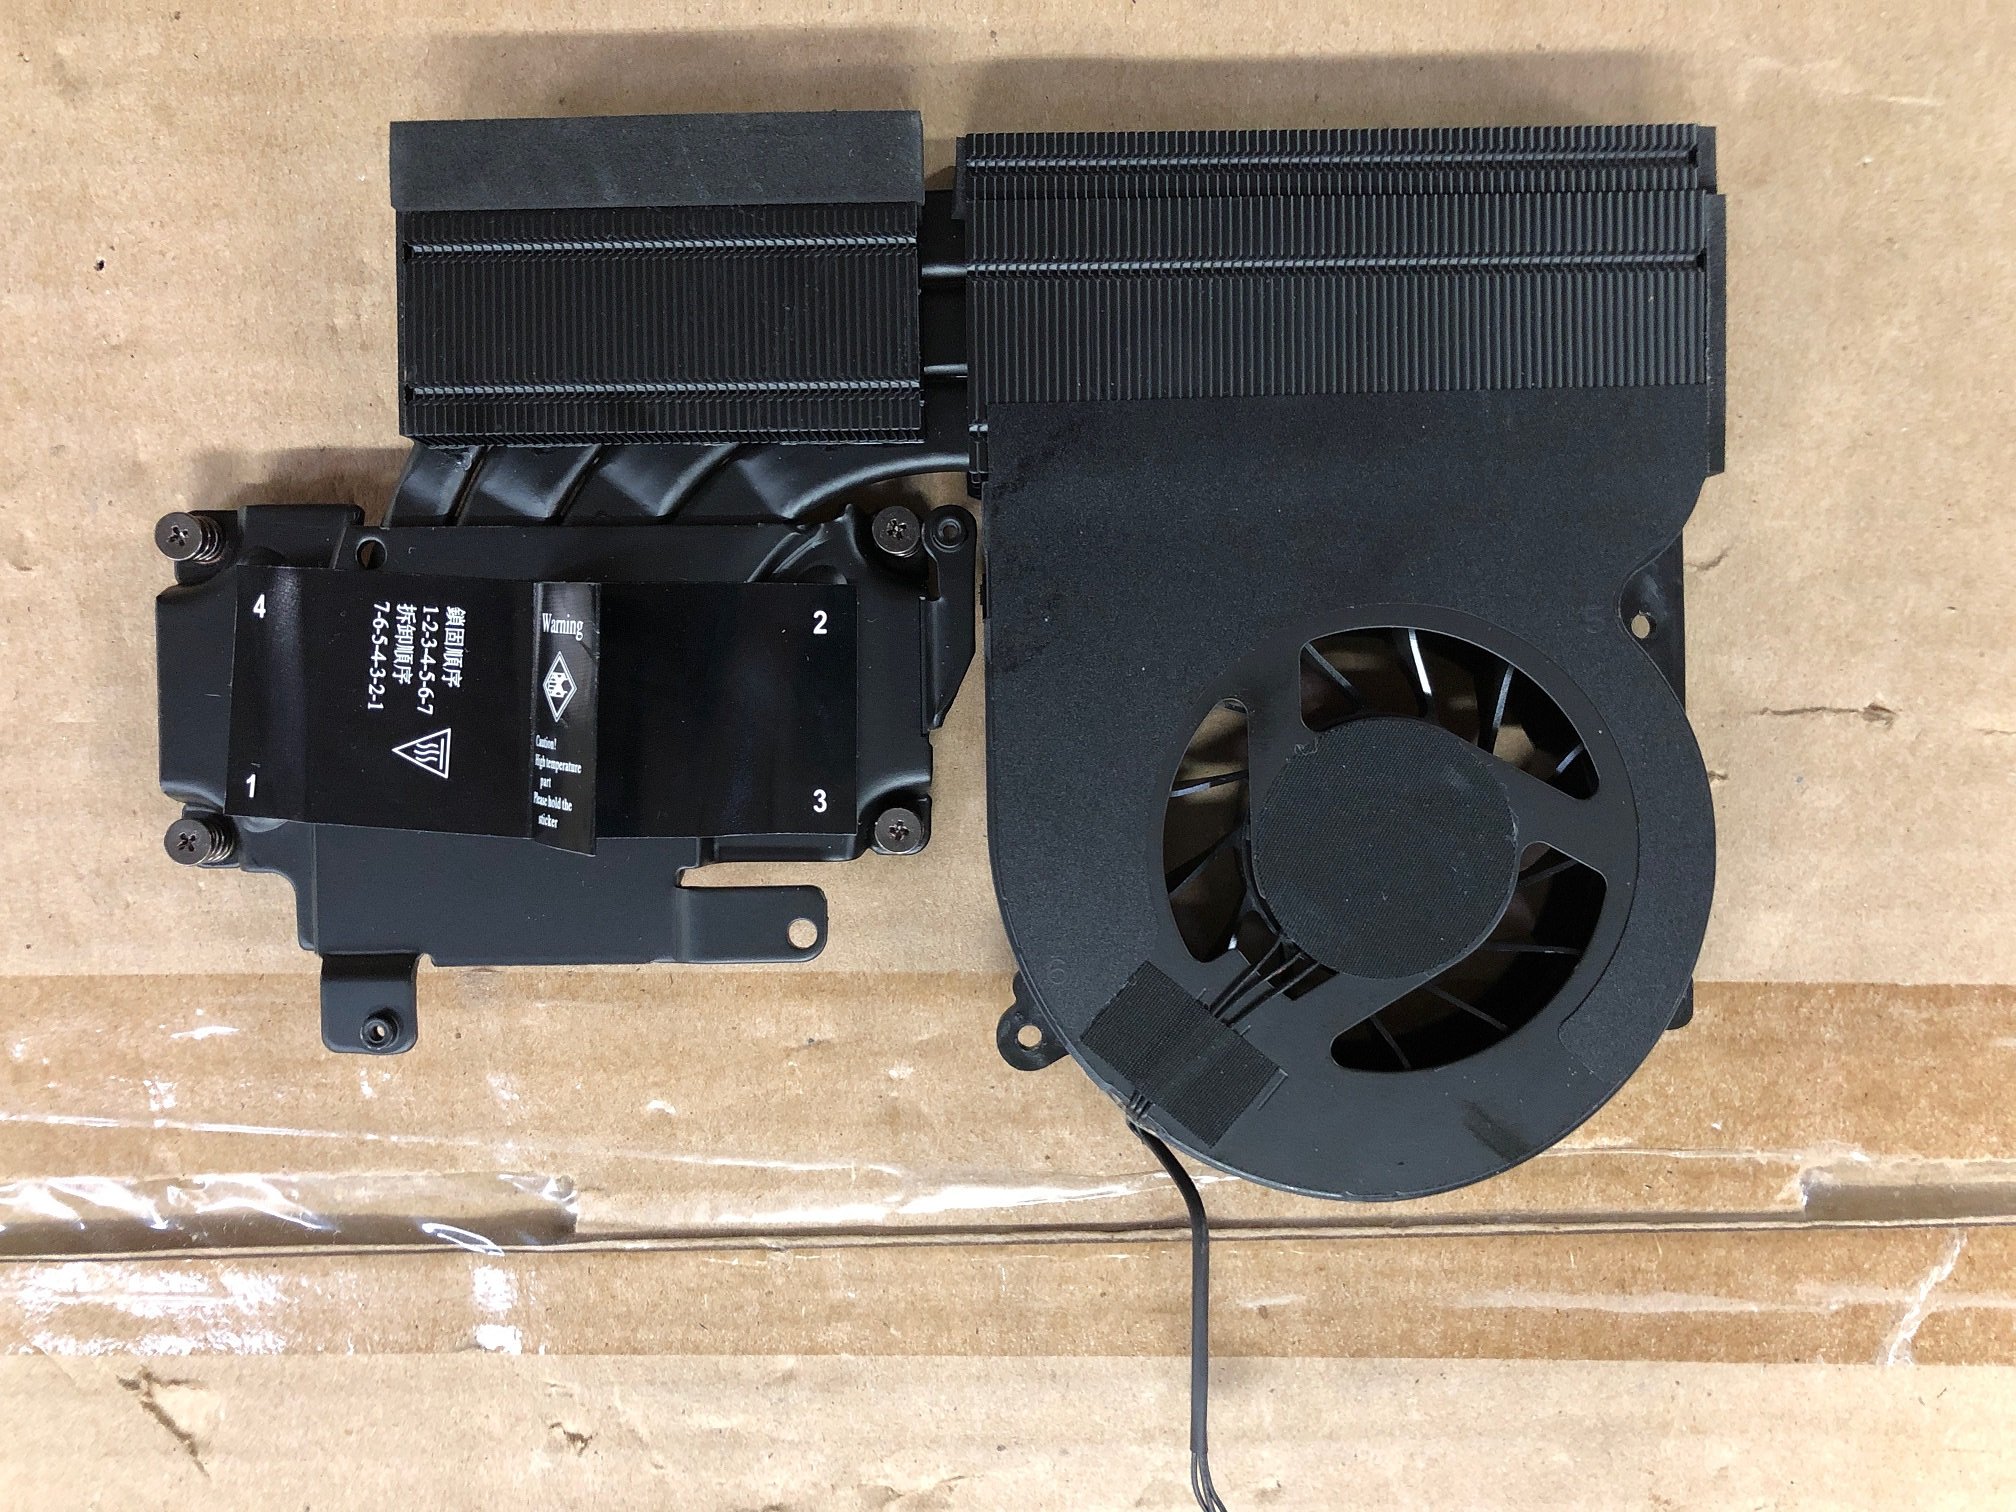
These are the CPU and Vapor Chamber heat sinks HID uses in their P870TM
Attached Files:
-
-
-
Hold 'FN' + 'D' keys while switching it on until it reboots.kfxsti, Falkentyne, Donald@Paladin44 and 3 others like this.
-
EK vardar fans are better than Noctua fans, in case you were wondering XD
I got a noctua fan that worked like 10 minutes, after which it got stuck on 100% with the PWM not working anymore, even though the PWM on the board works just fine with EK Vardar, and even though the inner circuit of the fan looks just fine on the Noctua. Amount of air was pretty good on the noctua though, just doesn't work anymore... -
too bad theres no vardar fan for laptop
-
You don't exactly place those in laptops, but in a laptop cooler to push more air to the laptop
ole!!! likes this.
-
Need help cleaning up win 10 and create win 7 desktop.
donald@HIDevolution said @Phoenix was the man.
Let me know if you have time to help.
Still waiting on P870TM1 to be delivered. -
Sure but I can't tweak it for you if you don't have the machine so tag me once again when you get it!
Once you get it, when you first turn it on and get the initial Windows 10 Setup Wizard, it will prompt you to connect to a Wireless Network, click on SKIP on the bottom right otherwise you will be forced to login with a Microsoft account which I strongly advice against.
Also, when it prompts you to enter a password, leave the blank for now as during our tweaking session, we will need to reboot a lot and that will just slow us down.
First thing I want you to do to save us time is to right click on your start menu button, then choose SYSTEM, from there,, hit Rename This PC and choose a name for your computer. (ie. I name mine TITAN). The name should be in capital letter. Some of the tweaks are tied to the PC name and thus, you want to name it properly from the get go rather than keeping the default random name which Windows assigns it ( DESKTOP-999-BLABLABLA)
Next, go to PC Settings > Update & Security > Windows Update and perform all the Windows updates. After rebooting, check for updates again just to make sure there aren’t any more updates
The moment you are in Windows, go ahead and do all the Windows updates which will take a long time, then download and install TeamViewer then run it, it will give you an ID/Password which you could pass on to me via a PM -
I will tag you when it's delivered and I have preformed all of your suggestions.
Thank you! -
-
I can surely attest to that LOL
*** Official Sager NP9877 / Clevo P870TM-G Owner's Lounge! - Phoenix 4 ***
Discussion in 'Sager/Clevo Reviews & Owners' Lounges' started by Spartan@HIDevolution, Oct 5, 2017.