This guide was first inspired by: How to do a clean install of Windows 7 or 8 on Samsung Chronos laptops | Arktronic.com
This guide may work with other Samsung Series 3, 5, 7, and 9 laptops with iSSD/ExpressCache as well. Give it a try and report back. I will add to this list:
- NP700Z5C-S01US
- NP530U3C
The Problem
You installed Windows 7 or 8 on this nice laptop via a bootable USB drive, but Windows won't load up. What gives?
My theory (after testing over and over) is that the iSSD gets in the way of the installation process. While Microsoft is to be blamed for not letting us choose where to install "system reserved" files to during the installation, Samsung is to be blamed for adding another layer to that with the iSSD. Normally, when you install Windows on a partition of a drive, the "system reserved" files are created automatically on a new partition on the same drive of the OS. With the iSSD in the game, the "system reserved" files are created on there instead. When booting up, the system cannot find Windows because it cannot boot up from the iSSD.
So my solution is to do just that, but then copy the "system reserved" files to its proper location afterward. The process goes like this. Create two partitions on a drive (Drive A), one for the "system reserved" files and the other for the OS. Install Windows on the OS partition and the "system reserved" files will be written on the iSSD (Drive B). Use the command line to copy over the "system reserved" files from Drive B to Drive A's "system reserved" partition. Restart and the laptop should boot up from Drive A.
If you are in any of these situations, then this guide may be for you:
- I installed a HDD caddy in place of the ODD (DVD drive) and don't have a DVD drive to install Windows with. So my only option is to install via a bootable USB drive. But it won't work--Windows does not boot up on my HDD.
- I tried installing a fresh Windows 7 or 8 with a USB bootable drive and got an infinite boot loop after Windows installed (restarts after Samsung logo)
This guide assumes:
- This will be a CLEAN install. Your recovery partitions, everything will be erased.
- You have a main hard drive (HDD or SSD) and the iSSD on board.
- You do not have a DVD drive available and booting from a USB bootable drive.
WARNING: By following this guide, you take full responsibility for any action you perform to your laptop. I take no liability for your own actions or damage caused here within.
Guide/How To
WARNING: There appears to be issues with UEFI/GPT mode models, as these models are giving users errors when formatting their drives (e.g. trying to format UEFI/GPT drive while in BIOS/MBR mode). Since this guide assumes a clean install, it would be wise to use BIOS/MBR (legacy) booting mode. If you are trying to format or cannot see a UEFI/GPT drive in BIOS/MBR mode, you should first switch to UEFI/GPT mode, format the drive, then switch back to BIOS/MBR mode. More information in this post.
- With the laptop turned off, insert the bootable USB drive onto the USB 2.0 port (USB 3.0 port will work too, I tried it).
- Turn the laptop on and press F2 key to go into BIOS menu. Turn off Fast BIOS Mode under Advanced tab. Everything else can be set to their defaults. Make sure your boot order is set correctly (SATA HDD [your main HDD] first, USB HDD [bootable USB drive] second). Exit and save changes. Laptop will restart.
- On restart, press F10 (repeatedly) to go to the Boot Menu and boot the USB HDD drive and begin Windows installation process.
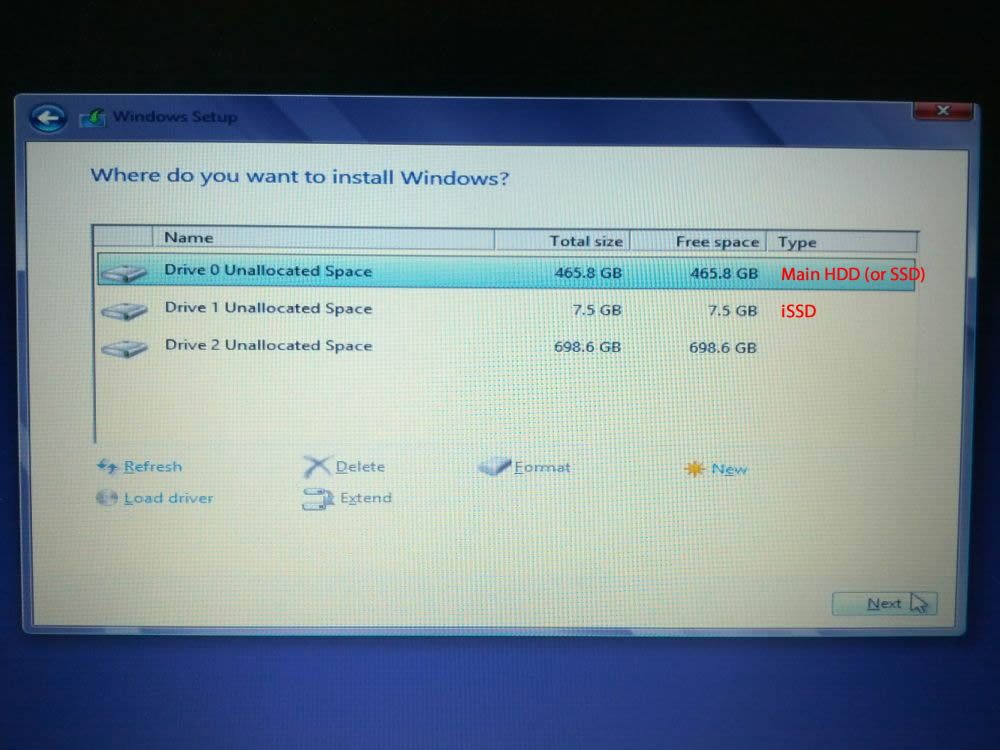
- On the partition window, you should have a list of all drives/partitions. Drive 0 should be your main hard drive for the OS. Drive 1 should be your ExpressCache's iSSD drive. All others are other drives you have connected. We will only focus on Drive 0 and 1 in this guide.
- Delete partition(s) on Drive 0 that you don't need (I delete all partitions for simplicity). Delete Drive 1 partition. So now yours should look something like this:
- Create a new 100MB (for Win7) or 350MB (for Win8) partition on Drive 0. Then format it.
Now you should have the following (we are going to assume this setup for the rest of the tutorial):
Drive 0 Partition 1........................350MB (for Win8)
Drive 0 Partition 2........................Windows OS (sizes will vary depending on your HDD)
Drive 1 Unallocated Space..................iSSD drive (7.5GB on my NP700Z5C)
- Install Windows onto Drive 0 Partition 2. In the process, Windows will install the "system reserved" files onto the Drive 1 (iSSD). After installation the system should restart.
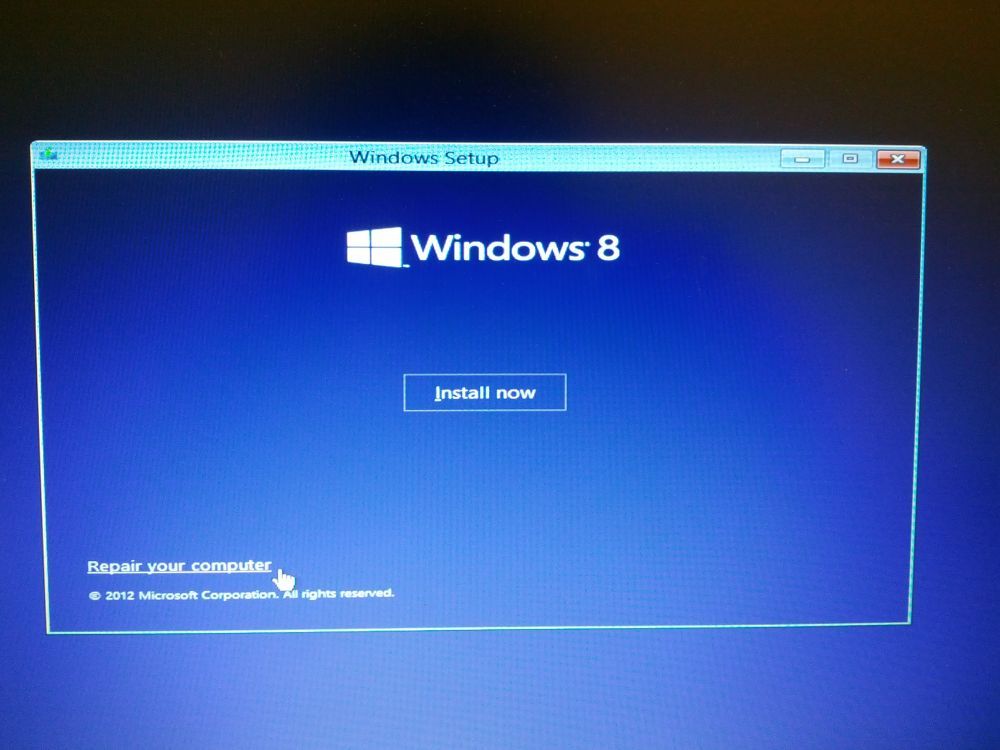
- Once again, press F10 and boot from the USB HDD drive to begin Windows installation process.
- This time, use the Repair your computer function and get to the command prompt.
- Once in command prompt, type diskpart to enter the disk partition mode.
Code:X:\Sources> [B]diskpart[/B]- Enter list disk to list all disks on the system. We are interested in the Disk 0 (HDD) and Disk 1 (iSSD) only.
Code:DISKPART> [B]list disk[/B]- Enter sel disk 0 to select disk 0 so you can make changes to it.
Code:DISKPART> [B]sel disk 0[/B]- Enter list part. You should see two partitions of interest: Partition 1 (350MB) and Partition 2 (Windows OS).
Code:DISKPART> [B]list part[/B]- Select Partition 1 by using sel part 1. Then make it active by entering the command active.
Code:DISKPART> [B]sel part 1[/B] DISKPART> [B]active[/B]- List all volumes by using list vol. Take note of the drive letter for your 350MB partition (mine was C), the temporary iSSD's 350MB partition (mine was D), and your Windows OS partition (mine was F).
It should look similar to this. Sorry for the blurry photo!Code:DISKPART> [B]list vol[/B]
- If your 350MB partition file system is RAW, you need to convert it to NTFS first by entering the command format fs=ntfs quick.
Code:X:\Sources> [B]format fs=ntfs quick[/B]- Exit diskpart by typing in exit.
Code:DISKPART> [B]exit[/B]- Now you want to copy the system reserved files from the temporary iSSD's partition over to the 350MB partition. Note, that this process actually uses the Windows partition, not the iSSD's. Type in bcdboot f:\windows /s c:. You should get a "Boot files successfully created" prompt if successful.
Code:X:\Sources> [B]bcdboot f:\windows /s c:[/B] (make sure [B]f[/B] and [B]c[/B] drives matches YOURS)- Remove your bootable USB HDD and exit command prompt and restart.
- Your Windows should load normally. Enjoy.
Extras
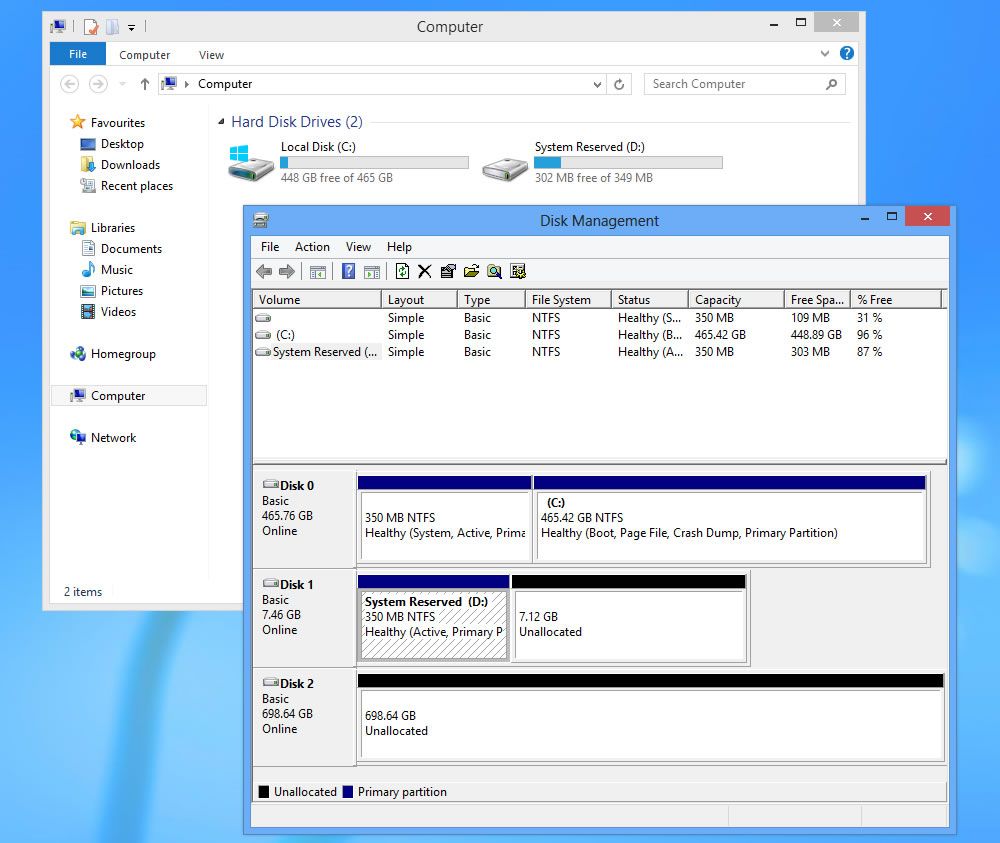
Once in Windows, you should see two drives of interest:
- Local Disk [C:]
- System Reserved [D:] <--this is the iSSD system reserved partition. We want to remove this.

Run diskmgmt.msc
Right click on the System Reserved [D:] and delete volume. You may do whatever you like with it now (enable ExpressCache on it, use as storage, etc.).
I hope this guide was easy to follow and helpful in some way. Please let me know if you have questions by posting below. Have a good day!
-
Alternative Method #1
Alternative Method #2
Alternative Method #3
-
Making this guide is a good initiative, lots of people seem to be having problems with USB install. I've been away for several weeks and only reading up on this forum tonight. Otherwise I would have responded to your other posts about it.
I find the easiest way to install from USB is to just delete the partition on the iSSD and let Windows Setup make its 100MB SYSTEM partition there. Of course when Windows Setup tries to boot after copying files, it will fail, because the iSSD isn't bootable.
What you do is boot back into Windows Setup (on the USB), use a command prompt to copy the boot files from the iSSD to your Windows partition on the HDD (or SSD), then make that partition Active (bootable). Simple as that.
I described the steps in some detail in this post a few weeks ago. I notice you were posting about it in the same thread, but you may have missed it.
Another way is to create your own 100MB dummy partition on the HDD during Windows setup, then (again) let Setup do its thing and create a 100MB SYSTEM partition on the iSSD. Once it's done copying files and fails to boot, use Acronis or some other imaging program to copy the SYSTEM partition from the iSSD to the HDD, overwriting the dummy partition. Flag it active (bootable) and you're good to go. That's how I did it the first time on a Series 5 this summer. Now I prefer the first method. Both work on Series 5 and Series 7.
Either way, delete the partition on the iSSD before installing ExpressCache (using Disk Manager in Windows). That way EC will create a new HFS partition on the iSSD when you install the software.
My experience is only with Windows 7, haven't tried Windows 8 yet on the Sammy.
Again, great initiative with this thread. Let me know if I can help in any way.
Update: Of course these procedures assume you're installing Windows from a USB2 port. Installing from a USB3 port requires either adding USB3 drivers to the Windows setup image or (easier) copy them to an SD card and load them during Windows Setup. -
You can boot from the usb3 ports, I always use these ports with paragon and usb drive/win8 usb install. (I have the latest NP700Z7C 17.3.
One issue I've had with this laptop is that my windows 8 pro usb key isn't the same media as what the laptop has certificates for. You need to go in to the bios, disable the certs, install windows 7 in non UEFI mode, then use the usb key for win8 pro to install the OS.
Insanity but it works. -
You can boot from USB3, yes, but you won't be able to complete installation of Win7 from USB3 unless it has access to USB3 drivers. Once it finishes loading and switches to WinPE for the actual installation, it won't be able to see the USB3 anymore.
Again, the easiest solution is to unpack the USB3 drivers on an SD card before starting setup. Windows Setup will say "A required CD/DVD drive device driver is missing. If you have a driver floppy disk, CD, DVD, or USB flash drive, please insert it now." At this point, just click Browse, navigate to the SD card and select the driver.
For my NP700Z3A Sandy Bridge, it's the ASMedia XHCI Contoller. For Ivy Bridge models, I assume it's Intel USB. On my model, loading this driver is not enough, I have to also load the Generic USB Hub driver, which is shown by unchecking "Hide drivers that are not compatible with hardware on this computer".
Still, it only takes a minute, and USB3 speeds up installation tremendously. That said, installing from USB2 is easier (though slower). And installing from DVD is even easier yet, as it gets the boot drive right from the start")
-
I have an issue that brought me to this thread, maybe you guys know something. I got the Windows 8 version of this laptop, the np700z7c-s01ub. Great. So I make the recovery disks, no problem, then swap out the 1TB drive with 256GB SSD. Restore to the SSD, all is well. Then today, for some reason when I close the lid, it shuts down improperly rather than sleep. It does this a few times, annoying, but not a big deal. The last time, it won't boot back up. After tinkering for a bit, it seems maybe the boot record is invalid or something. I can boot from a plain jane windows 8 image I have handy from another purchase, but no recovery tool will fix the boot record. AND SINCE THE WINDOWS 8 LICENSE/PRODUCT KEY IS EMBEDDED IN THE BIOS, I CAN'T REINSTALL FROM THIS MEDIA I HAVE, in an attempt to fix the boot issue. I did grab a copy of the bios license, but the media Windows 8 just says "The product key entered does not match any of the Windows images available for installation. Enter a different product key."
But there's no way to enter a new product key, it will continue to find the one in the bios. This laptop didn't come with any recovery media, so basically right now I think I'm screwed; at best I am downgrading to Windows 7, which seems to be my only option without sending the laptop back into Samsung.
Anybody seen anything like this? This model doesn't have anything in the bios about certificates to disable. -
Thanks for the guide Dannemand--I have added your guide to the alternative method. Updated guide. :]
-
Great job, hanime, very nice guide! And great idea to use bcdboot instead of copying the files from the iSSD. I think it's a better approach!
I tried to rep your OP, but it won't let me because I already repped you for another post not long ago. I'll give it another try in a week or two. -
Very useful.
I've added this thread to the sticky list to make it easier to find.
John -
If I want to simply install windows 7 from a cd, would I follow this? The problem I run into is it freezes at the windows logo once it loads the files of the installation cd,
-
The various solutions described here only apply to installing Windows from USB, and only when installing on a new or newly partitioned HDD/SSD. It also only applies to models with iSSD (ExpressCache). That makes it particularly relevant for those Series 5 models that don't have DVD drives OR to those Series 7 owners who either replaced their DVD drive or who simply prefer to install from USB.
So no, installing from DVD will not trigger the iSSD boot conflict addressed here (at least I haven't seen or heard of that). In fact, installing from DVD should be the preferred solution for anyone who HAS a DVD drive and who wants the most painless installation -- even if a bit slower.
Prior to installation, check the following in BIOS (applies to DVD as well as USB installation):
1) Disable UEFI. Should remain disabled even after completed installation. UEFI installation is hardcore, and far beyond this guide.
2) Disable Fast Boot in BIOS (if you have it). Can be re-enabled after completed installation.
3) Enable USB Legacy Boot (if you have it). Can be diabled after completed installation if so desired.
4) Make sure the HDD is in the Boot Priority list (so that Windows Setup can boot after copying files to the HDD). I keep HDD at the top of the list and use Esc (F10 on some models) to temporarily select boot device when I want to boot from USB or DVD.
If all of those are set correctly, I suppose a bad DVD or HDD could cause the hangup you're seeing. There are other things we could check, but it really is outside the thread subject. -
okay so I disabeled everything you said but when I load the windows installation DVD it says windows cannot be installed to the partition because the selected disk is of the GPT partition style. It is a formatted empty NTFS partition. IDeas?
-
I see. Your disk has been initialized with a GPT partition table (as opposed to the tratitional MBR partition table). That's actually what you would use with the more advanced UEFI installation. This affects the entire disk, not just one partition.
Did you initialize this disk and/or convert it to GPT (and if so how)? Or is it a new SSD that came setup this way?
If you want to give it a try, you can go ahead with an UEFI installation by enabling UEFI in BIOS and installing again. It's supposed to run faster, but just know that these Sammies have proven troublesome with UEFI (I never tried it myself).
Otherwise you can convert the disk to MBR using DISKPART by opening a Command Prompt from Windows Setup (as described in the second post of this thread). Again, I am hesitant to hijack this thread with lengthy explanations of that. I'll search this afternoon and try to find a relevant thread to direct you to. It's probably already covered somewhere, otherwise I am happy to help you there. -
I tried to send you a PM, but it doesn't seem to be working for some reason. I just bought this Samsung chromos 7 with windows 8 and basically want to install windows 7 from a disk onto a blank partition. It was factory set as GPT. Are you saying that if I keep UEFI enabeled it wont prevent me from installing on GPT anymore? Ill probably just end up returning the computer, its a pain to rplace the HD anyways.
-
Thank you very much for that update. I understand better now: So Samsung (and probably other vendors) ship Win8 PCs with GPT partitioned drives now. I've only tried Win8 previews and never bought a Win8 device, so I didn't realize that.
Probably Win8 is then UEFI installed, which would fit perfectly with the security improvements in that OS. AND I bet this explains why some Easy Settings features are not showing in Win8 Settings -- because they won't have access to the BIOS calls that control them. (Well behaved software shouldn't make BIOS calls anyway).
(I apologize, this line of thought strays from the thread topic as well as your question. But it may explain and help solve some other problems that users have had when they upgraded to Win8. Or maybe it's old news, I am not fully read up on all the Win8 posts.)
If I were you, I would enable UEFI in BIOS and try again with the Win7 installation. I admit that's probably where you started when you first posted because of the hangup. But do give it a try.
If that fails, you can use DISKPART to convert the drive to MBR, disable UEFI, and try again. Only concern is you will lose everything on the drive (I think) including the Recovery Partition. I would take some serious backup steps before doing this.
Let me know if you want to pursue this, and I will help you with DISKPART instructions. Basically you use the same steps as in the 2nd post of this thread (which is a copy of the post linked here) to select the HDD in DISKPART, then use the CONVERT MBR command.
Update: Oh, and no new PMs in my Inbox, dunno why. Actually, the last PM is a month old, maybe there's something wrong with my mailbox...
Update2: John sent me a test PM yesterday which I received, so my mailbox should be OK. Better to discuss issues in the thread though, where it can help others. -
A few quick answers:
(1) Yep, the NP700Z5C-S02UB came with Win8, GPT partitioned.
(2) Yep, UEFI + SecureBoot enabled in BIOS.
(3) I did keep it GPT/UEFI when doing a clean install of Win 7 (a long story in itself).
(4) n/a
A bit of the backstory: I first made a USB recovery disk, which I tested twice and it worked perfectly: booted into recovery, then ran it and went straight back to factory install in about 20 minutes.
I then researched how to do a USB Win 7 install with UEFI. At first I couldn't get the USB drive to get recognized during boot (SecureBoot error), even though I had properly set up the drive, including inserting a copy of bootx64.efi -- so I went into BIOS and changed a few options. I don't have my machine in front of me, so I'll come back later and clean this up, but approximately: I found a kind of hybrid SecureBoot option in BIOS that allows UEFI and something else (functionally, Legacy boot, I assume, though it had a different name) and enabled it. THEN the USB drive was recognized and booted.
At that point, I began the Win 7 installation. First step was to delete all the Win8 partitions on the C drive (I think there were 4), leaving untouched: (1) the iSSD drive and (2) the two C partitions with "SamsungRecovery" in their name. For Win7, I simply chose the giant empty partition on the C drive (don't recall if I formatted it) -- the installation COMPLAINED that the "partitions were in the wrong order!" -- but I clicked through and it installed no problem. Because I had done a UEFI-enabled boot, the install automatically created a 100MB EFI partition, and created a GPT on the boot drive. At no point was I asked, "UEFI/GPT or MBR?" I assume how the USB drive was formatted/loaded made that choice for me.
Long story short, everything works fine and as far as I can tell I have a UEFI system (though we might want to talk a bit about the partitions). The only collateral damage from doing things this way is that when I tried to run the recovery (back to factory install) that I described above, it failed, citing something like "cant' find recovery". Of course those partitions are untouched, but apparently I deleted a "hook" when I wiped out the original Win 8 installation. A pity -- but I have a copy of Win 8 and can do a clean install if I want. I don't have all the "crap" that originally came with the machine (or I do, technically speaking -- it's on the recovery partition) but I rarely use such things.
Let me know if can help or answer any questions! I'll take a closer look at the BIOS options tonight and fix that vague part above.
-Matt -
@Matt: Fantastic, thanks a lot for responding so quickly and so fully. Very useful info!
In your Easy Settings, are you able to set USB Charging and Battery Life Extender? I ask because those are BIOS settings, and I am curious if Easy Settings can access them in a UEFI setup.
Regarding your recovery: If you can still F4 boot into Recovery Mode, you can create a USB Admin Tool as described in this old post. It's based on Samsung Recovery Solution 5, I hope it's the same on yours (probably SRS6 now). Booting that USB Admin Tool may allow you to repair the links that prevent your Recovery backup from working. Or just forget about it and move on
@bball: Clearly the new Sammies DO accept UEFI installation of Win7 with everything working. I recommend you make a Recovery backup and test it out, then proceed to install Win7 as described by Matt. Look for those UEFI/Legacy BIOS settings that he described -- and with which I am not familiar.
Thanks again, Matt, much appreciated.
Update: Matt, here is another post on recovering your recovery. It may contain useful snippets for you if you want to pursue that restore problem. -
@Dannemand, yep (yesterday was a bit hectic but) I remember seeing both the USB Charging and Battery Extender options in Easy Settings.
Also, as I recall when I try to boot into recovery (either F4 or the USB backup I created) it doesn't start.
I can explore some more tonight and see how far it gets with F4. Thanks for the links to other methods -- I'll try those too (unfortunately SRS won't install, presumably due to the same issue).
-Matt -
@Matt: OK, thank you for the update. So UEFI doesn't limit the features available in Easy Settings. Good to know.
More on the recovery:
When you install SRS in Windows (or run the Recovery backup) it connects to the contents on the Recovery partition (at least in SRS5). Unless you specifically backup the Initial Image from the Recovery Partition, there is no way to restore the Factory Installation without an intact Recovery partition -- since that's where the actual image is located.
If that connection doesn't work (and F4 doesn't work either), your first priority should be to find a way to boot the Recovery partition so you can make that USB Admin Tool, which is key in repairing the link. Here is another post in the same discussion as the previous one I linked which may help you get back into that Recovery.
Just know that this can be a lot of work. Only you know if it's worth it... -
Hi there,
Thank for your guide. So far the only topic I found about this issue.
I plan to install Win8 on my 530U3C (pre-installed with Win7). I downloaded Win8 by Windows8-Upgrade-Assistant from MS & it is ready to install. It gives me choice to install directly in Win7 (not required bootable DVD or USB). Shall I simply do that?
I used to do 1 time with a Dell laptop (no iSSD or SSD), nothing went wrong. With your statements, it seems that the iSSD in Samsung may cause a problem. -
Actually, installing and upgrading to Win8 is dominating almost every thread on this forum. Lots of discussion and great advice on that subject.
The problem discussed in this thread is specifically one that arises ONLY when performing a new (clean) Windows 7/8 install, ONLY when installing from USB, and ONLY when installing onto a new or re-partitioned HDD/SSD.
Installing and/or upgrading to Win8 may involve other issues with the iSSD, in which I am no expert But the guides described here do not address that.
-
This is awesome.Thank you for the guide.
-
For those of you who have gone on to install Windows 8, how has it affected battery life? Additionally, is the multitouch track-pad taken advantage of?
-
Battery life seems to be the same to me. 5-6 hours on a good day. Track-pad drivers are still horrible.
-
Hi!
I've used your guide hanime! Works until I'm supposed to copy the boot files. It seems that i have the same drives as you have on your screenshot, but I getting: "Failure when attempting to copy boot file". Have any hint of what I might have done wrong?
Thanks!!
Richard
Got it to work after doing the whole procedure from start again. Lovely! Thanks for the guide hanime! You may add Samsung NP530U3C to the list of devices working with this fix.
Regards
Richard -
I have the samsung 530U3C with 500GB HDD inluding 24GB SSD Cache. Want to install Win 7. In my case it looks:
Drive 0 Partition 1....................100MB (for Win7)
Drive 0 Partition 2....................SSD Cache 22,3 GB
Drive 1 Unallocated Space........HDD 465GB
Dont understand how i have to go along now? could you please help me? The way 1, 2 or 3 doesnt work. -
@Blenderhead: Hello, in your case, Drive 0 is your iSSD (with two partitions) and Drive 1 is your HDD. What I would do is remove the Drive 0 Partition 1 or Drive 0 Partition 2, so in the end it would look like this:
Drive 0 Unallocated Space........iSSD 24GB
Drive 1 Unallocated Space........HDD 465GB
Then I would create a 100MB partition (type in 102400 for exact 100MB) on Drive 1, so it would look like this:
Drive 0 Unallocated Space........iSSD 24GB
Drive 1 Partition 1...................HDD 100MB
Drive 1 Partition 2...................HDD (the rest)
Then choose Drive 1 Partition 2 and install Windows 7 on there. Note that Windows will likely install the "system reserved" files on the Drive 0 Unallocated Space (iSSD 24GB)--this is expected, but in the end of the guide, we will want it on the Drive 1 Partition 1 (HDD 100MB). Let it do its thing and it will restart. Continue with STEP #8. Good luck!
EDIT: That is interesting that your iSSD is on Drive 0 instead of Drive 1--I imagine it should not affect anything, but we will see. Let me know if you tried the above and still no success. -
I have the same setup, my iSSD is on Drive 0. I followed your guide, but I am not able install windows 7 to my Samsung NP530U3C... After copying files from iSSD to 100mb partition and making it bootable, I am not able to boot Windows. Do you have any solutions?
-
Does anyone know if the Series 9 is also affected by this? I want to downgrade from win8 to win7 using a USB stick, do I need to perform all the steps in this thread or can I just install normally (only series 5 and 7 were mentioned)?
-
@Penetrator: You shouldn't have this issue with Series 9. It is caused by Windows Setup misidentifying the small built-in SSD used by ExpressCache in Series 5 and 7 (so-called iSSD) thinking it is the boot drive -- but you cannot boot that iSSD. Series 9 doesn't have an iSSD, just one large SSD.
You could run into other issues, though: If your laptop was delivered with Win8, that means it is configured for SecureBoot and UEFI (a new alternative to BIOS), and the SSD drive was partitioned using the newer layout called GPT (as opposed to the good old MBR).
Although Win7 SHOULD support UEFI and GPT, there has been issues, some of them potentially serious. You are probably better off disabling UEFI: I think the classic BIOS mode is called CSM in your BIOS settings. Also disable SecureBoot while you're there. And you may want to convert your SSD from GPT to MBR, but I believe that wipes all partitions on it.
There are many posts about this in various threads. Normally I would go look for them and include links, but I am heading out now, just saw your post and wanted to respond.
If I get time later, I'll find you some pointers. Or try Googling site:notebookreview.com Samsung UEFI GPT Win8 Win7.
Hope this helps.
Update: Just scan this thread from the beginning (it's not very big); you should find some relevant discussion as well. -
@Dannemand You seem to have a lot of knowledge with this issue, well i attempted to clean install windows 8 to remove the bloatware and start fresh, with out knowning about the 8GB SSD i just started deleting all the partitions including the recovery (not a smart move, but i have always done this with my previous notebooks). Now i have a OEM Windows 8 64bit install disk a hard drive with no partitions and a 8GB SSD that windows 8 claims to be small to install on. i tried to install on the the tera byte but keep getting the bootloop. So i tried your post but Alternative Method #3 but it didn't let me install on boot up because it wasn't on the required on right partition table that windows 8 likes. So what do you recommend ? Also anybody else that might know whats going on please give me some feedback thanks in advance guys.
-
@Bryhe1: If you can install from DVD instead of USB, you completely eliminate the boot issues with the 8GB iSSD. So that would be my first recommendation. If that fails, something else is afoul -- please see below.
If you MUST install from USB, hanime's guide in the opening post should work OK for both Win7 and Win8. When you get to the partition creation phase in Windows Setup, delete any partitions on the 8GB iSSD and create partitions on the HDD as hanime describes.
After Windows Setup has copied all files and tries to reboot, let it boot Windows Setup again and go to the Command Prompt (choose Repair or just press Shift-F10). Now follow the steps hanime describes to determine which drive is your Windows partition and which is your 350MB SYSTEM drive; use bcdboot to apply boot files to it; use DISKPART to make it Active (bootable).
(The difference between hanime's approach and mine is (A) I only create a single Windows Partition and skip the SYSTEM partition; and (B) instead of copying boot files from the iSSD (where Windows Setup mistakenly puts them) hanime uses the bcdboot command to write new boot files directly where you want them to go.)
If that still fails (including DVD install) the reason might be related to what I discussed with member El Penetrator just yesterday in this very thread: That your PC was delivered with UEFI and SecureBoot enabled in BIOS and your HDD partioned using the GPT layout (as opposed to the good old MBR layout). That is basically how Win8 PCs are delivered -- and in theory a re-install should work as well. But many more things can (and do) go wrong with UEFI/GPT.
Unfortunately UEFI installation on a GPT disk is one of those areas I only "know about" I haven't tried it myself. Partly for that reason, and partly to ensure a safer and smoother ride, I would recommend you to disable UEFI and SecureBoot in BIOS (look for Legacy or Classic or CMS mode) and convert your disk to MBR (using DISKPART from Windows Setup).
But please give hanime's guide a few more attempts first
-
I just have the same problem as bball when I try to boot from a CD....
but when I use bootable flash drive, I can through through the setup, but I found that the SSD is disk 0 and the HDD is disk 1?!!
I also found that u can instead of making the partitions manually u can do the following in diskpart but after deleting all the partitions
diskpart
select disk 0 (if it is ur HDD)
clean
convert gpt"
then u go back to the setup and select the drive (u will not find any volume in there, but still u can select it)
I'm still out of luck to get my system to work, but i'm still trying
-
@hafey: Make sure you disable Fast Boot in BIOS, that may help you boot DVD instead of USB.
Also, I am not sure why you would want to convert your HDD to GPT. If yours is a Win8-delivered PC (as I recall it is) it was already GPT when you received it. I would say converting to MBR might make things easier -- particularly if installing Win7.
Whatever partition layout you choose, make sure it is matched by your UEFI settings in BIOS: Disable SecureBoot and choose UEFI (or UEFI & CSM) if your disk is GPT; choose CSM if your disk is MBR.
You simply cannot install (or run) Windows on a GPT disk unless UEFI is enabled. -
Dann: My laptop is win8 delivered, and I've read that GPT requirements for win8 is different than win7, so I deleted all the partition to make the disk suitable for window 7 and to start fresh.
Till now I managed to finish the installation of win7 (in CSM on a gpt partition) but the system didn't boot, I still need to try the tricks related to iSSD and moving the system files, etc.
I am really enjoying the new experience and learning these new things about UEFI and GPT, However I would appreciate if help me with these questions:
1-I am under the impression that with UEFI I will have a better performance in regards to start up & hibernation. am I right?
2- If I want to my laptop to be working in UEFI, should I do the installation while I'm in the UEFI? or can I finish the installation in CSM and switch to UEFI afterwards?
3- Do you why when I'm in UEFI (secure boot disabled) I can't boot from USB flash drive, CD drives also hangs?
Thanks -
@hafey: Even if you managed to complete the Setup part of installation, it will never boot a GPT disk in CSM mode (as far as I know). It will boot the BIOS part, then read the so-called Protective MBR at the beginning of the GPT drive. This MBR exists to make the entire drive look like a big unknown partition to old programs, so that they don't inadvertently mess with the disk.
UEFI/GPT is more modern and allows for bigger disks and bigger partitions. It also should allow for faster boot times -- although many users reporting superfast bootup are simply seeing the clever Fast Startup feature in Win8, which does far more to reduce boot times than UEFI/GPT by simply resuming a small hibernation file instead or re-loading the entire OS. Still UEFI/GPT should speed up boot time some.
But to the best of my knowledge, you really MUST have UEFI enabled when you install and run on a GPT disk. For one thing, Setup probably doesn't create an EFI (ESP) partition in CSM mode, which is the actual boot code in UEFI. But I am surprised Setup even completed copying files for you, as it shouldn't have been able to write files to a GPT disk in CSM mode.
Read these Microsoft articles for more info on UEFI/GPT:
Understanding Disk Partitions
Windows and GPT FAQ
If I were you, I would start over, certainly choosing CSM/MBR for Win7 and maybe (just maybe) UEFI/GPT for Win8. In either case, would I use the following steps:
1) Set the appropriate BIOS setting.
2) Boot Windows 7/8 Setup and do the DISKPART CLEAN and CONVERT commands you discovered.
3) Re-boot Windows Setup again (so that BIOS sees the converted disk) this time for the actual install. If you run Setup from USB, you need to do the System File copying (or BCDBOOT) described in the guides of this thread. Do note that those guides were written for MBR disks. If you use a GPT disk, you have to account for the extra partitions. If you run Setup from DVD (highly recommended) you it should all be automatic.
Let us know how it goes
Edit: Re your question 3: I too found it VERY difficult to boot CD/DVD while in UEFI mode, took many retries, to the point I thought my DVD drive was defect. I believe it's the same problem again: You MUST have a GPT disk in order to reliably boot anything in UEFI mode. Mine is an older model, though. I'll be curious to hear your results. -
I need help...
I followed the instructions and after trial and error was able to install windows 8 just fin on my series 5 ultra... but unfortunately the iso i had downloaded was not windows 8 pro like it said and decided to re-download the correct iso and re install windows...
that being said, i dont know how i messed up but i am able to load windows 8 on my computer BUT unfortunately i need the usb stick to be plugged in in order for windows to boot... i know i need to move the boot files to the proper partition but other than i dont know how, i also cant delete or format the partition i made following the installation, i will post pictures so you guys can see what i mean


as you can see, when i use the command "bcdedit" you can see where my windows boot manager is installed and you can see in the second picture my partitions and in the third you can see that i dont have the option to delete the partition
any help? please -
Hello, all! =)
Thank you for all the wonderful info in this thread. I read everything and I am preparing to install Win7 in my Samsung 700Z5C-S03PT.
I have made a USB Admin Tool and already created a backup of the recovery partition, so even if something goes wrong, I should be fine...
But I wanted to ask: what is the recommended way to format and install Win7, using a DVD and without messing anything up and/or deleting the recovery partition?
I am guessing that the disk file format conversion and the UEFI settings (switching it OFF) also apply, right?
Should I follow Method #3 or is there a better way?
Best regards!
-
@Chris: If you can wait a few hours longer (till evening US Eastern time) I'll find some links to relevant installation guides for you. Good thing that you have that Recovery backup
@mreyna: It looks like we overlooked your post there, sorry about that. Before I dig into it, let me know if it's still relevant or you moved on. -
@Cris_PIM: The guides on the first page of this thread mostly deal with a workaround required ONLY on models with ExpressCache (Some Series 7 and Series 5) and ONLY if you MUST install from a USB stick (as opposed to from DVD). Since you are looking to install from DVD it will be much simpler, and you can largely forget about the guides on the first page.
There are dozens of other Win7 install guides posted in various threads here, but since we are in the right thread for it, let me just write a new one instead of locating a bunch of links:
Win7 Clean Install on Win7/8-delivered Samsung PCs
Win7-delivered model: BIOS mode (non-UEFI) with MBR disk
Note: If your PC was delivered with Win8, do NOT follow the steps in this guide before reading the section further down and following the conversion steps there.
If your PC was delivered with Win7, that means your HDD is partitioned using good old MBR, and UEFI is already disabled in your BIOS (assuming you or others didn't change it). This makes installation easy:
1) Download and save a copy of Samsung SW Update from here. And download the latest Driver Only WiFi driver from Intel Download Center. The latest WiFi driver as of August 22, 2013 is version 16.1.1. The file should be called Wireless_x.x.x_Ds64.exe for Win7 (x.x.x being the version number). Keep looking till you find that file. (This guide is for Win7, but if you're installing Win8, you don't need to download WiFi drivers, as they're built-in).
Just save these two files for later ( SW Update and the WiFi driver). Don't install them at this point. If your HDD (or SSD) has a separate Data partition, you can save the files there. Otherwise save them on a USB stick or a memory card. Do NOT save them on the current Windows drive, as it will be wiped during this installation.
2) Reboot to BIOS settings (F2) and disable Fast Boot / Fast BIOS (if you have that, you can re-enable it afterwards) and enable Legacy USB Boot (if you have that, you can re-disable it afterwards).
3) Still in BIOS, make sure UEFI is disabled (assuming you're installing on an MBR disk, otherwise read Win8 section below).
4) Boot Windows Setup DVD: Press F10 to choose boot device (or Esc depending on your model).
If your model does NOT have ExpressCache, you can also install from a USB stick. In that case it is best to install from a USB2 port (black). If you MUST install from a USB3 port (blue), check this post and this post.
If your model DOES have ExpressCache and you still MUST install from USB, you need to use the steps outlined on the first page of this thread to avoid a boot problem. Either hanime's guide in the opening post or one of the alternative guides in the second post.
5) When you get to the Partition screen in Windows Setup, format your current Windows partition and leave the others alone (unless you have backed up your Recovery and know how to re-create it, as described in this post).
If your model has ExpressCache and you see a small drive (8-24GB) just leave it alone. The ExpressCache software will automatically create (or reuse) its partition on it.
If you are installing on an SSD with an Intel Rapid Start Hibernation partition (Series 9) also leave that partition alone.
If you want to split your Windows partition into separate Windows and Data partitions (highly recommend if you do not already have a separate Data partition) you can delete the current Windows partition and create a new and smaller one. 60GB should be plenty for most users (mine is 48GB). The Data partition can be added in Windows Disk Management after completed installation.
If you want, you can delete the small 100MB SYSTEM partition (so-called MSR), but Setup will probably create a new one and use as boot partition (flagged Active). If you want to avoid a SYSTEM (MSR) partition altogether (to have fewer partitions) create your partitions with other tools BEFORE loading Windows Setup; OR create them using DISKPART in Window Setup; OR create them here on the Partition screen in Setup, then go back to the Partition screen when Setup announces that it will create additional partitions.
If you leave the current SYSTEM partition in place, it will remain as your boot partition, and Setup will simply add the new Windows installation to its boot menu. This is a very safe choice to avoid any potential boot problems. If you end up with two entries on the Boot menu, you can easily delete one of them after installation has completed.
6) Choose your Windows partition as destination and let Setup do its thing. You shouldn't have any boot problems if you're installing from DVD and/of if you left the original SYSTEM partition in place. When prompted, disable Windows Update (just temporarily until Samsung updates are finished).
7) After all is done and Windows is running, install the WiFi driver you saved in step (1) -- Wireless_x.x.x_Ds64.exe for Win7. It just spins an icon for awhile and doesn't display any confirmation screen. Now get on the network. (This guide is for Win7, but Win8 comes with built-in WiFi drivers that work great already.)
8) Install the SW Update utility you saved in step (1) and let it run. It may update itself to a newer version. Press the big blue One-click button and let it install the following drivers and essential items:
- Chipset
- Intel Rapid Storage
- USB3
- Touchpad
- Sound
- Graphics
- LAN
- Multi Memory Card
- TPM Host SW
- Windows Critical Updates
- Windows common patches
The drivers offered by SW Update may vary slightly, depending on your model. It may not have TPM or it may not need Memory Card drivers.
Some models have separate graphics drivers for the Intel GPU (HD3000/4000) and a discrete GPU (Nvidia or AMD); other models have only a single graphics driver, either because they have no discrete GPU or because a single driver package covers both GPUs.
The Windows updates & patches provide a base level of security patching early in your installation.
Close SW Update after this and let it reboot. Notice that you only had to reboot once, whereas if you installed these drivers manually, you would usually have to reboot many times.
9) I would NOT let SW Update install the following:
- Intel PROSet Wireless: Instead use the latest Driver Only package from Intel Download Center which you downloaded in Step 1. (Win8 comes with built-in WiFi drivers that work great already.) Check the WiFi remedies thread if you have WiFi performance or stability issues.
- Intel High-Speed Bluetooth: Windows has basic Bluetooth built-in, although the Samsung driver does add some features (and bloat).
- Intel Management Engine (Samsung HECI / Intel ME): The basic driver for this device is provided with Windows Update in Win7 (and built into Win8). The Samsung package includes other bloat which you will probably never need.
- Easy Settings: Depending on your model, SW Update may want to install an older version 1.x of Easy Settings. Instead, use the Find Model feature in SW Update to locate Win8 drivers for your model, then save the Settings package for Win8 using the Export function. Inside that package you will find a Win7 folder with Easy Settings 2.x -- which is far better than 1.x. As of Aug 22, 2013 version 2.0.0.55 seems to be the latest, and can be found under model NP880Z5E-X03CA. If you're installing Win8, install Settings instead of Easy Settings. Check the Easy Settings thread for more details.
- ExpressCache (only for models which have this feature): I would install this only after having finished installing everything and setting up Windows. As long as you are still installing and setting up, ExpressCache will only slow down the disk and wear your iSSD with unnecessary writing. Users with SSD as their main drive (instead of HDD) should NOT install ExpressCache at all. Note that (as with Easy Settings) you may be able to find a newer version of ExpressCache under Win8 drivers in SW Update, instead of the one automatically offered for Win7. As of Aug 22, 2013 the latest version seems to be 1.0.94. Check the ExpressCache thread for tips and troubleshooting; but do NOT use the MacDisk partitioning steps in the opening post, as they can cause serious problems in some situations. Recent versions of ExpressCache automatically create their own cache partitions as needed.
10) Now re-enable and run Windows Update.
11) After rebooting let the Windows updates churn for awhile, maybe even reboot again -- some updates need multiple reboots. Then run Windows Disk Cleanup and use Clean up system files (requires Admin account). Note that Disk Cleanup can take a VERY LONG time when cleaning Windows Update or Service Pack files. Do NOT under any circumstance interrupt this process as it can mess up your installation. Also run CCleaner (Google it) as it cleans out some temp files that Disk Cleanup doesn't.
12) Defrag the drive. If you have ExpressCache, you can run BOOTOPT.BAT in the ExpressCache programs folder ( C:\Program Files\Condusiv Technologies\ExpressCache) as the last step -- but only after defragging.
13) Done.
For my opinion on other Samsung provided software (including which ones might be useful) check the post linked here.
For discussion of extreme trimming and lean installation and reducing latencies, check the thread linked here.
Win8-delivered model: UEFI mode with GPT disk
If your PC was factory-delivered with Win8, that means it is setup to boot in UEFI mode (as opposed to the good old BIOS mode) and your disk is partitioned using GPT layout (as opposed to the good old MBR layout). Although Win7 theoretically supports UEFI and GPT, it has created problems for many users -- some of them serious.
You may have a smoother ride if you switch to legacy BIOS mode and convert your disk to MBR. But unfortunately that will lose all its content, including the Recovery Partitions. This also means you will no longer have a means of installing Win8, unless you have other Win8 install media.
If you have a Recovery Backup and know how to re-create your disk (preferably a Bootable Factory Image backup as described in this post) that may be acceptable to you.
Note: This is a serious step you are about to take, which will completely wipe your disk, including its recovery partitions, and which will change the mode in which it boots and runs.
You can convert the disk to MBR by opening a Command Prompt in Windows Setup (Shift-F10) then type the following commands:
DISKPART (to start the Disk Partition manager)
LIST DISK (to show all your disks. Notice which one is your HDD)
SELECT DISK 0 (assuming 0 was the number of your HDD)
DETAIL DISK (just to verify that you selected the right disk)
CLEAN (to wipe the disk)
CONVERT MBR (to convert the disk from GPT to MBR)
EXIT (to close DISKPART)
EXIT (to close Command Prompt)
After this, exit Windows Setup and reboot into BIOS. In the BOOT menu, disable SecureBoot and under OS Mode Selection choose CSM OS. Save these settings.
Now you can install Windows 7 using the steps above, except you have an empty disk. On the Partition screen in step (5) just create a Windows partition of whatever size you choose (I'd say 60GB is plenty, my own is 48GB). Setup will create a small so-called MSR partition (labelled SYSTEM) in front which will be the boot partition. See step (5) above for tricks to avoid that if it bothers you.
After Windows is installed, you can create a Data partition using the remaining disk space.
Note: If you ever need to restore your recovery, you must convert your disk back to GPT and change OS Mode Selection in BIOS back to UEFI OS. After that, boot the USB stick with your bootable Factory Image backup and let it re-image your entire drive.
Please let me know of any errors you notice, or hiccups you run into, when using this guide
Edit 8/22/2013:
* Numerous clarifications and updates throughout guide
* Added links to other relevant posts throughout guide
Edit 7/4/2013:
* Added warning for Win8 model owners to read Win8 section before proceeding.
* Updated WiFi driver info to version 15.8.0
* Find Easy Settings 2.0.0.55 under model NP880Z5E-X03CA
* Find ExpressCache 1.0.94 under Win8 drivers
* Added final cleanup, defrag and BOOTOPT steps
Edit 5/14/2013: Added/changed the following (thanks to apa64):
* Installing from USB2 vs USB3
* ExpressCache and installing from USB
* iRST partition on Series 9
* Separate Win & Data partitions
* Deleting/avoiding SYSTEM (MSR) partition
* Look under NP700Z3A model to find Easy Settings 2.x. -
Hello, i have a Samsung Serie 5 NP530-U3C with a 500GB HDD and a 24GB Flashdrive delivered with Win7.
After formatting all drives i wanted to install Win8 from an USB Stick. Obviously it didnt work, so i followed the steps of the 1st post. Unfortunately the laptop kept on restarting after the samsung logo (and it did some weird "klicking" right before the restart).
I made a screenshot of my diskpart: (picture was too large to directly upload here)
What i noticed:
- on disk 1 there isnt any space used (compared to the 1st post where OP has ~350mb used on his iSSD)
- in "list vol" volume 0 has a different formatting than in the screen of the 1st post
- there is a star (*) on the left side of volume 0 on the bottom of the page
ImageShack® - Online Photo and Video Hosting
I hope that somebody can help me, i tried it so many times now...
regards
Edit: After a few more tries i managed to get the c: to "RAW". Unfortunately now i get the error message:
Failure to copy boot files (at least that should be a quite adequate translation) -
@Dannemand: A couple of things I'd like to add to your install guide from my experience with Win7/Series 9/SDD drive:
- If you repartition the drive to, for example, c: and d: drives (system and data), don't delete the Intel Rapid Start Technology partition. You'll have to create it again to use IRST.
- I could not find Easy Settings 2.x when searching for my model's Win8 drivers in SW Update. I selected one of the models (NP700something) listed instead of searching and there it was. (yeah, I ditched the hacked ES1.x )
- Between steps 4 and 5, when installing from a USB stick: If there's a problem with Windows installer complaining about missing driver and refusing to continue, take the USB stick out, put it in different USB 2.0 port, go back in the install wizard and try again. Worked for me.
Also: Ultimate Boot CD is a good tool to have. It has (among others) Clonezilla for drive imaging and Parted for drive partitioning without data loss. It can be set up as a bootable USB stick.
Thanks for the great information on this thread! -
Thank you, apa64! I made several changes and additions to the guide. See what you think.
Hanime sensibly started this thread because a LOT of users with ExpressCache (mostly Series 7, some Series 5) had boot problems installing from USB, and we kept posting solutions in various other threads. The thread was really meant to address that USB/ExpressCache/boot issue.
But then members would post here "what if I don't have ExpressCache or if I install from DVD?" (Answer: just install, there are no USB/ExpressCache/boot issues). And later would come questions about downgrading Win8-delivered PCs to Win7 (now with UEFI/GPT issues).
The guide I posted the other day was really to address these "normal" installations that do not have USB/ExpressCache/boot issues (as described on the opening page). But I forgot about Intel rapid Start. Not the first time, because I don't have it myself.
As for "outside" partition tools, I use Parted Magic LiveCD for exactly the same reasons you describe. Parted is great. In my tests, Clonezilla did a great job imaging -- but failed when I tried to restore those images. I simply could not get it working reliably.
Otherwise I am a great fan of partition imaging. But so far NO imaging tools have shown that they can restore Recovery partitions and preserve the F4 link. I know I sound like a broken record
Thanks again. Great input! -
Hi Boser. Welcome to the forum. Sorry to hear about your install problems. Let's see if we can sort it out.
First of all: If you have (or can borrow) a DVD drive, I much recommend you try to install anew from that. Installing Win8 from DVD is a very smooth process on most Samsung models.
Assuming that is not possible, and you have to install from USB, the easiest solution to this USB/ExpressCache/boot issue is actually to leave the original SYSTEM partition on the disk alone: Windows Setup will see that original SYSTEM partition (which is already market Active) and write its boot files there.
Do you have a backup of your original Win7 installation you can restore and which will boot and run?
If so, I suggest you do that. Then boot your Win8 Setup USB; format the Windows partition (containing your old Win7); LEAVE the 100MB SYSTEM partition alone; then install Win8 on the Windows partition you just formatted.
I think that will work -- although I am not 100% sure because in this case you're going from Win7 to Win8, not just re-installing Win7.
In any case, please let us know. If this fails we have other options. -
G'day.
I just bought a Samsung NP530U3C-A08AU and would like to share my Windows 8 Pro installation experience on a SSD, which was less complex than what was written in the 1st page. This model is the same as other core i5 Series 5 ultrabooks, but comes pre-installed with Windows 8 Pro and has 24GB iSSD. My ultrabook motherboard has UEFI too.
First off, some of you must be feeling as disgusted as I am to learn that you cannot legally download a Windows 8 ISO without paying some money for it. You purchased the ultrabook with Windows 8 license already in the price, and now you have to pay AGAIN to get a DVD?
For the uninitiated, like myself, pre-installed Windows 8 no longer comes with a product key. This key is embedded in the BIOS itself. When you do a fresh install of Windows 8, the installer will detect the product key and select the appropriate Windows 8 version for you. Apparently the iso named above contains 2 versions - the Professional version and the "Core" version. Some said that if your pre-installed Windows 8 is the "Core" version, it should automatically select that one - I can't comment on that as I have the Pro version and my installation worked.
Once the ISO issue is sorted out, follow the below steps:
1. Create a bootable USB drive to install Windows 8. I tried the Microsoft Windows 7 USB/DVD Download tool (included in the iso), but it didn't work. The USB did nothing when I selected it in the boot menu (F10). I then read that this tool won't work because it formats the USB drive to NTFS format. You need to format it to FAT32 and then copy the contents of the ISO. Apparently this is required because of the UEFI feature, and some GPT/MBR issue which I'm quite clueless on. Read more here: Sean's Windows 8 Install & Optimization Guide for SSDs & HDDs
2. Disable Fast boot in bios, set SSD as the first device (I used a Kingston SSDNow 300V 240GB) and set the bootable USB as 2nd device.
3. Do the F10 thing to boot from USB. If the USB boot is successful, the laptop will restart and the Samsung logo will appear, but without the dotted circles. Might take a minute or 2.
4. Windows 8 installation starts. Select custom installation.
5. I selected "New" on my unformatted SSD and Windows automatically created a few partitions on it - which included a 300MB recovery partition. I then deleted the iSSD partition and left it unformatted.
6. I began installation on the SSD and everything went well.
7. The laptop rebooted, did some checking stuff (if I recall correctly) and then started Windows 8. There was no need to copy the recovery partition from the iSSD to the "350MB recovery partition" stated in the 1st post of this thread.
In summary:
-Get yourself that dammed ISO
-Create bootable USB with FAT32 formatting
-Disable Fast boot in BIOS
-Delete the iSSD partition when you begin installing Windows 8
Tried on NP530U3c-A08AU: Windows 8 Pro, 24GB iSSD, comes with UEFI. It's pretty simple, but it took me a few days to collect all these information to get it going. Hope someone benefits from my experience.
Cheers! -
Can anyone help me? I have a Samsung NP530U3B and followed the instructions in the OP, only difference is that I have a partition on my HDD where I store my personal stuff, and which I'd like to leave alone because I foolishly haven't backed it up. I'm trying to install Windows 7, and the installation goes smoothly until one of the final stages where it stays on "Setup is checking video performance" for ages. (I installed the latest graphics driver in case that was the problem, but it didn't help.) When I restart the computer, it stays on "Setup is preparing your computer for first use" for a while, then I get the error message "Windows could not complete the installation" and tells me to reinstall Windows.
Any help? I was thinking of installing the latest version of all the drivers, but I'm not sure if it would make a difference. Thanks in advance -
Hi quadtec,
Was your PC delivered with Win8? If so, that may explain why you're having problems. Your disk needs to be converted from GPT to MBR layout for a smooth Win7 installation -- which unfortunately will lose all partitions on it. You can follow the steps in this post (on the last page of this thread), first to perform the conversion, next to make a clean install of Win7.
But you REALLY need a backup first, both of your Data and your Recovery. In fact, if you're going to convert your disk to MBR, you need TWO backups: You always want two copies of critical data, and you know one will be lost in the conversion.
But first let me know if this was a Win7-delivered or Win8-delivered model, that determines everything. Also, if you still have your Recovery intact and are able to boot it with F4. -
It was delivered with windows 7. Yep, Recovery is still intact and bootable.
Thanks for your help! -
OK, that's great you still have your Recovery. And the fact that yours was a Win7-delivered model means you don't have to wipe your disk at this point.
I recommend you install from DVD instead of USB. That eliminates one potential issue. If you don't have an official Win7 DVD, I recommend you download a fresh ISO from Digital River (they're legal) and burn it to a DVD.
Then you really should be able to just install using the steps I linked in my last post. You don't have to worry about the Win8-related GPT-MBR conversion, just ignore that.
It's probably not a bad idea to first use Recovery to restore to factory, so that you start from a known state. That would also allow you to backup your data to an external drive before experimenting any further. But PLEASE be careful in that case to use the Recovery option that preserves your data!
Keep me posted on your progress. -
My problem is that I don't have a DVD drive, and I'd rather not purchase an external one unless it's absolutely necessary. I'm currently backing up my data to an external HDD, so should I just restore to factory settings when I'm done?
GUIDE: How to install Windows 7 or 8 via USB on NP700Z*
Discussion in 'Samsung' started by hanime, Nov 25, 2012.