
I was wondering if it would be easy to replace a crack lcd on this laptop and if you had any advice on steps about do so. thanks in advance.
-
The silver bezel on the LCD with the SAMSUNG logo is actually stick on with just adhesive. I believe if you were to take it off, there will be screws exposed to enable panel replacement.
YMMV. Your responsibility if anything goes wrong. -
Hello !
I bought a NP700Z5A in France - I'm French - a few months ago.
I wanted to know if it was possible to set the DVD driver region free ? It is set as region 2 for Europe, but I have a few region 1 DVDs that I'd like to play.
If this is complicated - as I believe it is with recent laptops - could it be possible to connect an external dvd player set region 1 to read region 1 dvds, while keeping the internal player set on region 2 ? Would the laptop let me do that ?
thanks for your help ! -
Hey everyone! Hopefully this helps someone. Anyways, I found this thread after my friend dropped my NP700Z5B 4-5 feet onto concrete and dented the corner of the lid... It was not even two weeks old yet! Haha, oh well. $#!+ happens. Since this thread didn't have a screen/lid disassembly, and Ynkyong1 (OP) said there might be some screws under the inner "SAMSUNG" border, I decided to go for it.
 Any of the photos can be linked to my PhotoBucket album where you can see all of the photos I shot, but didn't feel were necessary to this quick disassembly guide. If you have any further questions, you can PM me, as I don't frequent these forums, but I'll get PM emails. Also, you can add me on GTalk at
[email protected].
Any of the photos can be linked to my PhotoBucket album where you can see all of the photos I shot, but didn't feel were necessary to this quick disassembly guide. If you have any further questions, you can PM me, as I don't frequent these forums, but I'll get PM emails. Also, you can add me on GTalk at
[email protected].
Here's what I started with. It's bent kind of back into shape, but still rubs... At least I got it to stop catching and bending more, shortly after its plunge from the shelf.
![[IMG]](images/storyImages/IMG_2570.jpg)
Anyways, I started with the nail file tool of a Swiss Army knife and worked my way around the screen breaking the thin, metal strip free. When I got to the bottom side, I masked the screen with painter's tape (sticky, but no residue) to protect the screen.
![[IMG]](images/storyImages/IMG_2581.jpg)
Next, across the bottom and top, there are light gray strips reading "Opening Direction" telling you which direction to work with little arrows as to where to pry. Plus, with a close look, you can see the clasps along the edge, too.
![[IMG]](images/storyImages/IMG_2583.jpg)
![[IMG]](images/storyImages/IMG_2585.jpg)
Go to the back edge where the lid meets the hinge and insert either a credit card or the nail file to pop the plastic free from the lid.
![[IMG]](images/storyImages/IMG_2586.jpg)
Now, proceed to shut down just like I did. KIDDING! Do this a before you start.
![[IMG]](images/storyImages/IMG_2588.jpg)
Along the top edge, there will also be a light gray strip just like the one across the bottom. Pop it free just like you did with the bottom. Be more careful here as this one is thin on the top and bottom of the webcam.
![[IMG]](images/storyImages/IMG_2590.jpg)
I'm not sure if it's absolutely necessary, but I removed the bottom (as shown in the OP) and just taped my screws down so that the same screw goes back in the same hole. Not sure if this is necessary here, but I've gotten in this habit from working on small engines where it's important.
![[IMG]](images/storyImages/IMG_2591.jpg)
Now that the bottom light gray strip has been popped free and the backside popped free of the lid, I gently pried the hinge enclosure free.
![[IMG]](images/storyImages/IMG_2594.jpg)
Here is a shot of it removed. There is something installed inside it and wired it, and it has limited mobility. Excuse the shallow depth of field, I didn't feel like tightening up the aperture and was quickly shooting with auto mode.
![[IMG]](images/storyImages/IMG_2596.jpg)
On each side there are 5 screws, which I oh-so nicely circled in PhotoBucket's editor, I've already removed one in the photo. Remove these to detach the screen from the hinge.
![[IMG]](images/storyImages/IMG_2598-1.jpg)
![[IMG]](images/storyImages/IMG_2603.jpg)
Now, there are just 4 screws holding the LCD down. I forgot to snap photos, but if you've made it this far, they're damn obvious. The LCD also clips in along the sides. Very carefully pop it free along the sides with the nail file/credit card.
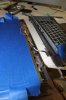
My screws laid out. The 4 large LCD screws, the 2 black hinge screws, and then the 4 hinge screws from each side.
![[IMG]](images/storyImages/IMG_2609.jpg)
![[IMG]](images/storyImages/IMG_2605.jpg)
I thought the ribbon cable for the webcam would be easy to remove, as I've popped many free in various laptops and cell phones... Mine wouldn't budge. Whatever, it's glued down anyways.
![[IMG]](images/storyImages/IMG_2606.jpg)
To get to the corner, I had to pry up the decorative silver piece seen on the inside, and the black piece that mounts it. They're both connected with little snap clips (right name? IDK, just take a peek). Anyways, I broke some of them when it hit this corner, and maybe broke another/more while disassembling it, but whatever, that's what epoxy is for!
![[IMG]](images/storyImages/IMG_2608.jpg)
Anyways, I carefully worked it into slightly better shape than it was before, but being so thing and brittle, I didn't want to overwork it and add another crack from the initial crash landing.
Now, for the metal border around the LCD... That glue is a PITA. I soaked it in Goo Gone and scraped it with the back edge of a butter knife, soaked it again, scraped it, soaked it, etc. until it was all removed. Now, I had to re-attach the webcam protective film. I whipped up a tiny batch of epoxy, 1 drop of each part, then applied just a bit of that to each side of the film and cleaned it up after this photo.
![[IMG]](images/storyImages/IMG_2614.jpg)
Now, I made another batch of epoxy (it's 5 minute set) and quickly put many, tiny dots all around LCD frame and the light gray strips from before. I pressed the border down with whatever small, heavy objects I could reach without standing up and monitored the metal border as the epoxy set up (15 minutes to harden). Now, it isn't as pretty as a factory install, but it looks great unless you run a finger across it when you can feel some slight irregular lumps, but again, whatever.
![[IMG]](images/storyImages/IMG_2625.jpg)
Here's what I'm left with now... It's far from pretty, but it isn't flared outward any longer and doesn't have sharp corners/edges. The needle nose pliers I used to work it chewed up the metal, so I hit it with some needle files I had to smooth out the burrs. Going into college next year, I don't exactly have the disposable income to ship it off to be fixed professionally, although I will happily be accepting a donation of a replacement lid if anyone feels inclined to do so haha! IMO, is purely cosmetic, and just a corner, so it doesn't warrant the money for a repair.
![[IMG]](images/storyImages/IMG_2630.jpg)
-
Hey guys,
I've scoured both Series 7 disassembly threads now and couldn't find what I was looking for. Basically, i've somehow gotten a small dent in the palm rest on my Series 7 . Its relatively minor, but i'd like to be able to get to the bottom of the palm rest and push the dent back out. Is this something accessible from removing the bottom panel, or is there another way to remove it? Or is there even a way to remove it/get under it?
Thanks for any help!
-
The palm rest is under the battery, so follow the guide and remove the battery. But whether there's a layer of plastic is another issue because mine only had a plastic palmrest.
-
does anyone know the model of the screen panel? i need to get replacement screen for this
-
Could you please confirm me if someone has increased the memory until 12GB?, I contacted Samsung Global Support and they told me that the Samsung Chronos Series 7 just supports 8GB Maximun.
Thanks in advanced -
@fabicarm: although I haven't tried it myself, I've read lots of posts on this forum saying that series 7 DOES indeed support 12GB. 4GB are soldered, but the 2/4GB pre-installed in the slot can be replaced with an 8GB module.
I also remember a post by John Ratsey (moderator and oracle here) saying there is only limited speed loss because it still does asymmetric dual channeling.
If you search (use Google with site: notebookreview.com) I guarantee you those posts are there.
Edit: first hit on my Google search (on my phone even): http://forum.notebookreview.com/sam...eres-np700z5c-ivy-bridge-109.html#post8822357 -
I confirm there are plenty of reports of people running with 12GB. I believe that 20GB should also be feasible if you can find a 16GB module. Look up the CPU spec on the Intel website and I expect it will say that it supports up to 32GB RAM (ie 2 x 16GB). Few in Samsung support actually understand the technical aspects of the products they are supporting (reading through these threads should be compulsory homework for them in order to broaden their knowledge).
I refer people to this table I made last year for my T420s. There are benchmark results for various RAM combinations. I'm sure that the results are applicable for combinations of larger modules but maybe a combination of 4GB + 16GB would have lower average bandwidth than 4GB + 8GB.
John -
I managed to break a screw while closing my NP700Z5C-S01US up and i was wondering if you all could point me in the direction of some screws i can buy to replace it.
I need one of the black screws that hold the case on. My estimate is that they are 7mm screws. I also stripped a silver 5mm screw that holds the hard drive caddy in. Would something like this work?
Samsung NP-Q430 Laptop Screw Set Of Screws ScrewSet OEM on eBay!
Also as a heads up to anyone opening theirs, the screws are fragile!!! The corners of the plastic enclosure are also fragile and cracks begin to appear after it has been opened several times (any advice on touching that up would be appreciated as well! -
The screws use in all notebooks are in a finite number of standard sizes. Perhaps a set such as this will give you a lifetime supply. This listing shows both M2 x 7 and M2.5 x 7.
John -
Thank you very much!
-
I tried to update firmware to 15FD while running windows 8 and it broke my laptop. In the process of update, the firmware software disabled the keyboard and power button, but while in the process of update the program hanged. There was no way to turn the laptop off. I inserted a pin in the tiny hole given at the bottom of the laptop to disconnect the battery and the laptop turned off. Now I am unable to turn my laptop on even with plugged in. Only I see is a small indicator for battery flashing green and yellow besides power button when the laptop is plugged in. Help please.
-
I think the BIOS update failed. It's time to contact Samsung support.
John -
Exactly the same problem for me, running Windows8. I am waiting for Samsung support call back...
-
@tvn595 let me know what they say. I am out of the county and will be back after two weeks. I will call Samsung then.
-
Just to add to this discussion, I updated to 15FD under windows 7 and the update went fine. It is amazing that samsung would release this update without testing on windows 8. Looks like i got lucky.
However, i noticed a new issue. While in windows 8 i have noticed the fan cycles A LOT more than it used to in windows 7. I don't know if this is windows 8 or the bios update. I had the "silent' option off before in windows 7 but the fan rarely became loud anyway unless i was playing a game. Now, in windows 8 with 15FD, the fan cycles when loading complex webpages. It is annoying because it comes on for a second with the cpu jump associated with every complex webpage load then immediate goes back down to quiet. If i had to do it over again, i wouldn't have updated just because of this annoyance alone. The pointless revving of the fan is driving me crazy.
Edit:
Could this be the Intel ME interface driver causing it? I installed it, but now don't know how to uninstall it to test if anything would change. Sorry to hijack the thread! -
Just an update. Installing windows 7 back fixed the fan problem. I won't be upgrading to windows 8 because of that annoying issue alone. Oh well...
-
They are coming to take my chronos tomorrow... I will let you know the following...
-
I've got my Chronos back fom Samsung support, they have replace the motherboad. BUT : I have no Express Cache SSD anymore, I have Windows Home instead of Windows Pro, and some screws are missing...!!! I'm very disappointed, I've called then once again and I'm waiting for their answer...
-
They may have replaced a board without the iSSD.
-
Hi everyone,
I recently replaced my Samsung Series 7 Chronos's LCD after spill hot tea on the old screen. After reassembling the new screen, the thin metal strip with "SAMSUNG" written on it is not properly sticking because of worn adhesive. Can you recommend me an adhesive that is similar to the one used by Samsung to fix the thing metal strip? Thanks. -
I sent my laptop for repair on 12th December to Samsung Canada (Mississauga), after trying to update bios 15FD while running windows 8. I didn't hear anything from them and today I called them. Apparently, they are very late because of holidays. I will post their repair standard when I will get my laptop back.
-
yknyong1 THANK YOU for the guide.
What's PLL name? -
any pictures of replacing the keyboard?
Or at least of removing the mainboard -
Maybe someone has a screw diagram for removing the mainboard?
-
Hi Yknyong and John Ramsey, thanks a lot for this gr8 thread, it has saved me many times. BTW, I ran into problems...First, I had a caddy installed in the ODD, but it stopped working after 1.5 years. I got 2 more caddies, even those are not working. Most likely the ODD Sata port is gone. How to replace that? Any suggestion?
2nd problem- My hinge is getting loose, ideas on how to fix it? Following the pictures from the guy fixing his LCD, I can take out the bottom strip of the LCD, but then what? -
It's unusual, but not unknown, for an SATA interface to die. A few people have hit problems when doing a drive swap. Perhaps the cable or connector onto the mainboard is a bit fragile.
Are the hinges wobbly (which might be caused by loose screws) or floppy (not enough friction)?
You can look through the parts list at samsungparts.com (I've linked to the -S03US which is a longer list than the -S02US). I can see hinges on the list so they are considered a replaceable part. How to do it might be explained in the service manual which is also on the parts list. And the manual might give a clue about the SATA connector.
John -
Hello,
Definitely a newbie to anything computer assembly but my base on my Chronos 7 has been having issues with the heat warping the back, so the screws keep coming out. I had to keep replacing the screws until eventually the area for one of the screws became too warped and no screws will stay in, so the base keeps coming up. This is effecting the charger and it has trouble staying in (as well as I believe effecting the ability to connect to USB devices). The screen/lid is also loose because of this, occasionally messing up the display entirely. Also, the plastic above the USB ports on the left side and the plastic on the top of the internet port has broken off (making it even worse than it already was with it's flexible port). To top it off, the trackpad has been having issues as it seems either over-used or just stuck on the left hand side.
I replaced the harddrive recently so I'm really not willing to do anything other than fix the current problems.
I was wondering how difficult it would be for me to buy a base and try to fix these problems on my own as a beginner? Or should I buy the parts and hire someone? The fact that the holes for the screws are warped may mean that replacing the base may not even solve the problem?
Just wanted some advice. Thanks. -
It must have been running very hot for heat to start warping parts of the chassis.
"Loctite" is made for stopping screws coming loose but may not work if the holes have worn too much in which case you might be able to use a tap to make them a slightly larger screw size.
Samsungparts.com says the base (Unit housing bottom) is no longer available but you can use the part number BA75-03361A to search for other sources.
John -
Hi everyone! It recently appeared a line of pink pixels on my 700z5a screen. I think it's bad contact because when I press it on the lower part it goes away.
Now the thing is, from redsox985 pictures, this location seems to match the screen connector. It just seems to be bad contac. Since it's out of warranty do you think I should open the whole thing and try to unplug/plug it or just leave it?
Thanks!
duarte

-
I agree with your diagnosis about the screen connector.
Your decision about whether to try to fix it depends on (i) how annoying the problem is and (ii) your willingness and confidence to get the bezel off the display. I haven't checked the details but it shouldn't be too difficult if someone has done it previously and provided some instructions.
Johnduartem likes this.
Samsung Series 7 Chronos NP700Z5A Disassembled: Parts analysis
Discussion in 'Samsung' started by yknyong1, Dec 16, 2011.


