Hi,
I just got a new Portege R830-P55X. I was wondering if it is possible to replace the optical drive with an HDD/SSD. Is there some kinda adapter that can do this? I want to buy an SSD for my primary drive and want to move a standard HDD to the optical bay. Is this possible?
Thank you
-
-
Which model / thickness (7mm or 9.5mm) is the optical drive? If it is the latter then you may be able to replace it using one of these caddies (the overall unit should be compatible but it may need modifiying). If the optical drive is 7mm thick then I don't know of any caddy.
John -
Do you know how i can find out? I tried looking in the manual but it doesnt specify the size of the optical drive.
Thanks -
Either measure the thickness or get the model number from Device Manager and Google the specs for that model.
John -
Hmm, its a MATA UJ8A2ES DVD RAM drive. Googled it to no avail. I measured the size physically and it comes to 10mm so I am guessing its the 9.5mm model. But I dont know internally if it will be smaller. It's hard to differentiate between 7mm and 9mm

-
Removing the drive to get an accurate measurement is quite easy. But when it looks like 10mm it appears to be 9,5mm. Someone noted that the R700 wired the DVD port via USB, so then putting another drive in there would fail, I guess.
But I would be very interested in that. The laptop would then be quite the killer Laptop for me. -
Can someone with the R830 look in Device Manager? My R700 has the 7mm UJ-844S USB drive. It specifically mentions USB in the description and, FWIW, HWiNFO32 can't see the drive at all (because it's not SATA).
John -
I'd be interested to know if the tecra R840 could have the optical drive replaced, even if the Portege r830 can't...
-
I went to Device manager--CD/DVD ROM drives--- shows MATA UJ8A2ES DVD RAM Drive
I even double clicked it, but don't know where the info about size and connection type is. Do you know where in the device manager I can find that out? Thanks
But the R700 and R830 pretty much have an identical chassis, so they would most likely have the same size optical drive, yes??
Also, if the optical drive is connected through USB, can't you just add a hard disk there and connect it to a free sata port instead of the usb? -
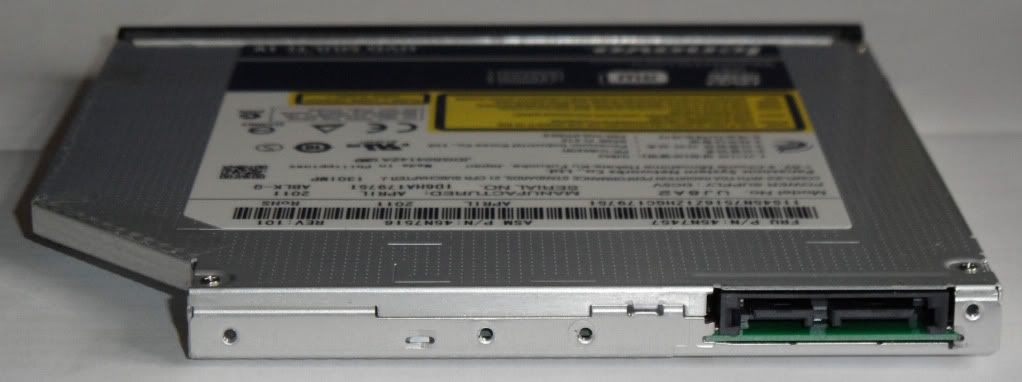
That is has no USB in the name is promising. HWiNFO32 should list it under the SATA drives. However, the best way to be sure is to remove the ~20 screws to get the base off the notebook and then you can inspect how the optical drive is fixed and connected. Below is a photo of the back of a 9.5mm thick SATA optical drive.

John -
Would the dimensions for the cd drive caddy also apply to an R835-P56?
-
Yes, they are exactly the same chassis design, so hey should be the same sized drive.
I haven't had a chance to open up my laptop yet. Whe I find some time for it, I will post the dimensions here. -
Would this caddy work?
NEW SATA 2nd HDD Hard Drive Caddy 9.5mm Universal DV22 | eBay -
That caddy should work but the one remaining uncertainty is whether there is enough room in the chassis to take the combined thickness of the caddy base plus 9.5mm drive. This may be around 10mm, perhaps a little more. We won't know for sure until someone buys one and tries it.
John -
Is there a guide to disassembling the laptop to get the dvd drive out?
-
If it's like the R700, remove the ~20 screws from the bottom which will then lift off. You may need to first remove the RAM cover to get at any screws underneath.
John -
Thanks, is there a link to the guide? Any ribbons I should becareful when lifting the bottom cover off?
-
Opened it up, the R835-P56X optical drive is SATA confirmed. Two small screws hold the connector to the drive. The connector itself is a ribbon cable.
-
what does this mean for the replacing drive idea...? (I don't know an awful lot about it. I'm just stalking this forum until I can decide what computer to buy, and if I can do this, it might tip the scales...)
-
It means, a 9.5mm drive may fit and that the connector to the DVD drive is SATA (had it been any other proprietary connector, the hdd caddy thing would not work).
-
I ordered the one on ebay and I will be trying it once I get it.
-
Hi all,
Just a couple of question:
- If you replace the DVD with an SSD you will install Win on that. How do you do it without the DVD drive? External drive?
- Do you avoid the warranty opening the case?
Regards -
Usually you replace the old HDD with the SDD first then you can use the optical drive to install Win7. The point of the caddy is so that you can install the old HDD back and use it without carrying external drives.
I don't really know about voiding the warranty. Didn't see any warranty stickers when I opened it up. -
let us know how you get on, i have a r700-184 (uk spec) and have already done the SSD upgrade, so down to 20gb free space now i've got all my files over onto the 120gb SSD, so not exactly future proof! re-installing the original 320gb hdd into the optical bay would be a right boon
in device manager my optical drive is the matsua one, listed as ATA drive, no S in front????lol! but no mention of USB either! -
It won't be possible for the R700. I asked Toshiba directly.
-
Ok, I just installed the 9.5mm caddy. It works! There are some slight adjustments that will need to be made so it sits flush within the laptop. Right now it sticks out 1-2 mm out the side of the laptop. I used the original bezel from the CD drive and slapped it on the front of the caddy.
Problems encountered: There are 3 brackets that screw into the original CD drive that secure it to the laptop. I was only able to screw 1 out of 3 brackets into the hdd caddy. It is pretty secure but not as secure as the original cd drive. Overall I'm happy and right now I'm running with two hdds.
Let me know if you have any questions. -
so if it works with the r835, i wonder why toshiba seem to think it wont with the R700??
-
Thanks for the update.
Given that they won't have thought of this possibility, their response would be to say that it won't work. It's not as if it is a one-screw task to do the swap either, unlike the media bay HDD options offered by some manufacturers.
Also, with the R700 there are two optical drive options. If you have the Express Card slot then the optical drive is 7mm thick. However, if you don't have the Express Card slot then I believe (but am not 100% sure) that the optical drive is 9.5mm thick. So first, check the optical drive thickness and, if it is 9.5mm, unscrew the base, remove the optical drive and see if the connector is SATA.
John -
I took off the cover of the hdd caddy (3 tiny screws). This allowed a better fit into the laptop and now there is no distortion or protrusion from the hdd caddy. You can't even tell that the cd drive has been replaced and everything is flush. Removing the top cover of the hdd caddy also allowed me to install another cd drive bracket which secures the hdd caddy to the laptop. If anyone has any questions feel free to ask.
-
ah right, i may well struggle then as i have the express card slot, so guessing the slimline dvd drive, altho as said it says in device manager is the 'ATA' version, no mention of usb. i will have to strip it for a look see!
-
Can you please create a installation guide with photos? Being able to swap the optical drive for a caddy raises the profile of the R830 considerably. I had previously assumed Toshiba applied the same USB style setup as the R700 appeared to use.
-
For those interested, I started a new thread here where I will answer any questions regarding the process:
http://forum.notebookreview.com/tos...al-drive-bay-portege-r835-p56x-hdd-caddy.html
Sure I'll try to write a guide for it in my spare time.
Materials Needed before hand:
2 phillips screw drivers (one for the big screws and other for the tiny ones) (preferably magnetized or just stick a magnet piece on it to magnetize it)
9.5mm HDD caddy
HDD
Warning: I do not take responsibility for any broken laptops/drives/broken fingers etc. Do this at your own risk. Be sure to take any antistatic precautions when handling any of the internal laptop components.
This guide assumes that you have already installed the SSD and would like to use the extra hard drive in the optical drive bay. It also assumes you are comfortable working on computers and know not to randomly touch stuff when the laptop is open.
Installing ODD Caddy for Toshiba R835-P56X (I do not know if this works for R830, R835-P50x, R835-P55x but there's a high possibility it should):
I ordered the DV22 caddy off ebay. It was around $16. There is a DV21 caddy and it should work as well (it just has different color schemes).
NEW SATA 2nd HDD Hard Drive Caddy 9.5mm Universal DV22 | eBay
First unplug the power cord from the laptop.
Flip the laptop and remove the battery: There are two latches.
Now with the laptop still flipped, orient the laptop so that the battery compartment is facing away from you.
Unscrew the 20 or so screws with appropriate screw driver (I used one from a Glasses repair kit+a magnet).
-You will notice there are three panels in middle. You will have to unscrew those since they hide additional screws underneath.
-One of those panels give access to the ram, the other for the hdd, and the smaller one I don't know.
Now after you have unscrewed all the screws, you can now slowly open the laptop from left to right (with battery compartment still facing away from you).
This should be done very gently and it should come off easily (if not you may need to check if you unscrewed everything). There will be some slight resistance as you lift it up since there will be foam padding underneath the bottom cover.
After you have gotten the bottom cover off, you will be staring at the inner workings of your laptop. You will notice the Optical drive is in the lower left corner of the laptop. Gently lift the drive but take note that it is still attached to the SATA connector by 2 screws. Remove the screws and gently remove the SATA connector from the back of the drive.
After that you should be able to take out your optical drive. You will note there are 3 separate brackets screwed into each of the sides of the drive.
(NOTE: Top and Right Brackets were removed in the picture)
These brackets hold the drive in place when it is in the laptop and you will remove these for later usage.
Picture of where Brackets should be from side
![[IMG]](images/storyImages/brackets.jpg)
Also the front bezel is removable by gently prying it off (had the bezel facing me and I pried from right to left).
Preparing the HDD CADDY
Now with the DV22 (DV21) caddy in hand, install the HDD (not going into details here since you should be able to do this). After installing the hdd and securing it with the provided screws, you will need to remove the top cover of the HDD caddy. It is held by 3 screws on the top. Unscrew those and remove the top cover. The top cover serves no purpose and it prevents the caddy from sitting flush within the laptop.
Remove the bezel from the caddy and replace it with the one you just removed from the original optical drive.
Now install the brackets onto the caddy. The screw holes on the caddy are off by 1-2 mm from the original optical drive. The only allows you to install some of the brackets. Note: you do not need to install all the brackets just some so that the drive is secured into the laptop. I was able to install 2 of the 3 brackets. With the caddy face down and bezel side facing to the left, the brackets I was able to install was:
(a) the right side bracket underneath the SATA connector and (b) the top side bracket (toward the usb 3.0 port). One thing you should note is that the right side bracket should not tightened all the way and should be a little loose so there is flexibility when installing the drive.
Now that you have caddy with the hdd and brackets installed, you can connect the SATA connector ribbon screw in just enough to hold the connector in place. And gently place it into the laptop. Make sure the right side bracket loops through the plastic nub that is on the laptop body there and that the holes of the bracket align with the screw holes of the laptop body. There is some wiggling room but the most important part is to make sure the caddy sits flush and that the holes of the brackets align.
After this, you are done. Put back the bottom cover of the laptop. Going from right (VGA port side) to left (USB3.0 side) and screw the bottom cover and you are finished.
Enjoy and I will add in the pictures later.Last edited by a moderator: May 8, 2015 -
I'm considering picking up a Portege R835-P56x and this project looks really interesting. Thanks for the guide.
I just have one question. I get the impression you didn't have to touch the original HDD at all and you're still running your OS off of that. Is that right?
Or did you swap the original HDD for the new SSD and install the original HDD in your new caddy?
What kind of SSD did you get, just out of curiosity? -
Sorry I didn't make it clear in the guide. I took out the original hard drive and replaced it with an Intel 510 120Gb drive. I then placed the original hard drive into the hdd caddy.
While it is possible to install an SSD into the hdd caddy that would be kind of a waste for SATA 3 SSD to be used as a secondary drive instead of the OS drive. I also have shown that the primary hard drive is connected via the SATA III interface. So SATA III SSDs can be used to their full potential. [7/15/11 SATA III has been shown to be disabled by Toshiba]
I do not know if the SATA connector to the optical drive is SATA III, I do know that the regular HDD that I have in the caddy is operating at SATA II speeds (probably due to the hard drive being a SATA II drive ). -
Very cool. I just placed an order for the laptop and a caddy. Looking around for a good deal on a SSD. This is going to be fun.
edit: Went with a Crucial M4 128GB -
Assuming I can restore Win7 from a system image created on a USB drive (or install from a USB DVD), is there any other reason not to leave the HDD in place? I would like to simply put the SSD where the optical drive was. A SATA drive is a SATA drive so it should boot from the SSD. I can switch the drive letters.
I was thinking that it would be slightly simpler this way to restore the original configuration for warranty purposes. -
FYI, if anyone else is wondering, I just did this with an R700 and it definitely has standard SATA ports -- not sure what the USB people were smoking...
Replace Portege R830 DVD drive with HDD/SSD?
Discussion in 'Toshiba' started by santhosh.sivajothi, May 31, 2011.