Actually, when I run diskpart, it shows 3 out of the 4 ssd (59gb, 59gb, 59gb). Disk 0 has zero space but disk 1 and 2 have 59gb space. I am in IDE mode.
-
It seems Sony has made it not possible to boot from an EFI partition still. I think this was done with the previous Z as well when they released the new firmware that enabled VT.
Tried booting an EFI partition from a USB stick with no luck. -
Yes, UEFI boot is option is actually there in the setup, but:
This "Opcode 0x27 (2)" is a check of something in a different configuration variable store (not the "Setup" variable we are changing). This EFI opcode is called EFI_IFR_VARSTORE_DEVICE and it means that the setup application is checking somewhere else for a TRUE condition before showing this.Code:[b] Suppress If Opcode 0x27 (2) [/b] One Of [0x7e<1>] 'UEFI Boot' \Help text: 'Enable/Disable UEFI Boot Function' Option 'Enabled' = 0x0 Flags 0x1 Key 0x0 Option 'Disabled' = 0x1 Flags 0x0 Key 0x0 End One Of End If [b]Suppress If Opcode 0x27 (2)[/b] One Of [0x7a<1>] 'Boot Priority' Option 'Legacy' = 0x1 Flags 0x1 Key 0x0 Option 'EFI' = 0x0 Flags 0x0 Key 0x0 End One Of End If
Now, you can directly set VSS regiser 0x7E to 0x0 and register 0x7a to 0x0 (in the same way you set register 0x258 to 0x1 to show Advanced menu) but this has no effect - UEFI boot will not work. I tried it.
I suspect that the EFI console has been compiled out of the firmware. But I still have to investigate that - I will download Tianocore EFI (which is a basis for all EFI firmwaers) to gather better understanding of this opcode 0x27.
Btw, if you only use Windows/Linux, you can disable "USB Legacy" in the "USB Configuration" menu. This will speed up the boot a bit, because EFI will not load USB emulation for DOS.
There is also Quick Boot flag:
I also enabled it...Code:Suppress If Opcode 0x27 (2) One Of [0x72<1>] 'Quick Boot' \Help text: 'Allows InsydeH2O to skip certain tests while booting. This will decrease the time needed to boot the system.' Option 'Enabled' = 0x1 Flags 0x1 Key 0x0 Option 'Disabled' = 0x0 Flags 0x0 Key 0x0 End One Of End If
Check the dump text file in the first post. You can also switch graphics logo OFF, and then also in Windows Boot configuration you can disable boot animation - this will eliminate ugly flickering we have with the new Z, and also speed up boot a bit more.gr9zev likes this. -
I think I know what the problem is! If you enable Raid configration again, and go to "SATA configuration" - you will see this:
SATA Port 0 - SSD
SATA Port 1 - SSD
SATA Port 2 - SSD
SATA Port 3 - DVD/BD
SATA Port 4 - SSD
^ See, last SSD is actually Device #5 - and IDE mode usually supports only 4 SATA ports. Can you try swapping DVD with SSD so the SSDs are 0, 1, 2 and 3? But this might not work if Insyde prevents any "software" swap - in this case the problem is unsolvable as it is due to port connections. -
Also,
One more interesting thing to enable is VT-d (which is accelerated virtualized I/O, for VMs that support it, of course), it is controlled by register 0x1A9 and to enable it the register should be set to 0x01
But, if you already enabled "Advanced" menu, you can find it in chipset configuration, so no need for "poking"")
You can use advanced_menu.py to change registers manually e.g. ones that are hidden even when Advanced menu is ON (just replace value of PATCH_OFFSET with the register of choice, and value of PATCH_VALUE with the desired setting). Of course, standard disclaimer "you are doing it at your own risk!" still applies
-
Anyone have any luck on enabling the TPM Function?
Suppress If
EQ [0x68<1>] == 0x0
+Grayout If
Opcode 0x22 (6) 01 00 01 00
Text: 'TPM State','Not Installed' Flags:0x0 Key:0x0
I set 0x68 to 0x1 and still no dice. It should work yes? (previous state was 0x0). -
Hmmm..interesting. I change to AHCI mode and 4 separate drives were recognised. Obviously I cannot use HDDerase in AHCI mode, so I tried hdparm. I actually set the hard disk password in BIOS and as a result the security mode is "Change" (instead of "No Accessed"). However, it seems the drives are "frozen" so no change can be made even secured erase is supported (I can see this information using hdparm -I /dev/xxx). I wonder if something can be done to "unfrozen" the drives. TIA
-
I am also checking this for Digital_Jedi_Rx - but unfortunately after trying to force it, it indeed looks like TPM is not there. Setup is using Opcode 0x22 to query for presence of the TPM in some other configuration store.
USA VPC-Z BIOS I have already has register 0x68 set to 0x1 - so it is ready for TPM.
But, the "Opcode 0x22" check fails - which I suspect is the actual check for hardware presence.
I guess the only way to be sure would be to open and inspect the USA Z for the presence of TPM chip. But I really find this weird, not to ship Z with TPM... were they high or something? -
Hm, I agree, it is a bit weird... guess its time to open it up and look for the TPM?.. =/ but anyway if Opcode 0x22 failed, shouldn't it be there but Grayed out/?
-
This is totally weird... Here in Germany when I was ordering my CTO Z, there was only one "Security Package" which includes both fingerprint sensor and TPM.
Just checked the Japanese site ( http://www1.jp.sonystyle.com/Product/Computer/Vaio/Z/VPCZ11ZHJ/) - it is the same there... Fingerprint sensor and TPM come in the same package.
It is beyond me why would they do any different in the U.S. configurations... -
Indeed it should be only grayed out, but still visible in the "Security" menu if the 0x68 is set to 0x1...
-
I think that maybe something sets 0x68 back to 0, have you tried redumping after making the change? That would probably explain it. I don't exactly have the time to redump right now.
-
Wait, so do you have a German Z or US Z, and do you have a TPM present?
-
I have German CTO VPC-Z11... (actually, I think it is the same model for entire Europe)
BIOS is the same actually for U.S. Z and German Z - but German Z appears to have TPM, and at least some USA Z's appear not to
I also have two USA BIOS dumps... but looking into them, there is nothing out of ordinary in the VSS store...
I am not really sure how would fingerprint sensor work... I thought it stores fingerprint data on TPM ?!?!
As for the 0x68... I cannot really check any possibility for system resetting it back to 0x00 as I have Z with the TPM - and there it stays set always. -
On other systems (ThinkPads & HP) you have an option to save the fingerprints to a local database or to the TPM, if the TPM is present it still uses a unique ID (From the TPM Chip) to encode and is used as the seed for additional encryption, this prevents when you have "encoded" a drive from it being used in another system.. as the private/public key pair is wrong
BTW my asian VPC-Z also has TPM onboard -
I just completed a dump, it looks like 0x68 got reset to 0x0... strange behavior.. I guess someone else should verify. However, I set 0x69 to 0x2, it persists, and still no TPM....
-
That's weird indeed.. Maybe something else checks this before setup is even started...
Also, I am looking into the list of modules (EzH2O 2.1.0.13) and it appears that EFI console is indeed missing from VPC-Z11 firmware. This explains why it won't boot to EFI.
In theory, if we would find sufficiently similar firmware from a different manufacturer that has EFI boot enabled, we could put back the EfiConsole inside with EzH2O "Insert Module" feature.
Now, old Z early EFI/BIOS-es still had EFI boot inside - however, I would not like to experiment witht those modules, as they were compiled for Montevina platform (Core 2 Duo), and this is Calpella... -
Does EzH2O even work on the new Z Series? Have you tried changing boot logo, for example?
-
Latest leaked EzH2O - version 2.1.0.13 that is, works. Anything older than that will immediately result in crash upon opening the BIOS file.
You can patch the logo.
You can even see all setup options (even some that are not visible in my dump)
However, setup option patching does not work, it crashes the application.
Good thing is, EzH2O also displays the offsets into VSS for every option, although it will not display what value means what (e.g. Enabled/Disabled/etc...) - for that, you will have to look at the setup string table dump. -
I can't find the bios downloads from the esupport sony site. I have a VPCZ1190x any clues?
-
You don't need an official BIOS, you need to dump your BIOS which is already on your computer.
For that, you need to use Insyde Flash1t tool (replace 1 with i in the flash1t)
To backup your BIOS, you need to boot into DOS e.g. by using USB stick and run flash1t:
This will generate dump.rom - which is your BIOS image. It will be 4 MB big.Code:flash1t dump.rom /g
Then, you need to use advanced_enabled.py etc... check the instructions
-
Hi it's me
I think new vaio z using now new type bios AMI Aptio so it cannot be hacked ?
or not ? -
Nope... new Vaio Z is using Insyde H2O, as the old Z.
-
Peter, did you even read the thread? Like the first post???
-
Haha, seems like he got banned for asking a question without reading the thread first?
-
Banned??? Whoa ! I didn't have anything to do with that ! I just thought it was a funny comment !
-
Well, I clicked on his other posts and nothing jumped out at me except maybe it seems like he had a tendency to jump into a thread and just start asking questions that were already covered at the begining of the thread?
-
psyq321,
Great work, +1 rep
I will be doing this after I reassemble the LCD screen. -
Is there any reason to do this other than being able to enable IDE/ACHI mode for HDDerase? I'm a little frightened about bricking the new machine, especially considering it's my work machine.
-
Also, where does one find this Flash1t (with 1 replaced with i) utility?
-
@unc27932,
Flash1t tool: http://www.sendspace.com/file/aplu0n
As for what is Advanced menu useful for... so far I can find those things useful:
- IDE/AHCI/RAID configuration
- Speeding up the boot process by disabling USB legacy and enabling "fast boot"
- Enabling of VT-d (accelerated virtualized I/O)
There are more things to change for advanced users / developers:
- Enable/Disable hyperthreading
- Increase "strong fan on" temperature
- Change the priority of the dynamic overclocking (default is that driver decides what gets priority - CPU or GPU)
- etc...
But, I agree - for most of the users the advanced menu is not really useful. Sony has configured all of the options really well so there is nothing to "tune" there for any average user. -
I got it to work, it's really a lot of options in advanced menu, thx very much, you are genius!
-
Never mind, duplicate post.
-
How do you locate the VSS and how do you sub values in the python script?
-
To locate the VSS table manually, you will need a hex editor. WinHex is a good choice.
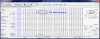
Fire it up and open the BIOS dump - and search for the hex. sequence of 24 56 53 53 (In WinHex this is done by going to Search->Find Hex Values, and entering 24565353) - this identifies the VSS table offset.
See attached pic how it looks on my BIOS.
As for the python script, at the beginning you will find this code:
If you wish to change some other variable, put the variable offset instead of 0x258 and the desired value instead of 0x01Code:PATCH_OFFSET = 0x258 PATCH_VALUE = 0x01
For example, to enable VT-d I/O acceleration for VPC-Z11 you would put:
Code:PATCH_OFFSET = 0x1A9 PATCH_VALUE = 0x01
Attached Files:
-
-
Ok Thanks, but how do even know which VSS values are editable?
Is there a surefire way of showing all the hidden menu in Insyde BIOS?
I tried the latest EZH20 but it hangs when I tried to access the setup...
Update:
I did run the patch and no errors reported.
When I flash the EFI with the /ALL parameters nothing changed.
Btw I am running an Acer.
Could it be
1)Different flash utility? (Shouldn't be right?)
2)Different Setup structure? (But the patch ran successfully) -
Thanks for the hard work Psyq321. I was able to do the whole without installing Linux (and in fact mostly with just a not so large (256MB) USB Key.)
All I needed was:
Prep work (not as bad as it looks):
- make a bootable USB key with FreeDos. Go to http://unetbootin.sourceforge.net/ and download the latest version. It will allow you to make a bootable USB with FreeDos straight out of the box.
- Download Flash1t (with i instead of 1 as you keep repeating ) with the link in this thread and copy it to the key
- Download Portable Python from http://www.portablepython.com/wiki/Download (you want version 2.6.1 and not 3.0.1 since you need Unicode per your python script.)
- Install Portable Python to the USB Key
- Download your advanced_menu.py script from your first post and copy it to to the App directory in Python installation directory on the USB key
Do the patching:
- Reboot the Z to the USB key.
- perform "Flash1t dump.rom /g" process to extract the rom
- copy the dump.rom file to the App directory in the Python folder
- Reboot to Windows
- Switch to command prompt on the USB key, in the python directory and do the "python advanced_menu.py dump.rom new.rom" command
- Reboot to USB key
- perform "Flash1t new.rom /f" process to write back the patched rom
The whole thing can literally be done in 15 minutes
I know your instructions suggest to download a bunch of other python files but reading your script, it seems to be doing all the patching anyway. Did I miss something?
I'm just posting that since people might be put off by the Linux requirements, other installation, etc.
Of course, the warning on your first post holds true, you may brick your VAIO and whoever tries that is fully understanding and responsible.
Just thought it might help a few,
Cheers and thanks Psyq321 for doing all the work ! -
@psyq321 Is there any way to unfreeze hard drive access in BIOS for secured delete?
TIA -
@Treofred,
Great Guide! +1 rep. Would it be OK that I add this guide to the first post?
@ozbimmer,
I didn't try it yet. But how are you going to perform secure erease - it looks like HDDErase is not working (it didn't work on old Z either) even if you force the SATA controller to "IDE"
Is there any other tool that can perform secure erase? -
I think hdparm (SATA controller to AHCI mode) can do secure erase. However the freeze state prevent it from happening.
-
Hi, Folks!
Psyq321: Thank you very much for all your hard effort!
Treofred: Thanks to you, too! While I have a VMWare Ubuntu install on my Z, I ran through your procedure to verify that it worked out OK. Everything worked out great! I would suggest a few hints for newbies. First, after the FreeDOS boots, they'll want to change over to drive C ("cd C:"). Note that this isn't your real drive C:, but is the USB drive (it boots up to "Drive A:", which is just a RAM disk). Second, just choose the defaults while booting FreeDOS - if you choose some of the other options which install EMM386, Flash1t will fail, since EMM386 prevents it from accessing the physical BIOS chip. Finally, some of the other boot options talk about installing FreeDOS to your hard disk. Don't worry - nothing will actually write to your hard disk!
Ozbimmer: This is a common problem with many BIOSes. The work-around, while non-trivial for most folks, is to unplug the SATA cables internally before power-up, and then to plug them back in just before running hdparm (or HDDERASE, for those drives which it supports). The good news is that'll save folks the effort of modifying their BIOS, but the bad news is that will require disassembling your system! Sorry!
Best Regards!
Mark -
Thanks, MJFlash. You have made me rethink my approach re bypassing the BIOS.
It's a hardware solution, and I am able to bypass the Sony BIOS and successfully secure erased all 4 SSDs (using GParted and hdparm). I am clean installing Windows 7 now and hopefully everything's fine
-
Hi, Ozbimmer!
Congrats! I'd love to hear about your new trick, though it's probably a good idea for us to start a new thread (we are getting rather off-topic - sorry, Psyq321!).
Cheers!
Mark -
Thanks, Ozbimmer!
-
Hi
is it possible to set the BIOS to boot from the SD Card slot ?
i cna boot from USB and i also can boot from USB SD card read, but is it possible to boot it from the onboard SD card reader ?
i am running linux on a SD memory card. -
Will this help people who bought the HDD version to get TRIM ?
-
By all mean, you did all the hard work so go right ahead !
-
Hi Mark,
yes, you're right, you have to swap between drives A: and C:, one being the freedos image (in RAM), the other showing the actual USB key. I like unetbootin, I think the way they do it is actually excellent.
In fact, since the script is all string manipulation to poke in the dumped rom, I was thinking of rewritting it/compiling as a C code EXE so that it could be done within the key/FreeDos without even having to reboot in Windows to run the Python. But I thought that people might freak out a little bit more about running a pure EXE on their extracted ROM vs a Python script with no obfuscation (thanks again Psyq321 !)
... that plus I got lazy once I got it working
-
Is it hard for a newbie like me to flash the bios and get advanced options? Whats the easiest way for me to flash the bios? I wouldn't even mind running an exe file
My intent is to secure erase the ssd.
Insyde hacking - New Vaio Z - Advanced menu in BIOS
Discussion in 'VAIO / Sony' started by psyq321, Apr 4, 2010.