So, I know that a thread exists already, but I would like to sum up everything in a concise manner so you don't have to go digging through a bunch of pages to find what you need.
Important Info:
You can purchase a working caddy from --
Ebay -- HERE (China Seller) or HERE (USA Seller -- more expensive but faster)
This one from amazon is also confirmed to work ( Thanks to porks) HERE.
As the face-plate is difficult to remove you may wish to order a replacement faceplate direct from Sony.
1. The direct number for Sony Parts and Accessories is 800-488-7669. This will keep you from having to wade through phone menus. (Thanks brokejumper)
-- Platinum Silver Faceplate -- SA
Part # 427655221 (Thanks niebyl2002)
-- Black Sony SA --
Part #427655211 (Thanks brokejumper)
Any 2.5" SSD or Hard Drive will work.
You can find an in-depth instruction on how to remove the faceplate carefully at the bottom of this post.
- - - - - - - - - - - - - - - - - - - - - - - - - - - - - - - - - - - - - - - - - - - - - - - - - - - - - - - - - - - - - - - - - - - - - - - -
Alright, so I'm going to try and walk those of you who might be interested in swapping your Optical Disk Drive for a Hard Drive or Solid State Drive.
First you will need a compatible caddy, the best fit right now is a fenvi caddy that can be purchased off E bay from a few different sellers. I went with this one ( HERE)
You will just need a screw driver, maybe some glue, and a little patience to get this finished.
Before switching the faceplates you will need to follow this guide to remove the Optical Drive from your SA/SB/SC/SD series Vaio. ( Guide Here)
Once you have removed the Optical Drive you need to carefully work off the curved plastic face plate. Opening the drive with the manual release by way of a bent paper clip makes it easier.
Try to gently work it off until the clips have released.
I did crack it while trying to do this so you may wish to skip the swap all together and purchase a spare face plate from Sony.
The part number is 427655211. Make sure you get the correct color.
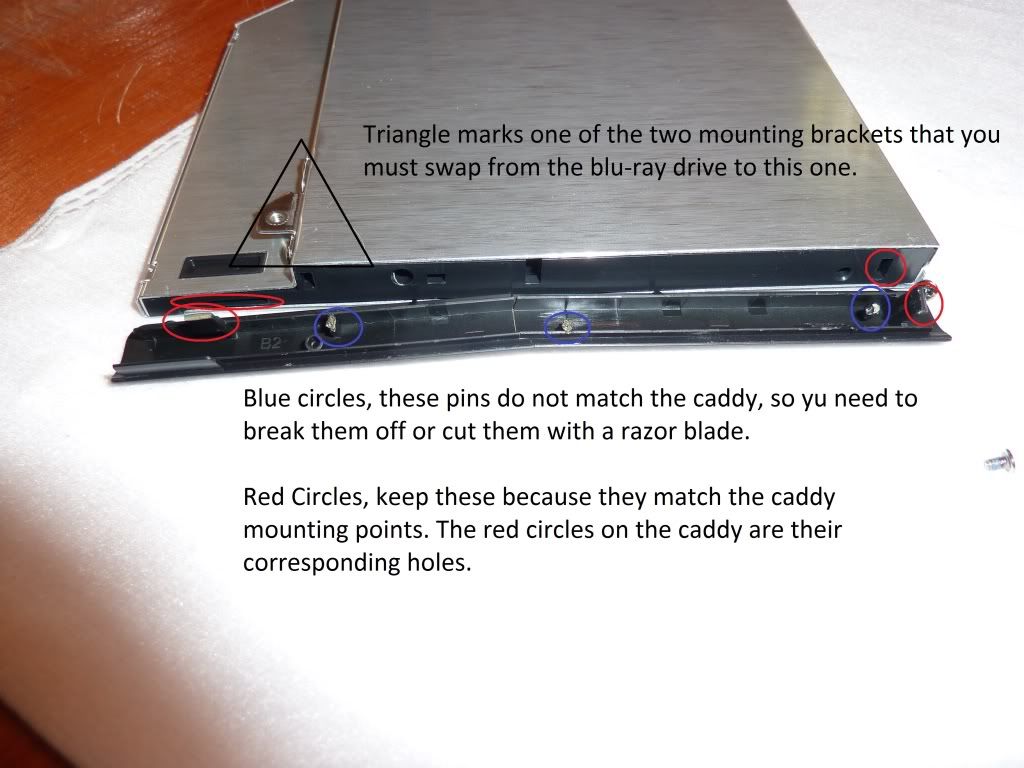
You then need to remove the face plate from the fenvi caddy. It very easy, just pry from one end, and then the next. It should not put up a fight and you should be able to remove it without breaking any pins.
Once you have it off you will see that the Sony face plate and the Fenvi Caddy do not match up exactly. Look at the photo below for more detail.

You will need to break off or cut off three of the existing plastic pins/latches ( marked in blue) from the Sony face plate.
You then should be able to comfortably attach the Sony face plate to the caddy without any obstruction.
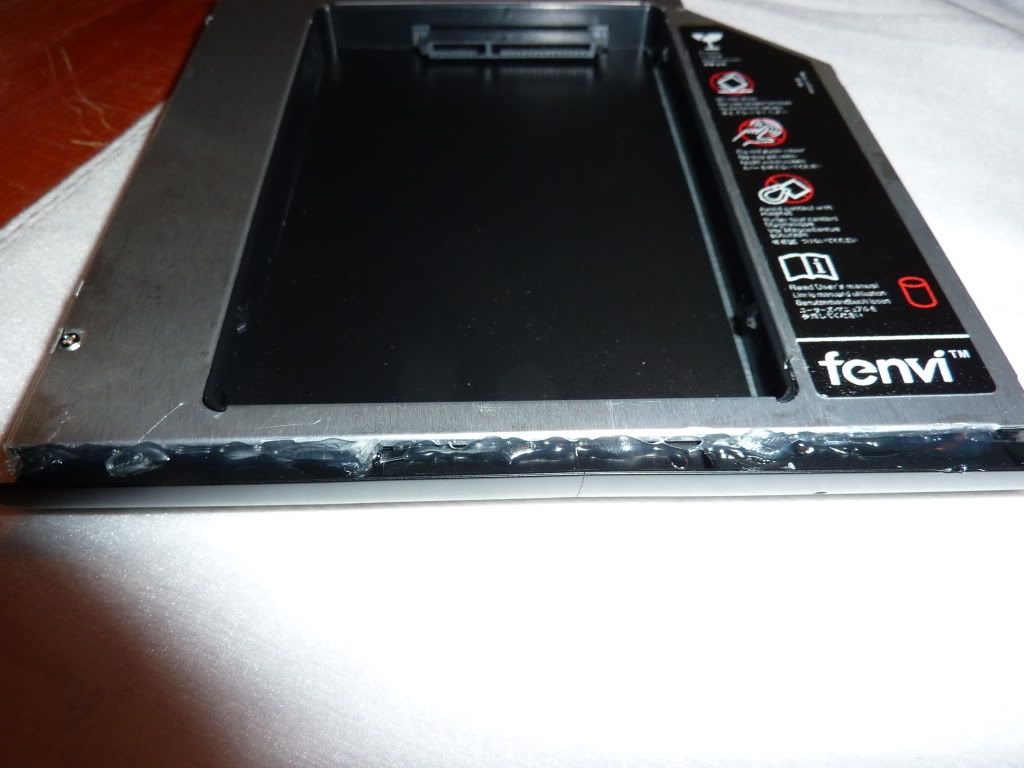
To secure it I used hot glue. I'm unsure if it is possible for the face plate to stay attached without glue. Since the caddy is not a moving part, nor does the face plate serve any functional purpose I can't see why it wouldn't be prudent to glue the face plate on tightly. It is very secure and

Make sure that no glue is on the top / bottom / side of the caddy or it will be difficult to seat inside the computer.
It is not ideal, but it does function and look quite fine once it is all back together.
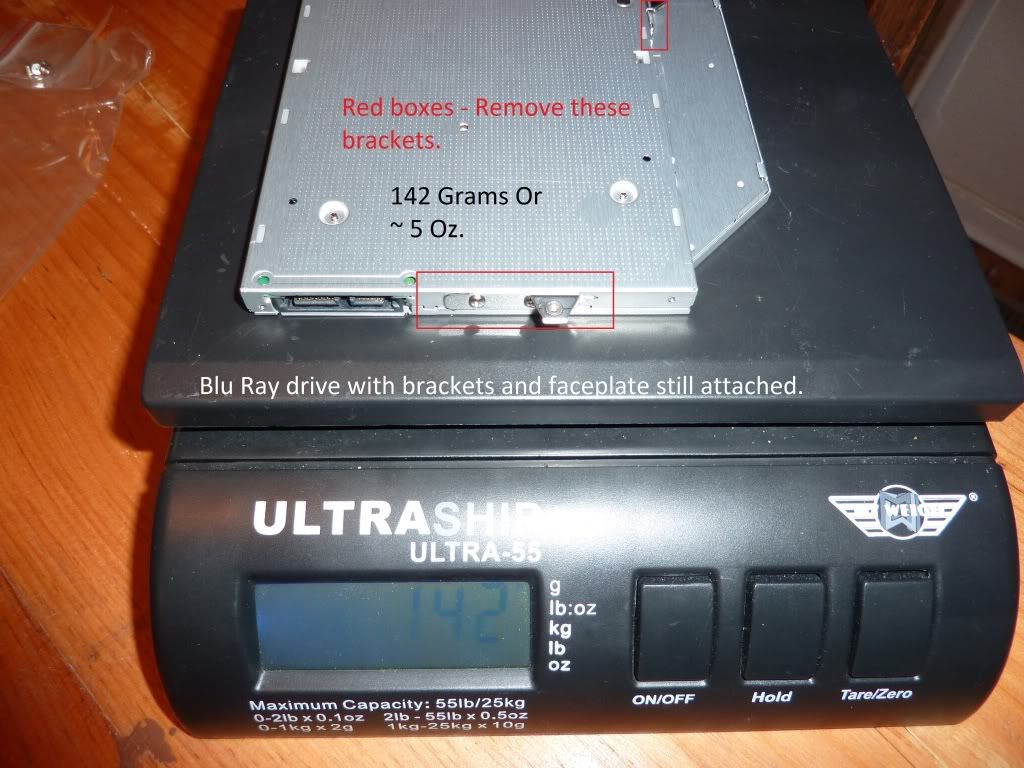
Do remember to reattach the mounting brackets from the ODD. It should be 4 screws to remove and replace.
The hard drive attaches very easily, set it inside the caddy and push in into the SATA connectors. There is also a small plastic piece that fits behind the hard drive to secure it in place. Make sure to push it down with the SATA label facing the top. (RED square in photo)

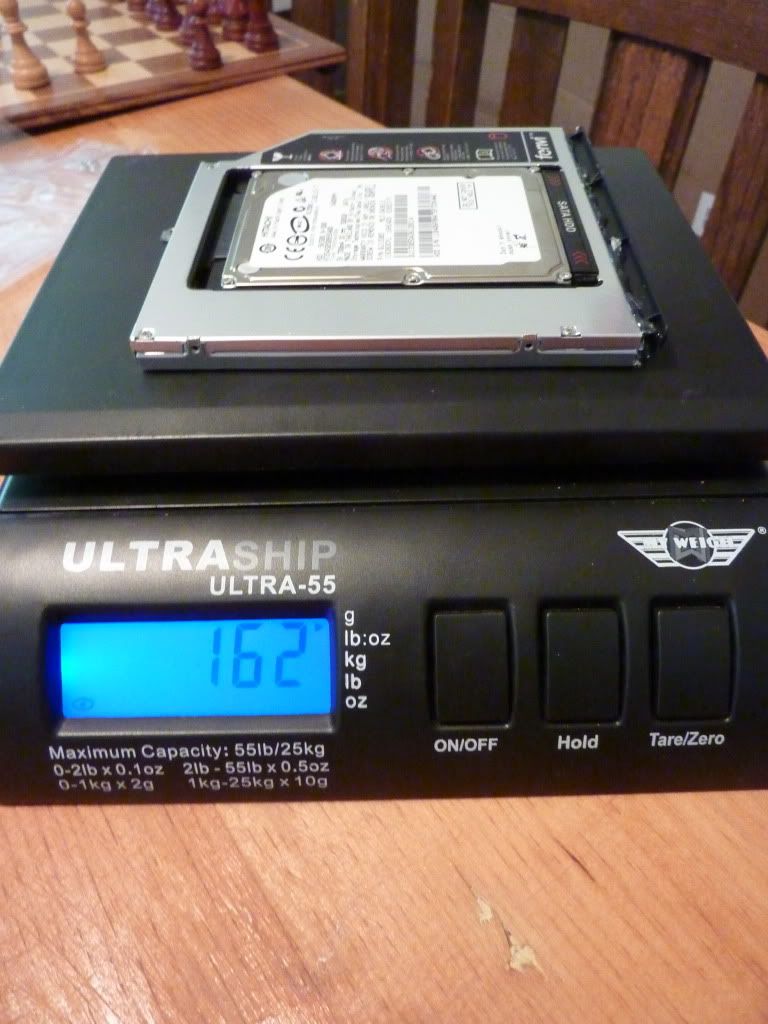
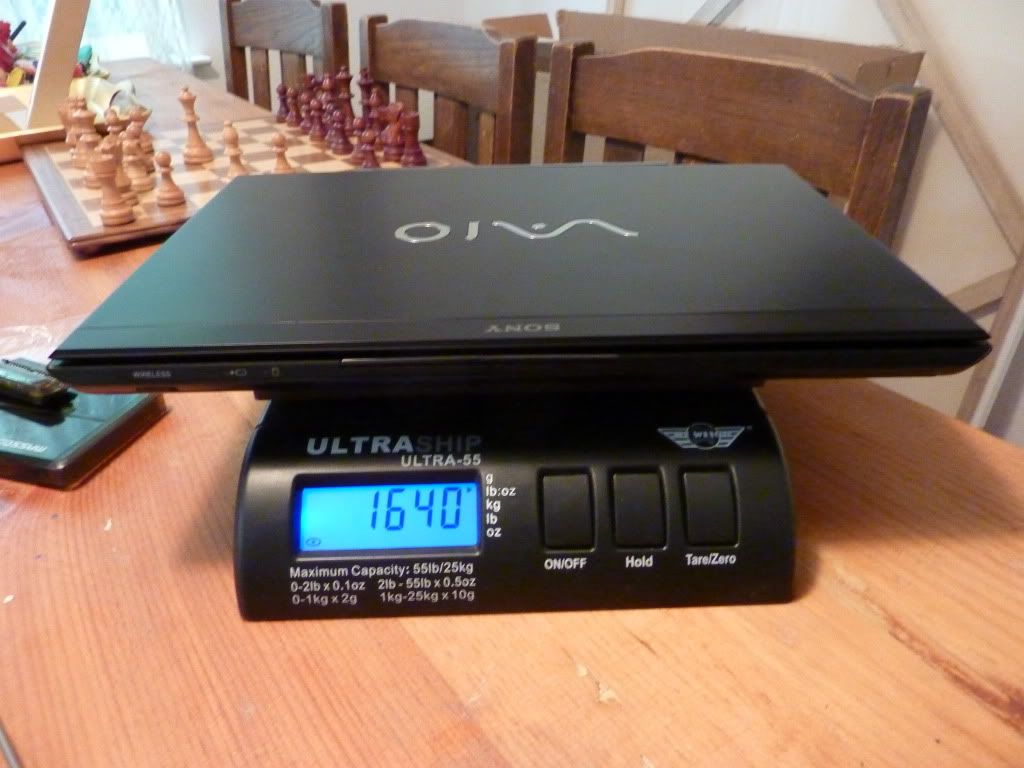
So, for those concerned about adding weight I did some comparisons between the caddy, optical drive and caddy with hard drive.
To sum it all up, the caddy with a hard drive adds a total of ~20 grams or .7 Oz.
The Optical Drive weighs 142 Grams

The Caddy weighs 56 Grams

The Caddy with Hard Drive weighs 162 Grams

Vaio SA with the caddy installed. Weight 3.62 Lbs or 1.64 Kg.


I think it is a worthy investment for anyone who dosn't use an optical drive on a daily basis. You can easily get an external enclosure for the optical drive off E bay for a small sum. Search for "Slim DVD enclosure 9.5" make sure it is SATA to SATA connection. Some may be for older drives and will not function properly with the new optical drives. My SA ended up weighing 3.62 Lbs. with the caddy and hard drive installed. About a tenth of a pound more than with the optical drive.
Thanks to niebyl2002 and everyone else who helped to make this work.
If you have anything I should add please let me know.
- - - - - - - - - - - - - - - - - - - - - - - - - - - - - - - - -
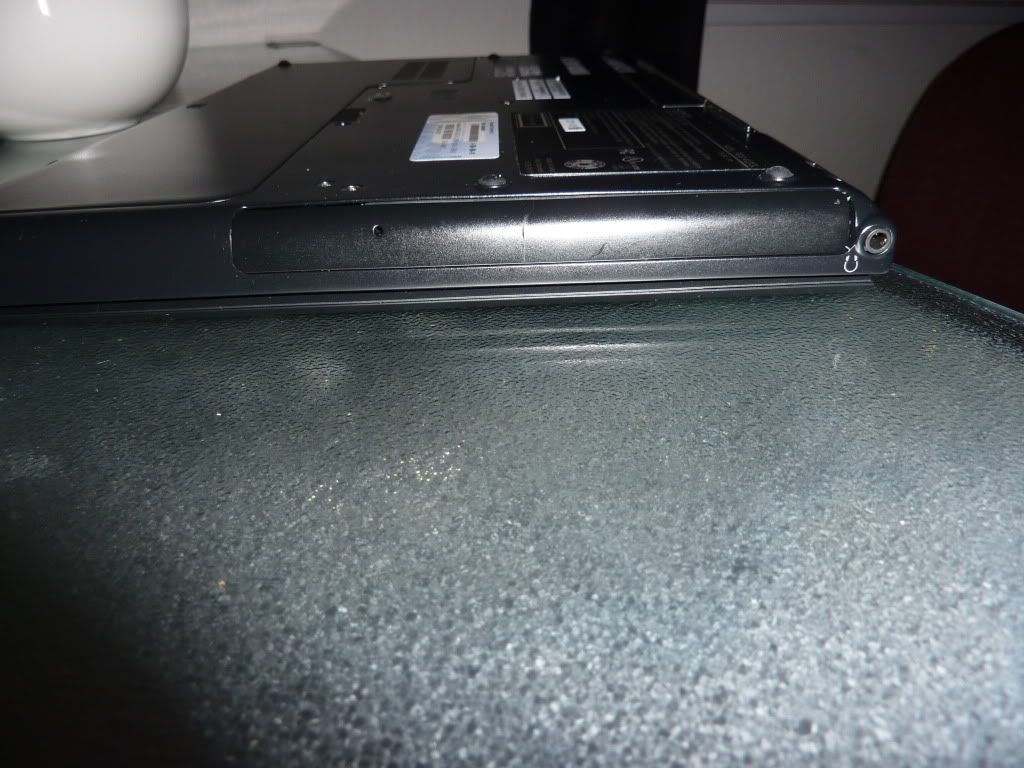
A few photos of the final result. Very good fit, and it actually makes the laptop seem a bit stronger and removes any flex in that area.

---------------------------------------------------------
1) Take the ODD out following the instructions in lazybee's post. Use a paperclip to open the tray
2) On the bottom of the opened disk tray, use a small Philips (+) screwdriver remove ONLY the darker-colored screws. I think there were 6 of them. (Don't take off any of the lighter silver screws or the blue screw. I made this mistake and had one heck of a time reattaching things.) Carefully pull back the cover to the expose the internals, being careful not to dislodge any of the tiny springs.
3) Start left-to-right (smaller clips toward the larger clip), using a small flathead screwdriver to assist you in pushing the clips back while you pry the cover off.
4) The largest clip (the on the thinnest part of the drive that isn't normally covered) is a bit of a pain. It took me probably 30 mins to figure out a way to get the thing off without cracking anything. What finally worked involved using two small flathead screwdrivers, one pushing down on the clip to release it from the catch, while putting the other at the end of the clip and using a twisting motion on the screwdriver (as though you're unscrewing an imaginary screw directly in front of where the clip ends) to apply outward force on the clip.
(Thanks mitpianoman)
-
Hello,
I'm looking to purchase a black faceplate in the UK, anyone know how? I have tried all Sony UK contact numbers and the US ones don't ship across the pond!
Any help would be much appreciated.
Cheers,
Ramy -
What are you talking about? BD/DVD Rom replacement in new sony vaio SA/SB is a matter of removing 2 screws and sliding out the old drive. Now in order to insert additional 2.5" second disk you need a $45 caddy from newmodeus.com that fits new vaio perfectly. No need to remove any faceplate from old drive risking it gets broken, the caddy comes with one to match your vaio color. Just insert new disk, slide your tray in and you are good to go.
I recently installed 2nd disk using this method in five minutes and it works great. On the top of that, I can swap my 2nd disk caddy with BD-ROM anytime in seconds if I need to.
Sent from my GT-P7310 using Tapatalk -
Hi guys, I also got confused with all this details of caddy installation. It seems that you can just replace the optical drive with newmodeus caddies without any faceplate removal etc.
My question is this also valid for the cheaper caddies such as ( http://www.amazon.com/gp/product/B004WYW7U6)? So, with these can I also just remove two screws, slide drive out, slide HDD caddy in and put the two screws back in without any faceplate change etc.? -
Here's another link for a fenvi drive shipping from Amazon that is only $18
http://www.amazon.com/9-5mm-SATA-Drive-Caddy-Adapter/dp/B005G4RZNU/ref=lh_ni_t
This caddy does require a sony faceplate which can be purchased from
https://www.servicesplus.sel.sony.com/sony-parts.aspx
-- Platinum Silver Faceplate -- SA
Part # 427655221 (Thanks niebyl2002)
-- Black Sony SA --
Part #427655211 (Thanks brokejumper) -
Anyone willing to ship me out a Black faceplate and i can pay them through paypal or something? I cant order it here in the UK!

-
Re: newmodeus - cost I suppose. Newmodeus is $50 including shipping, compared to the $26 of the other US seller plus an additional $8.74 for the plate plus sony shipping (sorry, couldn't work it out without purchasing) let's say $36 total. So, you pay an extra $14 for the specially designed bay you can remove with just the two screws, no glue or worry about damage. Seems fair enough, and I am going to do this. But, going through the China seller will save an extra $12, so better than half that price if you go through China. I believe most 9.5mm bays will work, so you might be able to get a cheap bay locally too.
Re: ramyt - I don't check the forums often, but I could do this for you. -
Hi guys,
Brilliant guide, I managed to do this with relative ease (although the hdd caddy with faceplate isnt as perfectly flush as the odd was). However I managed to wreck the optical drive by opening the back metal case part and the the tiny screws and metal 'hooks' fell out. Now it doesn't stay closed.
Surely someone else has done this! Could someone post a shot of the correct assembly so I can put mine back together properly? -
Thanks for the great guide, the caddy fits fine with the faceplate from the ODD. But im just having one problem, the 2nd HDD aint recognized at all, not even in the BIOS. I have tested the HDD in my desktop, and its the original HDD that came with my SB. Anyone know a solution? I can hear the HDD spinning and feel it vibration a little.
-
I wish to report successful use of the newmodeus Vaio SA/SB/SC caddy today on my SA, without the need to get a face-plate. This caddy is certainly the most expensive at $50 inc. shipping, but is by far the easiest to install, and should require only the removal and re-installation of two screws.
I say "should" as there may be other people like me where no mounting brackets were included in the delivery, which I at present believe to be an oversight. The brackets are the screw sockets on the caddy which line up with the sockets on the laptop itself, allowing the drive to be secured to the laptop. The lack of these brackets meant that I had to scavenge the existing brackets from the optical drive. This wasn't a big problem, just slightly less convenient than I expected.
My only real issue with the caddy is the very bright blue LED which turns on when the hard drive is being read. This might not bother everyone, but for me it did. I fixed this by dismantling the caddy, moving the LED and putting some black tape within the caddy over where the LED light exits, which has solved this problem. -
Sorry about the late reply JustGotHere. I havent looked at this post for ages! Im still in need of a faceplate if your still up for it?
-
Did you ever get this resolved? I'm having a similar issue where the second drive isn't being recognized by the BIOS or windows and am wondering if you did anything to fix yours?
-
Likely a stupid question, but have you tried using this drive with a different computer? Or in an external enclosure with this one?
-
I may have resolved it to a certain extent. I wasn't using any of the caddies in this thread but a slimline sata to 22pin sata adapter cord i happen to have from a custom caddy job from another computer.
Cable:
Amazon.com: Slimline 13 pin SATA Male to 22 Pin SATA Female Cable Adapter: Electronics
The adapter cable runs the 5v power and ground between the atapi connector and the hdd though it must not be running the "device is present signal" somehow since the laptop refuses to power the second hdd.
I just finished splicing a usb cord and connector to the adapter cable in order to power it from one of the laptop's ports to test it and sure enough the computer now sees the drive.
I was looking to get the newmodeus caddy though i wanted to run some tests on the second drive before doing so. There must be something about how they set up their caddy that lets the computer know that there is a device present as opposed to my cable.
Which leads me to saying that it's kind of resolved though i'm curious to know exactly what it is that the caddy is doing different as opposed to the adapter cable. -
Okay, so i got everything working. Took apart the adapter cable at the slimline end and it turns out that they didn't connect pin 1 of the power block to anything. For whatever reason this isn't an issue with other laptops but in the case of the vaio sb pin 1 of the power block must be connected to pins 2&3 in order for the laptop to send power to the additional hard drive. Not sure if this info helps anyone but myself but i'd thought i'd share just in case.
ChanceJackson likes this. -
hello,
thx for this great guide.
Well tbh, i even got the idea to do this from here
i still have a question, is it possible to deactivate the 2nd HDD like the "original" ODD?
To save energy, the vaio is cappable to deactivate the ODD...
thx for any hints -
if anyone else got the same Problem.
i used hdparm as mentioned here: http://forum.notebookreview.com/har...-ssd-hdd-storage-using-optical-bay-caddy.html
thx again and have fun
-
Vaio S13 - VPC-SA4C5E
This guide was perfect, thanks!
Removing the faceplate from the ODD was fiddly but your guide was invaluable. I'm posting the link to the caddy I bought because I was able to clip the faceplate straight onto it and the plastic nugs fitted perfectly without having to glue or a 2nd Bay Hard Drive/SSD Drive Caddy SATA to SATA for Laptop/Macbook for 9.5mm Hard Drive - Expand Your Data Storage by Replacing Optical Drive With this Caddy: Amazon.co.uk: Computers & Accessories
I had problems with Crucial m4 SSD, either it was a faulty SSD or was subject to a firmware bug which putting the SSD through a power reset cycle might have fixed but as it's a laptop SATA cable, it wasn't possible to follow Crucial's process to reset it easily. Samsung 840pro worked perfectly first time.
In my experience, it IS possible to dual-boot windows/linux from SSD in primary bay and HDD in ODD. In summary you should install windows 7 first but create a separate /boot partition in which to place grub2 for linux. Then use EasyBCD from windows to configure windows boot menu to select either windows boot (from MBR) or linux boot (from /boot which can be a logical partition). At time of writing I haven't got my setup correct yet because EasyBCD wasn't able to configure windows bootloader to differentiate between 2 linux os on SSD/HDD - the HDD linux is the only recognised so far. Hopefully that's fixable or I'll just remove grub from the HDD which will leave a dual-boot from the SSD, using the HDD in ODD for storage - this is a better way to go anyway. -
Hello everyone
I recently upgraded my HP 8710w mobile workstation adding new Samsung SSD 840 EVO.
I did the upgrade with new SSD disc but experiencing problem with old HDD.
Both works well in main HDD bay but neither work well in cd caddy (added as second disc).
1. If HDD is in main HDD bay and ssd in cd caddy, all are recognized but win doesn't want to install to SSD and don't want to boot from it either.
2. If SSD is in main bay and HDD in cd caddy, win install and boot fine but HDD in cd caddy doesn't work. Actually it is recognized and i can reach it trough Disc management but the disc just disappear suddenly. After reboot HDD in cd caddy is sometimes recognized and somethings not. Strange!
Caddy works well as I managed to reach and format SSD attached to it before.
Any suggestions ?
SSD is Samsung 840 EVO 120GB.
HDD is Hitachi 200GB disc
Cd caddy is 2nd IDE to SATA Hard Disk Drive HDD caddy For HP Mobile Workstation 8710w 8510w
Thanks
Replacing Optical Drive with Hard Drive Guide! SA/SB/SC/SD
Discussion in 'VAIO / Sony' started by lazybee, Jul 29, 2011.