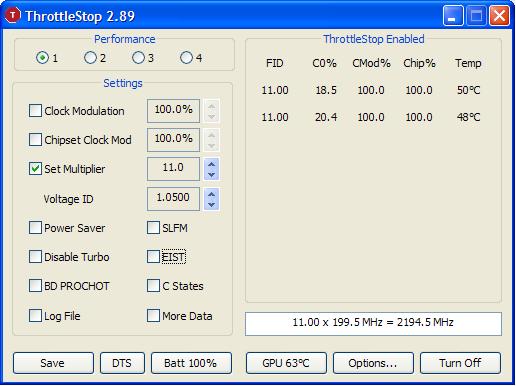
But your FSB is cut in 1/2.
My FSB is still 266mhz (throttlestop shows 9.5 x 266).
Anyway, I can't get any benchmark to run, maybe my voltage is not really 1.05v but lower.
I'll try a pinmod in the morning to bump the voltage up.
EDIT: Can anyone guess what voltage my CPU is running at when I try this trick?
-
-
moral hazard, when SLFM is enabled, chipset runned at 1/2 of default frequency.
-
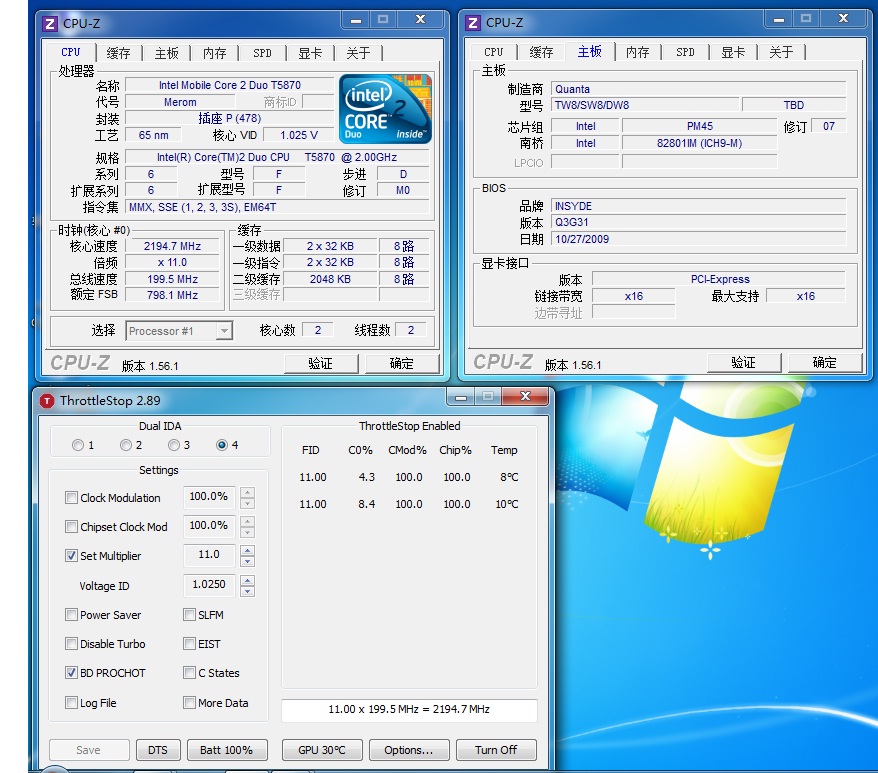
Yes, and normally throttlestop shows 133 x 6 when I enable SLFM.
And CPUz shows 266 x 3.
But when I do this trick, CPUz shows 266 x 9.5 and so does throttlestop.
Are you saying that they are wrong?
Wait 5 mins, I will give you two screenshots.
One screenshot I will give with a 15x multi, then I will show you 19x.
EDIT: now I see you are right...
Well that's not so good.
Do you have any idea on how to get the chipset to run at it's default frequency? -
You might find this post interesting.
-
I played with this trick a while ago. It made for a nice Everest screen shot but it only resulted in an overall performance decrease.
![[IMG]](images/storyImages/everest4587mhz.png)
It's possible to increase the multiplier but with SLFM enabled, overall performance wasn't as good.
I couldn't find a way to get the higher multi without SLFM enabled. -
Hi guys,
I have made simple guide/example on how to mod BIOS for unlocking Enhanced Intel SpeedStep Technology (EIST). This will allow everyone who own notebook with capable hardware to enable dual-IDA mode on their notebook. Have fun!")
<STRIKE> Rev 1.0 : EIST Unlocked Example.pdf
Rev 1.1 : EIST Unlocked Example Rev 1.1.pdf</STRIKE>
- Rev 1.0 & 1.1 are now out-dated.
- Please use Rev 1.1a instead.
Rev 1.1a : EIST Unlocked Example Rev 1.1a.pdf
- Included detail explanation
CYGWIN Installation:-
When install CYGWIN, make sure to select nasm. " ndisasm" tool is included in nasm package.
![[IMG]](images/storyImages/nasm.jpg)
Script:-
- Open "Start Menu" >> Cygwin >> "Cygwin Bash Shell"
- Navigate to BIOS image decompressed folder; "DUMP" (refer to PDF file)
- Enter this command (press Enter after inputting the command):-
Code:cat > ndisasm_bat.sh
- Copy the script in the *spoiler* below
Code:#!/bin/bash echo "--> disassembling *.ROM files" for f in $( ls *.ROM ); do DIS=$(echo $f | sed 's/\(^[a-zA-Z0-9_-]*\).\([a-zA-Z]*\)/\1.DASM/') DIS16=$(echo $f | sed 's/\(^[a-zA-Z0-9_-]*\).\([a-zA-Z]*\)/\1.16.DASM/') echo "--> Creating disassembled file: $DIS" echo "ndisasm -a -b 64 $f > $DIS" ndisasm -a -p intel -b 64 $f > $DIS echo "--> Creating disassembled file: $DIS16" echo "ndisasm -a -b 16 $f > $DIS16" ndisasm -a -p intel -b 16 $f > $DIS16 done for f in $( ls *.ff ); do DIS=$(echo $f | sed 's/\(^[a-zA-Z0-9_-]*\).\([a-zA-Z]*\)/\1.DASM/') DIS16=$(echo $f | sed 's/\(^[a-zA-Z0-9_-]*\).\([a-zA-Z]*\)/\1.16.DASM/') echo "--> Creating disassembled file: $DIS" echo "ndisasm -a -b 64 $f > $DIS" ndisasm -a -p intel -b 64 $f > $DIS echo "--> Creating disassembled file: $DIS16" echo "ndisasm -a -b 16 $f > $DIS16" ndisasm -a -p intel -b 16 $f > $DIS16 done for f in $( ls *.PEI ); do DIS=$(echo $f | sed 's/\(^[a-zA-Z0-9_-]*\).\([a-zA-Z]*\)/\1.DASM/') DIS16=$(echo $f | sed 's/\(^[a-zA-Z0-9_-]*\).\([a-zA-Z]*\)/\1.16.DASM/') echo "--> Creating disassembled file: $DIS" echo "ndisasm -a -b 64 $f > $DIS" ndisasm -a -p intel -b 64 $f > $DIS echo "--> Creating disassembled file: $DIS16" echo "ndisasm -a -b 16 $f > $DIS16" ndisasm -a -p intel -b 16 $f > $DIS16 done echo "--> Checking MSR register for EIST: mov ecx,0x1A0" > RESULTS.TXT echo "--> Checking MSR register for EIST: mov ecx,0x1A0" grep -i "mov ecx,0x1A0" *.DASM >> RESULTS.TXT grep -i "mov ecx,0x1A0" *.DASM - Click the CYGWIN icon at the left-top corner of "Cygwin Bash Shell" window >> Edit >> Paste
![[IMG]](images/storyImages/cygwin_paste-1.jpg)
- Press Enter one time & press "Ctrl" + "D".
- Make it executable file:-
Code:chmod +x ndisasm_bat.sh
Acknowledgments:-
- nando4 for helping me when I investigate the EIST Locked bit.
- unclewebb for the great ThrottleStop software.
- Dufus: the brains behind Dual IDA and a few more TS features.
- andyp@mydigitallife for the great Phoenix Tool, also for providing the fix for module reintegration problem.
- middleton for the brilliant assembly code tips (see post #322).
Known issues:-
####################################################################################
1) Phoenix BIOS & EIST Locked bit located in "F7731B4C-58A2-4DF4-8980-5645D39ECE58.ff" module
When rebuilding the modified BIOS image, it will probably failed with this error:-####################################################################################
If it failed as shown above, please use AndyP's Phoenix tool version 1.77 or later. The reintegration should be successful:-Code:Changes detected in F7731B4C-58A2-4DF4-8980-5645D39ECE58.ff Changes detected in TEMPLAT00.ROM New F7731B4C-58A2-4DF4-8980-5645D39ECE58.ff Module is 118386 bytes too big New F7731B4C-58A2-4DF4-8980-5645D39ECE58.ff Module is 118386 bytes too big F7731B4C-58A2-4DF4-8980-5645D39ECE58.ff not reintegrated Unable to reintegrate F7731B4C-58A2-4DF4-8980-5645D39ECE58.ff
Code:Changes detected in F7731B4C-58A2-4DF4-8980-5645D39ECE58.ff New F7731B4C-58A2-4DF4-8980-5645D39ECE58.ff Module is 2 bytes too big New F7731B4C-58A2-4DF4-8980-5645D39ECE58.ff Module is 2 bytes too big ** F7731B4C-58A2-4DF4-8980-5645D39ECE58.ff [B][U]reintegrated successfully[/U][/B]
2) Lenovo IdeaPad Y450's BIOS (Phoenix BIOS)
No matter what I did, I unable to build modified BIOS image for this notebook. It failed with this error:-####################################################################################
UPDATE (13 February): The reason why it failed is because there is not enough "space" to accommodate the extra 2 bytes. <STRIKE>Also can't rebuild it with Phoenix BIOS Editor because the modified BIOS image seems buggy (compared both original & modified BIOS with AndyP's Phoenix tool). I hope this is rare case & only involved Lenovo IdeaPad Y450's BIOS.</STRIKE> No longer a problem. Please refer to Rev 1.1a doc.Code:Changes detected in F7731B4C-58A2-4DF4-8980-5645D39ECE58.ff New F7731B4C-58A2-4DF4-8980-5645D39ECE58.ff Module is 2 bytes too big New F7731B4C-58A2-4DF4-8980-5645D39ECE58.ff Module is 2 bytes too big F7731B4C-58A2-4DF4-8980-5645D39ECE58.ff [B][U]not reintegrated[/U][/B] [B][U]Unable to reintegrate[/U][/B] F7731B4C-58A2-4DF4-8980-5645D39ECE58.ff
UPDATE (30 March): Thanks to middleton's inputs & comments at post #322, there is a solution on the " Module is X bytes too big" issue. Please refer to the latest document revision, Rev 1.1a, for more information.
kizwanLast edited by a moderator: May 12, 2015 -
Modified BIOS image for Qunata TW8 with EIST Unlocked:-
BIOS 3G51 @
Qunata TW8 EIST MOD.rarAttached Files:
-
-
@thunder372, you forgot to post the screenshot.
Qunata TW8 with dual-IDA enabled:-
![[IMG]](images/storyImages/dualida.jpg) Last edited by a moderator: Feb 6, 2015
Last edited by a moderator: Feb 6, 2015 -
is it possible to add the EIST option to the bios on the M570RU? EIST is enabled bu there is no bios option to toggle it.
-
Your notebook BIOS is 57RU_12 (R12R10.WPH), yes? I just checked & I found there is no hidden option for EIST (for toggle between enabled/ disabled) in it. It is not possible to add new options in BIOS. (Theoretically, it is actually possible but extremely complicated.)
On further checking, I found EIST is locked. You can follow the guide ( EIST Unlocked Example.pdf) to patch your BIOS to prevent it from locking EIST. This way you can control EIST (enabled/disabled) using ThrottleStop. -
cool, that's what I wanted to do
-
I'm not quite sure what I need to do, it says create a script and then step 3 says this script will..... it looks like a 2nd script?? but it doesn't say what to save it as? is it a script or just info? btw i'm using thr R13 bios, I don't have it as a stand alone file though, just a bootable iso, does anyone have it as a WPH file?
-
Sorry. " This script..." at Step 3 was referring to script at Step 2. Step 3 show an example of the output, produced by the script at step 2. The .DASM files are disassembled files. After you found the bit 20 lock, you'll need to use the information from the .DASM files, like the location/offset to locate it exact location in the .ROM files. Meaning you will need to modify/edit .ROM file, not the .DASM file. If you still don't understand, please let me know.
You can extract the boot file from the ISO using tool like UltraISO. Save the boot file to a file. Use tool like WinImage to extract the content of the boot file. Usually BIOS file can be found in the boot file. -
I extracted it but got an .IMG file, I tried to open it with winimage but it said it was not a valid file.
-
ok I managed to extract it, I'll have a go with the pdf instructions...
-
i'm stuck, how do you decompress the bios? I see no option in the tool.
-
don't suppose anyone could modifiy the bios for me? I can't work out how to even decompress the bios, i've uploaded the bios to mediafire, hopefully it's the right file, the tool opens it fine. (R13AR10.SXP)
R13AR10.SXP -
Sorry for replying late. I just made a correction & included detail explanation in the new revised guide. Please go to post #256 to download Rev 1.1 of the guide.
-
no problem, i'm still confused though, it's not decompressing anything from the r13 bios, but from the r12 bios i end up with 50 files
edit, r13 was corrupt i now have a working version. it's decompressed and i still have 50 files,which one is the bios? -
All of the 50 files in the DUMP folder are called BIOS modules. The BIOS file is the one you load in the Phoenix tool.
Can we discuss this in PM? I think it is more appropriate if we discuss this using PM.
-
ok, pm on it's way.
-
hi, i'm still having trouble understanding how to do the bios mod with the pdf guide, anyone fancy modifying my bios so I can use throttlestop?
i've uploaded it here: R13AR10.SXP -
Hi,
I like to thanks to kizwan for his great tutorial
Well i managed to unlock EIST on my HP Dv9684(Chipset 965).
Im using the F59A bios, its used in a lot of other Hp's.
Its working 100% fine here!
Screenshot
Original Bios:
WinFlash for HP Notebook System BIOS (for Notebooks with Intel Processors) HP Pavilion dv9684eg Notebook PC - HP Customer Care (United States - English)
Modded Bios (Wifi Whitelist, Slic2.1 and EIST):
30CCF59.7z
Use at your own risk! -
dammit, how'd you manage it? I can't even work out what to hex edit, guess i'm too stupid to figure it out.
-
well its not that hard if you follow the tutorial.
Btw i used this free hex editor: HxDen
my bios its Phoenix, and the code was on MOD_5100.ROM
EDIT: RanCorX2 where you go...
R13AR10_EIST.7z -
awesome thanks man, made my day.
-
superceleron: If you lower the VID voltage before going into Dual IDA mode, you might be able to run that speed reliably with a VID setting of 1.10 or less.
My T8100 is quite happy at 2300 MHz in Dual IDA with a VID of 1.05 V and its not a golden chip. Full load power consumption and heat output are less than the default settings so I'm getting the best of both worlds. Faster and more efficient. -
RanCorX2: Glad i could help
unclewebb:
1º thks for your great tool
2º well the max i could get it whitout a BSOD its 1.1750, below that instant BSOD.
And i dindt see a BSOD in a long time lol
-
just flashed and it's working!1!11111111111111111 so exciting
Cheers man, and unclewebb, the tool is sweet, very useful indeed!
-
superceleron: I didn't realize you were using a 65nm T7700. My laptop also uses the 965 chipset but it has a newer 45nm T8100 so it is happy with less voltage before a BSOD ends the fun.
RanCorX2: Great to hear that another user got this working and you're welcome for TS. It doesn't give you a huge performance increase but I like anything that is free.
-
Update: HP 2530P and 2730P dualIDA modded bioses added to the list. The LV SL9300/SL9400/SL9600 getting a full additional multiplier when running dualIDA, or 266Mhz overclock. Means a [email protected] HP 2530P can now tango with a P8600-2.4 Lenovo X200
Thank you to Kizwan for doing the full analysis and mod on the 2530P Insyde-style bios. I just tested then replicated the work to a 2730P. -
Where do I find the hex editor tutorial for bios modding that you have used?
-
-
Thank you to Kizwan.
Here's a the dual ida modded BIOS F.13 for the HP 8530w/p.
I flashed it today and TS works with it. Just unzip and run HPQFLASH.
Download from
sp51536 BIOS F.13.zip -
Thanks Maximinmaus.
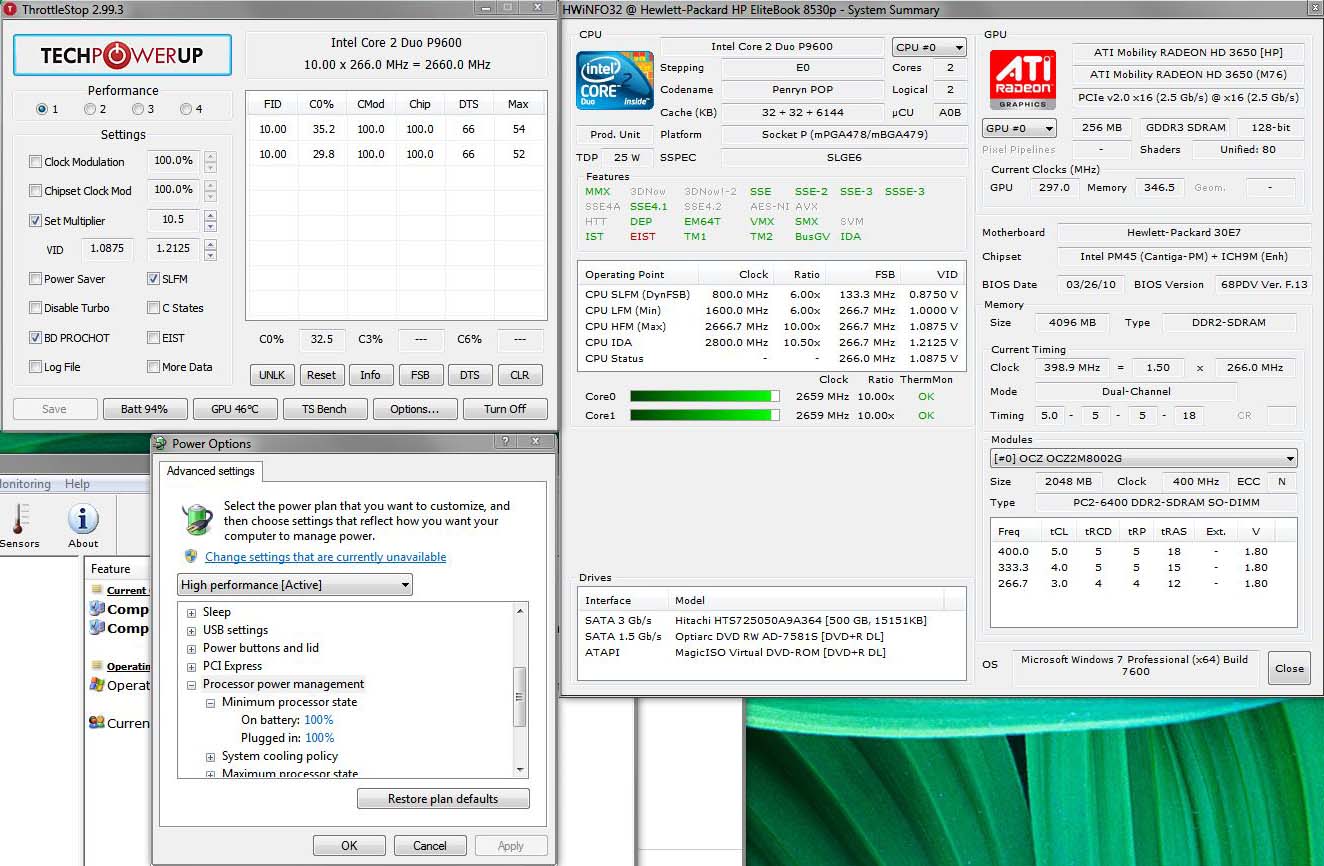
I tried it and ESIT is no longer grayed out. However it doesn't seem to work on my 8530p upgraded with a P9600. Max cpu speed is 2.66 GHz and with ESIT it should be 2.8GHz and this is what HWiNFO shows it just never gets to 2.8GHz (green bar up to 2.6 and I never see 2.8GHz).
I've tried the the steps in the first post. However, even though I can set the multiplier to 10.5 (default P9600 max is 10), I never see it used. I tried raising the minimum power state to 100% and DualIda = 1 and 2. Nothing seems to work.
Any ideas? -
This is how I got Dual IDA with my T9400.
1. increase VID to max
2. increase Multiplier to max
3. check Set Multiplier
4. uncheck EIST
The result is shown in the screenshot. I used the "Balanced" energy profile. -
Thanks again but I tried that and doesn't work for me. Thing is regardless of TS, once EIST bit was enabled in bios I should see IDA cpu speed/multipier being used if a load the cpu with a single threaded app. I don't ever see IDA happening so trying to lock IDA in with TS seems moot.
I installed Intel chipset driver info could this cause IDA to not work? Can't seem to uninstall it has it doesn't show up in the add/remove programs list.
Not sure what could be causing IDA to not work. I'm using Win 7 x64. -
Set your Win7 power profile to use 100% minimum CPU. Set a x10.5 multiplier (highest) in TS. Right click in TS and select "Start Dual IDA". As long as EIST is unlocked in the bios AND your CPU supports IDA then that should work. Certainly did on a U7600 and SL9400 that I tested.
-
Tried minimum power states as well as "Start Dual IDA" and setting DualIDA=2 in the .ini file.
Here is a screen capture.Attached Files:
-
-
veloscaper: Can you try toggling the Disable Turbo option on and off? It looks like the bios has disabled IDA / Turbo Boost on this CPU. If you can't get single IDA working then you definitely won't be able to get Dual IDA working.
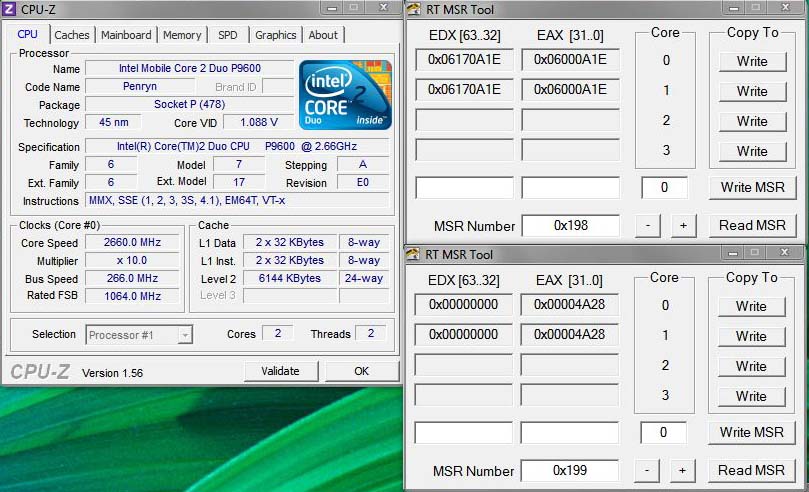
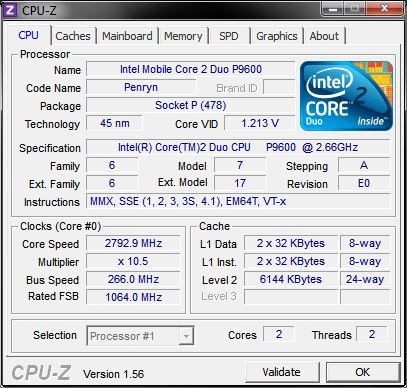
Can you post a CPU-Z screen shot too? Is this an ES processor or a retail OEM?
Can you download my MSR Tool and enter 0x198 in the MSR Number box at the bottom and then click on Read MSR. Do the same for MSR 0x199 and then post a couple of pics.
http://www.fileden.com/files/2008/3/3/1794507/MSR.zip
You can run two instances of MSR Tool if you want so you can read both of those registers on the same screen shot.
Edit: I fixed a bug where ThrottleStop was showing the UNLK and Reset buttons on your regular CPU. These options are only supposed to be available on the Core 2 Extreme CPUs. I couldn't find anything unusual to fix your IDA problem.
http://forum.notebookreview.com/7142585-post260.html -
Tried toggling Disable Turbo before and tried again with no change. Got the processor off ebay with no retail package, think it came from a Dell laptop and I don't remember seeing any ES on the lid of the chip. So I think it is retail. If nothing works I'll crack open the notebook and remove the heatsink to verify no ES.
cpu-z and MSR captures.Attached Files:
-
-
veloscaper, would you please tell me what MSR 0xCE reads. No need for a SS just cut and paste the numbers will do.
-
MSR OxCE:
EDX:
0x80174A28
EAX:
0x4345060D -
Okay that looks good, shows IDA present. Now what do MSR's 0xE2, 0xE3 & 0xE4 show?
*Something bad going on with my ISP connection at the moment, hope it doesn't last too long. -
MSR 0xE2:
EDX: 0x00000000
EAX: 0x02264508
MSR 0xE3:
EDX: 0x00000000
EAX: 0x10140414
MSR 0xE4:
EDX: 0x00000000
EAX: 0x00040414 -
The CPU looks fine. Give me a moment or two and I'll see if I can dig up some old SW that you could try.
-
Dufus, got the PM. Ran it and it quickly came back with "success".
So what's going on?
Thank you.Attached Files:
-
-
Well that's good news, shows IDA engaged and should be on both cores which you should be able to verify with HWinfo32.
Probably best if Kevin answers, may be just some finger trouble. -
veloscaper: The Specification box in CPU-Z shows your P9600 is a regular OEM CPU and it is not an ES processor. Now I just hope Dufus can tell me what register I forgot to check and adjust so I can get ThrottleStop fixed up for you.
Don't let his avatar fool you. Dufus is the brains behind Dual IDA and a few more TS features.
I'm just the programmer.
-
I succesfully enabled dualIDA on both cores, on my Dell Latitude D830 T7300, while using a multiplier of 11.0 @ 1.05V (2.0GHz->2.2GHz). I got a 9% cpu performance increase according to wPrime (2 threads).
In ThrottleStop 2.89, I had to manually uncheck 'Power Saver' & 'Disable Turbo' though. As my previous VID was sometimes even higher than 1.3, this caused a big temperature drop (from being temperature throttled using prime95 @2.2GHz to max 81 C).Attached Files:
-
How to Enable Intel Dynamic Acceleration (IDA) on Both Cores of a Core 2 Duo
Discussion in 'Windows OS and Software' started by unclewebb, Apr 21, 2010.


![[IMG]](http://img151.imageshack.us/img151/1925/dualida.jpg)


![[Sander]](images/avatars/[Sander])