
Hm, that's weird.
Are you using overclock level 1/2/3? Generally it should not be used since it adds too much voltage to the system.
-
-
I think we talk about 2 different facts. I dont mean the ,,fan performance mode,, i know that this mode means full blast.
I talk about the cpu performance mode where i can adjust the multis and Powerlimit. If i turn this on my fans spin 2600/2700 during idle... that doenst make sense to meNeal0790 likes this. -
Oh that.
If you turn on cpu performance mode it will overclock the cpu to whatever you specify in the bios. Overclocking creates more heat. -
Still doesnt make sense... its not important if i run 3.5ghz with 1.1v or 4.8ghz with 1.5v @ load. During idle my cpu runs 1.xghz with 0.xv. There is no reason to spin up the fans while idleing with 1.x ghz
c69k likes this. -
Considering this for the 15r3. Got my comp it goes to 97 deg running OCCT after a -.190 undervolt. Most tasks can go on without getting too hot it seems for now.
I assume theres very little if any heat transfer going on underneath.
Should I go through all this? Should I get thermal pads too? Or is it more likely the hardware it totally fooked and needs to be replaced by Dell?
If I get pads, which do I need for the 15? The same or? -
Nope im using a customized setting at 4.0.
Yep i have the same thing going on. Cores are at 1ghz but my fans are spinning at like i have a full load. Ive opened up hw64 and gone into the fan settings and clicked auto mode while its happening and they immediately go to normal, but after a few minutes there right back up to full blast again. Makes me think something is wrong with the fan profile, it knows what setting it should be at but its not adjusting the fans correctly.
Ive debating on trying to make a custom profile that matches alienwares, which might override the stock one. But i have no clue how to go about doing that. Theres way to many sensor settings and i dont want to mess it up. -
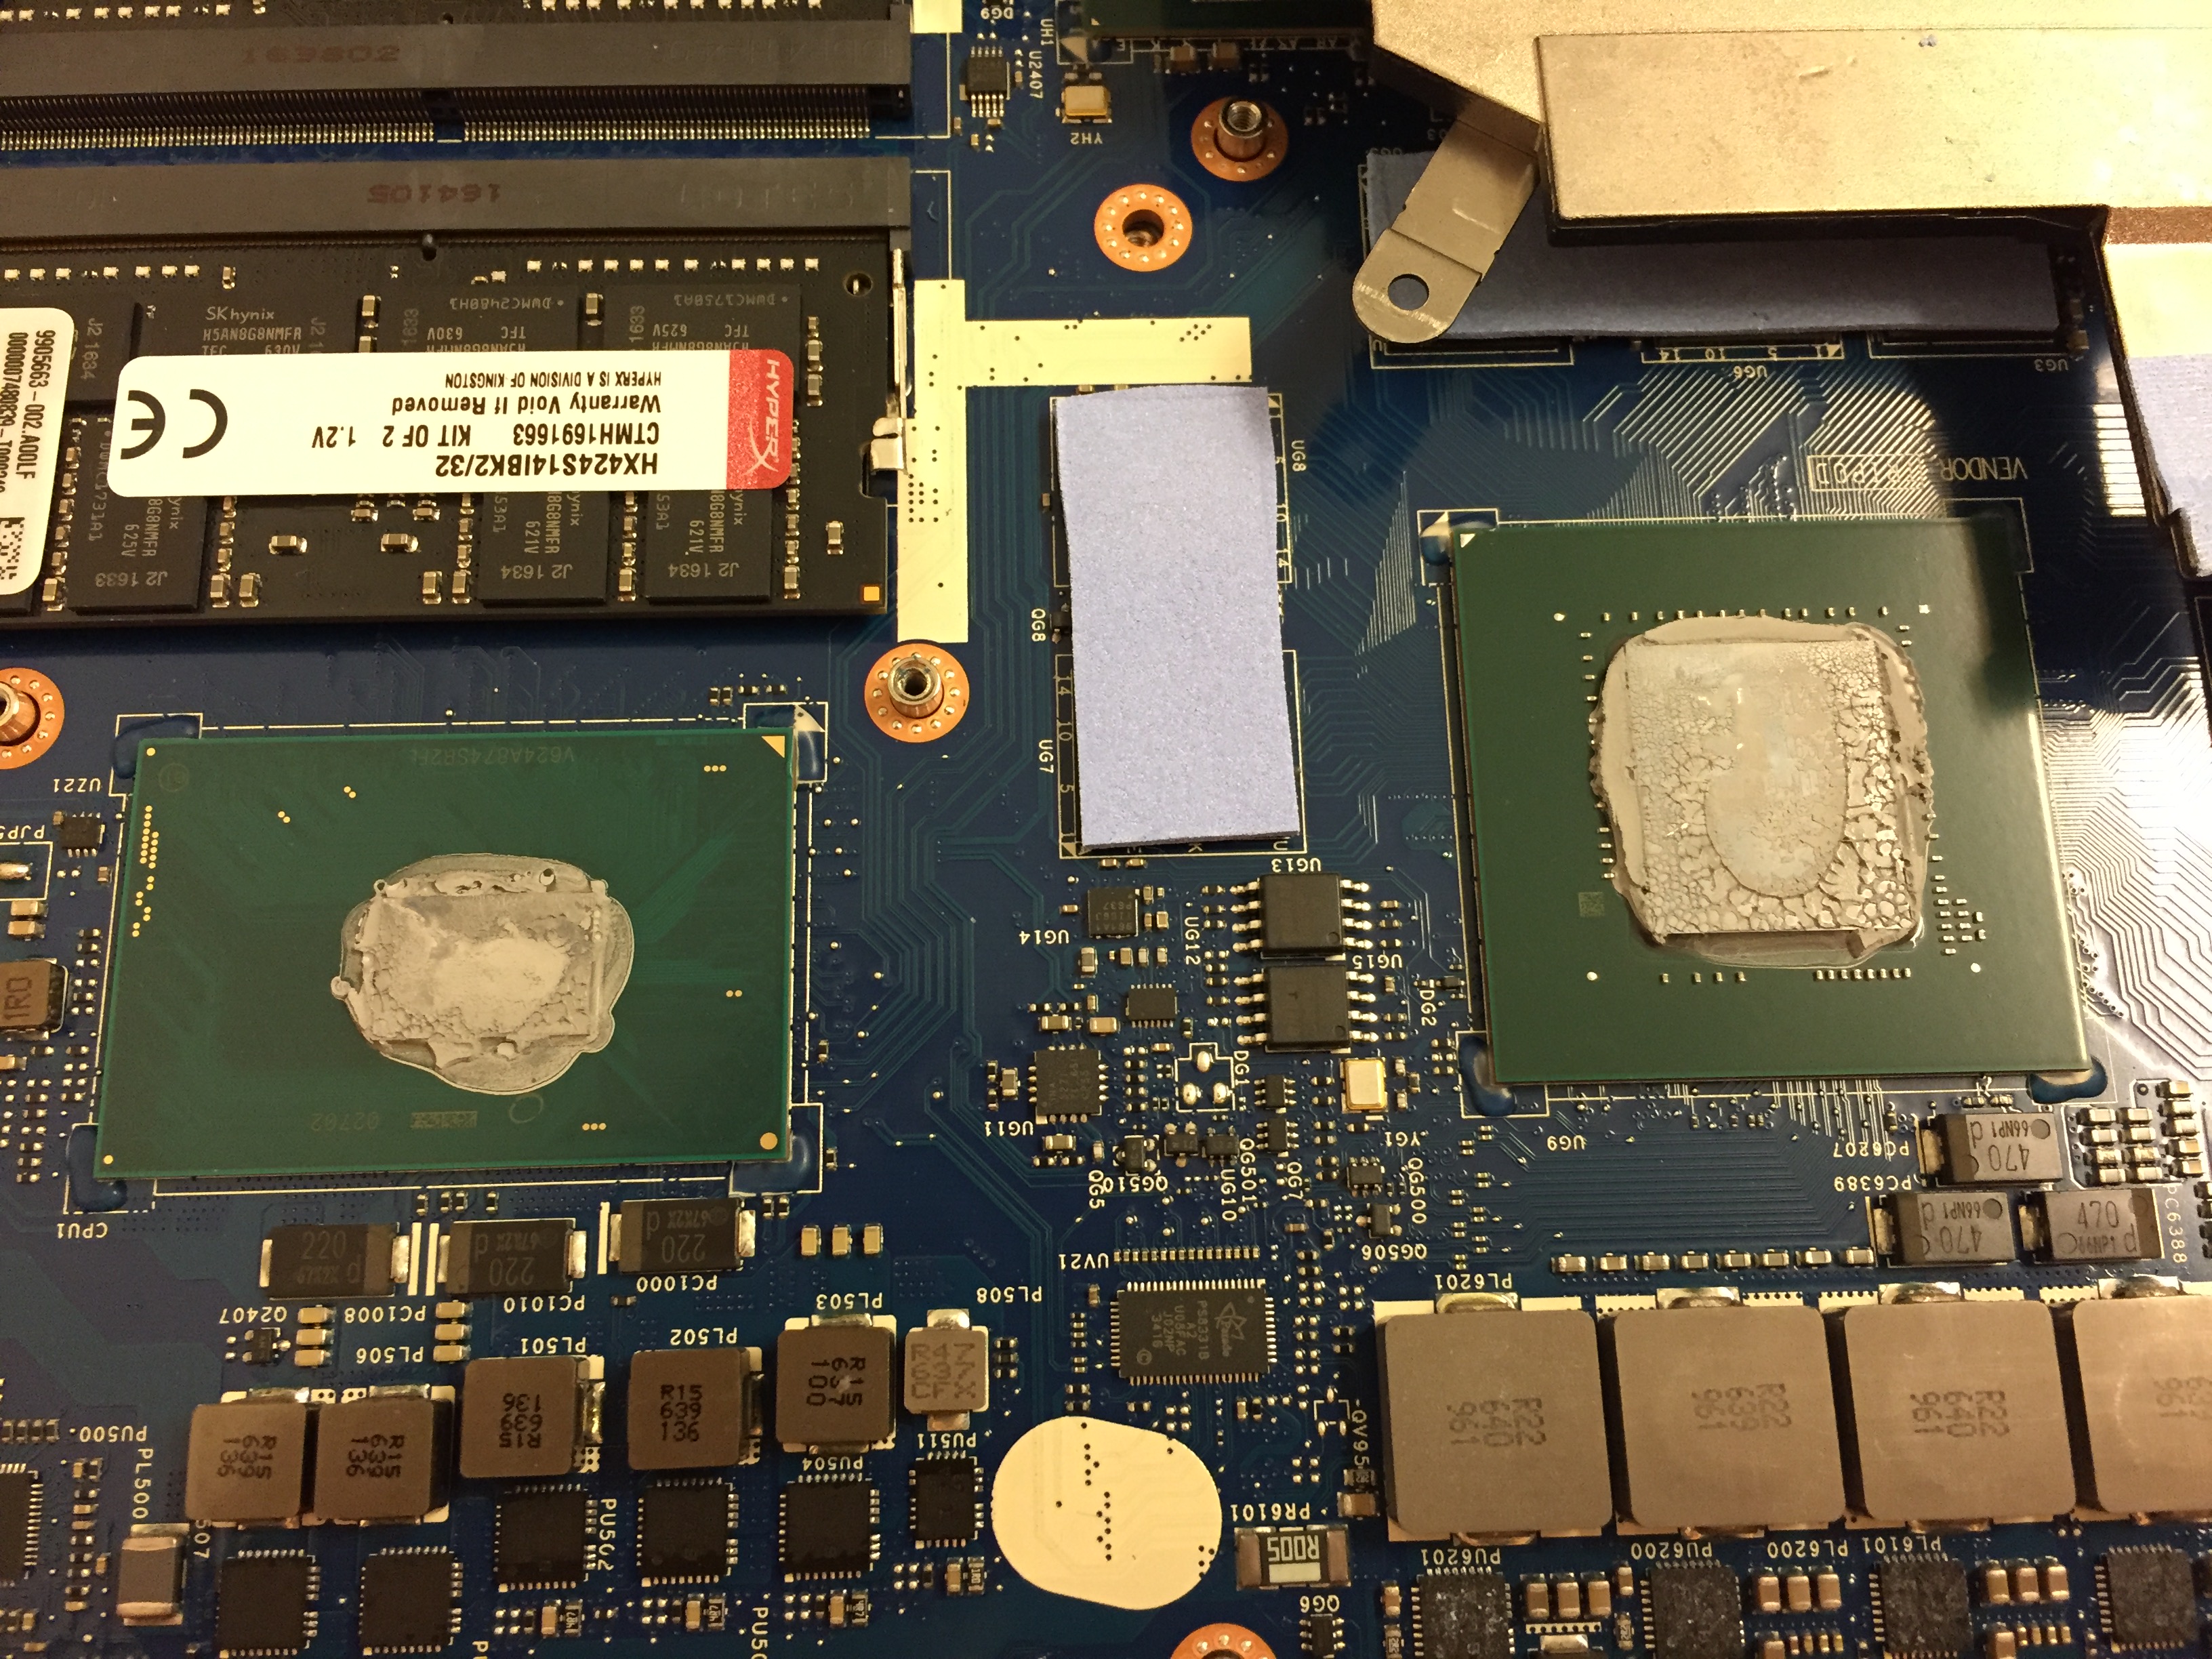
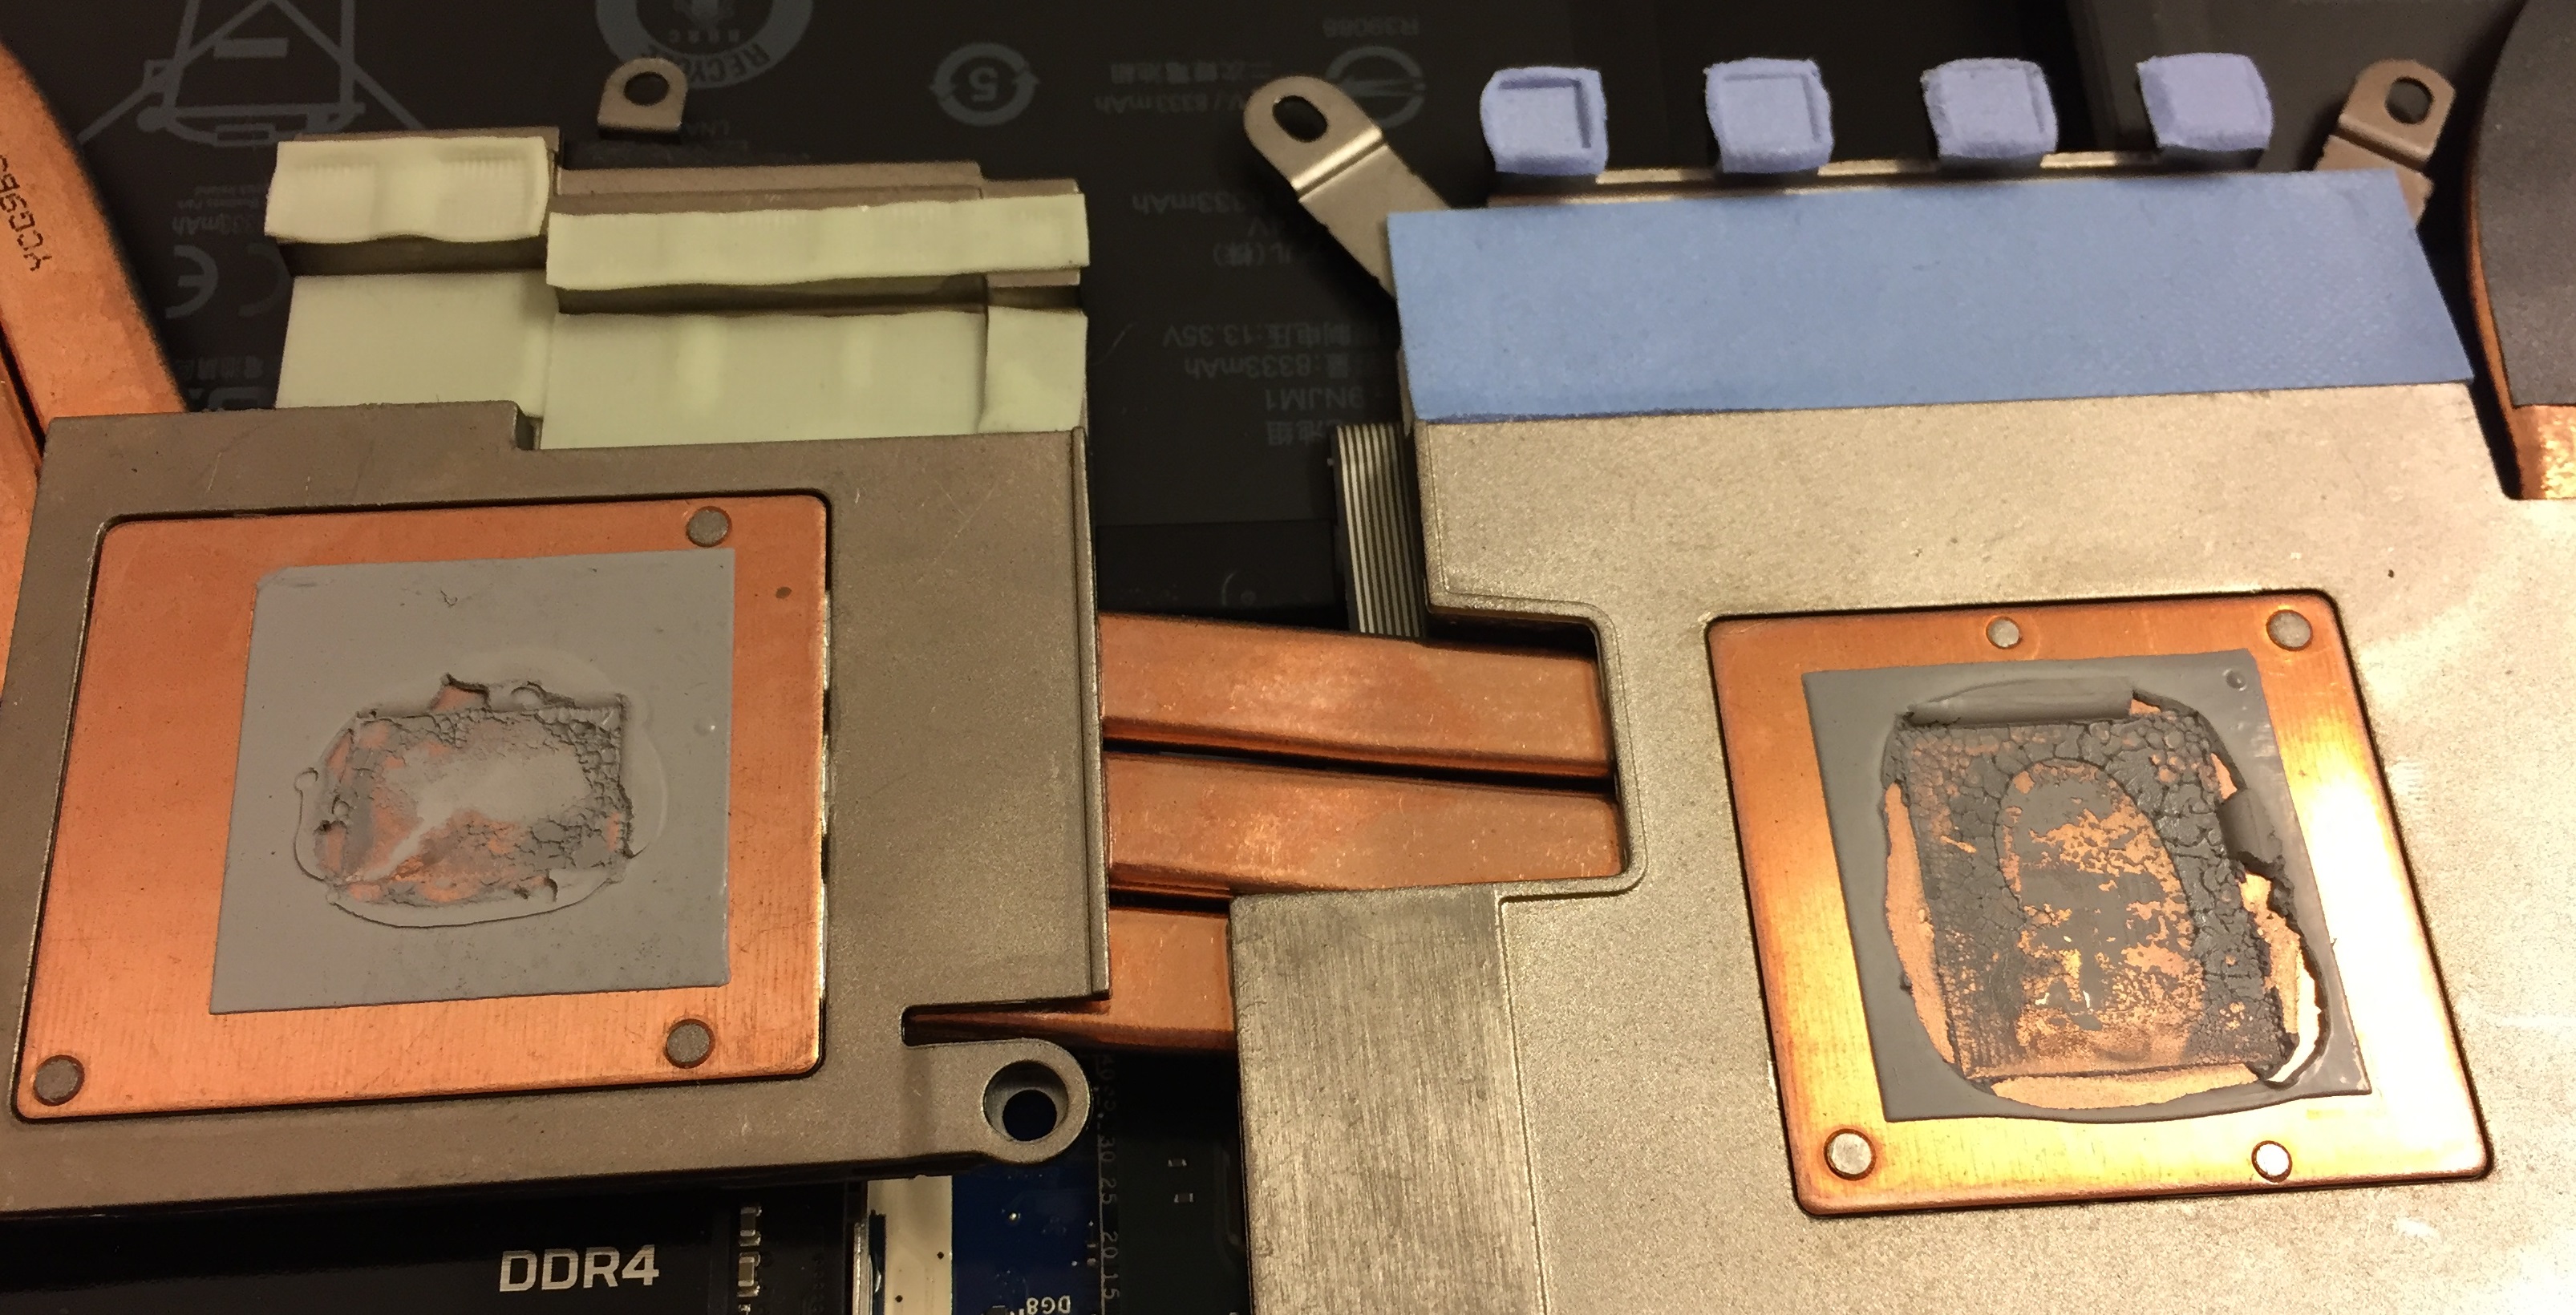
Want to share my experience re-pasting AW15R3, which unfortunately, didn't improve uneven CPU temperatures
") .
.
It seems the only option will be to add a copper shim and adjust thermal pads thickness.
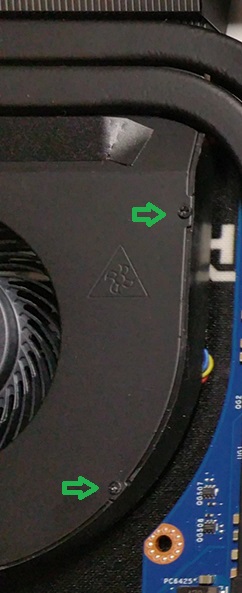
BTW, you don't need to remove mobo to repaste, just remove 6 tiny screws on fans to release the heat-sink.Attached Files:
Chrischank and Xenrail like this. -
-
Nice I am going to try this!
Question; How did you apply the paste?
You have to spread it yourself and spread it on thick because of the uneven pressure. -
I used Thermal Grizzly Kryonaut, evenly spread with thick layer over CPU and GPU.
After short test seeing no temperature improvements, I removed the heat-sink, the paste was still fully covering the CPU.
The thermal pads 0.5mm (DC/DC ICs) on a first screw side had very good footprint.
But, same thickness thermal pads closer to CPU didn't have good footprint from coils.
So, I decided to mod the surface of radiator (removed about 0.2mm), but still no luck - same uneven CPU temperatures.
I did some quick measurements, and it seems the radiator itself has quite bad tolerance, which produces the gap over CPU.
As soon as I get copper shims will continue re-pasting my AW
Chrischank likes this. -
what's the usefulness of scotch? sorry I speak very little English.
-
found
-
Didn't take myself, but found one in the Internet that should work (see below).
There are 3 screws on each fan holding the copper plate extending from a radiator.Attached Files:
Last edited: Dec 11, 2016 -
-
Hey guys, been watching the top threads for a while now as I've bought an AW 17 r4 1080 on 26th Nov and it's due to arrive on the 16th Dec. I've decided to do the repaste even though the cost of all the bits is just under £100 (those fujipoly pads better be worth it!) in the UK! I've done half a dozen or so repastes in the past successfully (mainly on Xbox 360s and I still have my original xenon series 1 going from 2005 so I can't be too bad
) but never with liquid metal. I'm very organised and confident plus the guide looks really good so I'm confident in my abilities to get the job done. I have a couple of questions, probably for iUnlock:
1, Thermal pads seem to be shown on the mobo and on the heatsink in the guide for the same area (First 2 pics of the AW1080 Model section), can I ask why? I'm sure it's only meant to be one pad at the thickness you state but worth checking...
2, Can you add the picture showing the bending of the heatsink arm to the repaste guide for when I (and others) go through it soon?
3, You recommend the fujipoly 11w/mk pads in your guide but I can get the 14w/mk extreme plus pads for a tiny bit extra (same depths). Is this ok or shud I avoid it?
4, What's the gloves you're using in the Wi-Fi card video and other pics?
5, Are you grounded in anyway at your wrists?
6, Are you working on an Antistatic pad/surface?
Cheers!
PeteLast edited: Dec 11, 2016 -
Nope, performance mode is off. I used only a cooling pad (cooler master U3) while testing.
While I am gaming (Tomb raider) the temps are around 72-76. This is with undervolting -0.150.selvedge likes this. -
What are you guys trying to do? Repasting requires flipping over the motherboard to remove the fan cables before you detach the 7 screws holding the heatsink to the motherboard.
Only the 13R3 does not require a motherboard flip.
1. There is multiple thickness thermal pad on the system. The pads are ok if they stick to the motherboard or heatsink during removal, you can carefully remove this and store it for later use (if you replace the pads).
2. Bend it upwards maybe 10-20 degrees, use your feeling to indicate that the bend will apply pressure on the heatsink when it is screwed down.
3. 11/14 is okay, very small difference so go with whatever is cheaper. 17 is too dense.
4. Just for safety and cleanliness.
5. Yes, with antistatic wrap.
6. Yes, pad and surface (rubber carpet).
All of these are standard practice of the LHz team when repasting. -
Look closer at the left of the picture. I think the heatpipes are fixed on fans' removable part.
![[IMG]](images/storyImages/1481537746-fan-unmount.jpg)
-
how did I even miss that lmao
although you'd also have to break the seal on the fan's fabric sticker -
Don't blame yourself, that wasn't easy to see at first glance.
I suspected it was possible but thought if there was anything else the heatpipes might be holding on. At least Dust cleaning will be easier.
Edit : If done as you repast of course.Last edited: Dec 12, 2016 -
Anyone have a link to the screws that hold down the tension arms on the heatsink?. I destroyed one pretty badly and want to order a few more for the future. I noticed there the same screws that old down the ssd and WiFi card too, so I used the ssd screw instead.
-
-
Can also get it from home depot. -
You must have a neat regional Home Depot. I've never seen big box stores like HD carry small precision screws.
Sent from my iPad using Tapatalk -
Screw size is M2x3. This is for M.2, wifi and heatsink. M2.5x5 is for most of the screws sizes left.
Neal0790 likes this. -
Thank you, just ordered the ones off amazon. This makes me feel much better about tearing it down again in the future.
-
First try after repaste with LM
@iunlock are these temps ok or should it be better? 4.2ghz is gamestable so far. Played 3h BF1 yesterday. If i stress cpu@ 4.2ghz and gpu@1950mhz at the same time, temps ar a bit higher. Cpu high 70s and gpu 61 degree. Ok oder repaste again?
Ps: firestrike runs fine with 4.4ghz too but dips to 4.2ghz during physx test... but fir the first try it is ok
Attached Files:
Last edited: Dec 13, 2016 -
-
The first and third pic links are broken...try uploading them to a 3rd party instead.
Looking forward to seeing the temps!
Good stuff... -
Ok here you are
First one:
![[IMG]](images/storyImages/qwgqc7pt.jpg)
Sec
![[IMG]](images/storyImages/56wjg89s.jpg)
-
Third
![[IMG]](images/storyImages/numyokiz.jpg)
Sry for doublepost... browser was buggy
-
Is the new fix out the one iunlock mentioned ???
-
I am currently waiting on my 17 R4 with the 1080 (getting delayed due to dell not having parts). I plan to do the repaste on the cpu and gpu soon after I receive it. the biggest question I have after reading through everything is how long do you let the LM set before putting the heat sink back on?
-
You can put the heat sink on immediately.
-
I'll be talking about it in the next video.
-
Looking great. Can you run OCCT for 1 Hour and post up the results? Also take screen shots of the rest of hwinfo64. Thanks.
-
Yes of course. Can run it in the evening. So temps are ok? Or do you think an new repaste with LM would result in better temps? Core difference is still to high... looks like i did not bend enough that tension arm
-
I tried the bending arm thing, but for me it didnt worked/got no improvement.
Still sitting at high 60s while occt for half an hour.
I cant explain how u got that good temps out of an aw15 @iunlock..
I used conductonaut btw. -
The temps look good. When you post the OCCT run, can you please make sure to post all the info on hwinfo64. Looking forward to it!
I can't tell you exactly why it didn't work for you, but perhaps the heat sink is too deformed? Can you post pics of the OCCT run? Thanks. -
Ok wow.... @iunlock occt produce more load than xtu stresstest. My 4.2ghz setting drops with occt down to 4.1ghz and stay there... increasing the powerlimits doesnt help...it makes it dropping more. Can you tell me your secret? How can i stop the drops? To be honest...ot only drops in occt so... in every daliy task it stay at 4.2ghz
Heres the difference between occt and xtu stresstest.
Firdt is occt with a horizontal flat line and then xtu with load spikes down to 95%
![[IMG]](images/storyImages/6m4taz6c.jpg)
Cpu runs fine @4.4ghz @xtu stresstest@20minutes -
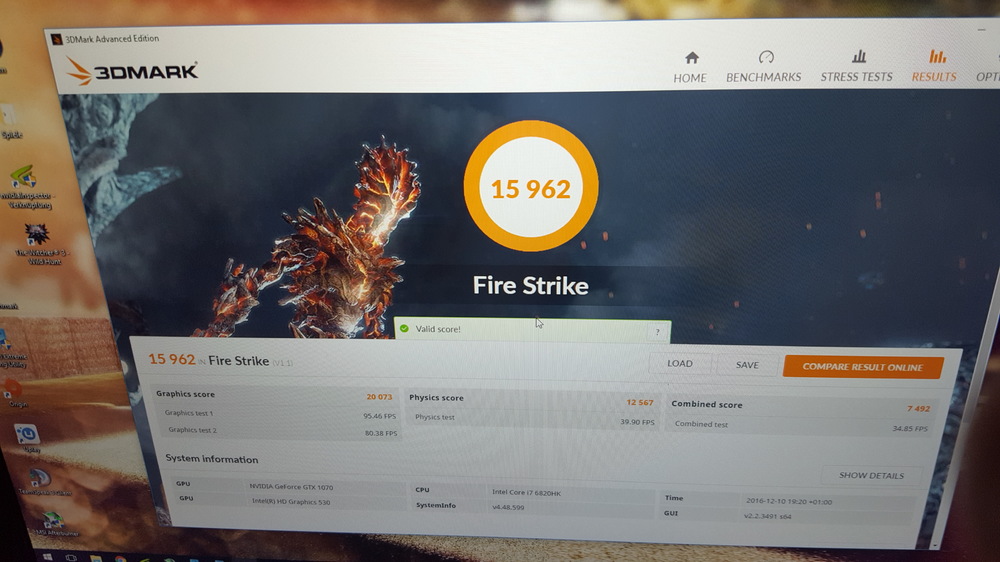
@iunlock finaly
![[IMG]](images/storyImages/031e57-1481660045.jpg)
Atm at 15min. Let it run another 45
-
I run OCCT minimal 8 hours to say something is stable.iunlock likes this. -
Now that's a real test....leaving it over night
-
I remember times where a cpu was called ",rock stable" only when it survived 7 days of prime95! i had my Q6600 run at 3.4GHz if i remember correctly... it went through hell I promise u
where are those times and why does no one use prime anymore?Johnni3 likes this. -
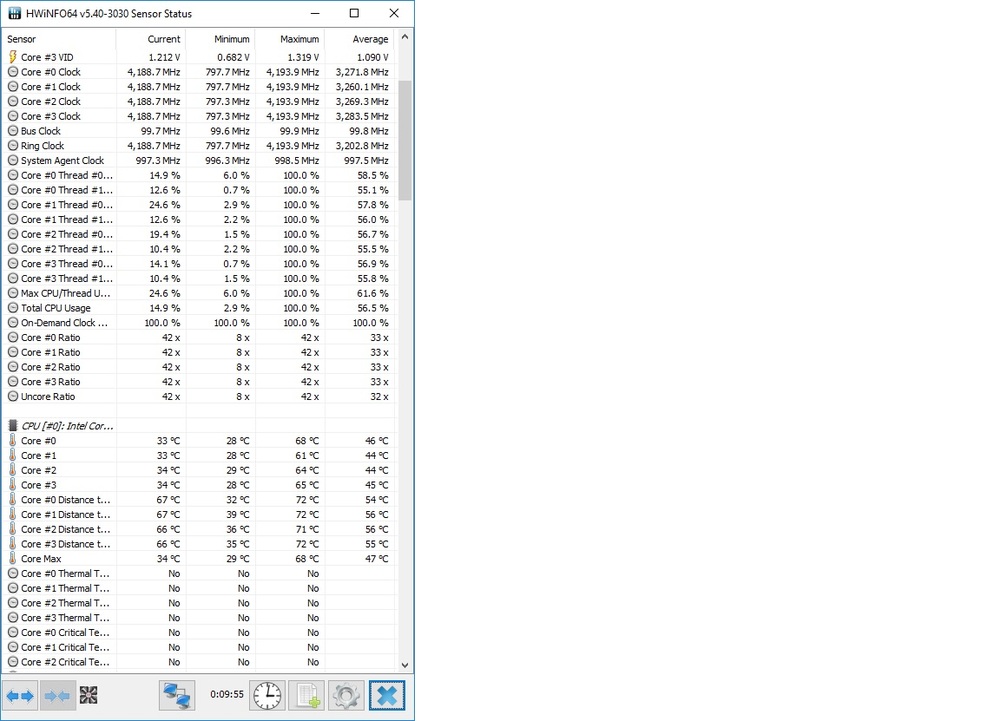
@iunlock
Passed
![[IMG]](images/storyImages/cea00a-1481693608.jpg)
-
barely 1 hour
run 8+ hours as I have said -
Ähhmm no...why should i? Absolutly senseless... 1hr prime or occt and a few hours game (bf1) is absolutly enough for daily stability.
-
Haha right? However, those tests are not practical as they are way overboard in an unrealistic way to be compared to real world hard core gaming or CPU intensive tasks....
I do get what you mean though...yea those were the days...
It looks like you had your CPU clocedk to 4.4, but it was throttling to 3.0GHz? Would you be able to post a screen shot of your entire screen with HWiNFO64 open as well so that we can see the current, min, max and avg info? Also it'd be nice to see the power limits and CPU wattage etc...
Thanks
Johnni3 likes this. -
No the 4.4ghz overclocking test was before my occt run. The cpu stayed @4.17ghz all the time.
I will do a new screenshot for you
Temps ok? Or should it be better? -
If you had repasted with LM, 80C's is a bit high although if you're happy with those then that's all that matters.
Thanks for posting the screenies....they are always welcome...more the merrier. -
Can you do an run with 4.2ghz for 1 hour? You had 66 degree 4ghz... 14 degree increase with 200mhz+ and more voltage semms legit to me
-
@iunlock did you get 4.3 or 4.4ghz stable with occt? If yes can you tell me how?
4.2ghz did not drop...but 4.4 drops down to 3.8ghz...
[Alienware 17R4 / 15R3] - Disassembly + Repaste Guide + Results
Discussion in '2015+ Alienware 13 / 15 / 17' started by iunlock, Oct 22, 2016.


![[IMG]](http://www.bilder-upload.eu/show.php?file=031e57-1481660045.jpg)
![[IMG]](http://www.bilder-upload.eu/show.php?file=cea00a-1481693608.jpg)