
I replaced the SSD on the samsung 960 pro. This mod lowered the temperature 10 degrees and removed the throttle.
Heat pipe mod allows to reduce the temperature of the pack by 3-5 degrees no more.
-
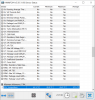
2 hours of overwatch(Cpu 80-90% and 99% gpu on match) -
Can we get a better view of the whole heat pipe mod? I was thinking of using the extra heatsinks from the PCH mod that I'll be doing, or will that be an issue as they aren't a single piece?
-
Doesn't tell us anything buddy, we need screenshot showing everything I mentioned in last post. See the link in my signature to "BF1 @ 1440p" for an example
Sent from my SM-G935F using Tapatalk -
I did not notice that BF1 has loaded your hardware stronger than overwatch
 .
.
kk 1 hour of overwatch - extreme 1440 ~fps 124. Without cooling stand. Unit just set on a table.
3.8 GHz -0.080v
GPU overclock only memory + 300 / curve in screenshot (but it dosen't work)


P.S. What is IA Prochot? Despite all my actions it always enabled вut besides that the graphics are locked in powerlimit all fine.Last edited: Oct 11, 2017Pete Light and Vasudev like this. -
Temps looks fine to me. Check Intel PCH temps in HWINFO, can you post that screenshot after gaming for an hour with and without using the cooling stand?
-
Nice mate those are some great temps you've done well!
Do you have bdprochot disabled in throttlestop? I think that may resolve that limit being triggered...
No matter what way you cut it that's a great result with the PCH. Mine consistently breaks into the 80s but I run a much higher CPU and slightly higher GPU clock than you (but lower undervolt).
Only thing I would say is you're not sustaining a very good GPU clock at 1V, hopefully you can push that further with a better curve...
Sent from my SM-G935F using TapatalkVasudev likes this. -
This required significant intervention in the chassis of the laptop. I'm not sure that Dell will not nullify my warranty for such intervention.
I think the PCH temp can be reduced to 50 degrees bringing the heat directly on the bottom cover of the laptop.
However, I kept the original detail
Pete Light likes this. -
-
Sad update:
After 3 months of travelling with it,and using it with LM Conductonaut, last night laptop failed to boot 4 times in a row.
My worst fear happened.
LM runout.
When i applied the paste,mind you, i applied very little , because i was afraid of it running out.
Note: i use to travel a lot and use the laptop in many places,so laptop sometimes gets picked up and placed in the bag minutes after shutdown.
In the past 2 days tho,i saw heat creep up to 80-85-88...but,being a complacent lazy ass, i said it will hold till i arrive home in a week,and repaste/clean...
No such luck!
Sadly,there is no surface tension that holds it in place, as i hoped.
So when it booted, after removing a ram bar, i was fortunate enough to get boot...but also a hang in windows.
CPU didnt fry...thank Lord!
Shutdown,battery disconnect,and fast forward today..
Boot start, heat instantly rose to 60 in idle...took it apart,and cleaned it with alcohol for the better part of 4 hrs.
LM everywhere...small bits...and i mean everywhere!
I forgot to take a pic, but trust me, it was scary.
So...after i cleaned everything multiple times, compressed air blow the rest twice, and i spect almost every connection...i put it back together with what i had around: noctua nt-h1.
Booted fine, in stress tests its at 85peaks with mids to 80.
I dodged a VERY expensive bullet (a MB i see it's at 900$).
Moral of the story:
LM is NOT suited to travelling and tilting laptop...regardless of how little you put.
(I used electric tape and a small bean that i then fought for an hr to make as level as possible on cpu die....and didnt put any extra on the heatplate...juuuust barely rubbed it with the tip of the application bud...again,minimum possible.)
So be careful guys...it CAN happen.Pete Light, ShotOfB12 and Vasudev like this. -
yes, but luckily i acted smart and didnt fry anything....but damn that was scary....
now i am trying to think HOW can i use LM and still hold it in place....
anyway,with noctua in its place, i get 83-70-80-69 on cores, with min at 55-57ish. not as cool,but....not too hot. for now.Pete Light and Vasudev like this. -
Its because of those LM runaway issue, I always stick with traditional paste. Try Phobya Nano Grease or TGK.
-
If there were droplets all over the PCB (not ONE drop but lots) then you shouldn't use LM on that system at all because there is obviously terrible mounting pressure. Under normal conditions, you would use the foam dam method that has been discussed multiple times now, along with the nail polish or tape (Super 33+ or kapton) over the resistors. The foam dam will stop LM from getting on the PCB but it won't stop it from leaving the CPU if the mounting pressure is terrible.
sometimes you can remove the "screw washers" to allow a little more pressure from more turns to tighten the heatsink down more, but that's assuming it's already properly balanced, not warped, and the thermal pads are the correct thickness. They might actually be called c-clips or something. Maybe @Mr. Fox can help more.
http://forum.notebookreview.com/thr...16l-g-1080-15-6-owners-lounge.797128/page-849 -
Foam method is needed otherwise Lm will run awat. +rep added. Sorry for that incomplete info on rep, I accidentally hit enter key so I couldn't complete my sentence. Forgive me.
Like @Falkentyne said @Mr. Fox can give insights. I believe someone posted their LM experience using custom foam and tapes to ensure zero LM spillage while travelling. -
If the c-clips are causing interference, the heat sink will bottom out on the c-clip before the cold plate on the heat sink is pressed against the CPU by the springs. The c-clips are only for convenience. They keep the screws and springs attached to the heat sink when you remove the heat sink assembly. They serve no other purpose. If you are not sure and cannot see well enough to determine if the heat sink is hitting the c-clip before the cold plate is pressed against the CPU, just remove them and reassemble. If contact was a problem because of the c-clips you will know it right away because the temps will be better due to improved contact. You can also add washers between the screw head and springs to create more pressure from loading the springs more. Don't go crazy with this. Just add one or two washers above each spring. Excessive pressure could crack the die on a topless mobile CPU. Adding a washer or two can create more pressure when the screws are already tightened as far as they can go and that is still not enough.
Foam barriers... works for CPUs and GPUs. If you use foam or thermal pads for barriers, they have to be thin enough and soft enough to collapse completely under the pressure of the heat sink. Otherwise, the foam or thermal pads will be an impediment to contact with the die and your temps will be worse rather than better.
Last edited: Oct 13, 2017 -
this is like opening a whole new can of worms right here...when i applied the first LM, i used iunlock's thin heat strip mod and ,ofc,electrical tape and then LM.
I did hope/believe that the lm would stay in place.
physical barriers to this ....... seems overengineered and highly risky from my point of view.
I am now considering finding the new updated heatpipe ...seems my unit has the old style of heatpipe. -
Zero risk. It's far beyond POC, already using it on three systems of my own and so are others. Not sure why you would see a risk to putting something soft and harmless in place to eliminate any possibility of the liquid metal escaping. Narrow strips of extra soft and squishy thermal pad also work, but the pad cannot be more than a few millimeters wide and 0.5mm thick or it will not compress enough and will be an impediment to die contact. Over-engineered is much better than a shorted motherboard, which has happened a few times to some unlucky folks. Most folks that know how to do it right will never have a problem, but an ounce of prevention is worth a pound of cure.
@iunlock is a smart guy. I'm not familiar with the "thin heat strip mod" you mentioned, or maybe I have seen it called by different terminology. Where can I see that?Last edited: Oct 13, 2017 -
-
sorry, meant changing heat pad thickness to allow for better contact.
Mr. Fox likes this. -
Can't quite remember where I had previously posted but...as there are several threads on Alienware heat issues.....there's some data on different manufactures/revisions of heatsinks in the link.
http://forum.notebookreview.com/thr...u-core-temperature-differential-issue.805062/
__________________________________
Don't use liquid metal full stop use a thermal paste (not Kryonaut unless you are going to repaste the laptop at Quarterly intervals).
Don't use Fujipoly or Alphacool thermal pads (too still, firm, can't compress) use Silicone based thermal pads.
I'm not saying those items are not good, they're just not suitable for this application.
It is most disconcerting seeing false details/ideas/hearsays to be taken as truth just because it is often repeated.
For those unable to find thermal pads here are two links for Silicone pads, Free Shipping for some but US Shipping may be high...
http://www.ebay.co.uk/itm/ARCTIC-AC...e=STRK:MEBIDX:IT&_trksid=p2060353.m1438.l2649
http://www.ebay.co.uk/itm/ACTPD0000...e=STRK:MEBIDX:IT&_trksid=p2060353.m1438.l2649
I only used the 1mm (just roll it thinner to use as 0.5mm (manipulate as you see fit).
I'll reiterate again, I don't do repaste for others only for myself, I have no affiliation with any TIM sellers, so take it or leave it.
My Max temperature is satisfactory....but the core differentials are still niggling.Vasudev likes this. -
You mean this results is satisfactory? http://forum.notebookreview.com/thr...e-guide-results.797373/page-274#post-10611861 Or have you finally fixed temps? Because Stock clocks and 2C from thermal shutdown ain't nice.
-
I did a foam pad barrier like previously mentioned and I toss my 15 r3 in my bag everyday no problems. Get to it asap man
-
What kind of foam exactly can we use? An eBay/Amazon link is most appreciated.
-
I used some foam that was in packaging to protect an LCD display panel. It is a 5.0mm thick black foam rubber that is really soft and can be pinched between your fingers and collapsed to nothing with no effort. You could use some thinner foam. but I would not use anything thicker. It needs to be very weak/soft and offer very little resistance to compression. When you tighten down the heat sink it will need to mash down to less than 0.5mm (however tall the top of the die is from the CPU or GPU PCB). You can see what I am referring to about 20 seconds into the video.
Some expressed concerns about heat. I installed that foam barrier stuff on August 3rd and recently took things apart last week (about 6 weeks later) for inspection and there was no evidence of any kind that it was melting or starting to degrade from heat. It looked the same as when I put it there... no change.
Be sure to use either electrical tape or Kapton tape on the CPU and/or GPU PCB to cover the metal contacts and surface mounted components before putting the foam in place. You can use a small dot of super glue on top of the tape to hold the foam in place so it does not move during reassembly. I did that and it worked perfectly. The foam is not a replacement for the tape. It is only a dam or corral to capture and safely contain any liquid metal that might drip off from where it is supposed to be.
Last edited: Oct 13, 2017Ashtrix, Falkentyne, Vasudev and 1 other person like this. -
Has anyone used nail polish to coat the sensitive areas around the CPU/GPU instead of tape? What about using both?
Vasudev likes this. -
-
I'm not quite sure what you mean by 2° from thermal shutdown ain't nice ?
"Initial temperatures as received and stressed with standard clock speed (no overclock)...#O 98°, #1 77°, #2 93°, #3 72°, GPU 43°..."
Those are the temperatures when I received the laptop without repaste and repad, naturally I'm not satisfied that's the reason I did a repaste and silicone pads replacement resulted in the new OCCT readings of................................#O 78°, #1 69°, #2 77°, #3 64°, GPU 38° which is a very significant drop in core temperatures but the core differentials are still greater than 10°, the reason why I'm still attempting to reinstall the heatsink (with a little mod). -
Look on core #0 who was 98°.... This means temp is 2° from thermal shutdown. None of today's Intel processors will run 100°
Vasudev likes this. -
Maybe I had mislead you with my poor post, that #0 98° was a temperature reading as from the factory before I took it apart.
After repaste, pad replacement and a little lapping of the heatsink copper plate, it dropped down by 20° to #0 78° as shown by OCCT.
Would have made better sense if I had the sentence of "Initial readings...." at the very top of the post. -
I used nail polish to coat over the GPU SMDs and the CPU BGA SMD's. @judal57 did that also. Nail Polish has also been discussed on OCN.
https://www.gamersnexus.net/guides/3068-how-to-delid-intel-i9-cpu-and-apply-liquid-metal
Just make sure the nailpolish is made of nitrocellulose. And you should use transparent nail polish. -
Hello Guys, I`m from Brazil, and I`m trying to solve the thermal issues with my alienware 17 R4 - CPU 6820 / GPU 1080 . I did everything as mentioned in this post, and my temperatures still high, >90ºC. Can someone help me please ? What should I do ?
Regards.
Eduardo Zucato. -
i'd start with reading the first post.... -
Thanks I’ll look into it and update with results when I get it done.Vasudev likes this.
-
Can you confirm how high the heatsink was that you used and whether it was copper or aluminium? Have you got a link to the one you bought? ThanksVasudev likes this.
-
Pm me
-
hello there,
im kinda desperate. ive already sent my unit (aw 15r3, 7700hq, 1060gtx) back to dell because of high temperatures. actually nothing changed. i have never done a repaste. but actually i want to try it. as i travel alot, i want to use a traditional past.
may you guys tell me what i need?
do i hqve to worry about warranty?
best regards and thanks for the help. -
I believe that simply repasting won't void your warranty. If you read the very first post here, it will help you a lot.Vasudev likes this.
-
Great post and totally agree regards suspicions that a few people are milking the thermal issues by using tactics to promote a repaste service - whats worse its for systems that don't even needLast edited: Oct 17, 2017 -
My first repaste and repad yielded lower idle and max temps, but the core differtial became apparent like most people here. It’s quite annoying to be honest.
Do you have any lapping guides that I can do specifically for the AW15 R3? -
Lap it once or twice either horizontally or vertically and too much lapping would destroy the HSF.
Did you spread the paste on CPU and GPU?Vaeron likes this. -
I used the spreader that came with the Kryonaut. I did struggle a bit with it because I thought a small drop would be enough, so I ended up using a little bit more than what I would just to spread it. I’m repasting it again probably this week.
Zero experience with lapping, so I’m not in a rush to do that. I just want to learn and see if I can do it.Vasudev likes this. -
Use smaller blob on CPU and bigger blob on GPU, spread the bigger blob on GPU in one stroke and after that if the paste on the spreader is excess, wipe it and just spread smaller blob of CPU so that you don't overuse it.
As a test if you've older paste just follow the method above and put the heatsink back, don't put in the screws yet but apply a little pressure on heatsink on CPu and GPU and afterwards remove the heatsink and look how the paste spread. You could check mine,
*OFFICIAL* Alienware 15 R1/R2 Owner's LoungeVaeron likes this. -
We’re the blobs in the middle? I had to spread it several times on the GPU. I used a line on the CPU and worked my way with that. I find that if I don’t put more than I’m used to, then it won’t spread evenly in one go.
Your pasting is great compared to mine. I had it covered, but it didn’t look as good as yours.Vasudev likes this. -
I followed the same method as you, a line method on CPU and big dot on GPU, the first three pictures depict that horrible paste method, then the fourth picture is the method I told you earlier.Vaeron likes this.
-
Did you wipe the excess on the sides to make it look good? I find that spreading it on both dies wastes some of the paste.
-
I did not wipe any excess on the sides. Apply a little force say 1-2% of your total muscle power to finish it in a single or two strokes just like painting.Vaeron likes this.
-
Ah, crap. I think it’s because I’m only using the edge of the spreader. Kryonaut seemed too dense (?) for it to spread in one go. I guess I have to watch people how to do it as I might just waste my thermal paste.Vasudev likes this.
[Alienware 17R4 / 15R3] - Disassembly + Repaste Guide + Results
Discussion in '2015+ Alienware 13 / 15 / 17' started by iunlock, Oct 22, 2016.


