First off, i want to say that this has been a very fun for me. Since getting the AMD 7970m, there has been a permanent smile on my face. Hope you guys get the same perma smile
Difficulty Level: Moderate
Tools Needed: Flat Edge Screw Driver, precision philips screw driver, tweezers, a steady hand
STANDARD NBR WARNING: YOU COULD DAMAGE YOUR COMPUTER BY DOING THIS GUIDE. NBR AND MYSELF AREN'T RESPONSIBLE FOR ANY DAMAGE THAT YOU MIGHT DO TO YOU COMPUTER BY DOING THIS VIDEO CARD UPGRADE. PLEASE ASK QUESTIONS AND TAKE YOUR TIME TO AVOID ISSUES
1) UNINSTALL ALL VIDEO DRIVERS, RUN DRIVER SWEEPER and CLEAN ALL REMNANTS OF THE PREVIOUS DRIVER. IN DRIVER SWEEPER, ONLY CHECK OFF THE VIDEO DRIVER ELEMENTS OR YOU WILL BE IN FOR A REINSTALL OF WINDOWS. REBOOT. CLICK F2 CONTINUOUSLY TO GET INTO BIOS FOR NEXT STEP
2) DISABLE THE INTEGRATED GRAPHICS
Unlike the 6990m that featured manual graphics switching, the 7970m features ENDURO which is AMD's version of Optimus. It is dynamic gpu switching aimed at maximizing battery life.
At the time of writing, there is no driver support for the 7970m...hence no Enduro. We have to shut off the integrated graphics.
Using the unlocked version of BIOS A08 (or A04), go to Advanced>Video Configuration, and change Primary Display from SG to PEG, then click on Internal Graphics Device, then IGD again and change from Enabled to Disabled. Save and exit
Please be careful to NOT choose PCI for Primary Display this will most likely brick your bios requiring a blind flash to restore it
You can get a copy of the unlocked bios A08 here:
ALIENWARE 17XR3 UNLOCKED A08 BIOS.rar
![[IMG]](images/storyImages/Capture3.jpg)
![[IMG]](images/storyImages/Capture-4.jpg)
![[IMG]](images/storyImages/Capture4.jpg)
Once rebooted, the computer should be using standard Microsoft video drivers. Shut the computer down.
3) UNPLUG AC, REMOVE BATTERY, REMOVE BACK COVER
First Remove battery. Then there are two screws that need to be unscrewed ( green circles). Then slide the back plastic panel towards you and lift it off
![[IMG]](images/storyImages/backcover.jpg)
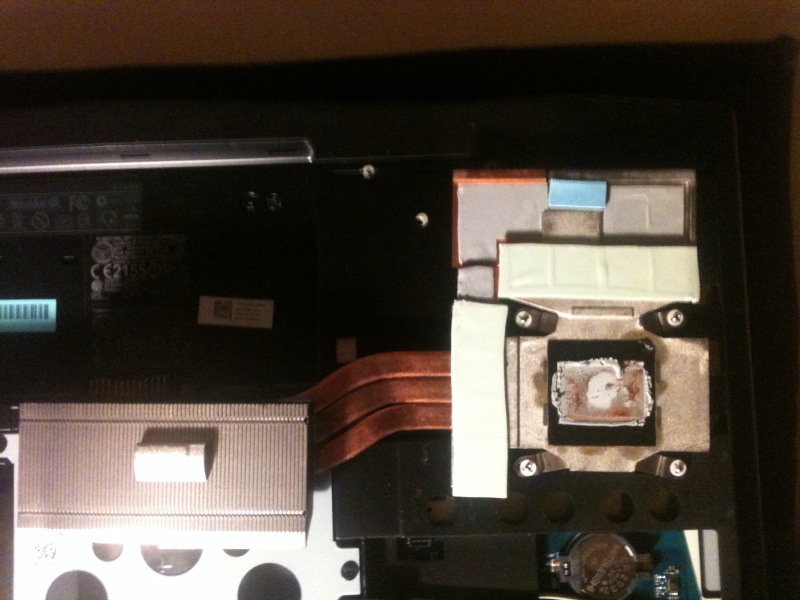
4) REMOVE GPU FAN and HEATSINK
Now look to the bottom right side. First remove the cpu fan, unplug the power connector ( RED circle).
Then, unscrew the 3 screws on the fan ( GREEN circles). Next, lift up the fan.
Now it's time to remove the heatsink.
First, unscrew the 4 screws that holds it snug over the GPU ( ORANGE circles). Follow the numbers...1-2-3-4, so unscrew 1 first, then 2, then 3 then 4. This forms an X pattern.
If this is the first time you've lifted up the heatsink, it won't come up easily. So take a flat head screwdriver and place it a few millimetres into YELLOW SQUARE. Then twist gently. This will lift the heatsink up. Don't push it in too deep or you will scratch the vram chip. This requires patience and be gentle
Now lift up the heatsink. Please be careful to NOT pull on the heatpipes themselves. I found them to be quite fragile.
![[IMG]](images/storyImages/Capture7.jpg)
5) REMOVE 4 PLASTIC STOPPERS, UNSCREW AND REMOVE VIDEO CARD
Now we see the video card. In the pic below we see an AMD 6990m.
You will notice 4 plastic stoppers ( RED CIRCLES). Carefully remove these as you will need to transfer them to the 7970m. I used tweezers to pull them off
Next unscrew the two screws that are holding the video card in place ( GREEN circles).
Now it's time to lift up the vid card. From the BLACK arrow, lift up to about 30 degrees, then pull the card out of the MXM slot ( ORANGE arrow)
![[IMG]](images/storyImages/Capture8.jpg)
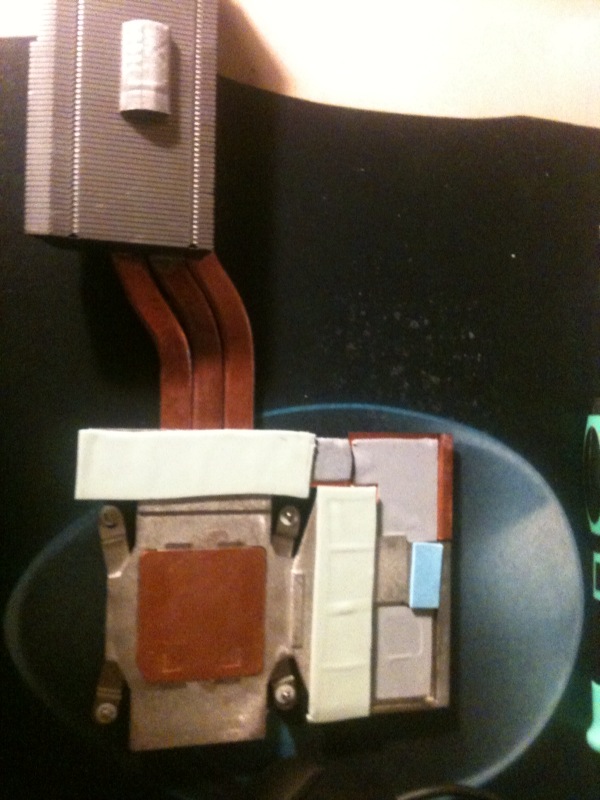
6) PREPARE THERMAL PADDING ON HEATSINK, THERMAL PAD ON BACK
***PLEASE NOTE, IF YOU ARE COMING FROM A NVIDIA 580/675m, make sure you have a compatible heatsink to the 7970m. The New 580m/675 heatsinks are NOT compatible with the 7970m and could cause issues with your card
I just reused the stock pads. BUT it should look something similar to this. I reused the stock 6990m heatsink as it is identical to the 7970m heatsink.
The pads should look something similar to this:
![[IMG]](images/storyImages/Capture6.jpg)
BigTony brought up a good point. He originally had a gtx 460m heatsink and there was this black Tape on the heatsink. You have to remove that black tape with a flat edge screw driver. The shape and size of the GPU die on the 460m is different to the 7970m. Take your time and be gentle
BigT's heatsink, that black tape has to be removed to have perfect copper to GPU die contact:
![[IMG]](images/storyImages/PC095435.jpg)
On the back of the card, please either reuse the large thermal pad found on the back of your existing card or put new thermal padding.
The pic below is the back of the 7970m, the area ( RED RECTANGLE) is the approximate place where the thermal padding goes. A good place to look is on the motherboard, there will be a 90 degree corner printed on the motherboard, that marks the upper corner where the thermal pad should go
On the motherboard, there should also be some black anti-static tape. This should prevent direct contact of X plate to motherboard ( BLACK RECTANGLE)
![[IMG]](images/storyImages/capture51MediumWinCE.jpg)
7) INSTALL VIDEO CARD, INSTALL PLASTIC STOPPERS, PUT THERMAL PASTE ON GPU
First install the 7970m into the MXM slot. Push it in at about a 30 degree angle, then push it down. BE GENTLE.
Next screw the card into the motherboard ( ORANGE circles)
Now, transfer the 4 plastic stoppers that were removed from the previous card ( RED circles)
PUT a dab of thermal paste in the center of the GPU die ( GREEN circle)
![[IMG]](images/storyImages/Capture5-1.jpg)
8) INSTALL HEATSINK AND FAN
Now you want to insert the heatsink. First slide the vent part of the heatsink to the vent port and gently place the heatsink onto the video card.
when screwing in the heatsink down...make sure you do it in an X pattern to keep the heatsink as flat as possible. Follow the numbering scheme...4-3-2-1.
Next, place the fan back in the fan slot and screw it in. Make sure you remember to connect the power connector or the laptop won't turn on
9) TURN ON COMPUTER, INSTALL AMD DRIVER
Now lets turn on the computer. If the video card works, you will boot into windows and be using the standard Microsoft video drivers. THe card should show up in your device manager as a Standard VGA Adapter.
Download this driver:
http://download.benchmark3d.com/AMD/Catalyst/8.951.1/8.951.1-120305.7z
I want to thank nbr member WILD05KID05 for suggesting this driver. He is an amazing technical resource. Up to this point i had been modifying several whql drivers but they did not work. I couldn't figure it out. Wild saw that the 7900m's required some new strings not found in the existing production drivers. CHEERS Wild! and THANKS
There are other modded drivers there...one specifically named "7900" which you might try but this is the one that i'm currently using and it works. Please experiment as new drivers become available.
EDIT: I currently have the 12.7 beta 7900 mod drivers installed and they work great!!!!
AMD Catalyst 8.981.2.0 12.7 BETA June 26 – 7900 MOD – BenchmarK3D
After unpacking the drivers...choose custom install. Make sure you install all of the following:
![[IMG]](images/storyImages/Capture9.jpg)
REBOOT.
THAT'S IT. ENJOY!
10) OVERCLOCKING
WARNING: Overclocking can have adverse effects on your computer if not done right. Please monitor your temps and avoid adding extra voltage to your card
So you have gone out, bought a shiny new 7970m and you were brave enough to install it. You've turned on your computer and were astounded at the improved performance of your computer.
And now, you want to see how far you can push the clocks
Now, finding a way to overclock the 7970m with no official driver and zero app support can be a daunting task. It may be easier as time goes forward, but at the time of writing, you can't overclock this card...OR can you? hmmmmm...only took me a week to figure this out, and now it seems so simple
Download and install MSI AFTERBURNER NOTE: Some have said that version 2.2.2 does not allow them to overclock. So go back to 2.2.0 or 2.2.1. Personally, i'm using 2.2.0
It has come to light that the reason why the latest MSI afterburner version does not overclock the 7970m is because it is missing the atipldxx.dll file. You can install the latest afterburner file and just drop this file into the root of the install directory and it will work
In the install dir, find and open up MSIAfterburner.cfg. You will need to open this up as a windows administrator
Modfiy the following lines:
UnofficialOverclockingEULA = I confirm that I am aware of unofficial overclocking limitations and fully understand that MSI will not provide me any support on it
UnofficialOverclockingMode = 1
SAVE, EXIT
hit START, and in then type regedit in the cmd line, and hit enter
![[IMG]](images/storyImages/regedit.png)
You want to navigate to the following location:
HKEY_LOCAL_MACHINE\SYSTEM\ControlSet001\Control\Class\{4D36E968-E325-11CE-BFC1-08002BE10318}
![[IMG]](images/storyImages/reglocation.jpg)
under, you'll see severl sub registry keys starting with 000...for example I have 0000, 0001, 0002, 0003, 0004. These are the ones that you are interested in. If you have more, then you will do the same thing to those as well....
Click on each numbered key individually and find the and look for a property called ENABLEULPS...and set the value to zero. Double click on it and change the value to zero
![[IMG]](images/storyImages/Capture22.jpg)
EnableULPS may not exist in all the numbered keys, but where it does exist, change the value to zero
EXIT
NOW, you have unlocked overclocking for the 7970m
This is what you see in Afterburner after enabling overclocking, notice the slider and all the room you have???? SICK:
![[IMG]](images/storyImages/msiAF.jpg)
THrough preliminary testing, it appears that upper stable limit on stock voltage is 1ghz core / 1.5 ghz ram
ENJOY
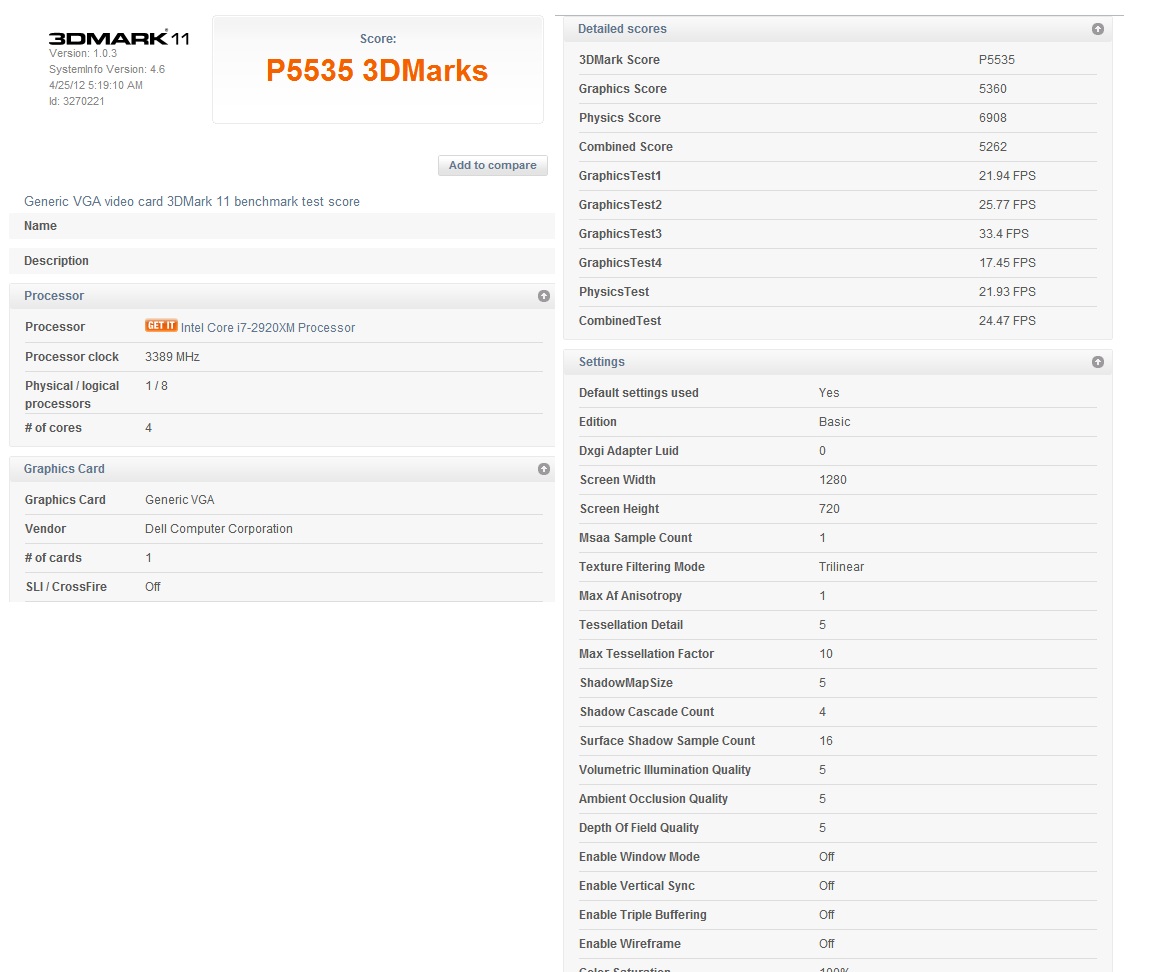
HEre is a teaser...GEO's 3dmark vantage run. Now remember, we have no drivers yet....EXCITING TIMES
AMD Radeon HD 7970M video card benchmark result - Intel Core i7-2920XM Processor,Alienware M17xR3 score: P24757 3DMarks
-
-
Thanks babe. <3
-
Couldnt be anymore detailed than this! Thanks man!
-
Slick, you are a gift of God to humanity.. so wanna rep you
darned thing doesn't allow me!!!
-
Thanks, should help many people as soon as they get their cards... including me
Now... maybe a walkthrough on where to buy
-
Pretty neat guide there hehehehe
-
Thanks guys!
I'll keep my ears open for you bro!
Wild, thanks for dropping in, you are always welcome here, bro! -
Oooh blue PCB. Nice. Great guide. Bidding on a 60Hz display at the moment. If I win at a really low price, I shall join the ranks if I can find a GPU.
-
Awesome guide Slick!
-
I tend to remove the whole GPU+heatsink combo and put them in together. That way I can make sure the pads and pastes are placed properly. Is it a bad idea?
-
i guess you could do that. Isn't that more difficult to get it in right?
-
I'm not sure if it's any easier, but it's the way I handled my R3. I also thought it would work out better for the pads and thermal paste.
It was easy enough, just slide it in carefully, press down, and screw it in place. -
What would differ if a guy was replacing his 580m?
-
I cant believe we get this far I remember playing GTA-4 on a toshiba X205sli with GTX6600M on super low settings now we can max out the most demanding games is insane this tech
thanks for the guide Slick dude
-
Yeah I remove the whole heatsink + GPU. Helps me clean repaste and such away from the computer reducing risk of damaging anything else incase of spillage or a stray paper clip or something.
-
slick... is yours a clevo 7900m series or a Dell one?
-
grzt is replacing his 580m tonight with a 7970m so maybe he will chime in. I don't think anything changes with the 580. All the steps are the same.
The only thing that is even more important is the first step...deleting the drivers and wiping anything nvidia from your computer.
mine is a dell 7970m with hynix vram
YW!
yes, how times have changed indeed... -
I dont know. It seems to be the same for me. I would be uncertain whether I put the stuff in correctly or anything shifted if I do it your way.
Other than different bracket and pad positions/sizes there is not much else. -
^ Also this. If you're removing the Dell paste this may help, since it is pretty thick stuff. I did this with my CPU, too.
-
So how do you buy one of these things?
-
Makes me wish I still owned a M17
-
Nice guide Slick!! Thumb up!
-
Holy Perma Smile!!! Holy Perma Smile!!!
Thhaaaannkksss Slick!!!!!!!!!!!!!!!!!!!!!!!!!!!
EDIT: so I lost sensors of hwinfo, when I click, I lose display
and brightness is kinda weird, but the rest is fine, now I will do a 3dmark11 -
so...how did it go?
-
it was easier than I thought, with Slick's guide, serious piece of cake
Long, check my post again, I edited, wth, how am I losing display to hwinfo sensors
man 3dmark11 has never been smoother
-
Awesome guide and pics SLICK! Thanks BRO!
So plug and play FTW AMD 7970M! WooT!
Can't wait to see your score Graz!!!
Cheers.
-
running, will be there shortly
this is really PnP, didn't do nothing except remove the blacktape! will post pics and some comments to upgrade from 580m, but tomorrow we will get the comments of 580m upgrade from two grandmasters so it will be much better
Not as impressive as Slick's run because my damn CPU (2920xm, I am having heat issues) throttled in the middle of the run will seriously switch back to my 2760qm
anyway still proves the point I guess right?
Attached Files:
-
-
check if your pads and pastes are put properly, there might be some problem with the conductors (stuff on top of the card) or VRAM. I got something similar when I installed GTX 580M.
-
it was the alignment or the heatsink was weird, did you change your heatsink going from 6990m to 580m?? weird thing is I think I am missing some thermal pad, I will receive some pads soon I guess, darned frozencpu still didn't send them I will check everything tomorrow morning, for now I am going to bed I guess
-
glad to see you got the card working. Where you think you are missing a thermal pad?
-
right there a picture of my heatsink (black tape removed, the glue took some good time to clean away), a few pads are missing, I will get some pads hopefully this week and do the padding myself, turned off the lappy after thinking about what long said
added the cleaned picture as wellAttached Files:
-
-
Ok guys I am going from a 6790m to a 580m I uninstalled all ati stuff and just downloaded the latest nvidia drivers but they wont install because of this "You must install an Intel driver first" can anyone help a noob out?
-
oh man, He did it again......
Awesome Slick...... +1 -
i only get at aprox 9th may my Clevo 7970M OEM
-
-
That's awesome!!!!
Thanks a lot for writing this in such detail!!!
I will keep this thread for future reference. -
First off, thnx for all the nice comments guys! It makes all the hard work worth it
Red, i'll keep my ears open for you, but your best bet right now is ebay or eurocom (upgradeyourlaptop). The dell cards are hard to come by
That a boy!!! Good work! -
Happiest boy ever PERMA SMILE!!!
-
Awesome..... system now recognizes the card but I don't think its utlizing it I can't even run Crysis 2 smoothly on high settings.... HELP!
-
right click, run with high performance graphics card (or something similar)
-
Right click on the desktop and select Nvidia Control Panel. When it launches, click on Manage 3D Settings from the left hand column. Click on the Program Settings tab. Under box 1, scroll down and select Crysis.exe (or whatever). Then under box 2, select Nvidia 580M or High Performance Nvidia Processor (differs between programs, but whichever is available with Crysis). Click on Apply, and you should be set, with the system automatically switching to the 580M when Crysis is launched.
-
Still laggy framerates I just upgraded from 6970m... have the latest drivers as well.
What is a BIOS for gtx 580m and how do I install it I downloaded it from Dell's site so maybe that will fix my problem? My computer is reading the card and its showing up in system properties so I assume its installed correctly. -
churt, you are suffering from throttling. It is well documented in this forum. The 580m's power throttle at 63c and then there is a temps throttle at 78c. Probably a 6990m would have been easier to deal with. Keep the back of the laptop elevated to reduce temps, use good thermal pads, and good thermal paste is definitely required with the 580m.
please view this thread for all the answers that you seek:
http://forum.notebookreview.com/ali...throtting-fix-no-need-modify-system-bios.html -
I don't think its throttling because it lags as soon as I start playing....
-
Awesome guide! +rep when I can
-
Churt, do you mind if im a bit rude and ask you to try in a different thread or create your own new one? this thread is going to get very busy with it being an install guide for a 7970
-
Hey guys, long time lurker first time poster. First off, awesome job slick, I am really going to get one of these when or if I can all because of you and your enthusiasm over it haha. Quick question though for everyone. I believe I read this in another thread but I wanted to receive definitive confirmation if it's true or not. I have an m17x r3 with a 580m and the 3d 120 hz display, i mainly got it for the higher quality display. That being said, is the 7970m compatible with my display? If it isn't I'm definitely going to be a sad panda. Thanks for your time everyone! Best forum ever!
Edit: Right after I posted this I seen slick's post earlier today answering my question in full. Sucks Still, awesome guide Slick!!
-
Thanks Hanza!
There's always the 680m for you
-
Guys my card dead was TOTALLY my problem (or the card was faulty), Slick's guide is piece of cake easy to follow ready to cook, everything, don't be scared! just follow it to the point and you will be fine (AND USE A DAMN AMD HEATSINK!!!!)
-
The heat sink is the same thing for all the cards isn't it? My 6990m fits great with my old 460m heatsink, just had to move all the thermal pads around.
Sent from my Samsung Galaxy S2 using tapatalk 2
[GUIDE] Installing and Overclocking the AMD Mobility 7970 in the M17x R3,an illustrated guide
Discussion in 'Alienware 17 and M17x' started by SlickDude80, Apr 24, 2012.