The central HDD bay is a good place For heatsink pipes extension and additional fan placement, it has the room and vents for it, if you wanna go big. Also, the new fan can share the power and signal from one of the existing fans' ports depending on which heatsink you want to extend.
But this would require some serious welding skills and good heatflow intuition or small ANSYS heat transfer simulation.
As for the M17x R4 GPU fan and M14x CPU fans: the GPU fan is identical to your stock fan regardless of CFM value (I believe it is the same fan with CFM values read at different points in the housing). As for CPU fan, the noise is unbearable (even though I padded it properly to avoid any vibrations) it doesn't vibrate but blades design make it F16 fighter jet loud with maximum 1-2 degrees temp difference so I switched back to stock fan.
-
-
I gave up on heatpipe manipulation some time ago. That level of modification without a documented precedent and a shop willing to take on the task (I dont have such tools) is simply outside of my skillset.
I meant just simply splicing the PWM cable to switch to bypass it on command. Regular fan curve can be in place for non intensive tasks and switched on when desired (gaming, benches etc.)
An interesting scenario for sure, can easily mold a vacuum with sheet of thin plastic with the internal walls layered in foil tape and maybe the external walls with eletrical tape to direct out of the frame (atop the GPU) but the heat dump would likely partially be taken in via the 2 original fans. Would have to create a new rear exhaust.
4930mx now installed!
Running 3.5Ghz @ .94 volts for now. Can probably lower but just wanted to get to the target of 85C for now until I learn more about using Throttlestop for overclocking. -
Something isn't right ... I run 3.5Ghz @ 1.07V and when I use prime32 pulling 58W I max at 80C ... I would say at 0.94 you shouldn't break 65C ... Btw. these clocks at this voltage means you got some seriously nice chip ... enjoy it.
-
Its hard to tell with accuracy due to a couple of things. The heatsink contact is scratched (more like scuffs) up and has discoloration like sauce on a shirt. I ran my finger nail over it and couldnt scrape any off, so I just left it. The fin array and the fan are quite dusty as well but I dont have any canned air, I was only able to clear the build up on the entrance/exit portions.
I dont think Noctua NHT1 is the best either, grabbed it because I could get it overnight free shipping from Amazon.
So far I have played R6: Siege and no problems at all. I was just using TS Bench for 1024m to get around 85C (and not crash). Ill use Prime in a moment and see if its stable.
Im hoping the heatsink replacement will be much better since my own seems rather uncared for, along with the Grizzly Conductonaut (sp?) and fan mod.
With 1024m TS bench it states im pulling about 46w -
I think it's definitely an improvement. Also these fans I use are from Dell directly.
-
I use GelidExtreme so that may be the reason. I used Noctua before, amazing results, ****ty longevity.
Try prime32, you will hit that 58W in less than a second and you will see the temperature numbers flying. It's a highly unlikely usage scenario though but good for testing thermal management system (Paste, sinks, fans ... etc.).
Maybe I have a bottleneck at the interface between the heatsink and CPU die because you are using LM and I am using non-conductive paste. I stopped using LM and took the laptop completely apart and cleaned the mobo and all components a while back because I found some LM super small particles in some places and I was uncomfortable with that. No matter how much I tighten the heatsink, still with excessive movement of the laptop LM leaks (I am in university and this is my only machine). -
Noo, See sig. GC Extreme here too !! Also no M14x R2 fan. I'm using the one from Voyager only.
MahmoudDewy likes this.
-
I tried Prime95 64 bit and it shot temps up through the roof lol, Ill try 32 bit nextMahmoudDewy likes this.
-
I see! Not a LM fan too it seems
Prime is my babe, I love it when it comes to bringing down cooling systems.
Ashtrix likes this. -
I may do that, or pass on it for now.
I just got my dremel in the mail, just waiting on the plastic sheet to mold the new screw location as Im sure some of us seen in the fan mod thread, I liked the clean look so I went ahead with that course of action. Though I opted for white, I like a bit of contrast, especially black and white.
This time I opted for a battery charged dremel. This way I can still have a dremelwhen I travel. -
Got the m14xr2 fan installed!
I messed up the template cut out I made, so I just intalled it as is for now. I forgot to get some glue as well. I will get some and get it done the clean way in the near future.
Idling at 3.0 @ .82v netting a 45-48C temperature.
Load is still pretty bad.
3.5Ghz @ .96v @ 80-85C @ 47-48.1w w/ TS bench 1024m
Im hoping the replacement heatsink will yield me some better temps just because mine seems to be shoddy at best.
Going to try R6 Siege again and see how it behaves.
Still waiting on....
eDP cable, heatsinks, m17xR4 GPU fan. These are coming from shenzen, so its going to be a little while. Hopefully beginning of November but worst case end of November.
Loving this laptop though, really looking forward to installing the 120hz panel, I noticed there is 3 columns of different levels of brightness in my panel. Its great that it was able to hit 100hz but I want color accuracy too for obvious reasons (who doesnt?)
-
I like the contrast white presents under the grill, but I finally made the frame that the OP of the fan mod thread had used. Ill also make one for the other fan when ever I get that in the mail. -
@EepoSaurus
Would you willing to share your settings in the BIOS to prevent downclocking? I seem to be able to play BF1 @ 4.4Ghz just fine at the moment but its downclocking to 3.0Ghz often.
Unless of course I am missing something else when it comes to overclocking laptops, this is admittedly my first laptop that could overclock on the CPU. Even if its just screen shots of the tabs you believe you altered. I tend to learn backwards. I dont have performance drops but thats likely because a 3.0Ghz 4930mx is more than enough for a single 780m. I am not current, TDP, or temp throttling but the downclocking persists. I have also flashed the unlocked BIOS as well. Thanks again! @Striker1234 @Ashtrix for getting that out in the wild for the Rangers.
Voltage is at 1.28 and I've set 300a in both options of Intel XTU, Mr Fox stated it wont actually pull that amount since its just a limit. I like Throttlestop but for some reason when ever I use it, it defaults to x21 or x38 and wont budge despite what settings I apply. I seem to have more success in XTU at the moment. I also set 32767/128 for the power limits so it would be unlimited in XTU @Papusan had mentioned in another thread in the forum.
I got my 4 heatpipe and 5 heatpipe heatsinks They work quite well! I also applied liquid metal Before I couldnt run more than .97v without going beyond 85C but now I can push 1.28v, though I am having issues actually pushing more than 80w without it kicking it back down to 40w on its own.
Im going to move on to GPU flashing my 780m for the moment and see what its limits are.
Thank you guys, thoroughly enjoying this laptop so far dispite its rebellion to hold 4.4Ghz lolStriker1234 and Ashtrix like this. -
I can screen cap but i can tell you just as easily. Disable cstates, energy efficient pstates vr faults and energy efficient vr vaults. If you are able to run the cpu at 4.4ghz at 1.28v then you have a very good chip but i warn you that you should look into verifying heat and speeds by a different means then in games. Use cinebench cpu score and it will let you know what the cpu can actually put up with. Average game load on cpu is 20 to 40%. Cinebench will test at 90%. It will let you know what your cpu is truly capable of. I reccommend throttlestop over xtu. Its worth learning to use throttlestop as it wprks better with your cpu.
-
After my post the internet died so I had a lot of time to look around in the BIOS.
I have those settings applied as you do but to my discovery I am power throttling at 90w which then follows with VR Thermal limit reason in TS.
The one setting that never seems to stick is Proc power limit, every reboot resets this to 95A, applying in TS and/or XTU doesnt seem to matter. After changing this value to 300a I still get a Power Limit Exceeded in HWinfo when it starts to throttle.
I guess ill just have to lower the overclock, unless there is something I am missing?
In any case thanks for sharing! Ill continue to tinker until I can get consistent performance -
I am starting to think I will need to get some mosfet copper heatsinks for the VRM's since it seems thats why I am power throttling
At least that is what notification I get in ThrottleStop and HWiNFO.
I can trim the copper and put some thermal pads on the ends to make contact with the heatpipes of the CPU heatsink. It may add heat but its better than heatsoak.... -
Looks like a big problem I have to resolve is the uneven heatsink, I have about a 10C variance on my cores.
Im working on school for now but I will be lapping the heatsink in the future to smooth out the temps.
In any case, love this laptop. Overclocking is a bit of a bust on the CPU but I like having modding options. makes things exciting, something I didnt have on the m4600 anymore.Ashtrix likes this. -
Two heatsinks and various attempts to fix the uneven temps and I could only do a differential of 7c. I would say don't waste time. The only thing that fixed the differential temperatures was liquid metal, and since you are going to do this anyway, it won't be a problem.
-
This is with liquid metal lol.
But when I take the heatsink off and buff with a wirebrush I can see where the heatsink bends in the reflection of light. Even before that I was a bit suspect of when looking down the heatsink but wasnt sure if it was a placebo or not. I want to lap the heatsink anyways. Always been a bit envious of that shine.
Also I baked my old heatsinks and the pipes expanded so they'll be going in the trash. For anyone wanting to add heatpipes to their in use heatsink then you will want to use 375F for 8 minutes probably. I used 410F at 8 minutes and nothing exploded but the pipes expanded. Ill keep the fin array for future modding materials but the pipes are useless to me now since they wont fit nicely in the laptop.
Once I finish my school stuff and start working again ill try again, the end result will likely be about 7 heatpipes. 6 for the CPU and 1 for the VRMs.
If cicichen doesnt get back with me then I will need to find someone else to fab a heatpipe for the VRM's. -
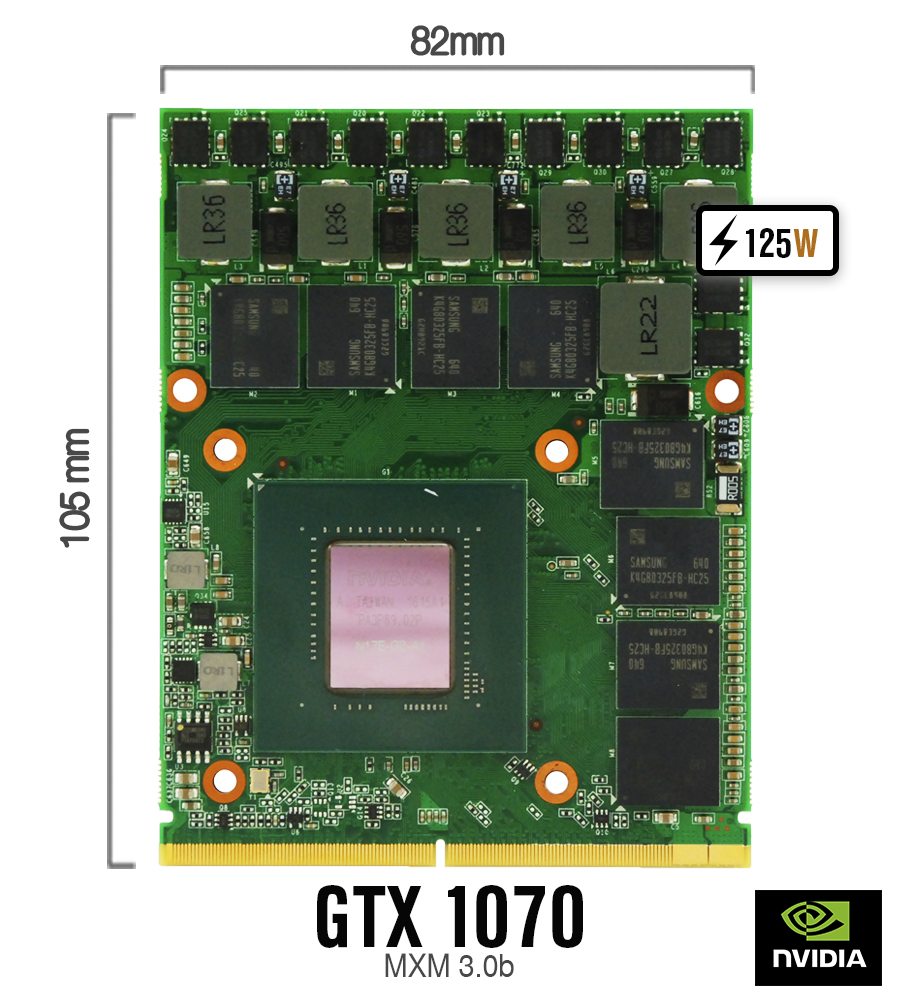
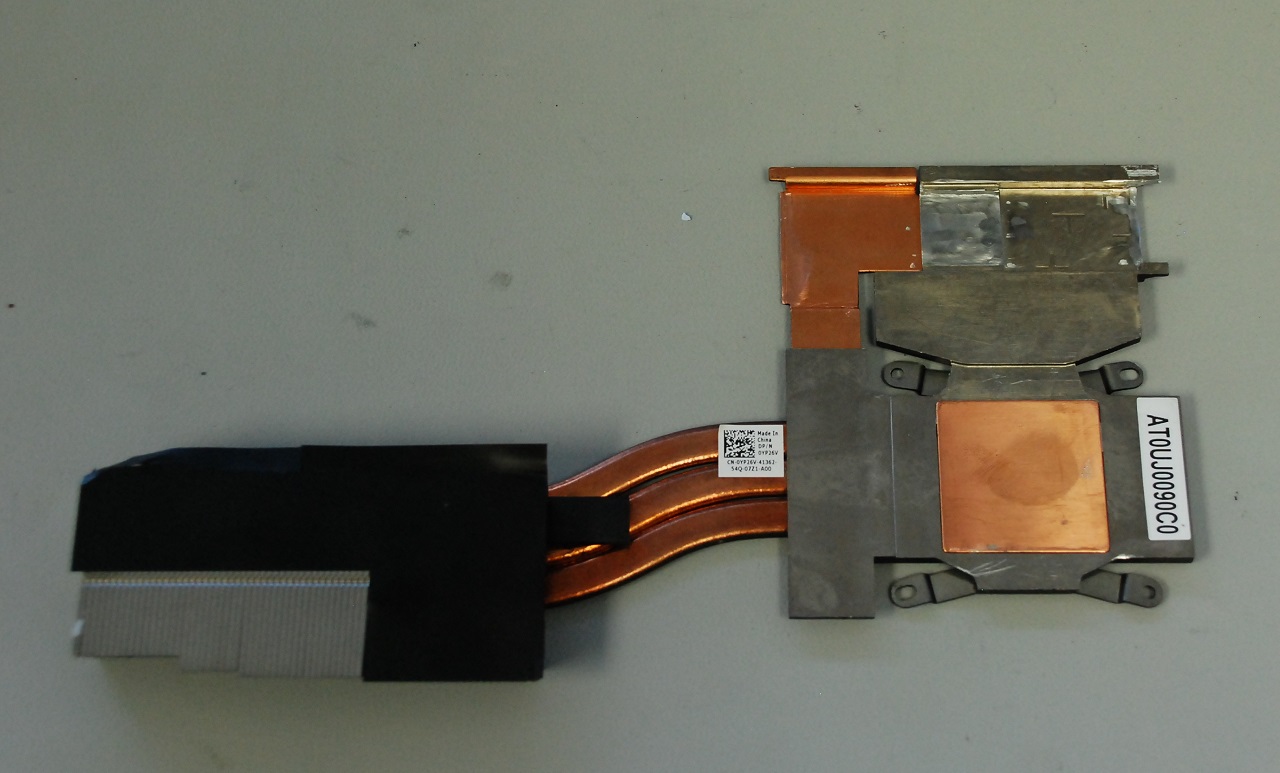
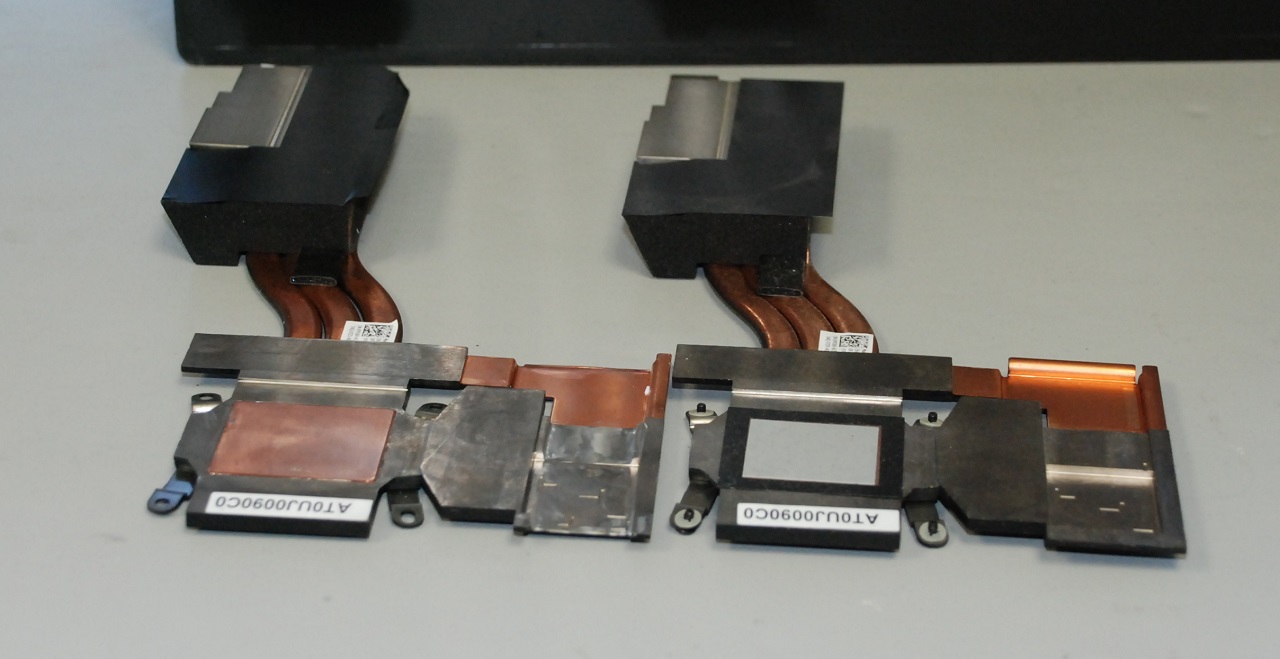
Here are some pics of modded VGA heatsink for our GTX 1070 standard size 82x105mm MXM3 card. We managed to get proper VBIOS for the GTX 1070 so it runs stable in AW 17.
Attached Files:
Reciever, Nomad, Striker1234 and 1 other person like this. -
-
I am more interested in the Clevo P375SM-A (Eurocom x7). Do I need 120Hz screen or the LVDS 60Hz ok?
If that is with liquid metal, then I would say this heatsink is too dangerous to use liquid metal with in the first place. It's highly imbalanced.Last edited by a moderator: Nov 15, 2017 -
This works with eDP as well I am assuming? I dont know why but I saw woodz saying that it wasnt working with 120hz screens in another thread.
I dont use enough liquid metal for that to be a concern, especially since my laptop isnt moving right now. Its still something I plan to fix in the future regardless though
Something happened in the family and now I am in a bit of need of quick cash. I was thinking of selling the 780m and popping in my m5100 2GB card.
Is there any reason why the m5100 shouldnt work? Or is it just trial and error, pop it in and see if it works?
I dont really play many games at the moment, especially with school. By the time I am done I will probably get the 1070 or m290x 4GB who knows at this point. -
assuming it is standard MXM 3.0B there may be a chance. The 17R1 used to come with AMD Radeon R9 M290X which is a rebrand of the HD 8970M. The m5100 is basically a HD 8870, so in theory it could work as it comes with DELL vBios. just watch out because the die orientation is different so you will need to remove the black tape on the heatsink die side and check of everything is aligned. Also, cover all the pins around the die with 105c rated insulating tape in order to avoid anything touching and shorting the board.
That still is not guaranteed to work but it's ok to give it a shot. -
Yes, you need eDP screen in P375SM/SMA to get GTX 1060 or 1070 working as P375SM/SMA model is dGPU only. In Optimus based laptop you can use standard LVDS panels. We still have some brand new P375SM/SMA and P377SM/SMA available.
-
If my situation doesnt change then Ill give it a shot, its a Dell m5100 at the very least but like you said alignment may be off.
Its easy to open up the ranger but the m4600 is a pain in the butt to open up. Luckily I still have the old 1000m, not that its relevant but would make web surfing and simple GPU accelerated tasks enabled again.
The card is a MXM3.0A, doesnt affect the slot size but the heatsink may not fit correctly. Im selling my y510p junk and m4600 first so hopefully I forgo pulling out the 780m for now. -
My machine is doing just fine, what I would be interested in is if you have 120Hz panels and edp cables for sale. I don't believe the SEC5044-173HT02-T01 would work on that machine as it is 40 pin panel and that machine requires a 50 pin cable right? I am also not sure if I can get 40-50 pin converter would work.
-
Could you please share the VBIOS of the GTX 1070 eDP for AW17?
Looks like the Zotac 1070 MXM Card that I have and I want to try flash it with your vbios in order to know if it can fix the fan issue.Ashtrix likes this. -
Hi
I have an AW17 with a 120hz screen and a GTX980m 8gb ram on board... Due to lack of use i was thinking of selling it... Due to it being a custom machine the gpu drivers need to be configured and updating from win 8.1 to win 10 would need some work....
I still have the original GTX 780m gpu that i took out... My question is for the sake of ease should i take out the 980m and put the 780m back in and sell the AW17, and then sell the 980m separately...
Thanks in advance
Ian -
I think it would be easier overall just to sell it with the 980m with instruction of it needing modded drivers.
Upgrading to Win10 is pretty easy though until I think the end of the year.IanC likes this. -
This may be of interest to us (potentially)
http://www.overclock.net/t/1643053/...ell-with-updated-microcode/0_50#post_26478129
Seems like updated microcode is allowing better overclocking on haswell systems. Not by a skyrocket margin, but reduced voltages for same overclocks or higher frequency limits.
What do you guys think? Possible to apply to our systems or nah?Ashtrix likes this. -
-
If someone provides the bios they want to use and the microcode in downloadable format, I'd be happy to see / try and integrate it into the bios... I'm working on a few other things but should have time tomorrow afternoon / maybe tonight!
Ashtrix likes this. -
Hey that was fast o.o
I dont know if its obtainable in a downloadable format as they use MMTool Aptio5 to update the microcode.
As for the BIOS for this to be applied to, I would vote for the unlocked BIOS that can be found here
http://forum.notebookreview.com/threads/alienware-17-r5-r1-bios-unlocked.802440/
Heres the condensed instructions from OCN
This simple process is done through the UBU tool and instructions found in this guide: https://www.win-raid.com/t154f16-Tool-Guide-News-quot-UEFI-BIOS-Updater-quot-UBU.html. Either use the extensive guide found on the thread, or use the guide below.
1. Download the latest UBU tool from the linked thread.
2. Download MMTool.exe and put it into the folder with the UBU.bat file. A copy can be found here under the link MMTool (aptio 5): http://voltground.com/haven/threads/13/
3. Acquire a copy of your BIOS from the manufacturer's product support site or otherwise.
4. Run UBU.bat and select your saved BIOS file. Once all the modules have loaded, navigate to the CPU microcode section by pressing 7 and enter.
5. Press 1 and enter to navigate to the list of microcodes, type 17 for the latest broadwell microcode (makes no difference what you choose for broadwell) then type 22 for the Intel microcode (19 says it's the best for overclocking, but my testing says otherwise).
6. Hit 0 to exit, then hit 1 to save it with a USB BIOS Flashback compatible name. If you don't have an ASUS board it will let you keep the original BIOS name or leave it as bios.bin to be renamed as necessary.
7. *Back up your BIOS settings/profiles before flashing!* Flash the updated BIOS with your preferred method. While some motherboards allow the edited BIOS to be flashed conventionally, ASUS users must use USB BIOS Flashback to get around safety checks. Check online to see how best to update your motherboard's BIOS.Nomad likes this. -
Here's a copy of all Haswell microcodes:
Haswell microcodes v01-v22.7z
These are downloaded from Intel, but you can also take them from the UBU subfolder 'mCode'.Ashtrix, Papusan, Reciever and 1 other person like this. -
Would there be any reason why this would brick our systems?
Or is it just trial and error like the norm? -
Heres a GIF of someone going through the process of updating microcode
http://cdn.overclock.net/8/85/85015838_OupUZxB.gifStriker1234 and Nomad like this. -
I tried, but I receive the error:
InsydeH20 BIOS not supported
UPDATE:
In this link they are providing the BIOS updated with the new Microcode:
http://forum.notebookreview.com/threads/brainstorming-aw17-r1-ranger-r5-modifications.811433/page-2
Please remember to EDIT the ServiceTag, since the one in their is mine.Last edited: Dec 8, 2017 -
Hey guys!
I installed the latest Intel ME and also updated the microcode to v22 (thanks again guys!)
However I when I try to install Intel Dynamic Platform & Thermal Platform driver for Extreme CPU it just outright fails.
Also I am not sure how to install the latest Intel ME interface from a bin file.
Any ideas guys?
I also tried overclocking again and still cant maintain 4.0Ghz at present, Im hoping it might be related to the above but who knows. (VRM Limit)
@Papusan @Striker1234 @AshtrixStriker1234 likes this. -
DPTF is trash, with it you can choose only between 3 profiles (45, 55 and 65W) so very limiting, I prefer to use WindowsPowerManagement instead.
About your question, did you enabled it in bios? Because is another setting that doesn't work well wit OC settings in bios, so one or anotherLast edited: Dec 11, 2017Papusan likes this. -
If I dont need it then Im fine with that as well.
I just reflashed the BIOS to the v22 microcode unlocked version. Only settings changed is disabled C states and Energy Efficient P states, lastly BD Prochot disabled
Also altered long and short power limits with 32767 and 128 values
I cant seem to hold anything over 3.6Ghz due to VRM limit even if my highest temperature is 80C or below. Im guessing it has to do with Package power, as anything above 50w will trip VRM limit and downclock to 3.0Ghz with .82v
I was hoping a missing driver was the cause, I guess not though?
EDIT: Just tripped VRM limit at 3.7Ghz with a 74C temperature :/ -
firstly a big thanks to all involved in the recent leaps that the AW17 R1 continues to make!
Over the weekend i flashed my R1 with the unlocked bios (with the v22 microcode update + corrected the service tag). Its great to have way more control thanks to the extra options in the bios.
Possibly placebo effect but ive reduced the voltage by 0125mv needed for the 4900mq at 4ghz. Under high load it seems to be fine, only time will tell re idle/low load stability. (Edit use static/override voltage cos im a control freak)
Probably going to look at fan replacements next and possibly an XM cpu(im really hoping i can resist temptation on the later cos need is nill and want high!)Last edited: Dec 12, 2017 -
Good to hear man!
Yeah YMMV but on OCN and reddit they report anything from .01 to .04 reduction in voltage needed to sustain their clocks.
Sadly, this was no use to me as I still VRM throttle anything above 50w package power.
Can someone point out the VRMs for me? I want to know what I need to look at in modding a heatsink to fix these VRM temps.
Thanks! -
From what I can tell the VRMs are on the motherboard. Maybe you should consider a replacement motherboard as yours does not sound like it is functioning correctly. If not the motherboard then maybe another 4930mx. You should be able to get better clocks then you are getting. Also if you are using LM on the cpu in my experience it benefits the 4930mx in a 17r1 to use a bit extra then what usually would be recommended.
-
Yeah I have been thinking that as well, might just be a lemon board. The original OEM PSU died 1 minute into playing R6: Siege might have screwed something along the way. Maybe some of the VRMs died and its just running additional load off the leftovers but Im not electrician so I wont pretend to know for certain. I have been using Liquid metal since using the 4930mx. Improved temps quite a bit. idling with 30w package power temps are about 45c-47c
I still want to mod a heatsink to see how far I can take the 4930mx, even if its a lemon board or CPU I should still be able to reap the reward of improved heat displacement with this current setup or (if deemed needed) replaced components.
The methods I have been pondering mean modding the GPU heatsink as well to save the vertical space for additional fin arrays.
I would prefer to do all this while I am in the US so this will likely all take place within the next few months. Right now I am wrapping my BSIT degree, just a Java course left and its a real pain.
Are the VRMs the 3 gray boxes or the (iirc) 6 smaller black boxes north of the CPU? -
Without a photo it's hard to tell, but generally speaking; big, grey square with two pins = inductor and small, low-profile black square with eight pins = vrm. Well ... vrm or a lot of other possibilities, yet vrms can be distinguished from the rest by having 4 pins on one side jointly connected (check tracings on the pcb) and 1+3 connected at the opposite end. There's also more complex vrms, but the cpu will use multiple, simple single-purpose types, so six of them in the same general area would be a good indication.
You might also google the scribbles on the chip, of course. -
Either the vrm's are faulty or it's drawing way more power than indicated. Are you running adaptive or static voltage?
If adaptive its potentially jumping all over the place - try static / override. In the bios set voltage type to override and use 1100 as the value then set the multipliers as 40 for each core. You probably won't need that much voltage due to the XM being better bin'd but it's a starting point. -
I run static but I havent tried setting it in the BIOS. I believe 1.05v might be a good start but ill give it a shot.
-
-
Tried setting static in BIOS as well and no dice. I still throttle even with a max temp of 72C
Guess ill need to replace the board. Always got to be something. -
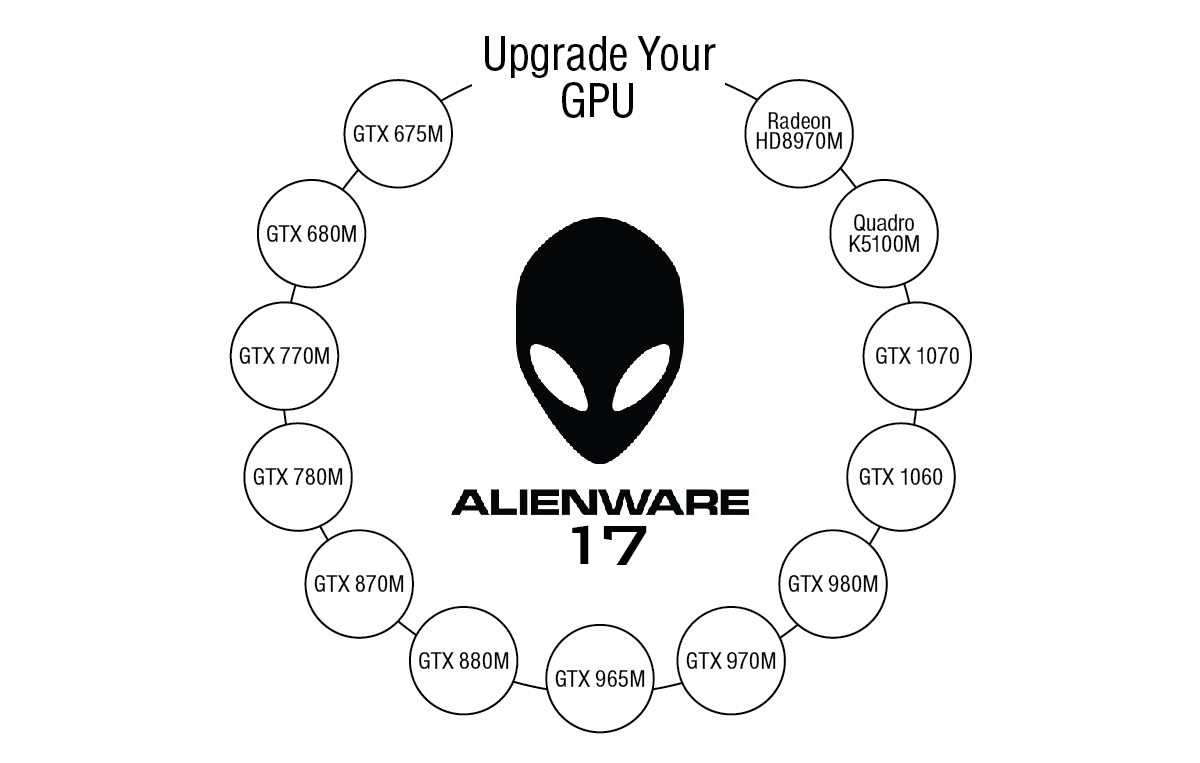
Here is our GPU Upgrade Chart for AW 17 - let me know if it is useful.... so we can create for other models
Attached Files:
Striker1234 and Robbo99999 like this. -
*OFFICIAL* Alienware 17 Ranger (2013) Owner's Lounge Thread
Discussion in 'Alienware 17 and M17x' started by Mr. Fox, Jun 12, 2013.


![[IMG]](images/storyImages/s-l1000.jpg)
![[IMG]](images/storyImages/s-l1600.jpg)
![[IMG]](images/storyImages/AW17_BottomOpen.jpg)