That's actually one of the things we are trying to discover.
Right now you've dipped your hand into a lucky dip, what you pull out is anyone's guess at this point, there's been once or twice some pattern had been found, only to be blown away with the report of another (different) faulty panel.
Some unlucky people have even had panels blow after disk wipes and windows re-installs, so
-
-
My GPU has now blown in the same laptop the blew the 120Hz LCD, otherwise I could help you.
I don't think it was win 10, the dam thing was running really high temps beforehand, typical 880M
I do have around 8 new and used panels, some have different part numbers, if any photos of these can help, please let me know -
I think you might be 'protected' from the EDID problems as long as you keep using Optimus and don't switch to discrete boot only.
Live dangerously and give it a try! -
Could this possibly be an issue with InsydeH20? I've seen reports floating around on the net about HP and Lenovo machines bricking after Windows 10 and both of them use InsydeH20 as well.
Mr. Fox likes this. -
Crikey! This is not good:
![[IMG]](images/storyImages/6sHog.png)
Okay, Secure Boot (setup) code is still there, but we also need to clear nvram again:
![[IMG]](images/storyImages/oR54Q.png)
Hmm ... next up:
![[IMG]](images/storyImages/uwhZR.png)
Jesus !
The soldering iron then; it's going, one way or another!PC GAMER likes this. -
Hmm ... not sure about the effectiveness. It's also extremely dangerous, far more so than an edid corruption.
First try booting in Legacy with the display cable disconnected. With any luck it'll accept the external monitor. If that works then we can cut the edid wires temporarily, boot with the bricked display attached and then reconnect the wires.
Going to try fixing it? If not, and it's destined for the trash-bin, then you could still help; rip-off (or desolder) the vbios:
![[IMG]](images/storyImages/ZGwAs.png)
Some people collect stamps ... but yes, all of them would help. But only need sticker+connector-area+controller-chip (the largest ic).
Mr. Fox likes this. -
Hey, may I know your specs please and are you running your on-board GPUs or your iGPU? Used win 10 for quite a while too, reverted back to win8.1 just to be safe. I want to reinstall win 10 again though as we don't exactly know what is causing the issue and people that previously had win 10 installed are getting their screen blown off anyways.
I am really sorry for you dude. That sure must suck. What temp was your 880M running at?
-
It certainly appears the corrupting element is persistent. If we knew for certain what was causing it and where it is lurking, we would be in a better place. Unfortunately, we do not have any answers and have only identified symptoms.
Several of us that developed the EDID corruption starting with Windows 10 had repeat EDID corruption on Windows 7. In my case I was fine using a pre-Windows 10 drive image of Windows 7. That images was created back in February. I blind flashed the system BIOS and flashed the vBIOS before restoring that image and thought I was safe. Those things were done before the third LCD was installed. And, I went for what, a month or so without issue? Within hours of doing a clean install of Windows 7 on a wiped SSD the fourth LCD had its EDID corrupted and that was using GeForce drivers I had used for 5 months without incident prior to installing Windows 10.
Don't lose heart yet. When the programmer I ordered from China arrives, I am going to attempt to re-write a good EDID to the EEPROM. If that is successful, I am going to snip the wire for pin #5 on the LVDS connector. If the display still works and doing that write protects the EEPROM there should be no further opportunity for EDID corruption. I will post photos and instructions if that is a success. I will also be willing to help those that cannot handle a DIY recovery. For those in the US and Canada, that may be more affordable than sending parts to another continent. Let's all cross our fingers and hope for the best. Hopefully, that will "bullet-proof" everyone that owns an affected model. It make be another week or so before I receive the programmer.
What would really suck is if the "malware" that is bricking these panels is hiding somewhere on a chip on the display panel. I don't know if that is possible. If it is, snipping the wire for LVDS pin #5 might ultimately accomplish nothing except for making it impossible to re-flash the EEPROM using that LVDS cable.deadsmiley, TomJGX, andrewsi2012 and 2 others like this. -
sigh!
EDIT: my screen ocassionally flashes on and off when booting up (showing the alienware text logo). this happened on the 60hz panel but it's still there on the 120hz panel. not sure if it's a fault in the BIOS or a windows issue as it boots fine when entering in the BIOS, safe mode, etc.Mr. Fox likes this. -
Updates from GeForce Community: Windows 10 + GeForce Drivers are Killing Samsung and LG Notebook LCD Display Panels
Here's another Alienware 17 R1 (2013 model Haswell) with the problem.
And, another M18xR2 owner that found the NVIDIA thread after Google-searching for the cause.
deadsmiley and PC GAMER like this. -
-
Yeah, sucks that he replaced it and the new 17" AUO LCD almost immediately bricked. Unfortunately, I know how that feels x4 and so do a few others. As they say, misery loves company.
-
So far my UEFI settings haven't changed but then I wonder if it's something that's underlying rather than visibly obvious.
Sent from my HTC One using Tapatalk -
Again thanks a lot @t456 and @Mr. Fox for your continuous work and support. @Mr. Fox the newly affected M18 has an AMD GPU in it which does not add up considering we thought it was only NVIDIA GPUs up until now. Can that potentially remove the drivers as having a part to play or is it just pure coincidence. The Nvidia drivers might be acting as a catalyst though which would make a lot of sense but at least we now know it's spreading to AMD GPUs too (which is sad but with each new broken laptop, NVIDIA and Dell are forced to get up their arse and try to do something instead of "brushing it under the carpet").
Hey guys wanna hear a joke.........................
Microsoft a little help please
Last edited: Sep 10, 2015 -
That was me
@t456 Here is an album with pictures of my one and only working AUO B173HW02 v1 control board.
I would like to write protect the EDID chip
https://www.flickr.com/photos/34026072@N05/albums/72157658035375019Mr. Fox likes this. -
I had the exact same panel model as it was shipped from the factory and I guess you just answered my question without me having to go through the pain.
-
So it, except it's not Microsoft that is doing the bios code injection; the bios vendor did.
The really strange thing was that a full flash didn't get rid of it, even though it should be all FF's in that section. So either it was marked read-only, or a running process immediately rewrote the FF's with Secure Boot setup code. Searching ' SecureBoot' in EC, ME and vbios yielded nothing, but ... what if that code is extracted on-the-fly, inside the bios itself?
Code:---------------------------------------- Find 'SecureBoot' in 'K:\aw18\bios and vbios\W230SS\compare\W230SS.06': K:\aw18\bios and vbios\W230SS\compare\W230SS.06(434): Found 'SecureBoot' 1 time(s). ---------------------------------------- Find 'SecureBoot' in 'K:\aw18\bios and vbios\W230SS\compare\W230SS.02': K:\aw18\bios and vbios\W230SS\compare\W230SS.02(434): Found 'SecureBoot' 1 time(s). ---------------------------------------- Find 'SecureBoot' in 'K:\aw18\bios and vbios\W230SS\compare\W230SS_5_eeprom_full_bios_flash.rom': K:\aw18\bios and vbios\W230SS\compare\W230SS_5_eeprom_full_bios_flash.rom(434): K:\aw18\bios and vbios\W230SS\compare\W230SS_5_eeprom_full_bios_flash.rom(437): ÿÿÿÿÿÿÿÿÿÿÿÿÿÿÿÿÿÿÿÿÿÿÿÿÿÿÿÿÿÿÿÿÿÿÿÿÿÿÿÿÿÿÿÿÿÿÿÿÿÿÿÿÿÿÿÿÿÿÿÿÿÿÿÿÿÿÿÿÿÿÿÿÿÿÿÿÿÿÿÿÿÿÿÿÿÿÿÿÿÿÿÿÿÿÿÿÿÿÿÿÿÿÿÿÿÿÿÿÿÿÿÿÿÿÿÿÿÿÿÿÿÿÿÿÿÿÿÿÿÿÿÿÿÿÿÿÿÿÿÿÿÿÿÿÿÿÿÿÿÿÿÿÿÿÿÿÿÿÿÿÿÿÿÿÿÿÿÿÿÿÿÿÿÿÿÿÿÿÿÿÿÿÿÿÿÿÿÿÿÿÿÿÿÿÿÿÿÿÿÿÿÿÿÿÿÿÿÿÿÿÿÿÿÿÿÿÿÿÿÿÿÿÿÿÿÿÿÿÿÿÿÿÿÿÿÿÿÿÿÿÿÿÿÿÿÿÿÿÿÿÿÿÿÿÿÿÿÿÿÿÿÿÿÿÿÿÿÿÿÿÿÿÿÿÿÿÿÿÿÿÿÿÿÿÿÿÿÿÿÿÿÿÿÿÿÿÿÿÿÿÿÿÿÿÿÿÿÿÿÿÿÿÿÿÿÿÿÿÿÿÿÿÿÿÿÿÿÿÿÿÿÿÿÿÿÿÿÿÿÿÿÿÿÿÿÿÿÿÿÿÿÿÿÿÿÿÿÿÿÿÿÿÿÿÿÿÿÿÿÿÿÿÿÿÿÿÿÿÿÿÿÿÿÿÿÿÿÿÿÿÿÿÿÿÿÿÿÿÿÿÿÿÿÿÿÿÿÿÿÿÿÿÿÿÿÿÿÿÿÿÿÿÿÿÿÿÿÿÿÿÿÿÿÿÿÿÿÿÿÿÿÿÿÿÿÿÿÿÿÿÿÿÿÿÿÿÿÿÿÿÿÿÿÿÿÿÿÿÿÿÿÿÿÿÿÿÿÿÿÿÿÿÿÿÿÿÿÿÿÿÿÿÿÿÿÿÿÿÿÿÿÿÿÿÿÿÿÿÿÿÿÿÿÿÿÿÿÿÿÿÿÿÿÿÿÿÿÿÿÿÿÿÿÿÿÿÿÿÿÿÿÿÿÿÿÿÿÿÿÿÿÿÿÿÿÿÿÿÿÿÿÿÿÿÿÿÿÿÿÿÿÿÿÿÿÿÿÿÿÿÿÿÿÿÿÿÿÿÿÿÿÿÿÿÿÿÿÿÿÿÿÿÿÿÿÿÿÿÿÿÿÿÿÿÿÿÿÿÿÿÿÿÿÿÿÿÿÿÿÿÿÿÿÿÿÿÿÿÿÿÿÿÿÿÿÿÿÿÿÿÿÿÿÿÿÿÿÿÿÿÿÿÿÿÿÿÿÿÿÿÿÿÿÿÿÿÿÿÿÿÿÿÿÿÿÿÿÿÿÿÿÿÿÿÿÿÿÿÿÿÿÿÿÿÿÿÿÿÿÿÿÿÿÿÿÿÿÿÿÿÿÿÿÿÿÿÿÿÿÿÿÿÿÿÿÿÿÿÿÿÿÿÿÿÿÿÿÿÿÿÿÿÿÿÿÿÿÿÿÿÿÿÿÿÿÿÿÿÿÿÿÿÿÿÿÿÿÿÿÿÿÿÿÿÿÿÿÿÿÿÿÿÿÿÿÿÿÿÿÿÿÿÿÿÿÿÿÿÿÿÿÿÿÿÿÿÿÿÿÿÿÿÿÿÿÿÿÿÿÿÿÿÿÿÿÿÿÿÿÿÿÿÿÿÿÿÿÿÿÿÿÿÿÿÿÿÿÿÿÿÿÿÿÿÿÿÿÿÿÿÿÿÿÿÿÿÿÿÿÿÿÿÿÿÿÿÿÿÿÿÿÿÿÿÿÿÿÿÿÿÿÿÿÿÿÿÿÿÿÿÿÿÿÿÿÿÿÿÿÿÿÿÿÿÿÿÿÿÿÿÿÿÿÿÿÿÿÿÿÿÿÿÿÿÿÿÿÿÿÿÿÿÿÿÿÿÿÿÿÿÿÿÿÿÿÿÿÿÿÿÿÿÿÿÿÿÿÿÿÿÿÿÿÿÿÿÿÿÿÿÿÿÿÿÿÿÿÿÿÿÿÿÿÿÿÿÿÿÿÿÿÿÿÿÿÿÿÿÿÿÿÿÿÿÿÿÿÿÿÿÿÿÿÿÿÿÿÿÿÿÿÿÿÿÿÿÿÿÿÿÿÿÿÿÿÿÿÿÿÿÿÿÿÿÿÿÿÿÿÿÿÿÿÿÿÿÿÿÿÿÿÿÿÿÿÿÿÿÿÿÿÿÿÿÿÿÿÿÿÿÿÿÿÿÿÿÿÿÿÿÿÿÿÿÿÿÿÿÿÿÿÿÿÿÿÿÿÿÿÿÿÿÿÿÿÿÿÿÿÿÿÿÿÿÿÿÿÿÿÿÿÿÿÿÿÿÿÿÿÿÿÿÿÿÿÿÿÿÿÿÿÿÿÿÿÿÿÿÿÿÿÿÿÿÿÿÿÿÿÿÿÿÿÿÿÿÿÿÿÿÿÿÿÿÿÿÿÿÿÿÿÿÿÿÿÿÿÿÿÿÿÿÿÿÿÿÿÿÿÿÿÿÿÿÿÿÿÿÿÿÿÿÿÿÿÿÿÿÿÿÿÿÿÿÿÿÿÿÿÿÿÿÿÿÿÿÿÿÿÿÿÿÿÿÿÿÿÿÿÿÿÿÿÿÿÿÿÿÿÿÿÿÿÿÿÿÿÿÿÿÿÿÿÿÿÿÿÿÿÿÿÿÿÿÿÿÿÿÿÿÿÿÿÿÿÿÿÿÿÿÿÿÿ§2'¨ÁG‡ K:\aw18\bios and vbios\W230SS\compare\W230SS_5_eeprom_full_bios_flash.rom(463): K:\aw18\bios and vbios\W230SS\compare\W230SS_5_eeprom_full_bios_flash.rom(466): ÿÿÿÿÿÿÿÿÿÿÿÿÿÿÿÿÿÿÿÿÿÿÿÿÿÿÿÿÿÿÿÿÿÿÿÿÿÿÿÿÿÿÿÿÿÿÿÿÿÿÿÿÿÿÿÿÿÿÿÿÿÿÿÿÿÿÿÿÿÿÿÿÿÿÿÿÿÿÿÿÿÿÿÿÿÿÿÿÿÿÿÿÿÿÿÿÿÿÿÿÿÿÿÿÿÿÿÿÿÿÿÿÿÿÿÿÿÿÿÿÿÿÿÿÿÿÿÿÿÿÿÿÿÿÿÿÿÿÿÿÿÿÿÿÿÿÿÿÿÿÿÿÿÿÿÿÿÿÿÿÿÿÿÿÿÿÿÿÿÿÿÿÿÿÿÿÿÿÿÿÿÿÿÿÿÿÿÿÿÿÿÿÿÿÿÿÿÿÿÿÿÿÿÿÿÿÿÿÿÿÿÿÿÿÿÿÿÿÿÿÿÿÿÿÿÿÿÿÿÿÿÿÿÿÿÿÿÿÿÿÿÿÿÿÿÿÿÿÿÿÿÿÿÿÿÿÿÿÿÿÿÿÿÿÿÿÿÿÿÿÿÿÿÿÿÿÿÿÿÿÿÿÿÿÿÿÿÿÿÿÿÿÿÿÿÿÿÿÿÿÿÿÿÿÿÿÿÿÿÿÿÿÿÿÿÿÿÿÿÿÿÿÿÿÿÿÿÿÿÿÿÿÿÿÿÿÿÿÿÿÿÿÿÿÿÿÿÿÿÿÿÿÿÿÿÿÿÿÿÿÿÿÿÿÿÿÿÿÿÿÿÿÿÿÿÿÿÿÿÿÿÿÿÿÿÿÿÿÿÿÿÿÿÿÿÿÿÿÿÿÿÿÿÿÿÿÿÿÿÿÿÿÿÿÿÿÿÿÿÿÿÿÿÿÿÿÿÿÿÿÿÿÿÿÿÿÿÿÿÿÿÿÿÿÿÿÿÿÿÿÿÿÿÿÿÿÿÿÿÿÿÿÿÿÿÿÿÿÿÿÿÿÿÿÿÿÿÿÿÿÿÿÿÿÿÿÿÿÿÿÿÿÿÿÿÿÿÿÿÿÿÿÿÿÿÿÿÿÿÿÿÿÿÿÿÿÿÿÿÿÿÿÿÿÿÿÿÿÿÿÿÿÿÿÿÿÿÿÿÿÿÿÿÿÿÿÿÿÿÿÿÿÿÿÿÿÿÿÿÿÿÿÿÿÿÿÿÿÿÿÿÿÿÿÿÿÿÿÿÿÿÿÿÿÿÿÿÿÿÿÿÿÿÿÿÿÿÿÿÿÿÿÿÿÿÿÿÿÿÿÿÿÿÿÿÿÿÿÿÿÿÿÿÿÿÿÿÿÿÿÿÿÿÿÿÿÿÿÿÿÿÿÿÿÿÿÿÿÿÿÿÿÿÿÿÿÿÿÿÿÿÿÿÿÿÿÿÿÿÿÿÿÿÿÿÿÿÿÿÿÿÿÿÿÿÿÿÿÿÿÿÿÿÿÿÿÿÿÿÿÿÿÿÿÿÿÿÿÿÿÿÿÿÿÿÿÿÿÿÿÿÿÿÿÿÿÿÿÿÿÿÿÿÿÿÿÿÿÿÿÿÿÿÿÿÿÿÿÿÿÿÿÿÿÿÿÿÿÿÿÿÿÿÿÿÿÿÿÿÿÿÿÿÿÿÿÿÿÿÿÿÿÿÿÿÿÿÿÿÿÿÿÿÿÿÿÿÿÿÿÿÿÿÿÿÿÿÿÿÿÿÿÿÿÿÿÿÿÿÿÿÿÿÿÿÿÿÿÿÿÿÿÿÿÿÿÿÿÿÿÿÿÿÿÿÿÿÿÿÿÿÿÿÿÿÿÿÿÿÿÿÿÿÿÿÿÿÿÿÿÿÿÿÿÿÿÿÿÿÿÿÿÿÿÿÿÿÿÿÿÿÿÿÿÿÿÿÿÿÿÿÿÿÿÿÿÿÿÿÿÿÿÿÿÿÿÿÿÿÿÿÿÿÿÿÿÿÿÿÿÿÿÿÿÿÿÿÿÿÿÿÿÿÿÿÿÿÿÿÿÿÿÿÿÿÿÿÿÿÿÿÿÿÿÿÿÿÿÿÿÿÿÿÿÿÿÿÿÿÿÿÿÿÿÿÿÿÿÿÿÿÿÿÿÿÿÿÿÿÿÿÿÿÿÿÿÿÿÿÿÿÿÿÿÿÿÿÿÿÿÿÿÿÿÿÿÿÿÿÿÿÿÿÿÿÿÿÿÿÿÿÿÿÿÿÿÿÿÿÿÿÿÿÿÿÿÿÿÿÿÿÿÿÿÿÿÿÿÿÿÿÿÿÿÿÿÿÿÿÿÿÿÿÿÿÿÿÿÿÿÿÿÿÿÿÿÿÿÿÿÿÿÿÿÿÿÿÿÿÿÿÿÿÿÿÿÿÿÿÿÿÿÿÿÿÿÿÿÿÿÿÿÿÿÿÿÿÿÿÿÿÿÿÿÿÿÿÿÿÿÿÿÿÿÿÿÿÿÿÿÿÿÿÿÿÿÿÿÿÿÿÿÿÿÿÿÿÿÿÿÿÿÿÿÿÿÿÿÿÿÿÿÿÿÿÿÿÿÿÿÿÿÿÿÿÿÿÿÿÿÿÿÿÿÿÿÿÿÿÿÿÿÿÿÿÿÿÿÿÿÿÿÿÿÿÿÿÿÿÿÿÿÿÿÿÿÿÿÿÿÿÿÿÿÿÿÿÿÿÿÿÿÿÿÿÿÿÿÿÿÿÿÿÿÿÿÿÿÿÿÿÿÿÿÿÿÿÿÿÿÿÿÿÿÿÿÿÿÿÿÿÿÿÿÿÿÿÿÿÿÿÿÿÿÿÿÿÿÿÿÿÿÿÿÿÿÿÿÿÿÿÿÿ§2'¨ÁG‡ Found 'SecureBoot' 4 time(s). ---------------------------------------- Find 'SecureBoot' in 'K:\aw18\bios and vbios\W230SS\compare\W230SS6M.02': K:\aw18\bios and vbios\W230SS\compare\W230SS6M.02(8653): Found 'SecureBoot' 1 time(s). ---------------------------------------- Find 'SecureBoot' in 'K:\aw18\bios and vbios\W230SS\compare\W230SS6m.03': K:\aw18\bios and vbios\W230SS\compare\W230SS6m.03(8653): Found 'SecureBoot' 1 time(s). ---------------------------------------- Find 'SecureBoot' in 'K:\aw18\bios and vbios\W230SS\compare\W230SS.03': K:\aw18\bios and vbios\W230SS\compare\W230SS.03(434): Found 'SecureBoot' 1 time(s). ---------------------------------------- Find 'SecureBoot' in 'K:\aw18\bios and vbios\W230SS\compare\W230SS6m.06': K:\aw18\bios and vbios\W230SS\compare\W230SS6m.06(8967): Found 'SecureBoot' 1 time(s). ---------------------------------------- Find 'SecureBoot' in 'K:\aw18\bios and vbios\W230SS\compare\W230SS6m.08': K:\aw18\bios and vbios\W230SS\compare\W230SS6m.08(8967): Found 'SecureBoot' 1 time(s). ---------------------------------------- Find 'SecureBoot' in 'K:\aw18\bios and vbios\W230SS\compare\W230SS.08': K:\aw18\bios and vbios\W230SS\compare\W230SS.08(434): Found 'SecureBoot' 1 time(s). ---------------------------------------- Find 'SecureBoot' in 'K:\aw18\bios and vbios\W230SS\compare\W230SS03.PM1': K:\aw18\bios and vbios\W230SS\compare\W230SS03.PM1(8846): Found 'SecureBoot' 1 time(s). Search complete, found 'SecureBoot' 13 time(s). (10 file(s)).
Indeed, even Prema Mod has that code. It actually makes sense; no Secure Boot, no Windows 8 'Certified' stamp for the OEM. Only thing is; every customer will have that rootkit embedded in their bios, whether they actually want 8/8.1/10 or not. Ordered it barebone, no OS or even drives, but it still had that virus pre-installed.
Now for something funny (or sad?); 1. Secure Boot, Windows 8.1 and Key Management.
It is itself a rootkit !!
That's like someone robbing you with words:
“Please thank me, as I've made you safe from robbers by taking all your possessions!”
@Prema ,
Would this be safe? Or, perhaps, 00 or FF fill instead?
![[IMG]](images/storyImages/rcY3R.png)
No; Secure Boot is probably separate from edid corruption, although it might be partially to blame. Even though it is part of UEFI specification, it is also persistent in hugging part of nvram sections for itself. If a bios vendor has not accounted for this (see Samsung bricks) or the creepy-code itself is buggy then it could expand and fill all nvram. What happens after that is what bricked the Samsungs; writes beyond nvram, corruption the bios and bricking the laptop beyond all hope of recovery (apart from programmer).
Anyway, I'll try no to mention this again ... it's a bit off-topic, after all. Not as much as benchmark scores, but still ... sorry
.
-
i have mine OFF!!! ALWAYS OFF!
-
It turns out my LG screen is not as dead as I first thought, it still is usable booting using UEFI with 8.1 with no display drivers installed.
https://flic.kr/p/ybvnXo
FYI anyone who has an AW motherboard that has no power switch installed, you can get the system to boot by bridging out the solder blobs on SW1. Bridge horizontally (left to right) across the blobs and you can use the top or bottom set. The middle ones are probably just for attaching the missing switch to the board
https://flic.kr/p/yt8pDXPC GAMER likes this. -
what's the part number of your motherboard?
-
Interestingly enough, my eDP panel is already bulletproof ... compiled an edid with 75Hz timings ( CVT-calculated) and G-Sync validated header:
![[IMG]](images/storyImages/xK6pP.png)
Darn, there should be 6B instead of the old B0 ! That took quite a bit of work to prepare ... think I'll now do the opposite of what everyone else is trying achieve; remove the hardware write-protect
.
! That took quite a bit of work to prepare ... think I'll now do the opposite of what everyone else is trying achieve; remove the hardware write-protect
.
Got a new tool for the collection, too:
![[IMG]](images/storyImages/Ixa8A.jpg)
Won't help with eDP though; single edid wire. No standard (=cheap) eeprom adapter can handle that, so that needs either software, an eDP -> LVDS adapter or, failing that, de-soldering. When desoldered you'd insert it in the DIP8 adapter at the top of the programmer; there's a HD 5870M vbios inside it right now.
Sadly, it is. WP would be almost 100% secure, though. Especially if the specific eeprom uses the wp-pin as the veto-ing member (and not the software wp bit). That bit might possibly be overwritten again ... but only under extraordinary circumstances. Of course, a proper magnet can corrupt anything, whatever write-protect is in place.
Let's focus on intel vbios as well, then. Everything that applies to nvidia, applies to intel.
Thanks, would you care to upload them as a .zip somewhere? Makes things a bit easier; it seems flickr has gotten better at blocking image-extract javascipts ... Also, have a good edid of the B173HW02 V1 (AUO219D) and, since it's been bricked, added it to the edid archive:
dell panels, correct edids, v5
Code:PnP id notes interf panel nr. ------- ----- ------ ------------- AUO219D ! LVDS B173HW02 V1 LGD01CA LVDS LP173WD1-TLA1 LGD0226 LVDS LP173WD1-TLC2 LGD0285 LVDS LP173WF1-TLC1 LGD0289 LVDS LP173WD1-TLA3 LGD02C5 eDP LP173WF2-TPA1 LGD02DA ! LVDS LP173WF1-TLB3 LGD02FC C LVDS LP173WF3-SLB2 LGD0343 LVDS LP173WF1-TLB5 LGD0391 LVDS LP173WD1-TLE1 LGD03FB LVDS LP173WF1-TL** LGD046C E eDP LP173WF4-SPD1 SDC3654 LVDS LTN173KT03-W01 SDC4C48 ! LVDS LTM184HL01 SEC314A LVDS LTN184HT03-001 SEC4A4B LVDS LTN184KT01-J01 SEC5044 !?A eDP LTN173HT01-301 SEC5044 !?A eDP LTN173HT02-D** SEC5044 A eDP LTN173HT02-P01 SEC5044 A eDP LTN173HT02-T01 SEC5443 LVDS LTN170CT08-D01 SEC5448 ! LVDS LTN184HT02-S01 SEC544B B LVDS LTN173KT01-*** SEC544B BD LVDS LTN140KT**-*** ----------------------------------------------------------------------------------------------------- ! = known bricked panels !? = bricked, but unknown which one * = unknown part id A = highly suspect: multiple variants exist, perhaps the others are safe ... B = multiple variants, flash the correct one! C = EliteBook 8**0w DreamColor, 10-bit, for fun ^^ D = 14.0" version for M14x, just in case E = G-Sync approved panel If multiple edids exist for one PnP id; flash the most recent edid, unless indicated otherwise. -----------------------------------------------------------------------------------------------------
-
@t456 have you received the panel yet? tracking says it's in your country.
-
The one in the picture is 05RW0M Rev A00
My other is 041W46 Rev A00 -
I'm not seeing the system you are referring to having an AMD GPU and having this EDID corruption problem. What are you looking at?
SW1 actually has a button switch on the earlier revisions of the Alienware 17 and 18 motherboards. I guess that was either too awesome to keep or it cost them an extra 2 or 3 cents in profits per machine so they decided to leave it off. Here is a photo of an Alienware 17 motherboard that has a button instead of solder balls. You can see it between the right display hinge and DMC slot. The earlier motherboard revisions for the Alienware 17 and 18 also have a switch like that on the other side of the motherboard near the RAM slots. They also removed the DMC socket completely on the latest revisions. Maybe to make an extra 50 cents profit on each one. (I'm being sarcastic about the profit thing, but I don't know of any other motivation they would have other than being cheap and looking for ways to cut production costs to bare bone even if that means saving only a few pennies here and there.)
![[IMG]](images/storyImages/o6lbh1J.jpg) TomJGX, andrewsi2012 and PC GAMER like this.
TomJGX, andrewsi2012 and PC GAMER like this. -
t456 doesn't turn my melon into mashed taters, but:
I'm hearin' rootkit, Windows licensing, the 1st few days in August I was hearin' a small stirrin' of folk who thought their hardware was being branded / tattooed somehow in order to pass activation on a clean install; they thought their BIOS was being 'corrupted' but I didn't know what to think about it nor find the time or place to say what I'm about to say. So is it like everyone's laptop (fffffft. everyone's hardware) is taking on the Mark of the Beast, or is it just me ...Cal Naughton, Jr.: If you slept with your best friend's wife, why would he apologize to you?
Jarvis: Yeah, I don't know, Cal. That's weird.
Cal Naughton, Jr.: That's what I'm sayin'! My head's all tied up like...a pretzel! I got a pretzel in my head!
Jarvis: Cal, you should probably pay attention. I think he's passing you.
Cal Naughton, Jr.: Is Ricky passing me in my subconscious?
Jarvis: No, he's actually passin' you! That's happenin' right now!
Last edited: Sep 12, 2015 -
Nope, it's not just you, bud. I think the same thing about their sinister actions. That's why I created and posted this earlier today (see below) in another thread discussing Secure Flash and Alienware blocking BIOS unlock mods. "Mark of the Beast" is a very fitting analogy for this Windows 10 thing (spying and EDID corruption, desktop motherboard BIOS corruption, etc.). What they are doing is extraordinarily evil in my opinion. It's being done without disclosure or permission. It's a personal trespass not unlike the computerized equivalent of being gang raped and then being accused of secretly enjoying the vile acts of your abusers. It is absolutely NOT COOL or acceptable and they need to be hung out to dry for it. Personally, I'd like to see Mr. Nadella (I like to call him Mr. Nutella) used as a human piñata for his digital crimes against humanity.
![[IMG]](images/storyImages/qWFZ44l.png)
-
Intel Core i7 4930MX
32GB Ram (4x8GB) DDR3L
80GB mSATA + 1TB HDD
2x nVidia GeForce GTX 780M SLI
Windows 10 Pro x64
Running nVidia GPUs.PC GAMER likes this. -
@Mr. Fox I actually saw that picture you posted which made me go looking for my missing switch. I tested the solder balls with a meter before I got brave and shorted them together.
@t456 I have successfully managed to get the ill advised hot-swap Legacy BIOS boot on my system to work. I can get all the way into windows and actually use it with the Intel HD drivers installed and the bricked screen running at 1080p
I would be more than happy to try out the software you mentioned earlier to try and re-write my EDID chip -
That is so kool brother Fox. In '85? I had that poster on me wall, bought it from KempMill Records; my probation officer made me tear it down on a home visit, that & a few others of Eddie & related visual metal paraphernalia.
My 1st Maiden concert was Somewhere in Time, Baltimore. Maryland 1987 ... old school -
Cool.
I have seriously considered trying the same hotswap thing. My M18xR1 is the only Alienware I have left that works and it has never had Windows 10 installed on it. Since you're ready to go (I have been too busy at work) I will follow your lead. Are you going to use the Linux edid-rw tool or purchase PowerStrip? I was thinking about spending the $30 on a license for PowerStrip since it has the ability to write EDID to EEPROM within Windows based on two examples I have found on the web. [ Example 1] [ Example 2] Although, I have Mint Linux on a 32GB bootable USB stick, so I may try doing it that way for free first... undecided at this point.
Even if it works, I still want the flash programmer. I'm considering pulling the BIOS chip off the mobo of the Alienware 18 and manually programming it with an unlocked BIOS and I can use it for that, too. -
Hey guys I just wanted to confirm the same exact thing that happened to all these AW laptops happened to my NP9377SM-A exactly the same thing...Am I the only person with a Sager that this has happened to? I think whatever is allowing this to happen that UEFI, Nvidia drivers, and Windows 10 are the key to what is allowing whatever is happening to happen, I had to RMA because its a really new system and I can't do all the stuff you guys are doing without voiding my warranty but I am really concerned that they might just put a new display in and send it back to me only for this to happen again when I get it back. Is there anyway someone could tell me exactly what I should tell Sager to do to fix this problem, or has anyone figured out how to fix this? I am comp savvy but not to the level of a lot of you guys on here so I am just needed someone to help me know what I should tell sager.....it would be a life saver and I would really appreciate it, and I always try to in some way try to repay people who help me
Thanks guys thank all you guys
@Mr. Fox
@t456 thank you for putting so much effort in to this and into this community I love how everyone is trying to help each other and fill in what microshit and ngreedia should be doing to fix this, you all are awesome KARMA for sure! +100
-
Have them check the EDID on the display and tell you if it is corrupted. And, refer them to this thread.
Yeah, what they're doing is really messed up and it needs to stop before it gets more out of control than it already has. Give 'em an inch and they'll take a mile. Until proven otherwise, I'm pinning 100% of the blame on Micro$haft for providing the triggering mechanism for GeForce drivers to cause harm. It could be something with DSR allowing garbage to be written to the EEPROM or something goofy like that, but the lowest common denominator for starting the process appears to be the installation of Windows 10. They need to start by firing the CEO that opened Pandora's box.
toughasnails, TomJGX and PC GAMER like this. -
I have never really used linux before and I did see that linux tool but it looked beyond my skill set to try and implement for this fix. Ideally a windows based program would be best for me but with some decent instructions using linux may just be possible.
-
I am really sorry guys, misinterpreted the CPU (2960MX) for an AMD GPU . I guess my noobiness knows no boundaries unfortunately.
Mr. Fox likes this.
-
https://flic.kr/p/xwvFsL
I think this program could work to upload data to the EDID.
I tried feeding it the raw data info for my display from a .bin file made with MonInfo but the formatting looks wrong where it says EDID read from file:
There are 00 where i think there should be FF at the start..Attached Files:
-
-
While we are on the subject of Microsoft "rootkits" and virus's, check this out.
-
Hi all
I got worried about blowing up my screen. I have a sager p370sm-a with 980m sli and 120Hz LG screen. Running Win10, upgraded from 8.1 and clean install after that.
Drivers are 355.83
I'll post a screenshot.. Is my EDID corrupted? And would it be wise to re-flash it?Attached Files:
-
-
It doesn't care and is still there. Think of it as an alligator; patiently waiting for you to make that fatal mistake .
Thanks, will get back to that.
You have no idea how right you are; have seen ICs advertised as saving $0.04 in production costs (per assembled unit!). Those savings were being described with a vast number of exclamation marks and the promise of blissful utopia .
Nice job! That socket was live, right?
For anyone else; you have to take care to insert the cable straight, making sure all pins make contact at the same time. Don't haste it and try on a powered-off system first. Sometimes there's retaining clips that make it harder, you want to do this in one go since there's about 10W on those pins (which doesn't sound like a lot, but it is ).
).
Have Linux stick prepared, only it's a bit ... bloated. Wanted to try an Adobe alternative, so used Studio ... on the plus side; it has lots of fonts . Anyway, you just need a 16GB stick and something like USB Image Tool (
instructions).
. Anyway, you just need a 16GB stick and something like USB Image Tool (
instructions).
One problem; first have to upload 16GB somewhere ... it doesn't compress well and there's 4GB persistent storage. Hmm ... will make something smaller and add DOS to it as well, just in case ... spare time is running out, though. Give me a day or two, have to make some screenshots/instructions anyway.
That's a neat alternative .
.
Yes, that tool supports only VGA and DVI/HDMI.
I'll include in the DOS boot, in case anyone's interested in modding those. For instance; higher refresh rate and hard-embedded gamut calibration. Gathered quite a bit of edids so far (some ~250) and they're all calibrated by series (if even that; cheap ones all use the same coordinates), so if you have calibration profile then you make that improvement permanent (no icc required).
Looks alright so far, only that is not enough information to be certain. Use either MonInfo, PowerStrip or softMCCS (quick instructions) to extract the actual edid.Last edited: Sep 11, 2015 -
This is EXACTLY why you need to disable Automatic Windows Updates with a registry hack or in Group Policy. Turning them off in the Windows Update Control Panel is flawed and doesn't actually disable the ability for Windows to update itself. It only suppresses it and some updates can still get installed without permission. I've also had it change my settings back to defaults without my knowledge and the next thing I knew I had a butt-load of Micro$haft cancer on my system and had to do a clean OS reinstall to get rid of the updates cancer running those settings to "not check" as your screen shot shows. The only Windows 7 update after SP1 that I have installed on my Clevo P570WM is Kernel-Mode Driver Framework v1.11 (KB2685811) and that was bundled with something else (I think Intel XTU, don't recall). I have not installed any Windows 8.1.1 updates on that machine (my M18xR2 and P570WM are both dual-boot). I install all drivers offline and disable Automatic Windows Updates, Customer Experience, SmartScreen, Error Reporting, etc. in Group Policy before my machines are allowed to connect to the internet for the very first time.
-
Thanks for the reply t456!
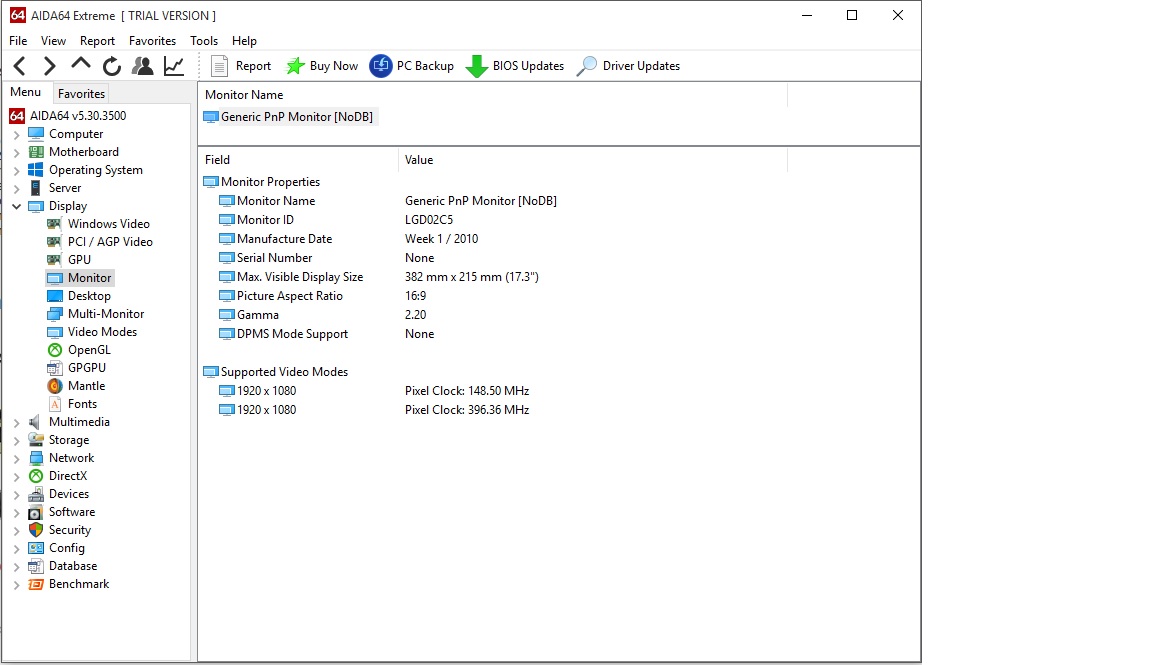
EDID file attached.
..apparently twice
Attached Files:
-
-
It's good. Except that those exports contain only the first 128 bytes and you have an extension block (+128 bytes). Doesn't matter; if at one time you do need to flash it then use the LGD02C5.bin from the archive. Don't flash those 128 bytes versions you've just uploaded.
PC GAMER and wikileaker like this. -
Thanks alot for your help t456! Really appreciate it. I´ll keep your advice in mind if I have to flash it.
edit: btw. Could this problem have something to do with Win10 writing something to the BIOS because it just "knows" your computer if you do a new install. No need for serials. Maybe it messes something up in certain BIOSes. Just shooting ideas here
PC GAMER likes this. -
Not exactly this. If you were to keep your computer offline and did a clean install of Win10, it won't activate. It needs to see the MS activation servers, after which I'm assuming it confirms that you have indeed activated before.
Source: Desktop with a Netgear wireless dongle needed drivers installed before it could connect to my wireless in order to get activated. -
That's not a 'maybe'; that's a definite. Except it's not MS doing the actual dirty work; the laptop vendor does that for them (they could refuse, of course ... ).
Couldn't resist, so got it finished;
![[IMG]](images/storyImages/N5N6zRP.png)
Live and persistent Linux with edid tools (770MB)
Instructions to write to stick:
Code:start 01 check 'pnp id -panel nrs.txt' for the correct bin 02 copy it to the 'write-edid' folder 03 open terminal (ctr+alt+T) 04 sudo bash 05 sudo sensors-detect Hit 'n' for all 'YES/no' questions, EXCEPT I2C/SMBus, hit 'y' for that. There'll be something like 'Using driver 'i2c-XYZ' <- mine was i2c-i801 (Lynx Point), hit 'n' for the remaining questions. 06 sudo modprobe i2c-XYZ (i2c-i801 for me) 07 sudo modprobe i2c-dev 08 sudo i2cdetect -l result: ###################################### root@it:~# sudo i2cdetect -l i2c-0 i2c i915 gmbus ssc I2C adapter i2c-1 i2c i915 gmbus vga I2C adapter i2c-2 i2c i915 gmbus panel I2C adapter i2c-3 i2c i915 gmbus dpc I2C adapter i2c-4 i2c i915 gmbus dpb I2C adapter i2c-5 i2c i915 gmbus dpd I2C adapter i2c-6 i2c DPDDC-A I2C adapter i2c-7 i2c DPDDC-C I2C adapter i2c-8 i2c nouveau-0000:01:00.0-0 I2C adapter i2c-9 i2c nouveau-0000:01:00.0-1 I2C adapter i2c-10 i2c nouveau-0000:01:00.0-2 I2C adapter i2c-11 i2c nouveau-0000:01:00.0-5 I2C adapter i2c-12 i2c nouveau-0000:01:00.0-6 I2C adapter i2c-13 i2c nouveau-0000:01:00.0-7 I2C adapter i2c-14 i2c nouveau-0000:01:00.0-8 I2C adapter i2c-15 i2c nouveau-0000:01:00.0-9 I2C adapter i2c-16 i2c nouveau-0000:01:00.0-26 I2C adapter i2c-17 i2c nouveau-0000:01:00.0-27 I2C adapter i2c-18 i2c nouveau-0000:01:00.0-28 I2C adapter i2c-19 i2c nouveau-0000:01:00.0-29 I2C adapter root@it:~# ###################################### If, for whatever reason, you have restarted/rebooted AFTER running 'i2cdetect -l'; ALWAYS RE-RUN THAT COMMAND before asssuming the edid will be on the same bus. The bus enumeration is usually fixed, but not always so; make CERTAIN you have the right bus. Those 0-19 are the list of buses, now we need to find out which bus the panel is on. It could be 'panel' (bus 2), but one the 'DPDDC's is also possible. Let's try bus 2 first. we read (-r) the bytes 0 to 127, so 128 bytes in total, and we check this bus 2 at address 50 <- this SHOULD contain the edid, BUT-T-T-T ... that is not guaranteed -> IF it is on a different address then either the read part or, especially, the writing part can change things that are hard to fix. We're not interested in the difference between 128 byte or 256 byte edids yet, so extracting the first 128 bytes will do for now. 09 sudo i2cdump -r 0-127 2 0x50 result: ###################################### root@it:~# sudo i2cdump -r 0-127 2 0x50 No size specified (using byte-data access) WARNING! This program can confuse your I2C bus, cause data loss and worse! I will probe file /dev/i2c-2, address 0x50, mode byte Probe range limited to 0x00-0x7f. Continue? [Y/n] y 0 1 2 3 4 5 6 7 8 9 a b c d e f 0123456789abcdef 00: XX XX XX XX XX XX XX XX XX XX XX XX XX XX XX XX XXXXXXXXXXXXXXXX 10: XX XX XX XX XX XX XX XX XX XX XX XX XX XX XX XX XXXXXXXXXXXXXXXX 20: XX XX XX XX XX XX XX XX XX XX XX XX XX XX XX XX XXXXXXXXXXXXXXXX 30: XX XX XX XX XX XX XX XX XX XX XX XX XX XX XX XX XXXXXXXXXXXXXXXX 40: XX XX XX XX XX XX XX XX XX XX XX XX XX XX XX XX XXXXXXXXXXXXXXXX 50: XX XX XX XX XX XX XX XX XX XX XX XX XX XX XX XX XXXXXXXXXXXXXXXX 60: XX XX XX XX XX XX XX XX XX XX XX XX XX XX XX XX XXXXXXXXXXXXXXXX 70: XX XX XX XX XX XX XX XX XX XX XX XX XX XX XX XX XXXXXXXXXXXXXXXX root@it:~# ###################################### So the edid is not here. If it was the edid then you'll see the '00 FF FF FF FF FF FF 00' start header, even if a little corrupted. If you find that then you know the bus AND the address. Anyway, let's try bus 6 next (DPDDC-A). 09 sudo i2cdump -r 0-127 6 0x50 result: ###################################### 0 1 2 3 4 5 6 7 8 9 a b c d e f 0123456789abcdef 00: 00 ff ff ff ff ff ff 00 4d 10 ff 13 00 00 00 00 ........M?.?.... 10: 00 17 01 04 a5 1d 11 78 06 de 50 a3 54 4c 99 26 .??????x??P?TL?& 20: 0f 50 54 00 00 00 01 01 01 01 01 01 01 01 01 01 ?PT...?????????? 30: 01 01 01 01 01 01 56 5e 00 a0 a0 a0 29 50 30 20 ??????V^.???)P0 40: 35 00 26 a5 10 00 00 18 00 00 00 10 00 00 00 00 5.&??..?...?.... 50: 00 00 00 00 00 00 00 00 00 00 00 00 00 10 00 00 .............?.. 60: 00 00 00 00 00 00 00 00 00 00 00 00 00 00 00 fc ...............? 70: 00 4c 51 31 33 33 54 31 4a 57 30 32 0a 20 00 b0 .LQ133T1JW02? .? ###################################### Good, bus 6 it is. Now pay attention to byte 7e. Read address like it was excel: ROW-COLUMN. In this example 7e = 00 (zero) and it's in-between values 20 and b0. The b0 is the final bit (and checksum), if 7e = 01 (one) then you have an extension block and require a 256 byte edid. These are also availeable the archive, but the difference is that you need to use 'write-edid-256.sh' instead of 'write-edid.sh'. Let's make an export to verify actual corruption first and also to help further research: 09 sudo i2cdump -r 0-127 6 0x50 > EDID/edidexport.txt Or, if case you have a 256 byte edid: 09 sudo i2cdump -r 0-255 6 0x50 > EDID/edidexport.txt Check the export by opening the .txt and copy/pasting the significant hex values to the Web Based EDID Reader website. The pasted values should be stripped of row and column id and the ascii characters to the right: example: ###################################### 00 ff ff ff ff ff ff 00 4d 10 ff 13 00 00 00 00 00 17 01 04 a5 1d 11 78 06 de 50 a3 54 4c 99 26 0f 50 54 00 00 00 01 01 01 01 01 01 01 01 01 01 01 01 01 01 01 01 56 5e 00 a0 a0 a0 29 50 30 20 35 00 26 a5 10 00 00 18 00 00 00 10 00 00 00 00 00 00 00 00 00 00 00 00 00 00 00 00 00 10 00 00 00 00 00 00 00 00 00 00 00 00 00 00 00 00 00 fc 00 4c 51 31 33 33 54 31 4a 57 30 32 0a 20 00 b0 ###################################### If the EDID Reader says 'checksum valid' then do not proceed any further; the edid is fine and, thus, something else must be wrong ... If it says 'checksum fail' AND you have your bus AND address by now; skip the stuff below and proceed to step 10. If, on the other hand, you received all XX on all buses then 50 is not the right address for you ... we need to look beyond 50: 09 sudo i2cdetect 6 result: ###################################### root@it:~# sudo i2cdetect 6 WARNING! This program can confuse your I2C bus, cause data loss and worse! I will probe file /dev/i2c-6. I will probe address range 0x03-0x77. Continue? [Y/n] y 0 1 2 3 4 5 6 7 8 9 a b c d e f 00: -- -- -- -- -- -- -- -- -- -- -- -- -- 10: -- 11 -- -- -- -- -- -- -- -- -- -- -- -- -- -- 20: -- -- -- -- -- -- -- -- -- -- -- -- -- -- -- -- 30: -- -- -- -- -- -- -- -- -- -- -- -- -- -- -- -- 40: -- -- -- -- -- -- -- -- -- -- -- -- -- -- -- -- 50: 50 -- -- -- -- -- -- -- -- -- -- -- -- -- -- -- 60: -- -- -- -- -- -- -- -- -- -- -- -- -- -- -- -- 70: -- -- -- -- -- -- -- -- root@it:~# ###################################### So there IS something else here besides the edid at 50 ... Wonder what that button does ... Anyway; go back to the beginning of step 9 and redo the 'read bus', only this time at address 11 (or whatever your results were). ###################################### 10 cd EDID/edid-rw At this point we should have: - BUS (here 6) - ADDRESS (here 50) - EDID LENGTH 128 or 256 (here 128). 11 sudo ./edid-rw 6 | edid-decode This is just a precaution; we want to make sure edid-rw uses the right address, if not then we need to change its code (report this if so). result: ###################################### root@it:~/EDID/edid-rw# sudo ./edid-rw 6 | edid-decode Extracted contents: header: 00 ff ff ff ff ff ff 00 serial number: 4d 10 ff 13 00 00 00 00 00 17 version: 01 04 basic params: a5 1d 11 78 06 chroma info: de 50 a3 54 4c 99 26 0f 50 54 established: 00 00 00 standard: 01 01 01 01 01 01 01 01 01 01 01 01 01 01 01 01 descriptor 1: 56 5e 00 a0 a0 a0 29 50 30 20 35 00 26 a5 10 00 00 18 descriptor 2: 00 00 00 10 00 00 00 00 00 00 00 00 00 00 00 00 00 00 descriptor 3: 00 00 00 10 00 00 00 00 00 00 00 00 00 00 00 00 00 00 descriptor 4: 00 00 00 fc 00 4c 51 31 33 33 54 31 4a 57 30 32 0a 20 extensions: 00 checksum: b0 Manufacturer: SHP Model 13ff Serial Number 0 Made week 0 of 2013 EDID version: 1.4 Digital display 8 bits per primary color channel DisplayPort interface Maximum image size: 29 cm x 17 cm Gamma: 2.20 Supported color formats: RGB 4:4:4 Default (sRGB) color space is primary color space First detailed timing is preferred timing Established timings supported: Standard timings supported: Detailed mode: Clock 241.500 MHz, 294 mm x 165 mm 2560 2608 2640 2720 hborder 0 1440 1443 1448 1481 vborder 0 -hsync -vsync Dummy block Dummy block Monitor name: LQ133T1JW02 Checksum: 0xb0 EDID block does NOT conform to EDID 1.3! Missing monitor ranges root@it:~/EDID/edid-rw# ###################################### Good, so we're looking at the same thing. If you've made it this far then we're pretty much finished. IF you have an edid address different from 50, then we need to change the write-edid.sh script accordingly (report this). If it is the standard address 50, then proceed: Let's rewrite the edid (the .bin you copied to the 'write-edid' folder). We'll presume it's called ABCDEF.bin. The actual tool it uses is i2cset (docs bookmarked), but this writes byte-for-byte, whereas the write-edid.sh script automates that (with address=50 pre-set). 12 cd .. 13 cd write-edid 14 sudo bash ./write-edid.sh 6 ABCDEF.bin result: ###################################### root@it:~/EDID/write-edid# sudo bash ./write-edid.sh 6 SHP13FFmod.bin Writing byte 0x00 to bus 6, chip-adress 0x50, data-adress 0x00 Writing byte 0xFF to bus 6, chip-adress 0x50, data-adress 0x01 Writing byte 0xFF to bus 6, chip-adress 0x50, data-adress 0x02 Writing byte 0xFF to bus 6, chip-adress 0x50, data-adress 0x03 Writing byte 0xFF to bus 6, chip-adress 0x50, data-adress 0x04 Writing byte 0xFF to bus 6, chip-adress 0x50, data-adress 0x05 Writing byte 0xFF to bus 6, chip-adress 0x50, data-adress 0x06 Writing byte 0x00 to bus 6, chip-adress 0x50, data-adress 0x07 Writing byte 0x30 to bus 6, chip-adress 0x50, data-adress 0x08 Writing byte 0xE4 to bus 6, chip-adress 0x50, data-adress 0x09 Writing byte 0x6C to bus 6, chip-adress 0x50, data-adress 0x0a Writing byte 0x04 to bus 6, chip-adress 0x50, data-adress 0x0b Writing byte 0x00 to bus 6, chip-adress 0x50, data-adress 0x0c Writing byte 0x00 to bus 6, chip-adress 0x50, data-adress 0x0d Writing byte 0x00 to bus 6, chip-adress 0x50, data-adress 0x0e Writing byte 0x00 to bus 6, chip-adress 0x50, data-adress 0x0f Writing byte 0x00 to bus 6, chip-adress 0x50, data-adress 0x10 Writing byte 0x18 to bus 6, chip-adress 0x50, data-adress 0x11 Writing byte 0x01 to bus 6, chip-adress 0x50, data-adress 0x12 Writing byte 0x04 to bus 6, chip-adress 0x50, data-adress 0x13 Writing byte 0xA5 to bus 6, chip-adress 0x50, data-adress 0x14 Writing byte 0x1D to bus 6, chip-adress 0x50, data-adress 0x15 Writing byte 0x11 to bus 6, chip-adress 0x50, data-adress 0x16 Writing byte 0x78 to bus 6, chip-adress 0x50, data-adress 0x17 Writing byte 0x06 to bus 6, chip-adress 0x50, data-adress 0x18 Writing byte 0xDE to bus 6, chip-adress 0x50, data-adress 0x19 Writing byte 0x50 to bus 6, chip-adress 0x50, data-adress 0x1a Writing byte 0xA3 to bus 6, chip-adress 0x50, data-adress 0x1b Writing byte 0x54 to bus 6, chip-adress 0x50, data-adress 0x1c Writing byte 0x4C to bus 6, chip-adress 0x50, data-adress 0x1d Writing byte 0x99 to bus 6, chip-adress 0x50, data-adress 0x1e Writing byte 0x26 to bus 6, chip-adress 0x50, data-adress 0x1f Writing byte 0x0F to bus 6, chip-adress 0x50, data-adress 0x20 Writing byte 0x50 to bus 6, chip-adress 0x50, data-adress 0x21 Writing byte 0x54 to bus 6, chip-adress 0x50, data-adress 0x22 Writing byte 0x00 to bus 6, chip-adress 0x50, data-adress 0x23 Writing byte 0x00 to bus 6, chip-adress 0x50, data-adress 0x24 Writing byte 0x00 to bus 6, chip-adress 0x50, data-adress 0x25 Writing byte 0x01 to bus 6, chip-adress 0x50, data-adress 0x26 Writing byte 0x01 to bus 6, chip-adress 0x50, data-adress 0x27 Writing byte 0x01 to bus 6, chip-adress 0x50, data-adress 0x28 Writing byte 0x01 to bus 6, chip-adress 0x50, data-adress 0x29 Writing byte 0x01 to bus 6, chip-adress 0x50, data-adress 0x2a Writing byte 0x01 to bus 6, chip-adress 0x50, data-adress 0x2b Writing byte 0x01 to bus 6, chip-adress 0x50, data-adress 0x2c Writing byte 0x01 to bus 6, chip-adress 0x50, data-adress 0x2d Writing byte 0x01 to bus 6, chip-adress 0x50, data-adress 0x2e Writing byte 0x01 to bus 6, chip-adress 0x50, data-adress 0x2f Writing byte 0x01 to bus 6, chip-adress 0x50, data-adress 0x30 Writing byte 0x01 to bus 6, chip-adress 0x50, data-adress 0x31 Writing byte 0x01 to bus 6, chip-adress 0x50, data-adress 0x32 Writing byte 0x01 to bus 6, chip-adress 0x50, data-adress 0x33 Writing byte 0x01 to bus 6, chip-adress 0x50, data-adress 0x34 Writing byte 0x01 to bus 6, chip-adress 0x50, data-adress 0x35 Writing byte 0x2A to bus 6, chip-adress 0x50, data-adress 0x36 Writing byte 0x44 to bus 6, chip-adress 0x50, data-adress 0x37 Writing byte 0x80 to bus 6, chip-adress 0x50, data-adress 0x38 Writing byte 0xA0 to bus 6, chip-adress 0x50, data-adress 0x39 Writing byte 0x70 to bus 6, chip-adress 0x50, data-adress 0x3a Writing byte 0x38 to bus 6, chip-adress 0x50, data-adress 0x3b Writing byte 0x27 to bus 6, chip-adress 0x50, data-adress 0x3c Writing byte 0x40 to bus 6, chip-adress 0x50, data-adress 0x3d Writing byte 0x30 to bus 6, chip-adress 0x50, data-adress 0x3e Writing byte 0x20 to bus 6, chip-adress 0x50, data-adress 0x3f Writing byte 0x35 to bus 6, chip-adress 0x50, data-adress 0x40 Writing byte 0x00 to bus 6, chip-adress 0x50, data-adress 0x41 Writing byte 0x26 to bus 6, chip-adress 0x50, data-adress 0x42 Writing byte 0xA5 to bus 6, chip-adress 0x50, data-adress 0x43 Writing byte 0x10 to bus 6, chip-adress 0x50, data-adress 0x44 Writing byte 0x00 to bus 6, chip-adress 0x50, data-adress 0x45 Writing byte 0x00 to bus 6, chip-adress 0x50, data-adress 0x46 Writing byte 0x18 to bus 6, chip-adress 0x50, data-adress 0x47 Writing byte 0x56 to bus 6, chip-adress 0x50, data-adress 0x48 Writing byte 0x5E to bus 6, chip-adress 0x50, data-adress 0x49 Writing byte 0x00 to bus 6, chip-adress 0x50, data-adress 0x4a Writing byte 0xA0 to bus 6, chip-adress 0x50, data-adress 0x4b Writing byte 0xA0 to bus 6, chip-adress 0x50, data-adress 0x4c Writing byte 0xA0 to bus 6, chip-adress 0x50, data-adress 0x4d Writing byte 0x29 to bus 6, chip-adress 0x50, data-adress 0x4e Writing byte 0x50 to bus 6, chip-adress 0x50, data-adress 0x4f Writing byte 0x30 to bus 6, chip-adress 0x50, data-adress 0x50 Writing byte 0x20 to bus 6, chip-adress 0x50, data-adress 0x51 Writing byte 0x35 to bus 6, chip-adress 0x50, data-adress 0x52 Writing byte 0x00 to bus 6, chip-adress 0x50, data-adress 0x53 Writing byte 0x26 to bus 6, chip-adress 0x50, data-adress 0x54 Writing byte 0xA5 to bus 6, chip-adress 0x50, data-adress 0x55 Writing byte 0x10 to bus 6, chip-adress 0x50, data-adress 0x56 Writing byte 0x00 to bus 6, chip-adress 0x50, data-adress 0x57 Writing byte 0x00 to bus 6, chip-adress 0x50, data-adress 0x58 Writing byte 0x18 to bus 6, chip-adress 0x50, data-adress 0x59 Writing byte 0x00 to bus 6, chip-adress 0x50, data-adress 0x5a Writing byte 0x00 to bus 6, chip-adress 0x50, data-adress 0x5b Writing byte 0x00 to bus 6, chip-adress 0x50, data-adress 0x5c Writing byte 0xFE to bus 6, chip-adress 0x50, data-adress 0x5d Writing byte 0x00 to bus 6, chip-adress 0x50, data-adress 0x5e Writing byte 0x4C to bus 6, chip-adress 0x50, data-adress 0x5f Writing byte 0x47 to bus 6, chip-adress 0x50, data-adress 0x60 Writing byte 0x20 to bus 6, chip-adress 0x50, data-adress 0x61 Writing byte 0x44 to bus 6, chip-adress 0x50, data-adress 0x62 Writing byte 0x69 to bus 6, chip-adress 0x50, data-adress 0x63 Writing byte 0x73 to bus 6, chip-adress 0x50, data-adress 0x64 Writing byte 0x70 to bus 6, chip-adress 0x50, data-adress 0x65 Writing byte 0x6C to bus 6, chip-adress 0x50, data-adress 0x66 Writing byte 0x61 to bus 6, chip-adress 0x50, data-adress 0x67 Writing byte 0x79 to bus 6, chip-adress 0x50, data-adress 0x68 Writing byte 0x0A to bus 6, chip-adress 0x50, data-adress 0x69 Writing byte 0x20 to bus 6, chip-adress 0x50, data-adress 0x6a Writing byte 0x20 to bus 6, chip-adress 0x50, data-adress 0x6b Writing byte 0x00 to bus 6, chip-adress 0x50, data-adress 0x6c Writing byte 0x00 to bus 6, chip-adress 0x50, data-adress 0x6d Writing byte 0x00 to bus 6, chip-adress 0x50, data-adress 0x6e Writing byte 0xFE to bus 6, chip-adress 0x50, data-adress 0x6f Writing byte 0x00 to bus 6, chip-adress 0x50, data-adress 0x70 Writing byte 0x4C to bus 6, chip-adress 0x50, data-adress 0x71 Writing byte 0x50 to bus 6, chip-adress 0x50, data-adress 0x72 Writing byte 0x31 to bus 6, chip-adress 0x50, data-adress 0x73 Writing byte 0x37 to bus 6, chip-adress 0x50, data-adress 0x74 Writing byte 0x33 to bus 6, chip-adress 0x50, data-adress 0x75 Writing byte 0x57 to bus 6, chip-adress 0x50, data-adress 0x76 Writing byte 0x46 to bus 6, chip-adress 0x50, data-adress 0x77 Writing byte 0x34 to bus 6, chip-adress 0x50, data-adress 0x78 Writing byte 0x2D to bus 6, chip-adress 0x50, data-adress 0x79 Writing byte 0x53 to bus 6, chip-adress 0x50, data-adress 0x7a Writing byte 0x50 to bus 6, chip-adress 0x50, data-adress 0x7b Writing byte 0x44 to bus 6, chip-adress 0x50, data-adress 0x7c Writing byte 0x31 to bus 6, chip-adress 0x50, data-adress 0x7d Writing byte 0x00 to bus 6, chip-adress 0x50, data-adress 0x7e Writing byte 0x6B to bus 6, chip-adress 0x50, data-adress 0x7f Writing done, here is the output of i2cdump -y 6 0x50: No size specified (using byte-data access) 0 1 2 3 4 5 6 7 8 9 a b c d e f 0123456789abcdef 00: 00 ff ff ff ff ff ff 00 4d 10 ff 13 00 00 00 00 ........M?.?.... 10: 00 17 01 04 a5 1d 11 78 06 de 50 a3 54 4c 99 26 .??????x??P?TL?& 20: 0f 50 54 00 00 00 01 01 01 01 01 01 01 01 01 01 ?PT...?????????? 30: 01 01 01 01 01 01 56 5e 00 a0 a0 a0 29 50 30 20 ??????V^.???)P0 40: 35 00 26 a5 10 00 00 18 00 00 00 10 00 00 00 00 5.&??..?...?.... 50: 00 00 00 00 00 00 00 00 00 00 00 00 00 10 00 00 .............?.. 60: 00 00 00 00 00 00 00 00 00 00 00 00 00 00 00 fc ...............? 70: 00 4c 51 31 33 33 54 31 4a 57 30 32 0a 20 00 b0 .LQ133T1JW02? .? 80: 00 00 00 00 00 00 00 00 00 00 00 00 00 00 00 00 ................ 90: 00 00 00 00 00 00 00 00 00 00 00 00 00 00 00 00 ................ a0: 00 00 00 00 00 00 00 00 00 00 00 00 00 00 00 00 ................ b0: 00 00 00 00 00 00 00 00 00 00 00 00 00 00 00 00 ................ c0: 00 00 00 00 00 00 00 00 00 00 00 00 00 00 00 00 ................ d0: 00 00 00 00 00 00 00 00 00 00 00 00 00 00 00 00 ................ e0: 00 00 00 00 00 00 00 00 00 00 00 00 00 00 00 00 ................ f0: 00 00 00 00 00 00 00 00 00 00 00 00 00 00 00 00 ................ ###################################### So ... it's the same edid ... Seems my eeprom is already write-protected (unfortunately, for me; it'd be 75Hz otherwise). If successful then you should have a different edid than before and your panel is fixed. There's also a vcom eeprom, but let's not get into that right now. finish
All correct edids collected so far are on the drive (folder EDID). Everything you need is there, including the instructions and the edid tools. Bookmarked the proper websites, guides and documentation in Firefox, that way you can keep them open side-by-side to the console. There's also a few screenshots (uncommented) and an easy-extract spreadsheet. This strips the backup or ic2dump output of the row and column ids, that way you can copy/paste it to the Web Based EDID Reader site and check the data. -
-
Well, what did you want for 30Gigs?)) Are you sure you can't decrease it to 8GB at least?
-
Can't you just copy/paste actual files from partition to FAT formatted USB flash and then make it bootable by ZX Grub4DosUSB?
-
Updated affected model list in post #2. If any other models need to be added to the list, let me know. I added the only affected Clevo example I know the model name for.
@Brent R. - did you RMA to XoticPC or another Sager/Clevo reseller? If Xotic, have you communicated with @Hutsady@XoticPC or anyone else about this yet? @D2 Ultima - let's hope your machine doesn't get hit.
*** Windows 10 + NVIDIA WHQL Drivers are Killing Alienware and Clevo LCD Panels ***
Discussion in 'Alienware' started by Mr. Fox, Aug 1, 2015.