Effective answer: No.
-
Just get a studio ATFP.
-
Agreed! Besides more aesthetically pleasing, it is also a better keyboard.
-
i'm not fan of illuminated keyboard, n i don't like m1330 keyboard either.
Just think to change studio XPS 13 keyboard's key to my XPS m1330. But will it work ? Any answer ? -
You mean pop off the individual keys and switch them over?
That might not work. First, the keys (and the mounting under each key) would have to be the same.
I know with thinkpads (I haven't actually checked) the different manufacturers use different actions for the keys - a key from a chickony (sp?) keyboard won't work on an NMB keyboard, alps, etc.
Redbox, if you want a black keyboard look into the Vostro 1400/1500 keyboards. -
oh my...
will dell release xps studio 3 keyboard for xps m1330 ?
and what different between vostro 1500's keyboard - xps m1330, is it white or silver with edge-to-edge keyboard ?
sorry for my english -
HOW do u do that?? (the media direct button, that is)
-
http://www.resaleremarketing.net/servlet/the-25/XPS-M1530-Studio-Illuminated/Detail
what is this site??! did they get mixed up or is it some type of modified version to fit the xps1530...sorry if its been posted already -
That's actually a Studio 15 backlit keyboard. That's the exact site I bought mine from and the exact model I bought. The "XPS M1530" title is an error.
-
does anyone know if the keys on the studio is interchangeable with the keys on the 1520/1500/1530 ?
If they are then im going to buy one, swap out the keys and run an EL wire under the keys and see if i can use the 3.3v power line from the unused wwan slot to power it? I mean worse come to worse i attach a power button for it somewhere (thinking to the right of the power button on my 1520) -
If you're handy with a soldering iron/gun (I wouldn't even know which to use
 ), and you wouldn't mind if you never get to use that WWAN slot if something goes wrong, then you could try. I couldn't tell you if the actual keys are interchangeable or not, though. They would certainly have to be of the exact same layout to even attempt it, and I don't know if they're attached the same way.
If you decide to go ahead with it, good luck and godspeed!
-
if someone can get me the part number for a studio 15 i'll give it a shot, im going to try to make a pcb this weekend or when i can find all the componants after doing some more research.
I know on the dell mini's you can solder into the motherboard for a USB hub but i want to avoid that. I want to make a pcb that plugs into the mini pci-e slot and have it be a USB hub. I know the mpci-e has two 3v pins so i might be able to use that and power one of these.
http://www.thatscoolwire.com/store/item.asp?Category=168&SubCategoryID=&GroupID=&SKU=WY-GH-86-3V
i was thinking about getting that, chop off the ends and just soldering a usb connector onto it. It sounds more difficult then i think it would be.
as for the keys, i know that the studio 15's keyboard "Fits" into the 1530/1520/1500 models just the mounting holes AND ribbons dont line up, so if its the same layout wouldnt the keys be the same? just a thought.
or if you would so kind as to take a picture of one of your keys i would greatly appriciate it. Pictures of all sides and measurements please! -
I'm not about to dissect my backlit keyboard (those keys are a royal pain to get back on), but I'll take one or two from my old non-backlit keyboard. Apart from the LED's, they should be identical.
-
Hey guys im new to this forum so hello
Well I came across this tonight and it totally bashed my dreams for a backlit keyboard... :/
I was JUST about to buy this, so im assuming it wont work?
http://www.resaleremarketing.net/servlet/the-25/Dell-XPS-M1530-Studio/Detail -
Correct, it will not work. The fact that it's listed as an M1530 backlit keyboard is an error. I bought that exact keyboard; it's the standard backlit keyboard for the Studio 1535, 1536, and 1537.
-
Damn thank goodness I came across this before I blew $50.
But I REALLY wanted that keyboard... :/
Thanks for bashing my dreams guys... haha j/k j/k.
Thanks for the help. -
The backlit keyboard is available fro ebay now for 25.00.
I am going to try a MOD for my M1530. I will post my findings! -
It wont work due to the extra connector that provides the power.
-
Hey all, im new to this forum. Ive had my XPS M1530 for a good 3 years now. Ive always wanted a backlit keyboard. Ive been doing some research, as most of you have, and it seems possible. Anything is possible.. I was thinking at first getting a crap load of surface mount L.E.D's and put them under the keys.. No way possible, since the keys touch flush with the back.. the best way is use the new Dell keyboard thats already backlit.. the only problem now is that there is no way to power it.. since there is no connection available on the 1530 to directly plug it in. My guess is just use the USB power. USB gives out 5V.. anyone know what the lit keyboard takes?
-
Im gona get my hands on a Brand new Dell Studio Keyboard, and see what I can do for my XPS m1530. Ill keep you all updated.
-
So.. I got a black, backlit studio 15 keyboard. I took out my xps KB and checked them out. The screw mounts on the top are different. A few of the clips are different.. ok enough.. the studio 15 KB WILL work with the xps.. or will it? Since the studio 15 ribbon cable is a 29 pin.. it won't fit the ..er 26 pin? Xps..lol it won't fit... so what's the only option? Use the xps keyboard. All u need is the "circuit board" from the xps, it fits in the 15's KB. I've tested the light, and it works. But the backlight is acutally a seperate film on the back of the KB. Sorry I'm on my cellphone, let's put it this way, I'm currently working on a tutorial with pics of how to do this. If any of you actually check this. Keep in touch. Or email me at [email protected]
-
Dude I am waiting with baited breath!
-
This is my first contribution to the internet
after many trial and errors I have success
what you need.
there are different keyboard for both the dell studio and the xps m1530 the one that you want from the studio is shown in the picture and the one you want from the xps is the one in the other both labeled pictures.
this particular keyboard is partially see through and the keys match exactly to the dell studio but only this particular model
so you must get these keyboards or it wont work. if your xps came with the right one youre in luck and will only need to buy the dell studio keyboard.
so here are the pictures. one more thing the top row does not match so dont bother but thats ok because you dont really need those just leave them and you get a nice tuxedo look.
What I did
1. remove your keyboard
2. remove white led backing from dell studio and solder a wire to each lead. Mine look like I got it on two for the white one no big deal it does not go anywhere. Do the same for the other lead
3.in the picture put the ground on the screw and the other you will need to solder to the last pint on the add on card I took a big chance here and I got power from here if it does not work swap black for white you might have it backwards.
4. remove keys with a flat screwdriver very carefully or you may need to buy another keyboard. You should buy two anyway just in case. unless you are really good.
It took me four keyboards to get this done but I didnt know there were different models of keyboards with different key backings.
Make sure you remove the see through film from the xps keyboard this will give you the most light. There is no dim or on and off switch yet. I might add a on off switch later but for now I am happy with it. you cand add color film from a floral shop to change the color to what you want
There is minimal battery drain from the led so no big deal to leave it on
the keyboard with white is the dell studio and the one that has the brown is just my table that is the xps keybaord as you can see this is the see through keyboard
I spent allot of time and money and yes it was worth it. A donation would be nice plus I will give more pictures and guidance to those who do just trying to recoup money spent". so anyone who cares i take paypal
If anyone does this please post I would love to see others get the joyAttached Files:
-
-
one more pic
Attached Files:
-
-
awesome work, where did you source your keyboards from?
-
I got it from ebay
-
very very nice job there sir.
i'm quite interested in doing this myself. i'd like to get a black keyboard with blue lighting to match the LEDs on the system already. -
Hey Green leaf
I was super interested in doing this, but i noticed in the last 2 pictures that the keyboard appears to be in different colors, both silver and black. to me, it seems as if this was because you had to use a silver m1530 keyboard to do this, and it appears as if some of the keys were not transferable, such as the function keys and the space bar. i'm hoping i might be able to use a black m1530 keyboard as a base instead of the silver one.
do you have any info about the keyboards that didn't work for the swap?
also, your instructions were just slightly difficult to follow, so i tried to re-write them clearly below. if you could take a moment or 2 to review the rewritten instructions and make sure i got them right, i'd appreciate it.
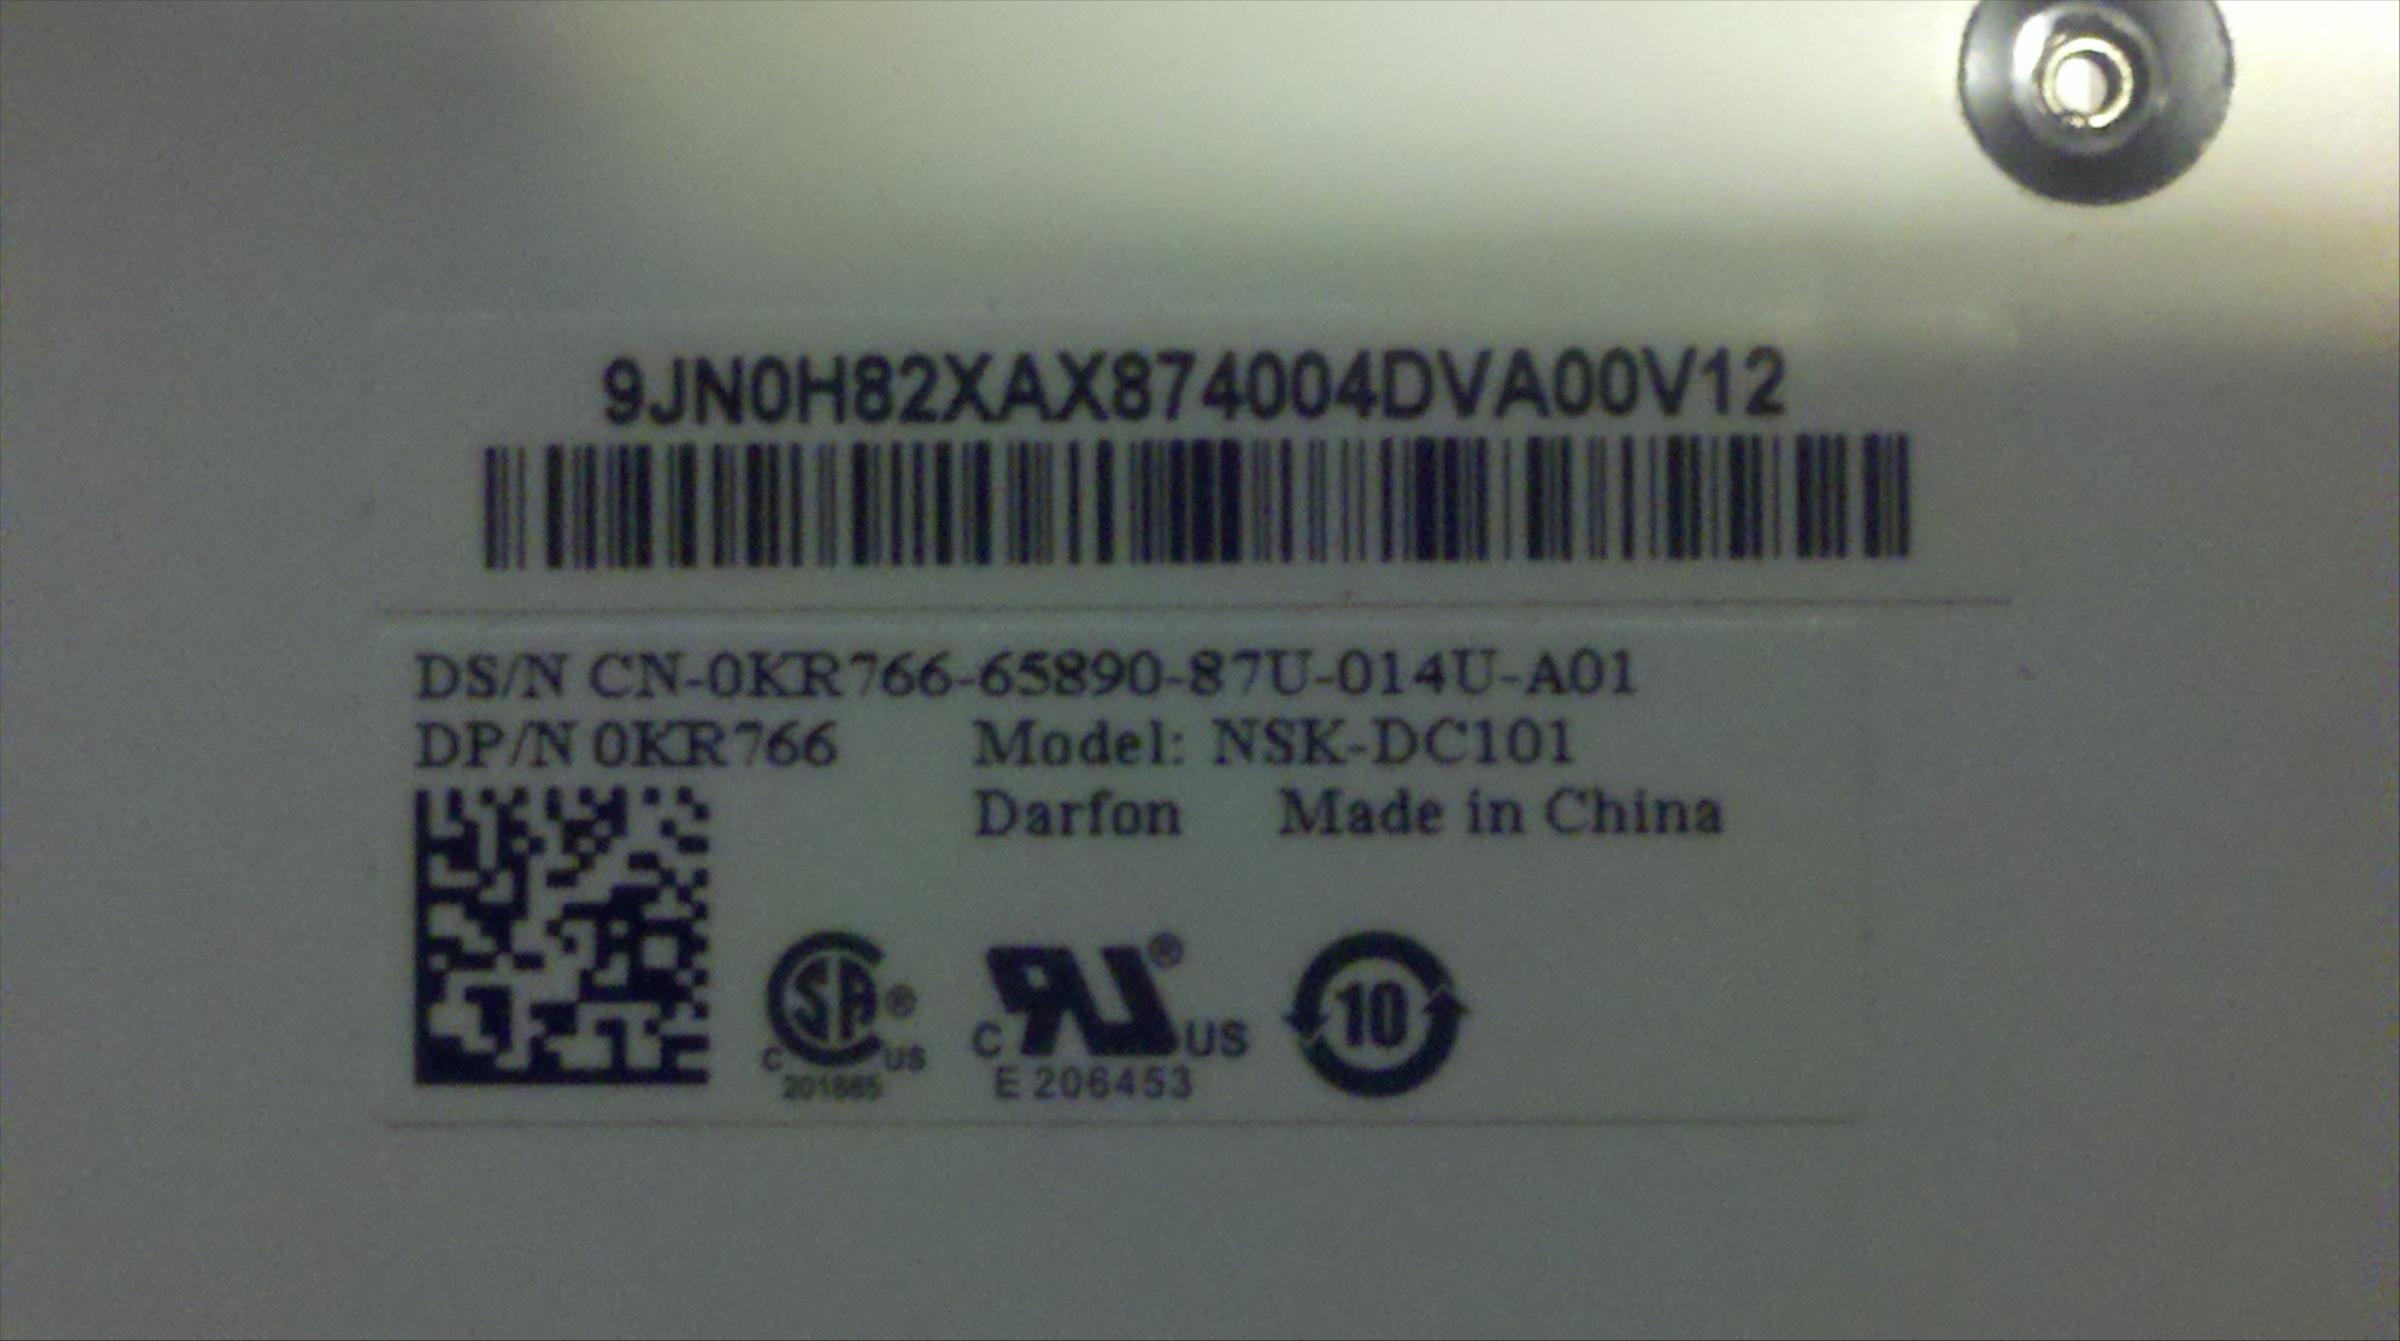
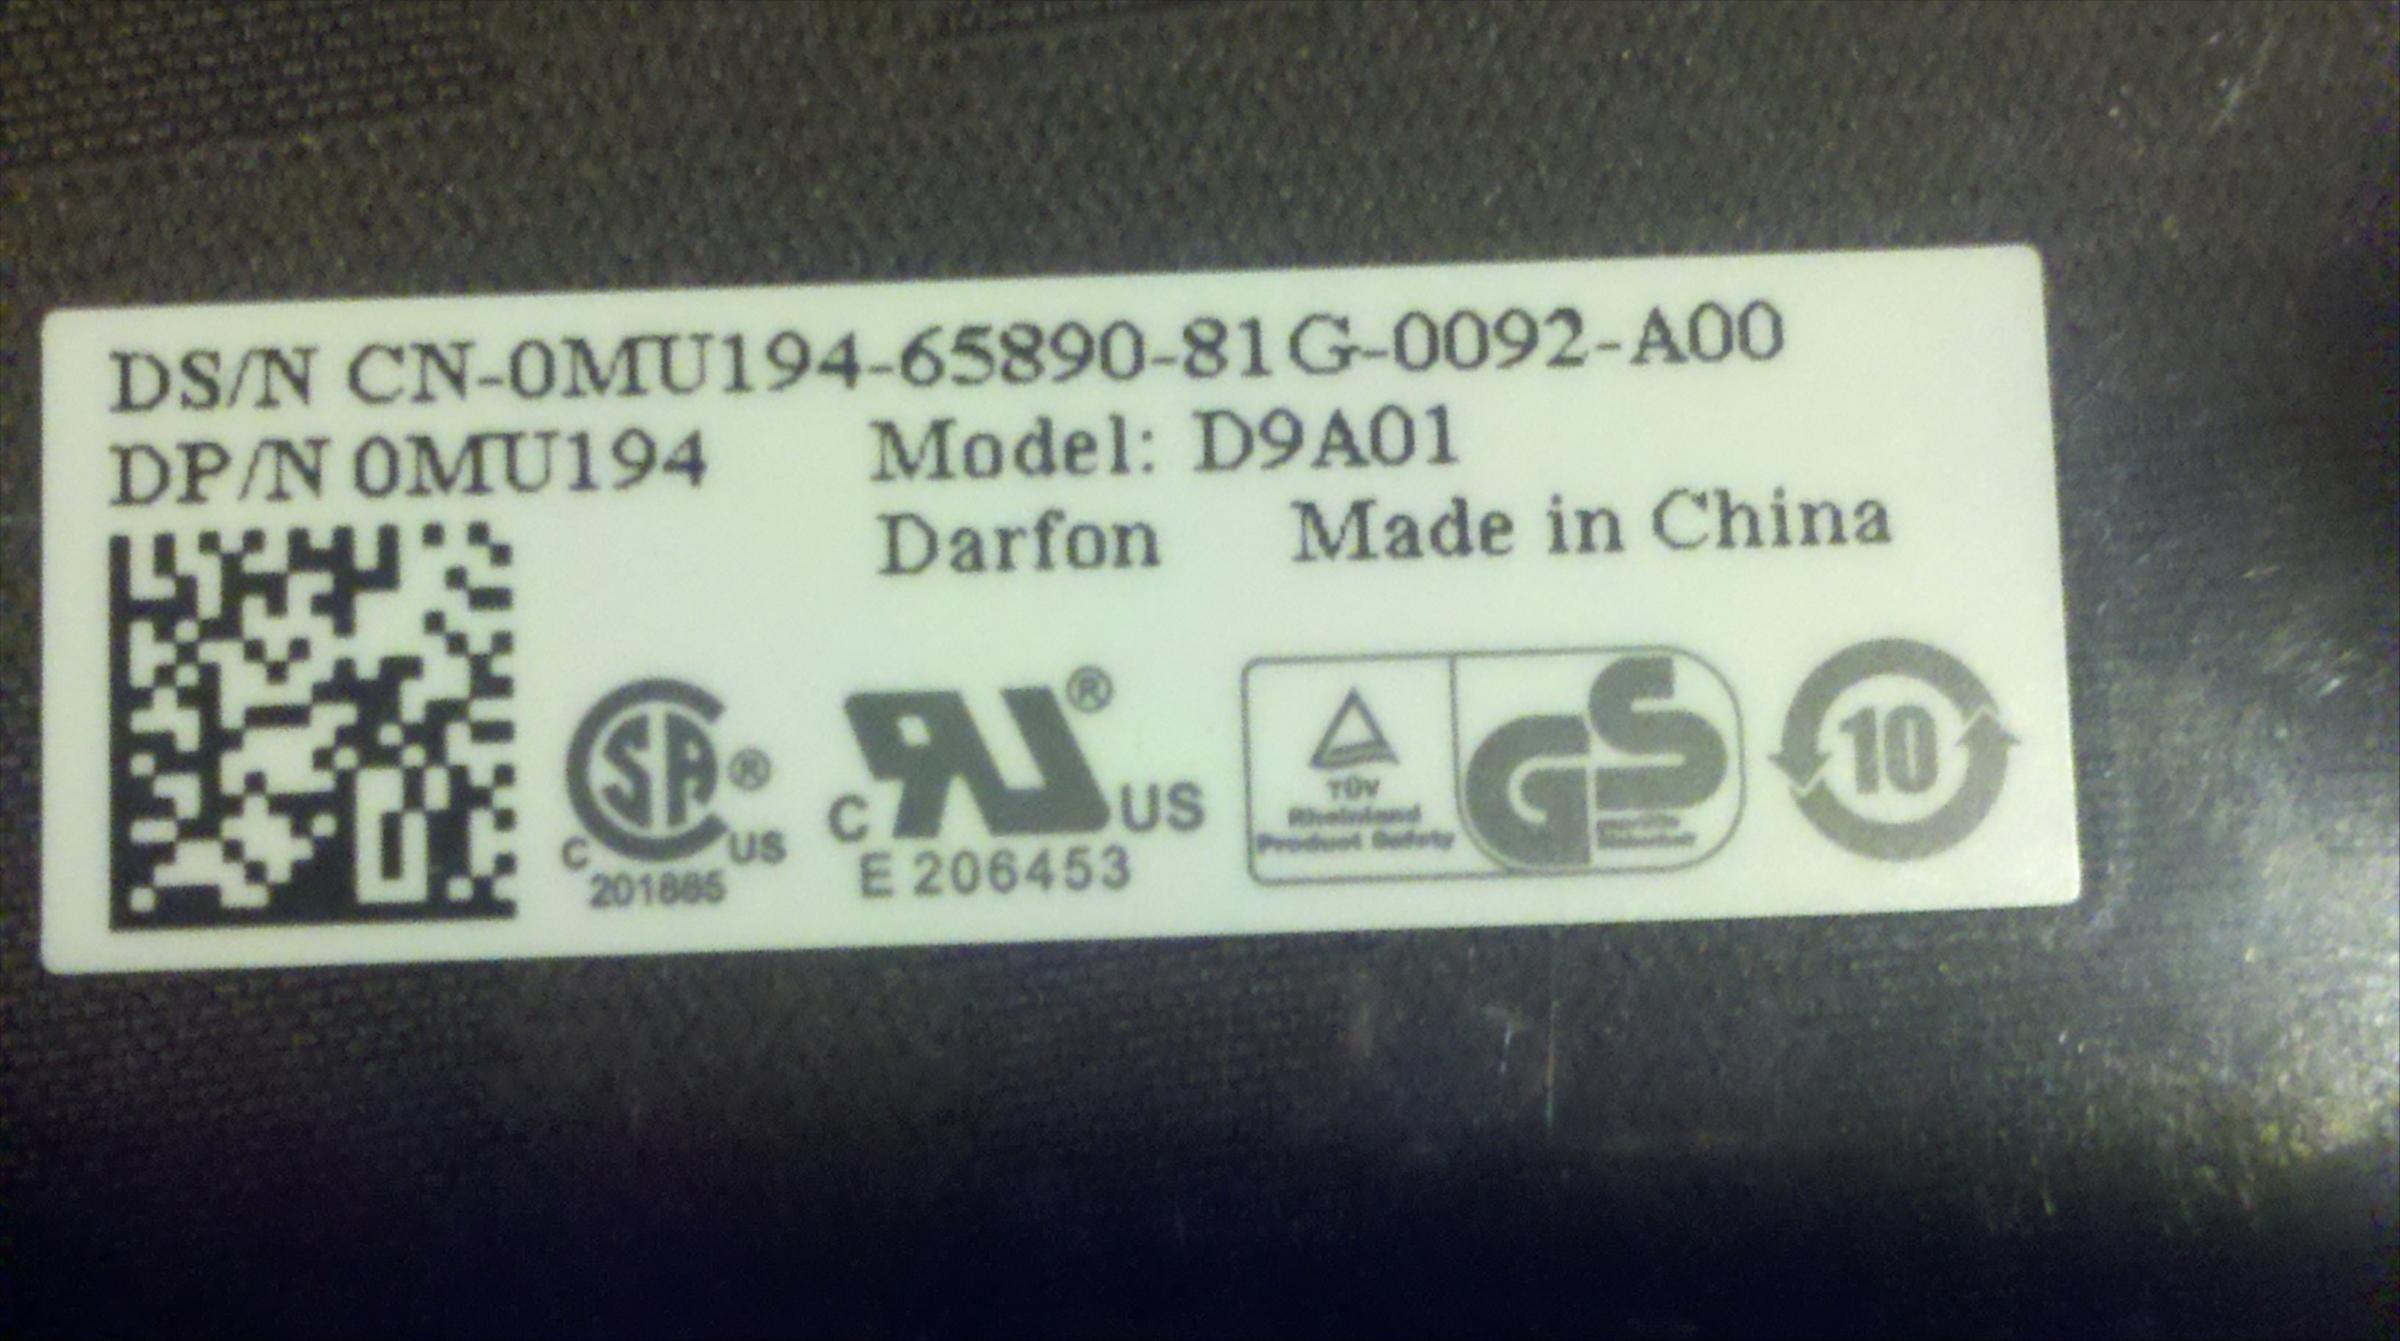
1. obtain both keyboards. there are 2 types for each, so be careful to get the right keyboards. the Studio keyboard is part number 0KR766. the m1530's keyboard is part number 0mu194.
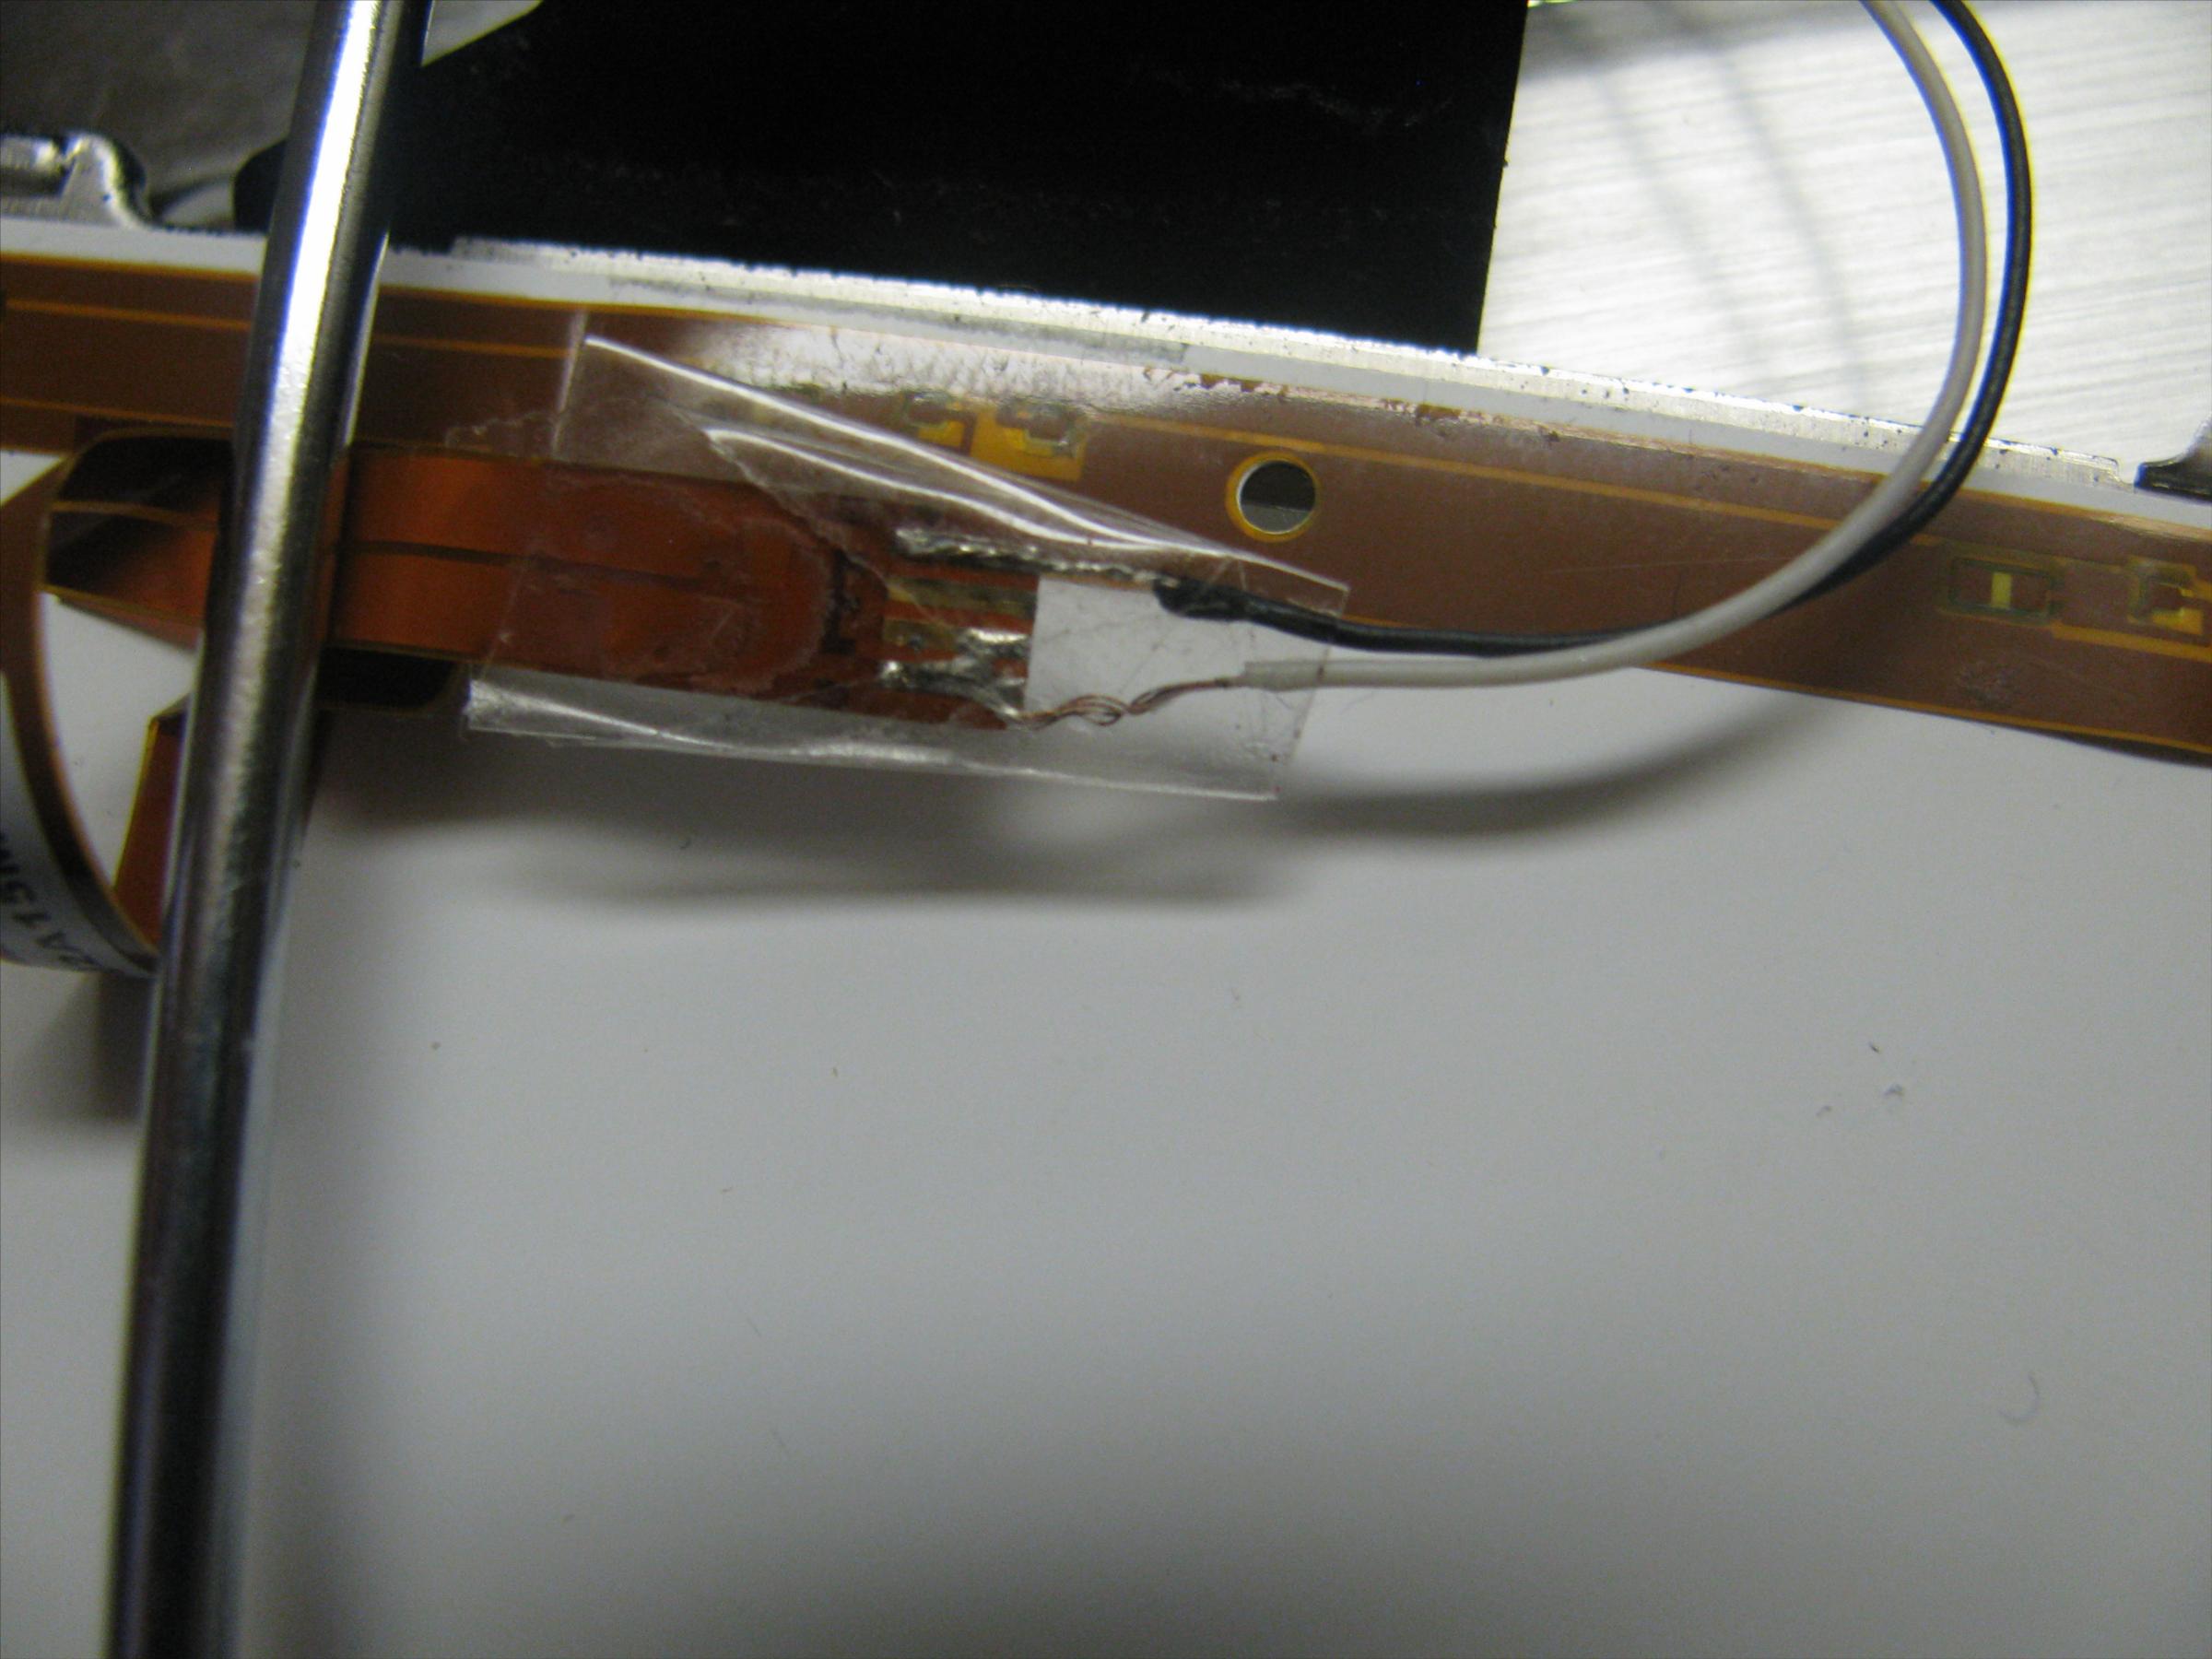
2. Remove the LED film from the Studio keyboard (part number 0KR766). There will be 2 leads coming off this film. solder a wire to each lead. It may appear to have 2 white leads and 1 black one, but the 2nd white lead doesn't go anywhere.
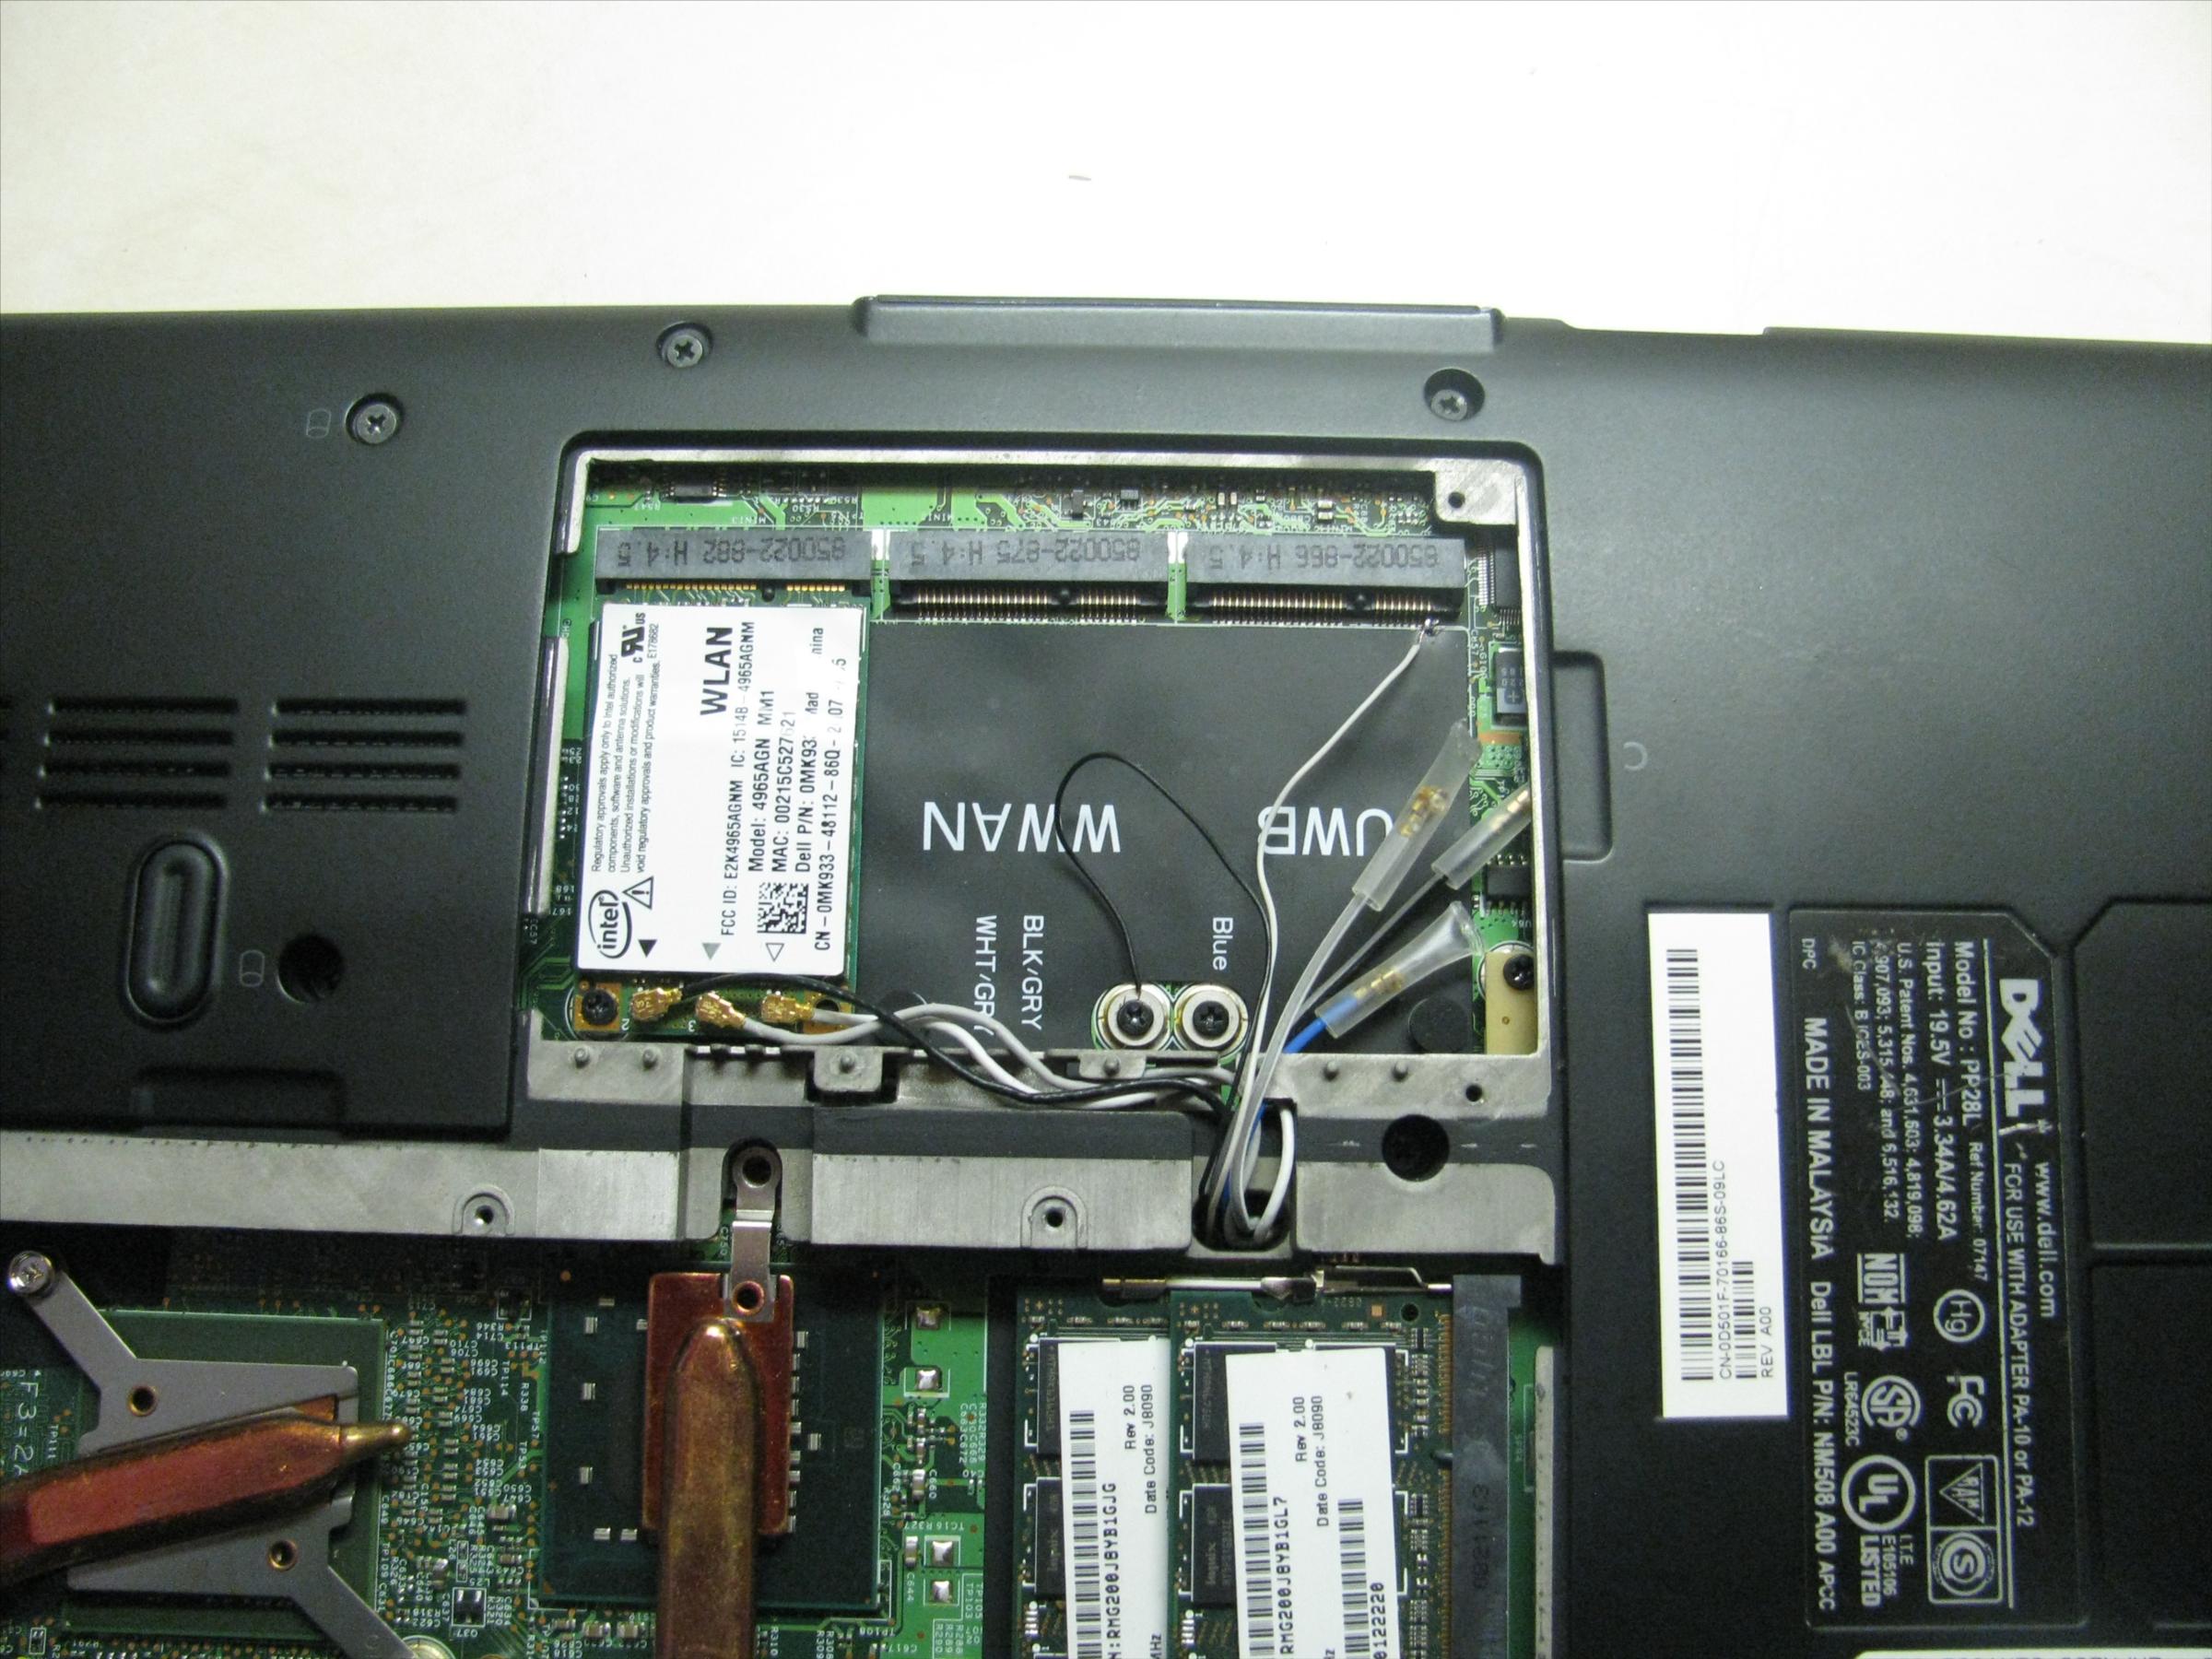
3. the Ground lead (generally black) can be attached to the ground screw in the expansion bay. The Power lead (white) needs to be attached to power. In Green_Leaf's case, he soldered this lead to the final pin of the UWB marked expansion/PCI-Express port. I'm a little concerned about this placement. it doesn't allow easy disassembly of the system if you need to replace something else. I'll have to look through the thread to determine proper amount of power needed and see if there is a better way of obtaining that additional power. Even if you use the same port and pin for power, it should probably be done with a plug in card as opposed to directly soldering to the board.
3. carefully pull off the keys from the m1530's keyboard (part number 0mu194), replace with the backlit keyboard's keys (part number 0KR766)
4. remove the transparent film from the back of the m1530 keyboard to allow the most light through.
i'm guessing that at some point it will be obvious that you place the LED backing in where the clear backing was in the past. -
seems right to me
as for the power it seemed like the best place for it
not to mention i had no support and i could have shorted the mobo but it all worked out
sorry no info on the boards that did not work
as for the space bar and fucntion keys they do not fit from the studio to the xps chasi so there you good luck -
i seriously need to fix my email settings for this thread. i had no idea you responded.
i'm thinking about a sort of plug to produce the power, something that allows a quick disconnect. will look into it later.
i know for a fact that the keys from the Studio keyboard mentioned in this thread doesn't go with the black keys from the keyboard in my XPS right now, so now i'm left with either ordering the other studio keyboard and trying to see if it fits, or just biting the bullet and ordering the silver m1530 board and starting on the for-sure working mod. i REALLY don't want to paint those F-keys though... -
hey @AMurderOfCrows if you get it to work as well can you put up a step by step tutorial on how to get it done i got a xps m1530 and would love to have a backlit keyboard as well hopefully you would so i can get it done thanks man really would appreciate it!!!
-
Started this project in earnest today. Using P/N 9J, N9382, Model NSK-D9201. Bought from This Ebay Seller.
Please note, i have not yet tried to see if this keyboard works on the m1530. I suspect it will though, as the m1530 used the 0mu194, as did the 1420 1520 1521, and so on. I researched keyboards that fit those other models, and found that some Vostro keyboards are also interchangeable with the m1530. This means that you can have a completely black, backlit keyboard!
![[IMG]](images/storyImages/IMAG0053.jpg)
Color is black. Keys are swapping in well, though not QUITE perfect...the fittings are the same, but the keys are shaped differently, so you really want to do all the removal and then all the replacement, you don't want to do it one at a time.
![[IMG]](images/storyImages/IMAG0058.jpg)
Delete key, and the top row, do not seem to be compatible. with each other. Probably not the space bar either.
I can't imagine how the light is going to shine through this thing.
I'll keep what i'm doing in mind and give a bit better play by play if this works.
EDIT:
Okay, i found out how the light shines through. Green leaf missed the part where you remove the metal shielding from the back of the new keyboard.
![[IMG]](images/storyImages/IMAG0059.jpg)
![[IMG]](images/storyImages/IMAG0060.jpg)
i've taken pictures with the "backlit" compatible keys put on the new keyboard, set in the dark against my laptop screen. I will post them when i'm done doing the key transplant. it makes a LOT more sense now.
![[IMG]](images/storyImages/IMAG0062.jpg)
![[IMG]](images/storyImages/IMAG0066.jpg)
One new note: The new keyboard has black rubber...button pushers?? and the backlit studio keyboard has some see-through ones. They can't be swapped.
Process thus far:
Buy the right keyboards!!
NOTE:
Spacebar is a different size and can't be changed. The top function buttons have their bases/holders "turned sideways" on the backlit studio keyboard, so they will never ever fit on the keyboard we are trying to mod, so you can skip the following keys:
Esc, F1 - F12, Num Lk, Prnt Scrn, Insert, Delete, Spacebar
Remove *ALL OTHER* keys from the non-backlit keyboard first so that it has no keys where we are going to work on it. This is to make sure you don't accidentally put keys in the wrong position.
Remove keys one at a time from the backlit studio keyboard. Start from one side or the other, removing from the bottom row on up. I'm right handed, so i started on the right side from the right arrow key at the bottom, working my way up to the Home key. I also worked my way left to the Alt key, and continued up, removing the keys one at a time and placing them on the non-backlit keyboard.
How to safely remove keys:
GO SLOWLY!!!
take a small thin object with a slight bit of a "point" and slide it under the key, near the top, between the key holder and the key itself. I used a butter knife. Once in position, simply rotate your hand to get the key to "pop" off it's base. Each key is held by at least 4 points on each base, so done correctly, this method "pops" two of those points off. This may seem silly, but do NOT force it too much. You really do not want to snap the parts of the key that attach to the base. The very first key i removed off the backlit board, i broke one of these things, so i'm going to have to find a replacement key.
![[IMG]](images/storyImages/IMAG0065.jpg)
When you put keys on, adjust carefully and apply equal pressure all over the key until you feel it snap into place on all 4 sides. Done right, the key will most likely stay "stuck" in the down position. Use your butter knife to gently lift up under the key and get it back into position. Then, test out the key for responsiveness and bounce. if it keeps getting stuck, remove the key and place it in again.
Remove the backlight film:
i kinda forgot how i did this, but it was dead simple...the sticker for the studio backlit keyboard is on the backlight film itself. you want to very very carefully pry it off the keyboard, paying very special attention to how you lift up around the copper colored film that contains the circuits printed on it. you do NOT want to tear this, ever. Note that the Studio keyboard's ribbon cable is glued to this also. pry it off as well, SLOWLY.
Preparing for backlight film:
Once all the keys have been transferred, turn the modded keyboard over and remove the plastic film. Once you have done that, you will notice a piece of metal that is kind of riveted to the back of the keyboard. gently and carefully remove this metal sheet.
When you are done with that step, go into a dark room and shine a light from the back of the keyboard. You should be able to see all your transferred keys light up from the front.
This is the point i'm at right now. Ive found the location where the backlight film will go. I still need to find out how much juice this thing needs, though if i remember right, it probably needs just a tap of +5v somewhere. I'm seriously thinking about tapping the wi-fi switch for the switch duties and for +5 if it has enough juice coming from that area. If it works the way i think it does, i could find the +5 lead and wire it straight to the wifi switch. in the off position, it should remain an open circuit. When WiFi is on, it should complete the circuit, providing +5 to the keyboard. Ground can still be pulled from the grounding screw with little difficulty.
The only thing to figure out is how to route that wire to the keyboard without causing a lot of issues. I suppose it is also possible to just leave it on like Green Leaf did, but personally, i think that would drive me nuts. I also take my system apart regularly, so i will not be pulling power from anywhere that can't be easily disconnected. -
As posted above, just wanted to share the thread created especially for the work of the keyboard
http://forum.notebookreview.com/del...-m1530-backlit-keyboard-mod-instructions.html
I hope it works, fingers crossed! -
This is going to be my last post in this thread. The new thread has actual working instructions for the back light in a MUCH better location than originally used here. the soldering is easier, it's a removable part instead of directly to the motherboard, and there are even some possibilities in using an "FN" key sequence to turn it on or off!
as such, i do not want to raise this dead thread any more, but if anyone still subscribed to this thread and didn't see the new thread, i wanted you to have an easy path to it.
http://forum.notebookreview.com/del...-m1530-backlit-keyboard-mod-instructions.html
Studio Illuminated Keyboard into XPS M1530? They look identical! - DOES NOT WORK!
Discussion in 'Dell XPS and Studio XPS' started by Forte, Jun 27, 2008.