
i've never really been a fan of multi-GPU setups.
i think i'd go with a full blown custom water setup if i ever did go SLI, though.
-
-
Ok, just done an 8hr run of Prime95 to verify my 4.5Ghz overclock. It worked out well - 60 to 64 degC CPU temperatures depending on which temperature you look at, here's a screenshot taken at the end of the run:
-preview.jpg)
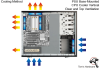
Case temperatures didn't increase at all (28-30degC fluctuation during the run - room temperature decreased overnight by about 1 degC), testimony to the fact that the CPU heatsink exhaust is pretty much immediately exiting the case. I did a couple of hours of Titanfall gaming yesterday, and case temperatures rose by 10 degC to 40 degC (GPU was max 71degC so that's good) - so maybe there's some room for improvement in case temperatures there. I'm gonna try adding a 3rd exhaust fan later today. -
Tried adding a 3rd Exhaust fan to create a 1 intake / 3 exhaust system - no big changes in temperatures, CPU & Case Air Temperature increased by 1 degC. Also tried adding an additional intake fan to the previous experiment for a 2 intake / 3 exhaust system - no effect. So, these experiments did nothing except to slightly increase temperatures & increase the noise - 1 intake fan / 2 exhaust fans is the optimal configuration for my rig. I'll post this pic up again, it's my final conclusion on the best fan setup for my particular PC:
So, I don't need to spend any more time on case fan cooling - that's sorted! The only outstanding thing now is perhaps optimising a GPU overclock. I've done a quick & dirty overclock of +200/+600 on the core & VRAM without any additional voltage and it passes 3DMark Firestrike. (+300 on the core is unstable / +700 on the VRAM is unstable). Further testing required to see if +200/+600 is rock steady stable for different benchmarks & gaming, but to be honest I don't need to overclock this GPU at this point for any practical gaming reason. I've noticed it responds well to increased memory bandwidth (VRAM overclocking), at least in Firestrike Score, and there's more headroom for VRAM overclocking. I'll post up a link of my 3DMark Firestrike score at this overclock in a second once I run it again. EDIT: Oops, that really wasn't stable, Firestrike run didn't make it through this time, I'll do some more in depth testing tomorrow or over the next few days and report back with a stable overclock (probably a version without any added voltage because there's not much headroom on the core for my high factory overclocked card - it already boosts stable at stock in games at around 1950Mhz).Last edited: Nov 28, 2016 -
The temperature I showed earlier was with the CPU overclocked. Forgot.
 Here's stock idle temps:
![[IMG]](images/storyImages/ID8b1N2.png)
-
Those are nice temps J.Dre, but idle temps aren't that important in comparison to load temps no?
On further news, as promised, I've finalised an overclock without additional voltage for my Zotac GTX 1070 Amp: +200 core / +500 VRAM. (see pic below for details of GPU settings)

***Firestrike Benchmark: 17106 (20911, 14354, 8237) http://www.3dmark.com/3dm/16352201?
***3DMark11 Benchmark: 21552 (27532, 13032, 13075) http://www.3dmark.com/3dm11/11780393
(gaming stable boost clocks of 2037-2050Mhz at max 72 degC and 1.031V-1.062V)
Max power draw from the wall for my desktop has been around 280 odd Watts, with normal power draw being around 250W (not including monitor of course) - hell this could almost be a notebook??!!
Has anyone any thoughts if it's a good idea or not to run with a GPU overclock in the region that I have? I purposefully didn't add voltage, and temperatures have not really increased, I suppose the GPU fan is auto compensating (increasing it's RPM).J.Dre likes this. -
Nice scores! And yeah, I'll have to run benchmarks again to see load temperatures at stock. Dynamic overclocking isn't very good for temperatures.
Robbo99999 likes this. -
When you say "Dynamic Overclocking", are you talking about how you've overclocked you own CPU? I used Dynamic mode for my CPU overclocking too. I went with "Offset Mode" rather than "Adaptive Mode", because my internet research showed that adaptive mode allowed the motherboard to auto regulate the voltage rather than letting the CPU have more of a say in what voltage it wants to use. I went with offset mode and +90mv, that just applies +90mv across the board to all voltage states (that is my understanding), although I did leave load line level calibration on stock settings that came with the motherboard. I use the Balanced Power Profile in Windows 10, and EIST is enabled, C-states is disabled as default on my motherboard, and I leave C-states disabled as I noticed that power consumption at idle wasn't really affected and I believe C-states can cause overclocking issues as well as potentially slow down the snappiness of the system.
-
Yeah, was referring to mine, haha. I noticed that the clock speeds would sometimes dip during benchmarks. If you're looking for consistent results, I'd recommend overclocking "by specific core" and setting all to a certain frequency, as opposed to allowing the system to handle it. For gaming, it doesn't matter as much.
-
I get consistent results with my CPU in terms of benchmarks & stable clock speeds when under load - just it allows it to downclock to like 1600Mhz at idle & something like 14W CPU power usage. Now I'm thinking that when you said 'Dynamic' you might have been referring to having different boost clocks for number of cores active? I have 4.5Ghz set as my turbo ratio for all cores, whether it be single core, two core, 3 core, or all 4 cores being active. (EDIT: In order to achieve a stable 4.5Ghz without downclocking during Prime95 I had to increase the Amps that were allowed to reach the CPU - it's a setting in the motherboard BIOS, the Auto setting wasn't allowing enough power/amps to feed the CPU so it was downclocking under heavy load - as I said just now that's sorted ages ago by just raising the amps limit in the motheboard BIOS)
-
Oh, okay. I see now, your previous post mentioning Prime95 with stable clocks. That's interesting... Perhaps I had something messed up in the BIOS that caused my core clocks to drop... I'll have to investigate further, lol.
-
(see my previous post which I edited while you were typing - you might need to raise you amp limit in the BIOS).
-
Just an update to this thread to post my experience of modifying the cooling of my GPU (Zotac 1070 Amp Edition). I was inspired by this article: http://www.tomshardware.co.uk/optimizing-graphics-cooling,review-33764.html
There were 3 'modifications' I did to improve GPU cooling:
1) removed GPU cooler and then realigned thermal pads optimally (not all the VRAM chips and other chips had 100% of their surface area covered - slightly misaligned in some cases - only 1-2mm here & there).
2) repasted GPU core with Thermal Grizzly Kryonaut. (used spread method). Factory applied paste job seemed pretty darn good without any excess paste and a good close mating of the heatsink to the GPU core, so maybe only a small win here by changing to Thermal Grizzly Kryonaut.
3) Applied thermal pads to the back of the card to allow the back plate to be used as a heat sink - this process is outlined at the Toms Hardware link above. Placed the thermal pads on the back of the card in the VRAM & also GPU core areas.
The Results? So far without any burn in of the new thermal compound it lowered GPU core temperature by 2 degC while allowing the GPU to run at the next notch up in frequency as part of the automatic boost function (up from 1999Mhz to 2012Mhz) - this is all at the same fan speed & room temperature for a 45min loop of Firestrike Extreme Graphics Test 1. It also allowed me to increase my VRAM overclock by 150Mhz (up from +400 to +550). At the moment I'm just in the process of testing the stability of the higher VRAM overclock, but it looks good so far. I imagine the backplate cooling mod has helped bring down the VRAM temperatures which in turn has allowed for a higher stable VRAM overclock. Happy Days! (I'll update this post if it turns out my new VRAM overclock is not 100% stable).
I am running a bit of a gauntlet regarding potential future warranty claims, as the back plate mod involved just cutting and removing part of the plastic insulating tape which is on the inside side of the back plate - just in the areas where my newly placed thermal pads resided - because they need to be in contact with bare metal to allow for best heat conduction. There weren't any "Void if Removed" stickers on any of the screws though. I have faith in it's reliability though, and my urge to tinker got the better of me!Last edited: Jan 20, 2017DukeCLR likes this. -
DOH, update to previous post, my +550 VRAM overclock up from my previous +400 was not long long term stable, got one crash during gaming just now (freeze & checkerboard pattern, after literally hours/days of gaming). Even though my GPU backplate mod seems to have increased the ability of my VRAM to overclock (praps through lower temperatures), it seems that I'll now need to dial back to +500 to see if that's ultra stable. Will update in future if it needs to be reduced again. (Not like you might care, but I suppose it's interesting to see just how much benefit a GPU backplate mod can bring.)
DukeCLR likes this. -
Ah, this is pretty cool, I've done some research on VRAM overclocking on the GTX 1070 cards that have Micron VRAM (rather than Samsung), and they are known to exhibit lower overclocking & checkerboard crashes if you're using the 'old' vBIOS. NVidia released an updated vBIOS to board partners to solve this 'Micron Issue'. My understanding is that the old vBIOS doesn't allow for quick enough voltage increase as the VRAM Mhz clicks up to full speed, thereby causing instability during overclocking. The new vBIOS allows the voltage to increase quicker (or maybe it slows the rate at which the VRAM accelerates up to full speed). Apparently not all vendors have released the updated vBIOS, and Zotac was one that hasn't released it yet. I did some research though, and Zotac have unnofficially released the new vBIOS for their GTX 1070 cards, but they only gave it "to some guy" who has now posted it in forums - quite a few people have tried the new vBIOS on Zotac cards and were able to overclock their VRAM further. Here's where you can find the new Zotac GTX 1070 vBIOS files:
https://www.reddit.com/r/buildapc/comments/5g8o36/vbios_update_to_fix_micron_ram_issue_on_zotac_gtx/
and here's the thread where people try the new vBIOS:
http://www.overclock.net/t/1601546/official-nvidia-gtx-1070-owners-club/6300#post_25685869
I took a gamble and flashed the new vBIOS & now I've got a stable VRAM overclock of +650Mhz vs the +500Mhz on the old vBIOS. In fact I was able to do benchmark runs up to +750Mhz, but I saw artifacts & performance didn't increase much, so +650Mhz seems to be the sweet spot. The power limits and core clock behaviour is all the same as the old vBIOS, so I'm happy with this new vBIOS. Old vBIOS version = 86.04.26.00.4B, new version = 86.04.50.00.99
EDIT: This is my new 3DMark Firestrike Score (21167 GPU score) (result is 'not verified' because it's using the latest hotfix NVidia driver): http://www.3dmark.com/fs/11631597
That's an increase of about 2% based on comparison with my previous VRAM overclock on old vBIOS with same graphics driver. So far it's been stable for an afternoon of gaming.
EDIT 2: +650Mhz turned out not to be stable during a Firestrike Extreme loop of Graphics Test 1, as it failed at the 45min mark. I'm gonna re-run it now at +600Mhz, at least that's still +100Mhz better than the previous vBIOS. Although normally I expect to see a checkerboard pattern with a VRAM related crash, but this time the test just stopped running and said 'run cancelled by user', which in the past has been the type of crash associated with the overclock on the core not being stable. I've verified my core overclock before though, so I'm thinking it's the VRAM at fault this time. I'll run that VRAM at +600Mhz now & retest.
EDIT 3: yep, +600Mhz stable for an overnight 8hr loop of Firestrike Graphics Test 1 - which I've found to be the most sensitive software I have for GPU overclocks. So, in conclusion, the new vBIOS allowed for an extra 100Mhz of overclock on the VRAM. GPUz is showing that I now have 295GB/s of memory bandwidth, and overall that's a 15% overclock on stock, for a total effective clock on the VRAM of 9316Mhz.Last edited: Feb 7, 2017 -
Small update: increased CPU overclock from 4.5Ghz @1.29V to 4.6Ghz @1.3V (it sometimes briefly spikes to 1.32V, but mostly 1.3V even for Prime 95v266). New overclock over 12hrs stable on Prime95, 60 degC CPU temperature. So this is now probably the max CPU overclock I'll go with, because I always said I wanted to keep voltage at or below 1.3V - based on reading around the subject most information points to 1.3V or below to prevent any CPU degradation, and I'm gonna want to keep this CPU for maybe 5 yrs possibly.
Last edited: Feb 13, 2017 -
Another small update re. CPU Cache Overclocking, and also the fact that my previous 4.6Ghz overclock wasn't 100% stable.
Yep, so I'd previously forgotton to run OCCT on my 4.6Ghz overclock, and even though it was Prime95v266 stable for 12hrs I decided to lower my overclock back to 4.5Ghz. I could have upped voltage to 1.34V, as this was looking to be OCCT stable, but that's a bit too far over my 1.3V limit I have set in my mind. Now at [email protected] (max recorded voltage under any situation), and I'm making up for some of the lost performance by overclocking the CPU cache (aka Ring Ratio), which I haven't done before. Previously CPU cache at 4.0Ghz, it's now overclocked to 4.5Ghz to match the core clock. We're only talking about minute gains here, but what the hell, it's good to squeeze out as much performance as possible!
It does bug me a little that the temperatures of the CPU cores are quite different from one another, and I've played with the idea of delidding, but the temperatures are still good - this is a screenshot after running wPrime1024 (v2.1):
 TomJGX likes this.
 -
Experiments on enabling idle CPU Power Saving features while retaining Maximum Responsiveness & Performance
OK, so like the title says I've been playing with different CPU setting configurations to determine the best performance while allowing the CPU to downclock and/or reduce voltage when idle. The thinking behind this is that I don't want the CPU running at a constant 1.3V and 4.5Ghz - for one this increases power idle power usage by 20W, but I believe it could potentially lower the life of the CPU. So, I've been playing with various Windows Power Plan settings as well as C-States and also Speed Shift enabling - and then testing with PCMark 8 and game benchmarks & synthetic benchmarks to determine the most responsive and highest performing 'power saving' configuration. PCMark 8 I see as a benchmark to determine how snappy the computer will feel in general usage of the OS, office apps, browsing the internet, etc.
These are the different configurations I tested:
A) Windows Balanced Power Profile / C-states disabled (my initial configuration historically)
B) Windows High Performance Power Plan / C-states enabled down to Package C6 (cores enter C7) (end result is that frequency locked at 4.5Ghz yet voltages lower at idle).
C) Windows High Performance Power Plan / C-states disabled / SpeedShift enabled by using Throttlestop program @EPP=78
Power usage measured at idle using KillaWatt for Option B (C-states enabled) = 42W, which is 6W lower than Option A or C.
Gaming benchmarks and synthetic tests didn't really show a statistical difference between the results of the different configurations above so we'll ignore those and focus on how responsive & snappy the computer might feel to use under the different configurations - as measured by PCMark 8. Here are the PCMark 8 results from the Home Test:
A) Windows Balanced Power Profile / C-states disabled = 4910
http://www.3dmark.com/pcm8hm3/314687
B) Windows High Performance Power Plan / C-states enabled = 5176, 5185
http://www.3dmark.com/pcm8hm3/314646
http://www.3dmark.com/pcm8hm3/314722
C) Windows High Performance Power Plan / C-states disabled / SpeedShift enabled @EPP78 = 4934, 4925
http://www.3dmark.com/pcm8hm3/314625
http://www.3dmark.com/pcm8hm3/314700
As you can see Option B was the best performing option, I ran some of the tests twice, and each test by default consists of 3 runs, so the results are reproducible and good. The Option B score is 5% higher than the speedshift version. Also my testing shows idle system wattage is 6W less using Option B too (in comparison to both Option A and Option B). At this point I'd say that C-states are more effective than speedshift in terms of performance & also energy efficiency. (Option B enables my CPU to stay locked at 4.5Ghz, but the voltage drops when idle - the voltage drop when idle was my main goal, while still retaining maximum performance).
I hope this info might be of use to anyone else who is looking for maximum performance from their CPU while still wanting to have power saving & CPU life saving features enabled. My advice is to use Windows High Performance Power Plan and have C-states enabled in your BIOS.inm8#2 likes this. -
OK, so I've gone back to 4.6Ghz overclock on core & cache, but with more voltage this time, and it's 3 hours+ stable on OCCT, and 8 hours+ stable on Prime95 v26.6, @1.33V (gaming voltage regulates to 1.32V, OCCT regulates to 1.33V, during general usage very brief rare spikes to 1.344V). Just ran F1 2015 on a looped benchmark run for 45mins with average 78% CPU usage and CPU Package temperatures averaged at 53 degC and peaked at 60 degC - so lots of thermal headroom for my most demanding normal usage. After doing some more reading, it appears that my previous viewpoint of using max 1.3V from a safety point of view is outdated when it comes to Skylake, apparently up to 1.4V is fine and up to 1.45V if you can keep your CPU very chilly! Here is the thread (amoungst others) where I picked up this new viewpoint: http://www.overclock.net/t/1570313/skylake-overclocking-guide-with-statistics
I guess I could take it up to 4.7Ghz, but I know I'd need to use at least 1.4V, it wasn't stable at around 1.38V, but I think I'd be getting into diminishing returns and creating extra heat & power usage for virtually zero benefit, along with increased risk of degredation - 4.6Ghz is enough for now!Atma likes this. -
Another update, this time on GPU overclocking. I've managed to get a higher & stable overclock out of my GPU - based around the realisation that anything boosting over 2100Mhz (even for very short periods of time - as viewed in GPUz) will cause it to crash, therefore I was able to fine tune core clock (along with +75% voltage) to ensure that 2100Mhz was never broken - this happens to be at around +198Mhz on the core for my card - my previous attempts had been at +200Mhz, and that was pushing boost momentarily over 2100Mhz - this kind of realisation/approach could be important to any of you guys overclocking Pascal. I've combined this new overclock with a custom fan curve (not aggressive), previously I let my vBIOS control the fans, but the default fan curve set through Zotac Firestorm program provides a really nice compromise that keeps the card really cool but not noisy (which I'm now using). With this new overclock & fan profile my stable in-game frequency when playing Titanfall 2 is 2075Mhz - that's up from 2025Mhz before! I've also eked out a few more Mhz on my VRAM too - if any of you want to narrow down a VRAM overclock, use Timespy Stress Test to verify stability, I've found it to be the most sensitive to VRAM clocks, whereas if you wanna test GPU core overclock stability then use Firestike Extreme Stress Test (which is Graphics Test 1 on a loop).
Here's my new Firestrike Score, very pleased!: http://www.3dmark.com/fs/12443516
Superposition Benchmark (4k): 6196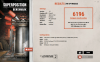
Note that with this new overclock the core never drops below 2050Mhz, even when tested with extended loops of Firestrike Extreme Graphics Test 1, previously it would drop to 1999Mhz at my previous overclock. I also learned through testing that adding voltage allows for boost clocks to stabalise at higher frequencies, even when the core overclock is the same numerical value - e.g. I end up with a higher boost clock for any given temperature with +50% voltage when at +174Mhz core in comparison to stock voltage at the same +174Mhz core - sometimes it pays to add voltage even if it's stable (but you obviously have to be able to cool it effectively though).Last edited: Apr 30, 2017hmscott likes this. -
OK, so I'm a bit of a numpty, some of my previous assertions in my previous post were incorrect - I've crossed out the stuff that was wrong! +198Mhz wasn't stable on the core, it was in gaming, but Firestrike would fail a looped Graphics Test 1 stress test, but funnily enough the one time I'd tested it before it passed, but I just got lucky that time! So, now I've gone down to +175Mhz on the core with 50% added voltage, and this is stable on Graphics Test 1 loop for over 3 hours, in game Mhz also not dipping below 2050Mhz and are 2062Mhz most of the time, so this is still a big improvement on my previous long time running overclock. The key learning points still hold true though - adding voltage not only increases stability at higher clocks but also the GPU will boost at a higher Mhz for any given temperature & any given core frequency offset overclock, and the modified fan curve I talked about continues to make a big difference too.
What I was incorrect about though, was my assertion that it made a difference between +198Mhz and +200Mhz on the core - this was rubbish! In fact, I've found that the GPU operates in 12.5Mhz increments, and in most overclocking programs a +25Mhz increase in core gives an ACTUAL +12.5Mhz increase in core overclock as reported by GPUz. Therefore, the overclock settings in most overclock programs only make a difference if you do it in +25Mhz chunks, so for my card that would be for instance: +150Mhz, +175Mhz, +200Mhz.
And here's my Firestrike score with my new properly stable overclock, still quite pleased: http://www.3dmark.com/fs/12493582Last edited: Apr 30, 2017 -
OK, this thread that I started has turned into a build log as well as tweaks I've done to my PC, so I'll continue in that vein. I've gone ahead & delidded my CPU with Coollaboratory Liquid Ultra! The goal was to further lower CPU temperatures & overclock a little higher, here are the pics of the process:
Delidded:
View attachment 145238
Cleaned Up (used a cut strip of credit card to scrape off old glue):
View attachment 145237
Liquid Metal & Kapton Tape:
View attachment 145239
RTV Sealant applied (tried to use it as thinly as possible):
View attachment 145241
Relidding with der8auer Delid-Die-Mate 2 (hope I didn't tighten it too much, praps tightened it just a few degrees more than their 90 degree recommendation!):
View attachment 145240
I always thought the IHS was a flimsy thing, but it's pretty chunky & accounts for pretty much the whole weight of the CPU package. I also noticed that the IHS does sit flat on the PCB, it's not warped. The IHS does seem to float on top of the chip, not reaching down to the PCB on any sides (but only by fractions of a mm I would guestimate) - I guess this means that there's really not gonna be any kind of gap at all between IHS & chip - great!
Next post will have images of temperature results achieved (can only attach 5 images per post).Last edited: May 15, 2017 -
...continuation of previous post. I've finalised my new overclock now on my delidded CPU (6700K), it's 4.7Ghz on core & cache @1.376-1.4V fluctuating depending on load. I verified the overclock with x264 benchmark ran overnight, as well as 3 hours stable on OCCT, I've also done some gaming in Titanfall 2 & F1 2015 with no issues. Temperatures are really good I reckon, you can see in the pics below (Average Temperature column is applicable as I reset HWMonitor sensors before starting each test):
x264 Overnight Stability Test
View attachment 145328
OCCT 3hr Stability Test
View attachment 145329
Titanfall 2 1hr
View attachment 145330
F1 2015 Benchmark Loop (Stormy Weather Setting: nearly 100% consistent CPU load)
View attachment 145331
So, delidding gave me another 100Mhz of overclock, as well as lower temperatures (like for like temperature comparisons, not shown, showed 10-15degC reduction in CPU temperatures). That additional 100Mhz overclock came at the expense of an extra 50mv, which actually happens to fit with 'the rule' that each +100Mhz requires 50mv, which is mentioned in this guide: http://www.overclock.net/t/1570313/skylake-overclocking-guide-with-statistics
My CPU also seems to sit slap bang in the middle of the results in terms of "luck of the Silicon Lottery", which can be seen in that guide above that the median overclock on a 6700K is [email protected] - such mediocrity!
Gaming PC Build Ideas, Purchasing on Black Friday Deals
Discussion in 'Desktop Hardware' started by Robbo99999, Nov 11, 2016.

