
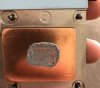
so i went for a repaste with phobyia again. first photos shows how was a paste spreaded
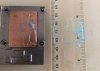
i did test with a toothpaste with a ruler ive also put HS on glass surface and it was moving a bit as it wasnt flat anyway screws on the right side top right and top bottom on a hs is more up than screws on left ive also tight them as ive could. im runnin on 4.2ghz with -100mv and thats the test in cine and other in aida stability test everything checked except local disk and gpu. as u can see 10c difference still appearing straight after repaste however core 1 and 3 run very cool... all test on max fans @Falkentyne @Papusan @Phoenix @hmscott
-
Hmmm, annoying, but you have such low temps, even the 10c higher cores shouldn't hit thermal throttling, so overall you're good.
At this point I'd report it to MSI, maybe they made a tooling change - sometimes stamps / forms wear out and they need to be remade to continue production, and sometimes there's an error introduced during the duplication - maybe the tool maker edged up a dimension and caused this.
If enough people document and report it MSI should correct it in production, and maybe offer a replacement part to those affected in the field.
If this were an LGA Intel CPU with an IHS then 10c is right at the border of where Intel will replace the CPU. They say 6c-8c is nominal.
Again, if the hottest core isn't thermal throttling it's not going to affect performance. It may limit OC as the higher you OC the closer the hottest core gets to thermal throttling, but your temps are now so good you'll likely run out of OC headroom before thermal throttling.
Now you just need to watch for temperature change over time, as the thermal paste ages, and then decide when it's too hot to continue without re-re-pasting.")
-
Thank you for the pictures.
The pattern with the toothpaste shows there may be a difference in pressure on the top and the bottom of the heatsink.
Most likely, the heatsink will need to be sanded lightly on the bottom side (away from the VRM pads) with 400-800 grit sandpaper (several strokes) then afterwards, you can use 2000-3000 grit to polish nice and clean to a shine (the entire heatsink).
Also, I think you used too much toothpaste on the test. Only need a rice sized grain.
The best way to do tests like this is to use a MIRROR GLASS surface, like a glass table or a small glass platform (transparent), then apply the heatsink on the glass --remember start with a VERY SMALL rice sized grain of toothpaste or thermal compound, you want it very small, then press down and then, without removing the heatsink, take a picture underneath the glass or table with the heatsink still on the glass. When you remove the heatsink, the pattern gets distorted because of suction. So it will look much more even than it actually is, because when you remove the heatsink, the paste gets 'suctioned' up.GENOCID likes this. -
-
but u see the thing is it will get worste yesterday i hit 97 or 92 in aida test and that was only few weeks after repaste i had a great temps first days as well first 2 times... im using 0.5mm padshmscott likes this.
-
Each time you re-paste you get better at reassembly, tighten up the gaps that allow air in, which causes oxidation that dries out paste.
Most paste will be affected by this, the goop most vendors use during production is formulated to avoid drying out over lowest temps, so it won't dry out or take a lot longer.
Some pastes take a few days of operation to reach stable temps, although I haven't heard of them getting worse; they usually advertise the temps get better over time, like AS5 and Kryonaut. NT-H1 is supposed to be stable within 24 hours.
Long term, like 3 months - 18 months...paste can age out and temps rise, but it should take weeks after first noticing the increase in temps before you *must* repaste, or reduce clocks.
Hopefully this time with more care taken in tightening screws to get constant closure around all points at the same time, you won't have any gaps to let in air, and it will remain stable long term.
Vasudev likes this. -
@Falkentyne, how about his VID at 1.195V at 4.2GHz, but with a -100mV offset?
-
Yes you are correct.
The problem is, because you have less heatsink pressure on the 'top' (By the VRM's), this causes the paste to pump/dry out, as @hmscott noticed also. The heatsink itself is not moving (it's not a tripod!). But thermal stresses wind up making the paste move from most to least resistance and then you get the pump out effect, in the area where there is least pressure.
If the heatsink is perfectly flat and pressure is even, this will NOT happen. If the paste winds up drying out eventually, ALL The cores will rise up to 95C. But that will take about a year to happen.
Some heatsink lapping kits came with transparent glass. The reason they used transparent glass as a lapping surface is:
1) glass is amazingly flat.
2) glass can be used as a tool to check heatsink flatness and spread, by applying the rice sized dab, pressing down, and then looking underneath WHILE THE HEATSINK IS STILL ON THE GLASS.
In your case, you have a balance problem with less contact pressure by the top side (VRM side) of the heatsink and more contact pressure on the bottom side.
This can be fixed by taking several even, clean strokes of 400 grit sandpaper on the BOTTOM HALF (away from the VRM's, e.g. along the half where cores #1 and #3 are) of the heatsink. The copper will look a bit scratched after that but that's fine. Then after that, take 2000-3000 grit sandpaper across the entire heatsink to polish it down to a nice finish. That will drop the core temps on the hotter cores and bring the temps much closer together. This will also reduce the pump-out problem because the pressure is now even across the heatsink.
Sandpaper is cheap anyway. You -could- RMA The heatsink to MSI And ask them for another, but it's better to just fix the problem yourself, rather than be without a laptop for a few weeks...(unless they just MAIL you a heatsink directly).GENOCID likes this. -
It's also important to inform the vendor when you discover and fix a problem like this, so well documented, so they know they have a new production problem that needs fixing.
You can open a ticket with MSI as an FYI and attach a zip file of documents, images, photo's, showing the problem and solution, with sensor data backing up the problem and fix steps along the way.
WELCOME TO MSI MEMBER CENTER
https://register.msi.com/home/login
REGISTER YOUR MSI PRODUCT NOW TO ENJOY A HOST OF BENEFITS !
Warranty Registration More
Exclusive updates on promotions and events
Quicker service and product support
View your current registered MSI products
The vendor isn't enemy, it's better to make them your partner and even friend over time. It really helps with being able to get support when you need it down the road. You can then refer to your helpful FYI ticket in the future when making new requests.GENOCID likes this. -
That isn't important. VID isn't important. He needs to fix the problem with the high core temp differential. Such a high core temp differential causes PREMATURE PUMP OUT and dryout of the thermal paste, because it is in contact--direct contact--with a VERY HIGH temperature part--the direct CPU core die !!
On IHS (LGA CPU's), this problem doesn't happen so fast, because the IHS spreads out the heat across the entire surface, so the paste isn't exposed directly to such high stresses in such a low small area. It's sort of a similar reason why, even though GPU's have higher watts/TDP than CPU's, why repasting a GPU with liquid metal has less of an effect on temps than a CPU--the GPU surface is much larger so the heat gets spread out more and then dissipated much better.Vasudev likes this. -
I'm not saying he shouldn't do this.
I'm saying he can do that ANYTIME.
Unless sandpaper isn't available in his country or something, you can get sandpaper at any local hardware store.
I'm a complete tool, a novice and have feet for hands, and even I was able to sand my copper down to get the cores within 1C without AVX, and that's because I was careful and knew what part of the heatsink needed to be worked on, and I didn't go overboard.
Besides, sanding stuff is fun. Especially when you get the results and have a nice shiny surface looking at you!
@GENOCID:
Here is how I sanded my heatsink:
I know you're usually supposed to use water, but you can use either water or alcohol. Doesn't matter.
Apply alcohol (or water) to the sandpaper. (start with 400 grit).
Sand down the bottom half of the heatsink (where the cooler cores are--AWAY From the VRM's carefully, not too much, just a few strokes, 20 should be ok......DO NOT APPLY PRESSURE. Let the SANDPAPER do the work, not your fingers!). After a few strokes, clean the sandpaper a bit and then apply more alcohol or water. The bottom half has more pressure than the top, so you want to 'relieve that pressure' by sanding. That way the top will have more pressure, the pressure will then be more even and the CPU will be smiling at you.
Then when done, switch to fine grit (polishing) sandpaper, 2000-3000 grit is best here, then sand the entire heatsink. This is for polishing/finish now. You don't need it perfect like some of those overclocking mods where the heatsink is as reflective as a mirror Just get rid of the 'scratches' from the 400 grit, then get the entire heatsink nice and pretty.
Then redo thermal paste and reattach. You should see a big improvement.Last edited: Feb 11, 2018 -
@hmscott i had this problem after few months when bought laptop so i doubt i could do wrong screws or somethin i made sure they ae correcly screwed and tight.
thats gonna be my next step with a sanding hs because ive put it on a glass from a side where only hs was touching glas and it wasnt feelin flat because it was moving so im not sure but i will do what @Falkentyne suggested if my temps gonna go crazy againhmscott likes this. -
Actually under the IHS the same surface area on the actual CPU die exists.
Under the IHS is the point where the core temp differential happens, you can re-paste and carefully adjust the heatplate interface against the IHS, and you will have the exact same differential.
It's rare to find this, I've only seen it twice. First time I solved it with a delidding, but the next time I used Intel return - took a few days to report and hear back from Intel before they would do the exchange.
I haven't seen the edges of the interface on the GT73 heatplate where this problem is happening in person, but I think if you coated the edges all the way around with K5 Pro - maybe even put a thin edge *on* the plate / CPU before tightening then more around the edge, that might seal it up so air won't get in.
K5 Pro is used to bridge air gaps between chips and heatplates when there is no replacement pad available - K5 Pro used as a thermal pad substitute - K5 Pro hardens and seals against air.
Wow, so much trouble just to re-paste...and a good example of why it's best to avoid starting this journey in the first place.
Tune the undervolt, fan, OC, and external cooling to the max before deciding to embark on what can be a long journey to re-paste.
K5 Pro
http://www.computer-systems.gr/content/k5-pro
!!! K5 PRO !!! Thermal paste for use insead of thermal pads.
K5 PRO viscous thermal paste for thermal pad replacement 30g (Apple iMac, Sony PS4 & PS3, XBOX, Acer Aspire etc)
https://www.amazon.com/viscous-thermal-paste-replacement-Aspire/dp/B01C5XWF2U
There are a lot of sizes and order options on Amazon:
https://www.amazon.com/Computer-Sys...&field-lbr_brands_browse-bin=Computer-Systems
https://www.amazon.com/s/ref=nb_sb_noss?url=search-alias=aps&field-keywords=k5+pro+pasteLast edited: Feb 11, 2018GENOCID and Falkentyne like this. -
You can also safely use 3000 grit sandpaper on the CPU direct surface also for polishing that, if there are any annoying marks on the CPU.
If you still doubt sandpaper and making the HS flat can work, this is 4.7 ghz I just did this morning at 1.271v. (IA AC DC loadline=5)
I then reduced the voltage to 1.260v and tried again:
Funny: it was actually 82/83/83/83 until I started mashing the print screen button, which put more load on the CPU and raised core 0 by 1C. So yeah.GENOCID likes this. -
Well, it might be worth actually seeing it happen again, so give it a few days and some thought before tearing it apart again.
Often I've seen people rush the process and miss out - some were repasting hours after using AS5 and now Kryonaut because they didn't like the temps, and it takes a few hundred hours of use at high temperature (50%-100% CPU usage) to "burn-in" before lowest temperature results are seen.
Besides, check out the K5 Pro and see if that can help seal off the air from getting in via the edges.
Sanding Aluminum isn't fun, and if you get impatient and it's not enough you have to do it again, and again.GENOCID likes this. -
Copper, not aluminum. The copper is easy. Forget everything I said about the 'metal posts' i found those posts don't even touch the mainboard. We're talking about just the copper block now. BTW look at my 4.7 ghz LM temps
GENOCID likes this. -
@Falkentyne said: "only afraid of K5 because someone said it becomes adhesive, if used on VRMS or chokes it could pull the choke off!"
Please don't spread FUD like this, it's not true.
K5 Pro comes off easily after it dries, and before it dries it's just a liquid. I've pulled it off of computers after years of use, and it just comes right off without scraping at all. -
im runnin custom fans all the time when oc up to 135% and always using max fans on when testing. i think the only solution will be sand down HS. im runnin on paste so i will get phobya again or N1 when i order sandpaper. im tired of it yet upset so i will do it in few weeks probably in mid of march unless i dont see temps crazy again. thx guys
hmscott likes this. -
This is exactly what I mean when I say these guys are all just victim's in your experiments, you keep learning and changing - making lots of errors - and they accept it like it's gospel.
You need to perfect these things on your own, then when you are *sure* the procedure and steps are all required and needed and successful, then post it and release it for people to use. Test it out on a few laptops in private for needed confirmation too.
Otherwise include a huge disclaimer that this is experimental and not confirmed to work!Last edited: Feb 11, 2018Coruscator likes this. -
I'm not spreading FUD. A user on the alienware forums who used K5 said he had difficulty removing it because it became adhesive. He was using it for VRM cooling because the alienware pads were causing gap issues on the CPU.
Now maybe there's different types of K5--I really do not know. I was considering grabbing some for a custom job someday.
*Edit*. I still had nightmares about RAM chips (VRAM) coming off with the heatsinks back in the day. (Even though it never happened to me). -
Cool, it's always good to back off when things get emotional, not just for the project but for those around you at home.
It may be that for this application the pastes you've tried aren't good, and you should try others as well. Do some research while taking a break to see what else looks good that is available to you.
You can also go back to stock performance for now to avoid overtemps if they start up again in a few days.
Please post here and keep us up to date.
-
Not proven to work? Learn and experimental, yes. But results! Definitely so.
Did you not see these temps? WITH PRIME95?
Um...even Shehary sanded the heatsink.... -
Difficulty removing it could be due to "hard to reach" places, it does flow like a liquid and get under components, and certainly will hug components, so to remove it you will need to use a toothpick or some other soft pointy thing to lift it up from places your fingers won't go. Or just leave it in places it doesn't matter, don't get OCD about it.
It's not "adhesive" it doesn't work like a glue, but it does harden to the point it's going to come apart in soft pieces.
K5 Pro comes apart in all soft pieces, not hard to remove, but it might be tedious to some and if you are not careful and apply pressure to components you could damage things - which is why I suggest never re-pasting - you need some sensitivities gained through hand craft work and small tools to be competent at doing everything involved in doing a good re-pasting.
There aren't different K5 Pro's, there is only one, you tend to do this with things you don't like, create FUD about them, doubt as to which "version" has the problem, you may not even notice it yourself.
Do you have a link to the post your read? I never seen anything say K5 Pro is adheisive and I certainly haven't noticed - and I have used brand new K5 Pro from Amazon just shipped to me a few months ago, as well as for many years.
Stop putting out "bad news" trying to induce Fear Uncertainty and Doubt about things that you can't back up!Last edited: Feb 11, 2018 -
Yes, you told people that it was the "posts" to sand off, not the heatsink, so you were WRONG, and sent people on a wild-ass goose chase again.
You do this all the time.
I've seen you "discover" something in one post and a day later recommend others that they must do it, and then retract it later.
Stop doing that! Take the time to perfect what you are doing, verify it across a few laptops, then and only then tell others "what to do", you are causing more trouble than you know, and *not* helping.Coruscator likes this. -
-
I can't find the link right now. It was in the alienware thread when I was searching for people using PGS tape and K5 pro. Sorry. I'm in a ranked game of league of legends right now.
-
Look in your older PM with me
What is NEW PRODUCT? Old in new Package?
Last edited: Feb 11, 2018hmscott likes this. -
Please stop being so hostile. I may have been incorrect about things but no need to keep insulting me every time you see fit. My goal is perfection, nothing more.
-
Then perfect it before inflicting the bungling errors in between on others.
Maybe this is what you saw?
What he meant was K5 Pro sets, and it's easier to pull up the heatsink when soft. It's not a glue, and any adhesive qualities is the K5 Pro setting to itself, not other components.
@aaronne have you actually dislodged components from the board when removing K5 Pro? Or are you only concerned about that potential?
I haven't found it necessary to use a heat gun, but I can imagine it will release easier when it's softened by heat.
You need to be careful when using a heatgun on sensitive components, you can damage them with a too strong setting on some heatguns.
I'd rather take it slow and easy pulling up, using an X-ACTO knife to carefully cut the K5 Pro along the perimeter of a component or heatsink before or as I am lifting it, rather than subject the surround area to a heatgun.
Again, this is part of preparation, having the right hand tools and the experience of previous craftwork before tackling re-pasting. -
If you looked at the page on Youtube where it came from, it's from 2014. It's a small company, probably an engineer trying to do the "marketing speak", so we need to give them a little slack.
-
I know

If you search... He/Company rep have even talked about K5 Pro on this forum
-
Yeah, it's a mystery, I've used the new and old stuff and it looks, feels, and acts the same as I have been using for a very long time... I used it on old Macintoshes (the computers, not the rain coat) in the dark ages...
Published on Jan 21, 2014
K5 PRO is a new product developed and produced by Computer Systems laboratories research team. K5 PRO is designed to replace thermal pads that are used on GPUs , CPUs, memories and other electronic components. K5 PRO has high thermal conductivity (up to 3 times higher than most thermal pads) and can replace thermal pads of up to 3mm thik. Please refer to this video for application instructions.
You can order K5 PRO from our online shop at www.computer-systems.gr
or from ebay www.ebay.com/itm/261419323645
Now available on Amazon
K5-PRO here http://www.amazon.com/gp/product/B00K... -
-
Yup, a successful use of K5 Pro and ICD by @Exostenza
Response by K5 Pro maker:
And, follow a up that it was still working great by Exostenza about 5 months later:
-
-
Confirmation of success is always helpful when trying to help new people with a similar problem, so old good news is still good news.
Vasudev likes this.
-
I always try to offer other proper info. Main goal. What's work for others... Should work for j00
hmscott likes this.
-
Right, examples of previous success using the same or similar materials and methods is helpful.
Thanks for looking it up
-
Ok sorry for jumping the gun. But let's just agree:
1) sanding the heatsink surface flat pays dividends.
2) using 0.5mm thermal pads instead of 1mm also helps when doing #1
-
-
-
@Falkentyne can u show on heatsink picture where to exactly sand off?
hmscott likes this. -
Lost my last league of legends game on my desktop, got reported, bullied and threatened with account ban AGAIN by unparented kids, 1 person came to my defense, and meanwhile my laptop was doing a 2 hour prime95 test. I swear everyone hates me.
Vasudev likes this. -
If you are uncomfortable with sanding, contact MSI support and see if they will sell you a spare CPU heatsink. Then you will have something to practice on. But you need to sand down the part of the heatsink or the side of the heatsink with the **COOLER** cores, because it means there is insufficient heatsink pressure on the HOTTER CORES side and more pressure on the COOLER cores side.Last edited: Feb 11, 2018Jzyftw, raz8020, GENOCID and 1 other person like this.
-
How is temp and core temp difference with Aida64 (Stress FPU and GPU checked) ?
-
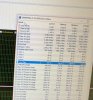
Why is AIDA drawing more Watts than small FFT prime 95? Is AIDA64 using AVX instructions? Core temp is already 15C higher than small FFT ! My CPU is not stable in prime 95 @ 4.5 ghz with AVX enabled at 1.175v. I'll upload a screenshot soon. the AIDA test is running.
-
-
I stopped the test after 5 min because i know my system is not fully stable with FMA and avx at 4.5 ghz unless i increase voltage or drop it to 4.4 ghz.
Here is the screenshot
-
-
I think AVX uses Voltage boost (30mv). I read on an old Overclock.net post that voltage is boosted when an AVX load happens. That might explain the VID shown now is 1.2069v but in the non AVX load its 1.176. I'm not sure. I think each core has different VID boost for AVX? Maybe core 1 and 3 are higher boost. Because i am only drawing 85W, but the temps are strange now.
But I draw 100 watts, and the cores are 1C different....
Look at the difference:
4.5 ghz, no AVX, VID=1.174
4700 mhz, no AVX, 1.260v VID, 98W !!!!
AIDA FPU test, 4.5 ghz: Bios vcore=1.174v but VID=1.206....(AND TEMPS HIGHER THAN 4.7 GHZ WITH HIGHER VCORE...WHAT)?
The Official MSI GT73VR Owners and Discussions Lounge
Discussion in 'MSI Reviews & Owners' Lounges' started by -=$tR|k3r=-, Aug 16, 2016.


![[IMG]](images/storyImages/giphy.gif)