yes, there is small hole, little bigger then the speaker holes and can use paper clip to press the button or you can press it with pink finger easily if bottom cover removed.
![[IMG]](images/storyImages/w8qkbl.jpg)
-
Yeah but from right to left isnt it PCIE 1 , PCIE 2? then SATA xDLast edited: Dec 16, 2016
-
Time for little upgrade....baby steps.....

having issue with system drive temp, exceeding 55° even if no HDD activity or laptop in idle mode and once temp go up, stays there, sign of low quality thermal pads...
Note: I've all 3 drive slots full and one drive temp exceeding effects other drive temp too.....
replaced stock thermal pad with 3.2w/m-K and thickness 1mm (brand unknown)
![[IMG]](images/storyImages/2wp351s.jpg)
![[IMG]](images/storyImages/2a0axhh.jpg)
After replacing pads, temperature still exceeding and stays there so replaced both pieces of thermal pads with single thermal pad but this time with Arctic Thermal pad 6.0 W/mK and 1.5mm thickness (even had really bad experience with 0.5mm and 1mm thickness of Acrtic thermal pads on different machines)
![[IMG]](images/storyImages/9hqm4n.jpg)
and result is satisfactory, temp barely touch 50° and start dropping as soon as there is no activity on system hard drive and other 2 hard drives temp not get effected
@Mobius 1 you were right about low quality of thermal pads and I also notice this same above behavior of temperature of GPU, before gaming if GPU temperature is 40° where after gaming GPU temp drop to 45° and stays there where both fans spin at normal 1200rpms and only see this behavior where thermal pads not good enough to transfer the heat quickly to heat-sink.
There should be a fan on HD heatsink like this will be perfect machine for work too
While gaming, CPU/GPU fans spin above 2500rpm and pull air from the bottom cover mesh which is good to keep the drive temperatures at bay but while working both fans barely touches 2000rpm and slow air intake cause HD/SSD temp rise if there is continuous activity on any HD/SSD -
No, it's SATA, then PCIE 1 and then PCIE 2, from left to right you can check it in BIOS in storage information if put drive in PCIE 2 it will show Disk 1 not Disk 0.
-
Aren't there little letters stamped below the slots? It's hard to see but the top one has an S, the other two have a P next to them.
-
yes worst/most annoying app feature ever!
with me and @Atma having gaps on the sides....i have already pulled the lower left corner and right corners....one of these days....i just gonna go nuts and let it rip go all rectangled at it. bottom half is where all the electronics are, and it sometimes gets warm to touch,msi logo horizontal bezel. saw a glimpse of it didn't want to rip "her" more...might create my own gaps lol
yeah press the button down for like 10 secs, so msi has another way is 20sec hold down power button. its good to know in am emergency. -
Yes from top to bottom
m.2 SATA (S)
NVMe PCIE 1 (P)
NVMe PCIE 2 (P)
if you look at the snapshot, right side, on mother board, you will see the labels of both PCIE slots, middle one says PCIE 2 and bottom one says PCIE 1 where if you have drive in bottom one (last one) and check in BIOS it will say Disk 1 not Disk 0 where it should say Disk 0.
My guess is what @specialist7 pointed out is right, as it labels like bottom one PCIE 1 and middle one PCIE 2 and top m.2 SATA and then mechanical HD
so either MSI made mistake while labeling the PCIE slots or they made mistake in BIOS but both information mentioned on MB and in BIOS doesn't match.hmscott likes this. -
msi use laird technologies pads and paste. http://www.lairdtech.com/products/Tflex-300
light green all rated at 1.2w/mk. so anything u use even 3w/mk will be better.
but ofcos use the highest w/mk pads u can find.alaskajoel likes this. -
what is weird is if you change ACHI to RAID and vice versa. make sure u press f10 save and go back in. the drives will be ordered differently in the raid more vs achi...they change the drives around. give it a try. i prefer to have in RAID. even if samsung wont install its nvme2 drivers its slower in achihmscott likes this.
-
Sticking to the infamous chimie 120hz/5ms....its the show piece screen that u got this laptop for. don't want 4K. txt is just too small on 17"hmscott likes this.
-
well crap
using higher rated pads won't help since there's barely any airflow
what bad experience you have on the arctic? -
How do you know that is the original chimei 120hz/5ms TN panel?
that price is too cheap. and i dont trust buying cheap, because u pay for what you get. nothing on he site shows me its the chimei model
Monitor Name (Manuf): CHIMEI N173HHE-G32
less than half prce of $62 vs $155? I need proof that site really sells our model. i cant find any information....hmscott likes this. -
Bad experience with 0.5mm and 1mm was after applying, if heatsink pulled, thermal pad cracked and the part which stick on chip stays on chip. while the rest comes out with heat-sink
in my case it worked better, before applying thermal pad where the temp stays above even if the laptop in idle mode and 1% disk activity.
![[IMG]](images/storyImages/2nh0x8x.jpg)
and after applying acrtic thermal pad
![[IMG]](images/storyImages/j5idrt.jpg)
-
It does help. mines don't go over 50C. sm951 temps can go all the way to 100C so the heatsink and pads are helping. plus the 960 pro runs hot aswell but with better thermal designed this time round.
i rather have pads/heatsink than not. heck even AW is copying us with their "special" to order heatpad spreader for their m2 drives.
there is always a space for a custom fan right next to the m2 drives. that empty slot has a fan connector nearby for 1070N SLI. just have to find a custom fan and some hard mods.
and those if you running the original 1tb hard drive that came stock with msi, that drive runs very hot, also affectiing your m2 temps. i took mine out first thing i did when i got the laptop. i use it as an external drive and it runs damn hot compared to 500GB drives.Atma likes this. -
So you are saying to use 1.5mm pads instead? i found the 1.0mm dont touch evenly...think might get 1.5mm pads...
-
Ah alright, that's good info.
Maybe apply thermal pad on bottom of ssd also, might help. Recycle the stock ones.
Didn't think of that, everyone should def try remove the hdd and check their m.2 temps again.
1.5 might contacy more evenly, but remember of pressure having the possibility of bending the drive.
Always check for warping/bending.kennyman likes this. -
Did you finish to upload the image?
-
Thats alittle easy to fix. don't screw the 3 screws too deeply....screw enough pressure until u look underneath the drives and feel its got enough pressure...with the 1.0pads - i want to screw down the heatsink more so that it connects all evenly and better pressure but MSI screws has a certain max so can't force it to screw on it harder. so with 1.5mm gently screw back the heatsink until u feel it won't bend/break the m2 drives
-
my temps are usually within reason, 40s-50s when the fans ramp up then spin down, then ramp up again some time later etc
-
work in progress...will finish uploading till Sunday hopefully.tonuzzi likes this.
-
will be good idea and yes 1mm not touch drive chips evenly or if you have all slots filled with drives as not all drives chips are in equal height and if use 1.5mm, make sure tighten the screws like X and evenly, so heat-sink sit even.Last edited: Dec 16, 2016kennyman likes this.
-
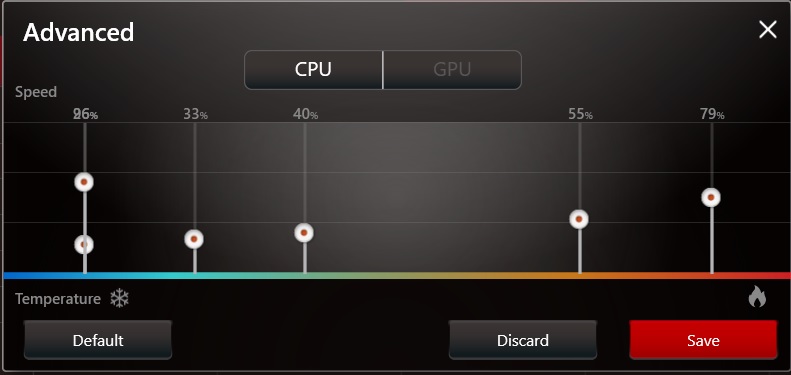
Has anyone found a solution for the CPU fan curve in Dragon Center? I still can't adjust it properly.
Attached Files:
-
-
did you try to reset your laptop EC settings?
-
I tried it. I still have the problem
-
i would like to know too, looks like theres two missing bars on my one in the fan curve on advanced. However, i usually leave it on auto anyway so i dont really need the curves
EDIT: on the fan curves, it seems like the gpu has 6 points of adjustment, whereas the cpu only has 5. The third point defaults at 40%, and the fourth point at 55%. This explains my prior issue of the fans suddenly ramping up and ramping down as there is no in between 50% fan speed. In other words, the fans spin up to 1800rpm on the cpu, then go back down to 1200rpm. This leads me to believe the advanced settings also affect the auto setting, or that the lack of this one level of adjustment affects more than just the advanced setting.
Any suggestions? or was the cpu fan meant to only have 5 points of adjustment.Last edited: Dec 16, 2016 -
![[IMG]](images/storyImages/hugyoubro.gif)
THANKS.
I never would've looked there.Maineiac12, alaskajoel, DukeCLR and 1 other person like this. -
I discovered a dead pixel on my display. It's toward the lower left and really not that noticeable with normal viewing.
I was using different colored backgrounds here to look at things. I discovered this one [ WARNING, if you have epilepsy don't watch this] that is supposed to fix dead pixels. It didn't work, and I doubt it will, but my eyes will never be the same. -
Oh wow, just today I was asking myself this. I am glad I found your post and thanks to Maineiac12 to letting us know.
I noticed rather soon that I had a stuck pixel. I will try this method but I doubt it will help. I don't mind mine though") I draw the line at about 3 dead pixels before I get crazy.
I draw the line at about 3 dead pixels before I get crazy.
Oh, and your link made me feel like I was slowly traveling to a new dimension. -
This is my first stuck pixel ever. I was a pixel virgin.
-
-
So there are multiple reports of these having stuck or dead pixels? Not really giving me the warm fuzzies for trading my gt80. Lol
-
Multiple as in more than 1? So far yes, but that number is also real for any notebook haha.
You don't have to trade if you don't want to, but I can't go back And I still have my GT80 here!
-
On an unrelated note: upping the current limit to 225 allowed me to overcome current limit. I also need a ridiculous high voltage to achieve 4.4ghz, so I won't be using it normally.
custom90gt, kennyman, alaskajoel and 3 others like this. -
4.2~ seems to be the voltage wall for 6820HK
with newer 7820HK I hope it's much better binned -
display screen onboard connector
![[IMG]](images/storyImages/2uivy3c.jpg)
and it's 40 pins for sure. counted and confirm...and cable is....surprise surprise surprise
![[IMG]](images/storyImages/jr9qc4.jpg) Last edited: Dec 17, 2016kennyman, Atma, alaskajoel and 3 others like this.
Last edited: Dec 17, 2016kennyman, Atma, alaskajoel and 3 others like this. -
found stuck pixel and its at right bottom corner, hidden under the task bar....under cover agent...007....

![[IMG]](images/storyImages/2ykhz48.jpg)
-
A video of the CTD issues I am having. Still cannot work out what is causing it!Atma likes this. -
I can't remember, is this happening in all games at stock settings? I read a few days back where you tried under volting your GPU, that should not be required, it should be amazing out of the box. If it's one game that's crash you would think its a driver but it seems like your problems could be more serious.
-
Can you run hwmonitor or gpu-z to check the memory on your GPU? There were some issues with nvidia GPUs with micron brand memory.
I checked mine and I've got Samsung. -
Happening in a number of games, DOOM, SimCity and Battlefield 1.
I have tried to underclock the GPU not undervolt.
GPU memory is Samsung.
As mentioned this is the second MSI laptop that has performed in this way. I am on my second replacement. -
so far I know....in all MSI laptop range equipped with GTX 10 series cards, micron ram is only for GTX 1080 cards.
6RE model with GTX1070 only comes with Samsung vram, Micron vram is only in 6RF with GTX1080 model GDDR5x
GDDR5X explained and only in GTX1080 but in future will be available to other cards.
Following snap shot taken from nvidia site, notebook with 10 series cards
![[IMG]](images/storyImages/2ik8bo.jpg) Last edited: Dec 17, 2016
Last edited: Dec 17, 2016 -
LED keyboard still lit when PC in sleep mode
I'll walk away to grab a bite and when I come back my keyboard is lit and the power light is blinking
Is there a way to turn the keyboard lighting off when it's sleeping?
I tried dragon setting led off but it doesn't have any effect. -
try from steel series application
-
Open Steel Series app, click on the color you use, look on the right there is a tab for sleep. Turn off illumination for sleep.kennyman likes this.
-
Just before you press SHUT DOWN, let SHIFT key PRESSED, then proceed to shut down. IT happens to me on my desktop too.Atma likes this.
-
I wish there was some bios setting to make the keyboard light when you power on instead of waiting for Windows to boot.
Shehary likes this. -
This is the 120hz?
If so, upgrading to a 4K by yourself seems easy -
yes, it's 120Hz and agree that upgrading the screen from 120Hz to 4K will be easy just have to buy the screen and replace it with current panel.
this connector is located under the top panel which is behind the screen panel
![[IMG]](images/storyImages/2ymccrd.jpg)
To open it, remove bottom panel, total 6 screws, 2 at corner between GPU heatsink fins, 3 in middle on top of power & other display ports and one is at other corner between CPU heatsink fins
![[IMG]](images/storyImages/4uwetf.jpg)
find a sweet spot on top panel, with little bit pressure, pull the panel, there are many hinges so have to be gentle.Last edited: Dec 17, 2016Atma likes this.
The Official MSI GT73VR Owners and Discussions Lounge
Discussion in 'MSI Reviews & Owners' Lounges' started by -=$tR|k3r=-, Aug 16, 2016.


![[IMG]](images/storyImages/j7utxy.jpg)