Is it an easy task to flash the vbios? I have downloaded the msi 970m 6gb vbios from the first pasge and also have nvflash.
Mick
-
Can you go to your device manager, and take a screenshot and post it? I'd like to see if you have any errors, and like to see what it says under display adapters.
-
Ive checked and sadly there is no display adapter listed!! Although I have spotted an issue with system devices. A yellow warning triangle has popped up next to something called Intel(R) processor PCI Express Root Port 1 -D138. clicking properties reveals this: Windows cannot start this hardware device because its configuration information (in the registry) is incomplete or damaged. (Code 19)
Ive No idea what that is!
Also Ive tried installing the driver several times, and have noticed that just after driver installation and when the installer wants to reboot the system, I selected to restart later then fired up GPU-Z...And it then showed the 970m But only showed half the ram 2990mb, and several fields were blank.
Mick -
I had same error.had to uninstall that device driver in device manager then restart and let Windows reinstall. Worked for me.
Sent from my LGUS990 using Tapatalkm11kkg likes this. -
Exactly this. Thats is why I asked. All you need to do is click uninstall the driver (the PCI Express Root Driver) and reboot your computer. Windows will install the driver and again, and your 970m should work fine.m11kkg likes this.
-
Thanks for your help guys, sadly though even when I got the warning triangle cleared, Windows only loaded standard vga drivers :-( trying to load the nvidia driver again just seems to fail (even though it acts like it's worked) and brings back the yellow triangle in device manager.
This may seem a bit drastic, but perhaps the drivers just don't like my win 7 64 bit, so I'm just installing 8.1 as I type this from my phone")
-
Did you try and install the nvidia drivers, then reboot, then uninstall the PCI express driver, reboot and check it this way? This is the order it has to be completed. You could have also tried to also tab the box that says "delete this driver software" as well to see if that helped.
m11kkg likes this. -
Over the past few hours I'd tried all sorts of methods, gave up!!
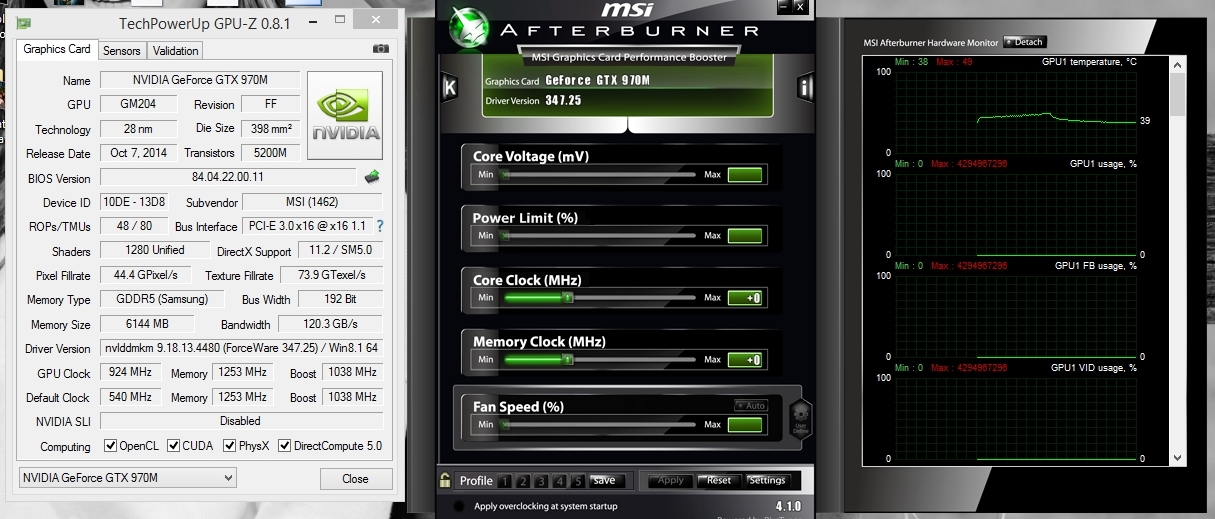
Good news though, I'm now typing from a spangly install of Win 8.1 Pro. With the 344.80 drivers installed correctly, Nvidia control panel is all functioning and GPU-Z shows my 970m correctly with the correct memory and bus speeds.
Happy days
Although I haven't installed any other drivers I might give a benchmark a whirl and see what happens.
Cheers Guys, will let you know the scores shortly.
Mick -
Congrats! Please post some screenshots of the configuration, temps, scores when you get a chance. This is some great news for people still holding onto older GX660 laptops.
Can you give me your system config so I can update the first post.
Laptop Version:
Windows Version:
BIOS Version:
EC Version:
Thanks -
Still not updated any drivers apart from the Nvidia, but have installed antivirus and just ran 3DMark Firestrike demo benchmark.
Came back with a score of: 5959 http://www.3dmark.com/3dm/5773080?
Stock clocks, no tweaks yet and GPU temp peaked at 66C
Laptop Version: MSI GX660R MS-16F1
Windows: 64-bit Windows 8.1 (6.3.9600)
Bios Version: E16F1IMS.30L, Build Date 10/4/2011
EC Version: 16F1EMS1 Ver 4.17 Build Date 08/27/2010
The bios is non stock & modified, from the GX660 thread, from a couple of years ago.
MickLast edited: Feb 3, 2015Txordi likes this. -
Thanks man. That looks good to me. Still a very respectable score and not at all far off of what a stock 970m/4700mq would score.
m11kkg likes this. -
Cheers m8, have updated the info.
I have a fair idea how hot the 7970m (82C) and cpu (90C) ran together during gaming so it will be interesting to see how this new gpu and new heatsink with the extra heatpipe will run.
Mick
-
Quite better than my old 880m+4710mq. If you play a game for a lot of time you can monitor your temps and share with us!m11kkg likes this.
-
Ok guys, I'm in full "oh $#!t" mode now.
I started to remove the X bracket tonight with the plastic spreader that comes with Gelid paste. I was very careful, and all went well until the very end. I got a little too close to the inside edge, and a resistor came off. One is loose. The one in red is still connected, but has a loose connection on the right side of it. The one with the yellow arrow is gone. I still have it - attached to the X bracket.
So am I hosed? There's the a computer shop that does electronic repairs down the road that may be able to resolder it.
Thoughts?
-
O man thats no good.. Someone else is going to have to chime in on how important those things are. I'm assuming very. At this point I would say getting them soldered back on might be your only option. Ugh I feel bad for you.
I hope that in the future people will just use the screw driver method. Pushing from the front of the card towards the back with a tiny screw driver in the screw mount holes was very easy and pretty much prevents something like this from happening.
Edit:
A quick google search tell me that yes it should be possible to simply resolder those back on and fix it good as new. Another good thing is that you have the exact resistors/size in hand.
You could always try and see if it still works?
Possibly try a product like this to reattach them.
http://www.mouser.com/ProductDetail/MG-Chemicals/8331S-15G/?qs=yK3xcw/edWHuUT4MkRgb/g==&kpid=855978087&gclid=CJLmtI2kx8MCFRE1aQodu4MAaQ --- a cold solder. I read this works to reattach them. Though it is $52.00, it still may be cheaper than paying a store to resolder it for you.Last edited: Feb 3, 2015 -
Oh no! Can't be a good feeling. Hope you can get it repaired man .
Sent from my LGUS990 using Tapatalk -
Thanks. Nothing like getting that uh oh feeling.
I was talking to my dad who's done electronics for many years. He was saying that soldering them on should make them as good as new. It's just a matter of finding someone who has the equipment to do it. I guess this surface stuff isn't a big deal as long as you have the right equipment.
The shop down the road says they can repair motherboards, so I'm guessing that would involve some soldering and stuff. They may have the right equipment - or may know someone who does.
I'm hoping they can fix it. If they can, it looks like it'll be around $80, but that's better than buying a new card.
I started to do that but it didn't seem to want to separate much. That's when I started using the Gelid spreader to get under it. It worked well - except for the last part.
I"m not sure that it would work. I"d have to at least bridge that resistor gap and I'm not willing to do that yet until I'm sure I can't get it fixed. More of a "what do I have to lose at this point" type of deal.
The other issue is that I haven't done the heat sink mod yet, and I'm not wanting to do that without a card that's ready to go. My laptop still works fine with the 675M in it - even if the card sucks by today's standards.
It really sucks, but there's not much I can do about it at the moment considering how late it is. So no use pouting about it. Best I can do is try to find a shop tomorrow that can resolder it and hope for the best. If that doesn't work, then I gotta figure out where to go from there.
I knew this could happen ... always a risk. If nothing else, I hope I serve as a warning to be really careful.
Talon likes this. -
You'll be good man, I have faith that this can be repaired by any electronics repair shop worth their salt. You have the resistors in hand, and from everything I've found they can and have been repaired/replaced and resoldered back to the board. I wouldn't fret it much. It sucks that you have to delay installation, and you have to pay to have it fixed, but it can and will be fixed; and soon you will be up and running.
Let us know when you get it fixed and are up and running!superguy25 likes this. -
Well... I'm fairing a bit better than Superguy at the moment but not out of the woods. All is back together with the new card...but it's not showing as an NVidia card even though I have the 51X bios. It's shows as a "Microsoft Basic Display Adapter" with 3 GB memory. Going to try the mod inf method now even though it was supposedly supposed to recognize the clevo 970m using 51X bios. At least it's def. running video off the card since it's showing the correct vendor id for the 970M
pci\ven_10DE&DEV_13D8.
Or do you think it would better to flash vbios?
Will be back... -
I appreciate the kind words and support!
I'm hoping I can find a good electronics shop - if the shop down the road can't help. I'm fortunate to live around a large city that should have someone with the skills and equipment to fix it.
I'm also lucky that resistor stuck to the adhesive on the X bracket. It's so tiny - really would suck to lose.
12Marshall, I'm glad you're faring better than me. I hope you get it up and running soon! -
I wouldn't worry, you should be able to get them fixed. You could do it yourself too, don't sweat it
Unless you broke the resistor in half.... in which case................ you can buy a new resistor of the same resistance and solder it
-
How can you tell what the ohm rating is?
-
quick question for Talon or whomever can answer.... I'm trying to update the vbios with nvflash in windows and when I drop the 6GB firmware from Talon's download it gives me an error...
firmware 1462.1128 does not match the adapter 1462.110C.
Should I force it using the -4 switch in nvflash?
How did you do it Talon? -
If it's not broken, you can measure it. You should be able to buy most resistors from several suppliers. In my previous work, we used to make small PCBs that often used those types of resistors.
But as long as it is not broken, you can simply solder it back. Carefully, that is, so that you don't damage anything else
-
Don't flash to MSI vBIOS its not required and actually I like the Clevo the best IMO. Also no guarentees that MSI vBIOS will work on your system config. And you could end up locking yourself out of being able to even flash back.
I will send you directions on how to install the modded driver, unless you know how already. -
Hi Talon, the laptop2go links were dead so I made my own inf from the information from Omega and others later in your thread.
I am so happy. It's all working flawlessly and very cool at idle.
I will post a complete install in the next few days for others with my system.
Thank you so much for putting this thread together.
I will also post some benchmarks shortly.
More questions:
I would still like to flash to msi vbios... which one should I use?
And did you use nvflash dos mode or windows?
I want to use msi afterburner although I'm reading that there is an effort by nvida to restrict overclocking the 970M and 980M.Attached Files:
Last edited: Feb 4, 2015 -
-
I would not bother installing the MSI vBios. Like I said, if you do that its possible you won't be able to even boot into windows and flash it back. Flashing the MSI vBios will not allow you to install normal drivers. What fixed the driver issue for me was updating my system BIOS to MSI latest version.
-
I would like to do something to allow me to use MSI afterburner again to adjust overclocking...maybe someone will have an idea.
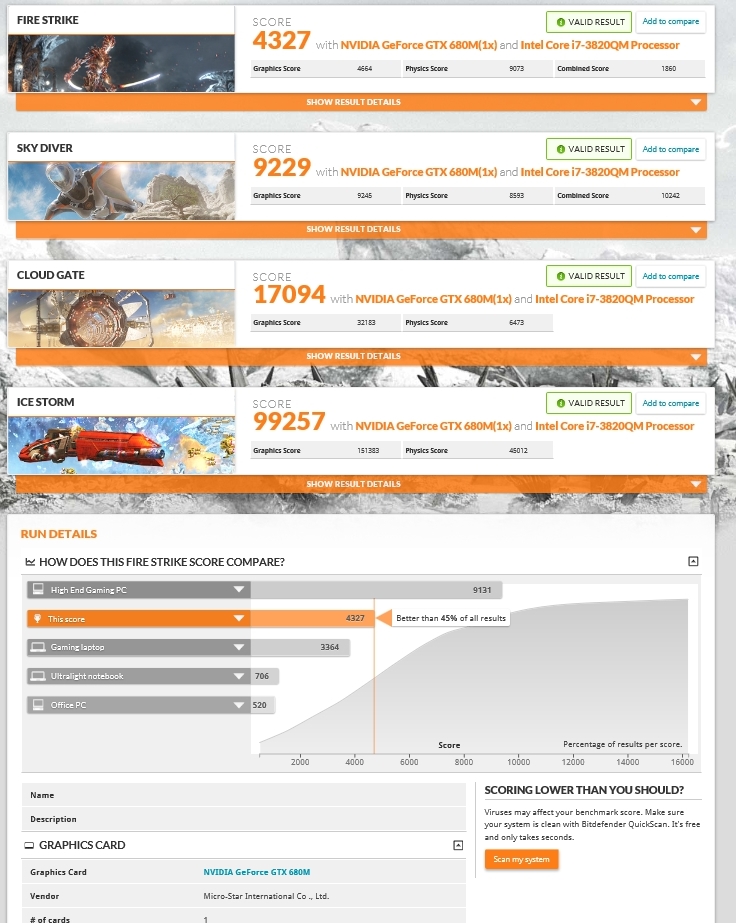
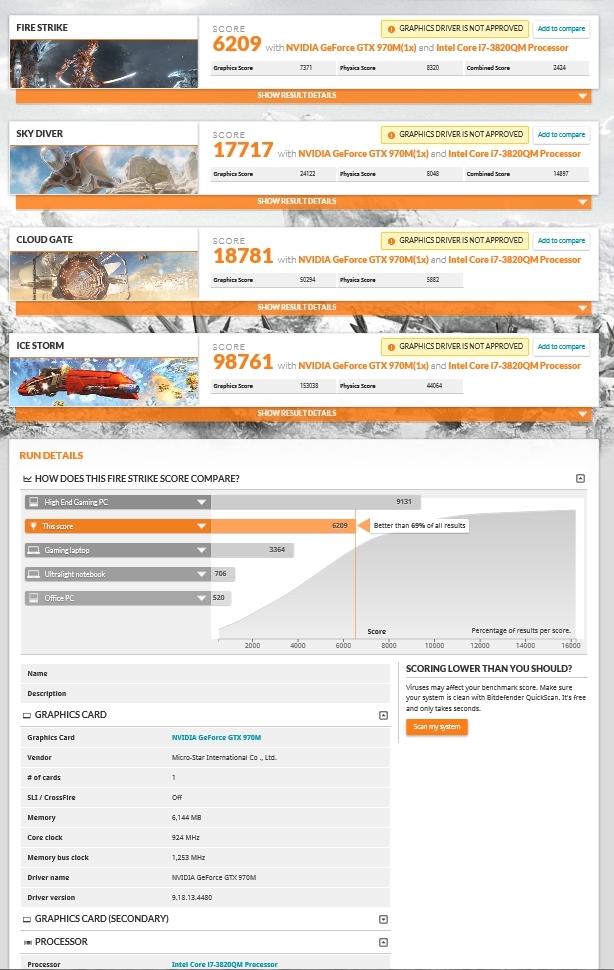
Anyway so far I'm pretty much blown away. I just did a 3Dmark run and I posted a 43% gain in graphics capability without any overclocking.
More importantly there was a noticeable increase in quality besides just FPS. Here are my runs before (yesterday GTX 680M) and after installing GTX 970MAttached Files:
-
-
You have to use 344.80 or 344.75 and earlier for overclocking via MSI afterburner. Nvidia broke overclocking in any newer drivers. Hopefully it will be fixed soon.everythingsablur likes this.
-
I see things are going a bit "bumpy" on this thread
@superGUY
Don't worry man! I know pretty well the feeling in your chest.. Usually the outer resistors come in pair and have a similar (or pretty close) ohm value. They do regulate load current balancing on the core in regards to the internal chip sections (like memory controller, CUs, frequency multiplier etc).
If one of them gets off your GPU would still work but some of its parts would behave abnormaly and likely heat more than the rest of the chip. Anyways you could get it soldered with no problem
@Troy-C & Txordi
Unfortunately a GT70-2QE does not exist
You'd have to do with the KLM for now.
With the GT72 in the market it doesn't make sense for MSI to market that SKU..
@12Marshall
Nice one with that upgrade! I'll let know my friend who is still rocking my old GX660 with a 5870m..
@Talon
Maybe it should be added to the first post: that intermediate step in BIOS flashing is neccessary because MSI changed its internal UEFI update routine from v1.0 on pre .50V BIOSes to v1.2 on post .50V up to the latest. This applies to Haswell based SKUs with UEFI capability.
SandyBridge/IvyBridge SKUs still use the DOS boot method so should be safe (unless there's a user error ofcourse)
Txordi likes this. -
I know that this is a little off topic, but I use Ubuntu a lot and I've tried to install bumblebee (more or less do what the NVIDIA optimus should do) and my new 980m card is not recognized. Anyone has tried to do the same? Thank you guys.
-
I think most of the user's here are using Windows including me
Txordi likes this.
-
Hehe. I know, but for doing work and for my job I prefer so far linux. For gaming of course, windows
-
Thanks. Makes me feel like it's not a complete loss and I'm more willing to try it if I can't get it fixed.
Anyone know of any good electronics shops that can do this in the Baltimore/DC areas?
-
Took it to the shop. Two of the three guys didn't think they had the skill to do it, so I gotta wait for the other guy to look at it and see if he can. In the meantime, I'm going to keep looking for electronics shops.
Txordi likes this. -
-
Good luck man. Hope you'll solve it.
-
Okay so my 980m is going strong, thanks to the help and moral support from Talon. I am not trying to advertise or anything but - is there a better place to sell my 880m than on ebay? The traction just seems low on EBay and I have an okay rating. I just want to get rid of it to recover some of my 980M cost =)
Thanks for any insight. -
You could always try the marketplace on these forums. I've sold a few things, including 2 laptops on the forums here.
Make sure you follow the rules and just use the template form provided to create the thread. -
Ok Talon my EC Version is: 16F4EG62 Ver5.09 for the front page.
-
Found a shop that will fix it for $35 and do it in 15 minutes - and do it while my wife waits. So she's going to take it up tomorrow morning.
TribalOne likes this. -
Good news! Look forward to your install going great and your 970m up and running.
-
Hi all,
Here are the comprehensive details for upgrading my GT60 One-403US (MSI 9S7-16F311-403)
All of the steps I took were based on posts in this thread primarily from Talon and Omega.
The system was stock with an Nvidia GTX 680M (4GB) video card
with Bios: E16F3IMS.50X and EC firmware 16F3EMS1 ver 5.05
I purchased the new Clevo GTX 970M from R&J Technology as Talon describes.
I also purchased some Arctic Silver 5 and some quality thermal pads.
1. Obtain Upgraded Bios and EC firmware
In my case Bios E16F3IMS.51X and EC firmware E16F3EMS1 VerT.18. My 51X version was modded by Svet from MSI to unlock all its BIOS options and to allow BLCK OCing.
The modded bios and EC firmware upgrades are available with a donation to Svet. He is extremely helpful and provides very easy to follow and detailed documentation to update your bios and EC firmware. Make your donation here:
https://forum-en.msi.com/index.php?topic=134259.0
You can see my request here..
https://forum-en.msi.com/index.php?topic=252835.0
Svet was very prompt and extremely helpful, way more helpful than the small donation.
2. Update Bios and EC firmware
The steps are relatively straight forward:
a. Make a bootable Dos USB drive (many ways to do this... google search)
I suggest you do this and test booting to it before you proceed as you may need to go into your existing bios and change it to legacy booting and also change boot order to start with a "USB drive" (it may list the name of your stick like it did for me)
b. Use the tools Svet provided to move the new bios to the bootable stick and follow his instructions exactly to update the bios.
c. update the EC firmware using winflash that is inside the provided archive (16F3.T18 in my case).
3. Check out the new bios and set your system stable
In my case I now could set my memory timings (Svet explains this but it's very easy to find on your own).
You can also set your multiplier (if you have an unlocked CPU). In my case I set memory timings and also chose default graphics to be the nVidia card and really didn't change any other options from default.
4. Remove the old video card
a. Remove the power and battery from the unit and flip it over.
b. There are 6 screws to remove and pop off the back plate.
c. remove the single screw holding the fan in place and unplug the fan and remove it.
In my unit the CPU and GPU are completely separated such that I could remove each separately. In some cases the heatsinks are intertwined and REQUIRE you to remove both the CPU and GPU heatsink.
Since I was replacing the GPU I decided to also remove the CPU heatsink anyway just to re-apply new thermal compound.
d. The GPU heatsink is held in place by 4 tension spring-loaded screws. They will not come out of the heatsink. Simply unscrew them in the reverse numbered order (notice numbers next to each screw).
e. Gently lift The GPU heatsink off and out. We will be modding this slightly with a dremel to use with the new GPU so clean the thermal compound off and set it aside.
f. Remove the single screw holding down the GPU and then gently pull up and out from the end of the video card and it will easily come out of it's slot (clean it up and sell it on ebay).
5. Modify the GPU heatsink to accomodate the new GTX 970M (or GTX 980M)
a. I used a dremel with the small sanding/cutting disc to cut away a 1/4 inch soft raised aluminum section as defined in this image http://forum.notebookreview.com/attachments/img_4601_zps9017b824-jpg.117600/
Honestly you don't have to be that careful here... You just want that chunk gone and not grind down adjacent parts of the heatsink.
b. Once happy with what was removed (5 minutes) then blow away any aluminum shavings from the heatsink with a can of air or your method of choice as long as you remove ALL aluminum particles.
6. Prepare / install the new GTX 970M (or GTX 980M)
The new clevo card comes with an installed heatsink as well as a very annoying (practically glued on) heat spreader on the bottom side of the card which must be removed (it interferes with both fit and with the screws on the heatsink that you modified). Take note of where thermal pads are installed on the new card.
a. Remove the Clevo heatsink by removing the four screws that hold it on and gently pull it off the GPU core.
b. Clean off the GPU core with a few Q-tip swabs until clean.
c. Remove the annoying heat spreader by using only thumb nail pressure against the parts of the spreader that come through the screw holes toward the top of the card. Press them until they are pushed back through the hole to about even with the card one at time (spreader will not come off yet). After going around the card and doing this at each hole the spreader will eventually start to loosen up and then one after another they will loosen enough to easily push / peel the spreader off. This takes about 5 minutes.
d. Install your new GTX 970M by gently pushing the card into the GPU slot at a slight angel and once in all the way into the slot the card will easily sit down in line with the screw hole that holds the GPU in place.
e. Replace the screw that holds the GPU in place and fasten tightly.
f. Optional - gently place the modified original heatsink onto the card and carefully observe that the heatsink isn't hitting Anything when it's sitting in the right place on the GPU. Notice that it's a pretty tight fit so be careful and remove the heatsink for the next step.
g. Apply quality thermal paste to the entire GPU core. Remember... less is more here... It is not necessary to have a thick coating and in fact putting too much thermal paste can be very detrimental. Just make sure the GPU core is entirely covered and you can smooth it out a bit with a Q-tip swab.
h. Apply Thermal pads where necessary to guarantee contact of the larger chips with the heatsink. You can look at Talon's first post to see what it looks like or you can follow the same pad placement that Clevo used.
i. Gently install the modified heatsink taking care to align the four install screws without dragging anything across the newly applied thermal paste and thermal pads. Screw the heatsink down in order (see numbers 1-4 right on the heatsink). It should be screwed down tight.
j. Optional - if you had removed the CPU heatsink you will need to follow the same process but with three screws and again make sure that you applied a thin layer of thermal compound to the entire core.
k. Plug in the fan, set it in the proper place (it sits easily) and replace the one screw that holds it down.
l. Replace the 6 screws to install the back plate.
m. Replace the notebook battery.
n. flip over and plug in power and all your usb / sound / ethernet / HDMI / other cables.
7. Boot up and Nvidia driver install
The next steps may vary depending on whether you are successful with the previous steps and dependent on the version of Windows you have. For this install we will assume Windows 8.1.
a. Pray and hit the power button (Immediately listen/feel for the fan because if it isn't spinning but the machine is booting you should turn off the machine ASAP and check your work.)
b. If your machine boots to windows you can immediately tell if it's using your card by looking at the power button light (orange if using Nvidia and blue if using Intel graphics).
c. At this point your machine will either install the proper drivers (since we never actually uninstalled the Nvidia drivers you already had on the machine) or you will likely need to install Nvidia drivers.
d. Check to see if the Nvidia Geforce experience is running in the taskbar. If it is then your drivers installed and you can check Device Manager to see if it's properly recognizing your new card and the Integrated Intel graphics as well).
e. If drivers were not installed automatically then Download the latest nvidia drivers and "Try" to install them. It may fail but it will at least create the folders we will need for the next step. (nvidia typical puts the installation folder in c:\nvidia)
f. If the driver install fails create an inf file based on the post here....
The Official MSI GT60/70 970m/980m Upgrade Thread.
The name in that post is actually wrong... I named it nv_dispi.inf and I moved it to
the proper Display.Driver folder which is 5 levels deep from c:\nvidia
g. Disable driver signing (which is easy and in win 8.1 it is a temporary choice made prior to a reboot which will allow un-signed drivers to be installed ONLY in the next reboot.
h. After your machine reboots you can browse to setup which is 4 levels deep from c:\nvidia and right click on Setup and run as an Administrator.
i. Drivers will install and will require a reboot.
j. Reboot and ENJOY!Last edited: Feb 4, 2015samXLR, reaper2346, yegg55 and 2 others like this. -
12Marshall Awesome Guide! I am going to link this post to the first post. I like the extra detail you went into here for users who aren't as familiar with the internals of the laptop.
-
@12Marshall
We both have the same model. Originally my nb is an MSI GT60-ONC. Upgraded to GTX680m at that time then became GT60-ONE, then to GTX970m became GT60 only lol.. It's good to hear that I am not the only one who upgraded my nb to a 9xxm card for my nb's model. Cheers -
Spent half an our for googling those secret 51X Beta and other BIOSes. Not sure why nobody posted links on them hence they are not unlocked by SVET so you could (if they are already posted here then sorry because I googled everything but not this thread).
What I found is:
1) The complete list of them on TI:
2. GT60/GT70 BETA EC T16(Win7) and T17(Win8) on MSI.com
3. 51x Beta Bios & T24 EC Firmware for GT70 Medion BAREBONE by iTzZent on NBR
4. 51X Beta BIOS and T18 EC Firmware for GT60 BAREBONE by the same guy on TI.
Who knows if it's BIOS is OK to use those BIOSes only at least with MSI GT60 and GT70!
5. Controversial info from Meaker and ThePCGamer about description of 30P BIOS in 1) that the E1762IMS.30P BIOS is for Windows 8.1 only and the GTX 780
Last edited: Feb 5, 2015 -
I tested the .30P bios with the 780M but have heard issues with later cards with it, as for windows 8.1 only I don't think that should be the case.
-
I need to help. I installed 980m in my gt 70 ( ms -1762). How can i upgrade vbios ?
-
Don't think vbios upgrade is necessary. Most have reported the stock Clevo Vbios appears to run just fine and better than others at this point. Unless I missed something.
Sent from my LGUS990 using Tapatalk
The Official MSI GT60/70 970m/980m Upgrade Thread
Discussion in 'MSI' started by Talon, Nov 10, 2014.