Dang, you got my hopes up there!!! Oh well, seemed like a great idea.
-
Ok so partially got it working via software flash. If you dump via afuwin, it copies only the BIOS region, which is the 12Mb file. I have successfully reflashed the 12Mb file via FPT after disabling BIOS Lock in the BIOS. Do not try and flash the full 16MB file, for some reason FPT doesn’t correctly detect the BIOS region in the image and it flashes it incorrectly. We also cannot flash the whole 16MB file since there are protected registers for ME region that I cannot find a way to disable, yet.
-
Anyone have a solution for this: flash the final BIOS in afuwinguix64 it writes: "stage: failed!" "address: 0xFFFFFFF?
Thanks -
Yes it’s called a CH341A hardware flasher.
-
Thanks for your response. When I had bios 1.04 I didn't need the bios hardware flasher. Now that they updated to 1.05 I can't? BTW. This is a razer blade 2019 advanced with the 9750h. First I've seen of the 1.05 bios.
If that is the route, I guess its the route then. -
Hi, I have a Blade Stealth late 2019 GTX edition which I haven't yet tried modding. If I were to mod the BIOS to enable all the options, and then start changing them, what's the worse case scenario that could happen if I change something that it doesn't like?
Would disconnecting the CMOS battery always get it back to a working state? Or might the hardware flasher be necessary to fix it? Or could it get completely bricked in a way that even that couldn't fix?
Edit: I've read through the entire thread now, and I think I have an answer. It sounds like disconnecting the CMOS battery would always be enough to unbrick it after changing options in the BIOS, and the hardware flasher would be required if the BIOS flashing itself somehow went wrong, but it can't get any worse than that. It would be good if someone could confirm that I'm understanding it correctly though") Last edited: Feb 12, 2021
Last edited: Feb 12, 2021 -
Definitely not. Removing CMOS just resets values to failsafe. It’s ridiculous to think you can reflash the BIOS by simply disconnecting a battery. You need a hardware flasher for complete brick protection
-
Definitely not to which bit? And who said anything about reflashing the BIOS by disconnecting the battery? I agree that sounds ridiculous
-
I've run into the issue a few others in here have with a Late 2019 RBS 1650, but haven't found a solution. Hopefully I can provide some more information and get some advice on how to proceed. Running bios v1.04, I was initially able to get rid of the PL throttling with David's post Take Full Control of your Razer Blade w/no PL Throttling. However, I had to remove my aftermarket NVME for those options to show up.
I found Buiden's post Razer BIOS Mods - Potential to Unlock All Hidden Options and while there were a few minor differences all I wound up with was a BIOS with hardly any information/options (which appears to have happened to a few other people in this thread).
I've uploaded the IFR dump and have found a couple conditionals which should evaluate to false (suppress: 12 06 02 0F 00 00) and (grayout: 12 06 EA 0D 01 00), but then I started getting into the actual area I care about (CPU config), and it got pretty messy. Hopefully someone with a bit more experience modifying the bios can provide some pointers. I don't have a programmer, so not bricking my laptop is preferred.
Thanks in advanced -
Sorry I'm losing track of things a bit here, what issue exactly have you run into? (I'm curious because that's the same model as mine)
Also are you sure your BIOS version is 1.04, and if so where did you get that? Mine came with 1.02 originally, and the only update I've ever seen Razer release was in November 2020 and is version 1.05
Oh and what make of SSD did yours have originally? From everything I've seen, they're supposed to come with a Liteon one, but mine actually came with a Samsung for some reason.kevtainer likes this. -
Following the second guide referenced in my OP (unlock all hidden options) it renders the BIOS essentially useless (all options are hidden). If I follow the first guide (disable PL throttling), that works, but I have to pull the nvme drive out for the options to show up in my bios, that kind of sucks.
You're right, it's v1.05
I believe it was a Liteon, I replaced it almost immediately with a 2tb when I bought it new from the store in Vegas in Dec of 2019. -
Ahh I see, interesting. Sorry I can't help with that as I haven't tried any of this yet (and don't think I will be now, as it looks like I'm probably going to have to RMA mine). Hopefully someone with more experience will see this soon and be able to help you.
In the meantime, as you have the same model as me, is there any chance you could have a look at my thread here and see if yours does the same thing? Pleeease? I really want to find out whether anyone else has the same issue (which would mean it's probably something that needs to be fixed in firmware) or not (which would indicate a hardware issue with mine) before I risk sending it back to Razer for them to try to fix it, but I've had no luck at all so far finding anyone else with the same model who has been able to check theirs. Thanks
-
Does the CH351a work on the newest Stealth with 11th gen CPUs as well? I digged a little in the thread and didn't see if it was possible...
-
Hi!
Got a Razer Blade Advanced (RZ09-03304G42, 10875H, 2070 Super) and have the following details in Bios:
System Bios Version: 1.04
EC FW version: 1.01
MCU FW Version: 1.00.01.00
ME FW Version: 14.0.31.1120.
Have the CH341A programmer - although I was not able to read the BIOS. Maybe the SOIC clip was not properly connected.
Just wanted to make a backup from the BIOS.
Shall I upgrade the EC/MCU/ME FW?
Shall I downgrade this bios to have the possibility of 'undervolting' or 1.04 is still one of the good bioses where this is possible after unlocking it?
Is there a version which is unlocked and safe to burn in - or better to read the existing and modify it for myself?
(I don't want to change the serial number and other settings which might be accidentally changed by burning in somebody else's Bios).
Thank you! -
I believe the serial is stored in the embedded controller, because I flashed the full 16MB BIOS from Razer with CH341A and it did not overwrite the serial. My recommendation is to get the latest BIOS from Razer, unlock, and flash.
this test clip included with most CH341A kits sucks and can slip off easy. My recommendation is to pinch the clamp so it opens as wide as possible and clamp it to the base of the BIOS chip, that gives the best contact possible. Just be careful not to crush any of the surrounding SMD components on the board. -
So you recommend to go with the 1.06 Bios updater and after that unlock the BIOS?
I read about the bin file inside of this update - I could extract it, but maybe it is better to read it after a successful Bios upgrade and then unlock the read content of the chip (then flash it back).
Anyhow - for safety reason I'll save the existing 1.04 content of the bios chip, just to test the programmer. -
That’s a good plan. I have bricked my machine several times and I have always been able to recover using the full 16MB bin file inside the Razer updater
-
Read the original rom and did the CFG lock and Overclocking lock on the 1.04.
Setup -> Advanced -> Power & Performance -> CPU Power Management -> View/Configure CPU Lock Options -> CFG Lock - Set to USER (disabled)
Setup -> Advanced -> Power & Performance -> CPU Power Management -> View/Configure CPU Lock Options -> Overclocking Lock - Set to USER (disabled)
Flashing back now.
Could you please tell me if these are the necessary ones to enable the flashing from Windows?
I would not dismount the. bottom cover if not necessary
(of course I understood, that it requires a different size of rom to flash).
Thank you! -
Thise two locks you disabled are to re-enable undervolting in windows.
there is one called BIOS lock I think under chipset -> security that must be disabled to allow flashing through windows.
You can only flash back the same version of BIOS from windows since you will use afuwingui to read the 12MB rom from the chip. You can flash back with fptw64 -
Found Bios Lock under:
Setup/Chipset/Security Configuration/Bios Lock
What parameters did you use?
Show:yes Access/use Default. Failsafe: Disabled Optimal: Enabled
USER/Disabled/Disabled?
I think after this (plus the previous 2) it is possible to do the rest from Windows.
Throttlestop for undervolting and flashing new (modded) bios via the fptw64. -
I see CFG lock, Overclock lock, and BIOS lock to disabled on failsafe and optimal. I want them disabled for good. I left user access to see them in the BIOS just in case I change my mind
-
Thanks!
It seems that Throttlestop works fine.
Managed to reach -250 mV on Core and -110 mV on Cache.
![[IMG]](images/storyImages/a50df7f77fadd38dd6f2c6d51c00cd5f.png)
![[IMG]](images/storyImages/a1d389d6dcd2a5728526aef5fa8e8e4e.png)
The rest for tomorrow.
Thanks for the help!Last edited: Feb 17, 2021 -
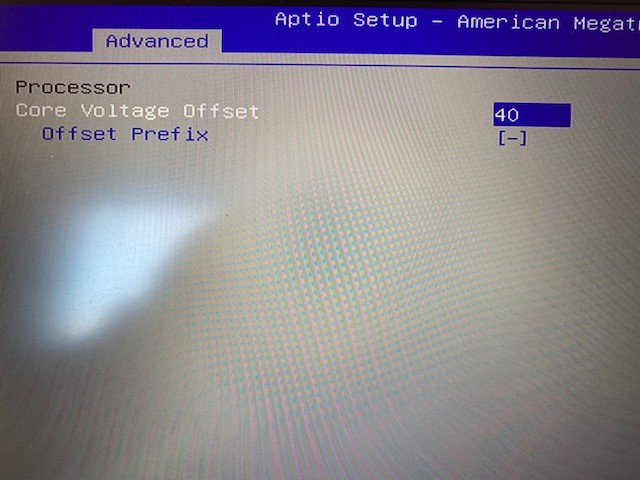
Hi Guys.
Can someone help me ?
After the instructions I tried to undervoltage the CPU with of course the CH341 BIOS programmer but I don't get an undervoltage MENU in the BIOS like the picture down - why?
Does anyone know what I'm doing wrong ?
I have got an : Razer Blade PRO 17 2020 with 10875H and RTX2080 Super Max-Q / BIOS : 1.06 with newest EC updateAttached Files:
-
-
Hi!
As I did the same yesterday I can tell you what I got at the Razer Blade Advanced 10875H+2070Super with Bios 1.04.
Read the Bios, used AsProgrammer. Then saved it a s original.rom
Then opened in AmiBcp 5.02.0031 and edited the following 3 entries:
Setup/Advanced/Power&Performance/Cpu power management control/View configure cpu lock options/CFG Lock : set to user/disabled/disabled
Setup/Advanced/Power&Performance/Cpu power management control/View configure cpu lock options/Overclocking Lock: set to user/disabled/disabled
Setup/Chipset/Security Configuration/Bios lock: set to user disabled disabled
First 2 is for UV, the 3rd permits writing the Bios from Windows.
It seems the Afuwingui program reads the content of the Bios and it is the part of the 16MB rom file from 0400000 to 0FFFFFF (12MB).
(not verified the latter - just compared with a HEX editor)(Thx Raidriar)
Flashed back the modded bios with the CH341A (erase chip, write, verify - took half an hour)
After this: went to the BIOS and loaded Optimized defaults. Read somewhere that this is important.
The Core and Cache voltage cannot be adjusted from the BIOS. Have not found the menus.
BUT: from windows the Throttlestop utility can adjust them.
Be careful, this should be edited in the FIVR and do it carefully. Always test the settings with TS Bench, run Cinebench or other CPU intensive tasks.
When I lowered too much - it started throwing errors in TS Bench. Also if you lower too much the system will freeze.
Go with 10mV steps... Cache is more sensitive to UV - that will be less negative.
I don't know the reason, but it seems TS write these values to the BIOS - so they are coming back even after a reboot when TS not loaded.
No clue why are they permanent - but verified the existence of the values with Hwinfo and XTU - they showed the same.
In case you save wrong values, you have to pull the battery off and remove Cmos battery from motherboard. Then load optimized defaults again.
In my case the system is stable on a very nice UV:
core: -250mV (not tested under 250, maybe can go more)
cache: -110mV (on -120 throwing errors in TS bench, -125 instant freeze)
It is almost unbelievable, but that is what I reached. Got a warn from a friend that maybe this amount of UV will destroy the VRMs on the MB.
Do not try to go this low, unless you reach it via a lot of steps...
![[IMG]](images/storyImages/ee536046865fecdd5a2ffeb1ac3c49fe.png)
So from 90W TDP the CPU went down to 70W which is a pretty good saving in heat dissipation.
If you want silent computer simply limit the CPU to 99% in Windows Power management.
Power&Sleep -> Additional Power Settings -> Change Plan Settings -> Change Advanced Power Settings -> Processor Power Management
This will eliminate the turbo and in Balanced mode the CPU will run near stock value (2,3GHz) which is more than enough for everyday tasks and consumes only few watts.
Even with stock values (no UV) the cpu consumes near 5-10W and the computer is silent.Last edited: Feb 18, 2021 -
THANK YOU for the very detailed description!
For me it is a bit strange that OTHERS apparently have this menu and we don't ........ although they are the same BIOS ...... maybe someone could say something who has successfully done this? -
Until Throttlestop saves the values permanently I don't really care.
Works as expected.
I did not modify the TDP limits and other settings like mentioned on page 26 - just wanted undervolting and flashing without the hardware programmer. -
Flashing without a hardware programmer - is this easy or have you got any discription about it
-
Any reason you used 1.04 instead of the latest BIOS available?
-
If you mean me ? I've tried with BIOS 1.06
-
Tried it, works fine.
Downloaded the tool called: ' AMI AFU for Aptio V'
Then read the BIOS content with \AMI AFU for Aptio V\afu\afuwin\64\AfuWin64\AFUWINGUIx64.EXE Just click on SAVE.
This reads the 12MB part of the BIOS. I think that is the exact copy of the original 16MB bios file from 0400000 to 0FFFFFF.
The saved part can be modified by Amibcp like mentioned previously. Did the changes from page26.
Save the modified rom as you wish.
Then downloaded the FPT from here.
Unzip to a folder.
Test the Bios access via fptw64.exe -I in a command prompt:
FPTW64.exe -I
Intel (R) Flash Programming Tool Version: 14.0.10.1204
Copyright (C) 2005 - 2019, Intel Corporation. All rights reserved.
Reading HSFSTS register... Flash Descriptor: Valid
--- Flash Devices Found ---
W25Q128FV ID:0xEF4018 Size: 16384KB (131072Kb)
--- Flash Image Information --
Signature: VALID
Number of Flash Components: 1
Component 1 - 16384KB (131072Kb)
Regions:
DESC - Base: 0x00000000, Limit: 0x00000FFF
BIOS - Base: 0x00400000, Limit: 0x00FFFFFF
CSME - Base: 0x00001000, Limit: 0x003FFFFF
GbE - NOT PRESENT
PDR - NOT PRESENT
EC - NOT PRESENT
Master Region Access:
BIOS - ID: Read: 0x000F, Write: 0x000A
CSME - ID: Read: 0x000D, Write: 0x0004
GbE - ID: Read: 0x0009, Write: 0x0008
EC - ID: Read: 0x0101, Write: 0x0100
Total Accessible SPI Memory: 16384KB, Total Installed SPI Memory: 16384KB
FPT Operation Successful.
Then flash the modded bios:
fptw64.exe -f mod1.rom -BIOS
Intel (R) Flash Programming Tool Version: 14.0.10.1204
Copyright (C) 2005 - 2019, Intel Corporation. All rights reserved.
Reading HSFSTS register... Flash Descriptor: Valid
--- Flash Devices Found ---
W25Q128FV ID:0xEF4018 Size: 16384KB (131072Kb)
GbE Region does not exist.
Processing Flash memory block 2 from 3071.
- Erasing Flash Block [0x403000] - 100 percent complete.
- Programming Flash [0x0403000] 4KB of 4KB - 100 percent complete.
Processing Flash memory block 4 from 3071.
- Erasing Flash Block [0x405000] - 100 percent complete.
- Programming Flash [0x0405000] 4KB of 4KB - 100 percent complete.
Processing Flash memory block 7 from 3071.
- Erasing Flash Block [0x408000] - 100 percent complete.
- Programming Flash [0x0408000] 4KB of 4KB - 100 percent complete.
Processing Flash memory block 10 from 3071.
- Erasing Flash Block [0x40B000] - 100 percent complete.
- Programming Flash [0x040B000] 8KB of 8KB - 100 percent complete.
Processing Flash memory block 15 from 3071.
- Erasing Flash Block [0x410000] - 100 percent complete.
- Programming Flash [0x0410000] 12KB of 12KB - 100 percent complete.
Processing Flash memory block 18 from 3071.
- Erasing Flash Block [0x413000] - 100 percent complete.
- Programming Flash [0x0413000] 8KB of 8KB - 100 percent complete.
Processing Flash memory block 112 from 3071.
- Erasing Flash Block [0x471000] - 100 percent complete.
- Programming Flash [0x0471000] 4KB of 4KB - 100 percent complete.
Processing Flash memory block 153 from 3071.
- Erasing Flash Block [0x49A000] - 100 percent complete.
- Programming Flash [0x049A000] 4KB of 4KB - 100 percent complete.
Processing Flash memory block 699 from 3071.
- Erasing Flash Block [0x6BC000] - 100 percent complete.
- Programming Flash [0x06BC000] 308KB of 308KB - 100 percent complete.
- Processed memory blocks 3071 from 3071.
RESULT: The data is identical.12288KB of 12288KB - 100 percent complete.
FPT Operation Successful.
After the reboot I had the menus available in the BIOS.
DON'T FORGET: this only works if the BIOS was already unlocked as I wrote previously and the modded file was flashed via the hardware flasher.
'Setup/Chipset/Security Configuration/Bios lock: set to user disabled disabled'
Last edited: Feb 18, 2021pau1ow likes this. -
I used what the computer had installed out of the box.
As it fulfills my expectations I don't even plan to upgrade.
Downloaded the newer bios and even the EC update - but I'm afraid that after the updates the UV values will not work like before.
-250mV Core and -110mV Cache UV is amazing, don't want to lose it for any stupid reason which I cannot revert later.
2W Package TDP on base clock (2,3GHz) is almost nothing, the computer is cold
This is what I wanted. A cold and silent computer for everyday tasks (web/Youtube).
Connected via the TB3 cable - powered by the TB docking station. Ideal.
And still capable of some powerful gaming or computing if necessary.
![[IMG]](images/storyImages/5a8666c147a828367cac9330c4a1c598.png)
-
Has anybody figured out how to disable nvidia GFX in BIOS on 2020 models? Need to disable to use as an ultra book/ long battery life. Optimus sucks
-
Had no chance to try the battery usage time yet, but as you can see limiting the Processor to 99% in windows power management gives very low processor usage - 2-20W package.
This eliminates the turbo, so CPU runs around 2,3GHz stock speed.
Also possible to lock the multiplier to a lower number and that also should reduce power usage.
Found this: https://insider.razer.com/index.php?threads/razer-blade-performance-configuring.20960/
Maybe it helps selecting the GPU per application.
Or simply disable the Nvidia GPU. Maybe that also works.
Heard from somebody, that using i9 on 1200Mhz and gets 5,5 hours on an Alienware 17" 4K beast from battery.
So our Razer with 80Wh should last for 10 hours after such a settings
Mine is totally silent, totally cold - only lukewarm at the SSD. Around 40 Celsius according to HW monitors. Mine runs from a TB3 docking station, no power brick connected.Last edited: Feb 19, 2021 -
None of those work. I need to be able to select IGFX in the BIOS to actually turn off PEG0 which the nvidia gfx lives on. Otherwise there is always power going to the GPU
-
In Amibcp5 under the Chipset you can find options for Graphics related hidden menus.
Most probably you can find the necessary switch there. -
Have you tried this:
http://forum.notebookreview.com/threads/switchable-graphics-options.831842/ -
Doesn’t work in 2020 that’s why I’m asking if somebody has modified the switch logic to get it working. 2020 has a mux and the only switch case is for SG or PEG, it cannot be overridden to IGFX as it always reverts back to PEG or SG
-
ThrottleStop does not write anything to the BIOS and it does not write anything to the Windows registry. It only writes the voltage information directly to the CPU voltage control register.
It is up to the BIOS to reset this CPU register during a restart. During a fast restart, this might not get done.
To fully reset your CPU, hold down the Shift key on the keyboard and then select the Windows Shut down menu option. This should reset your CPU to default voltage values. No need to pull the CMOS battery.
Time to upgrade to TS 9.3. It has a few new features for the 10th Gen CPUs. The FIVR window now includes access to the Thermal Velocity Boost and V-Max Stress features. Clearing these boxes allows the CPU to run a little faster when fully loaded.
![[IMG]](images/storyImages/nO7i3W1.png)
Limit Reasons has also been updated for the 10th Gen CPUs.
https://www.techpowerup.com/download/techpowerup-throttlestop/ -
And if you put it to SG and in the SG menu you select only the IGFX?
-
Reverts back to SG. There is logic there that needs to be defeated/broken.
-
no.. that was not what was needed... didn't need the programmer after all
-
Thank you!
Upgraded yesterday.
However it seems my result of -400mV on Core and -110mV on Cache is not real. At least the Core is wrong as it seems the system handles them together.
I see the numbers at the HW monitors (set in TS, see in Hwinfo or XTU) - but I think -400mV on an 10875H cannot be true.
Made several tests - there is no significant difference between the undervolted values. Did test on stock, -150, -250 -400mV.
Stock Voltage, Optimus disabled. No UV.
3Dmark11 [link] [link]
P23809 Graphics 28498, Physics 16319 Combined 15406
Geekbench 5 [link] [link]
1231/7497
81W maximum CPU TDP.
Time Spy [link] [link]
8005 Graphics 7769, CPU 9679
GPU Power 108,98W CPU power 84,113W
CBR20 [link] [link]
3273
CPU Package power:89,064W
_______________________________________________________
Reboot at 18:30 with -150 Core and -110 Cache Undervolt
3Dmark11 [link] [link]
P23622 Graphics 28196, Physics 16113 Combined 15569
Geekbench 5 [link] [link]
1247/7792
72,07W maximum CPU TDP.
Time Spy [link] [link]
7988 Graphics 7735, CPU 9814
GPU Power 108,577W CPU power 67,88W
CBR20 [link] [link]
3861
CPU Package power:84,862W
_______________________________________________________
Reboot at 18:58 with -250 Core and -110 Cache Undervolt
3Dmark11 [link] [link]
P23537 Graphics 28047, Physics 16002 Combined 15695
Geekbench 5 [link] [link]
1242/7856
72,155W maximum CPU TDP.
Time Spy [link] [link]
7991 Graphics 7735, CPU 9840
GPU Power 108,207W CPU power 67,559W
CBR20 [link] [link]
3931
CPU Package power:82,74W
_______________________________________________________
Reboot at 19:23 with -400 Core and -110 Cache Undervolt
3Dmark11 [link] [link]
P23470 Graphics 27780, Physics 16375 Combined 15509
Geekbench 5 [link] [link]
1199/7557
71,7W maximum CPU TDP.
Time Spy [link] [link]
7945 Graphics 7677, CPU 9914
GPU Power 102,815W CPU power 68,222W
CBR20 [link] [link]
3946
CPU Package power:83,019W
So it seems the Cache and Core undervolted together, no matter what I set it TS. Cache counts. -
Do you know where is the Bios Lock in 1.06 bios? It is not under the Chipset.
Started the Bios update tool, then canceled.
I think it is possible to modify the c:\Program Files (x86)\Razer\Update Tool\Charlotte5_0106.bin before the update - so all the necessary changes can be done in advance, so no HW programmer needed anymore.
This could be an ultimate solution for all users (if the updater does not check the checksum of the bios image).
So ideally new Razer users could download the bios update tool, start it, then cancel.
And then modify the c:\Program Files (x86)\Razer\Update Tool\Charlotte5_0106.bin with Amibcp5 and then do the flash.
This would lead to open Bios which is writable as my previous post.
So CH341a is not even needed to have an open and user configurable bios (in case the user flashing from an earlier bios).
Edit:
found it:
Setup -> Chipset -> PCH-IO Configuration -> Security Configuration ->BIOS Lock
Made the changes, then did the bios update. Successfully flashed - have it on video.
And then it stayed on 1.04.
Tried several times - flashing successful, reboot, then it is still on 1.04.
Have no clue why.Last edited: Feb 23, 2021pau1ow likes this. -
Setting the core offset to a larger value compared to the cache offset is a trick that tells the CPU to use less voltage when running AVX instructions. The maximum difference between these two voltages should be approximately 100 mV. If you set the cache to an offset of -110 mV then there is no point in setting the core much higher than -210 mV. If you set the core to -300 mV or -400 mV or -1000 mV, the CPU will ignore any excess. Your testing shows this.
Cinebench R20 uses lots of AVX instructions so I like using it when requesting different voltages.
https://www.techpowerup.com/download/maxon-cinebench/
For a baseline, start with the core and cache set equally at -110 mV. After that, start increasing only the core in steps of -25 mV. Most people get their best results with the core offset approximately 100 mV beyond the cache offset. This is the point where Cinebench results will level out. You will not see any improvement if you keep increasing only the core to -300 mV, -400 mV, or beyond.
Here is a link to some Cinebench R20 user testing.
https://drive.google.com/file/d/1B2HZjwlS6B5vO-m6HrkYMuiu8yVh3LvY/view?usp=sharing
Intel XTU forces the core and cache offset registers to the same value. For the 8th and 9th Gen mobile CPUs, you seem to get better performance when you set the core offset request higher than the cache. I believe the 10th Gen CPUs are the same.
Two tests, one at an offset of -110 mV for both voltages and a second test with the core at -210 mV and the cache at -110 mV should prove if this is true for 10th Gen CPUs too. Your results above seem to show this.Last edited: Feb 23, 2021pau1ow likes this. -
Thank you for the detailed explanation!
I'll do the test tomorrow and will link the results here.
I also concluded that the difference in the core values are approximately 200mV, that's why I doubted the -400mV as Core UV.pau1ow likes this. -
Mine was Samsung too
-
u/Sultanxda over on Reddit through his own testing had found a while ago that having the core offset be double the value of the cache value offset is the absolute limit. Anything beyond having the core offset be double the cache offset resulted in no further reductions in power usage.
Undervolting: Setting core voltage offset higher than cache voltage offset yields lower package power for certain workloads : MSILaptops (reddit.com)
If @pdudas wants to provide further verification by doing more testing that would be appreciated. I had plans of doing it at some point, but I have been busy with school and work. -
Everyone used to believe that setting the core to double the cache was some sort of magic number. That seemed to be true for 8th and 9th Gen but 10th Gen has proved that this is not true. The maximum difference should be somewhere around -100 mV.
With 8th and 9th Gen, the typical cache offset was -125 mV so the core was set to -225 mV or -250 mV and this seemed to be the peak. It looked like a perfect double so the double legend began.
Many 10th Gen mobile CPUs are only stable with the cache at -75 mV. Some are only stable at -50 mV. Improvements are still being seen with the core at -150 mV so now it is more like a triple instead of a double. In other words, the double was just a convenient wild guess.
It is always best to do your own testing. A difference of approximately -100 mV seems to be optimum for 8th, 9th and 10th Gen. It really does not matter if you go beyond this magic number. Some set the core to -1000 mV. Any excess is simply ignored by the CPU. If it was actually using all 1000 mV the CPU would instantly crash with a BSOD. -
Has anyone attempted this on the RBS 2020 11th gen? If not, I may be trying it tomorrow. The cooling of this system is so good, that sustaining 50w with no dGPU load is totally possible.
pau1ow likes this. -
Hi, I tried to follow this guide for the 2020 base and was having issues is there a possible way someone could do it for me if I provide the bios bin file please?
Razer BIOS Mods - Potential to Unlock All Hidden Options
Discussion in 'Razer' started by stranula, Nov 10, 2019.