Hey, I unlocked some settings but I have a couple of questions. First, the only way I can seem to see the options is to remove my NVME and I don't really understand how to fix this. Second, does anyone know where I can set the multiplier for the 9750h? I would like to limit the multiplier to like 37 for thermal reasons. Mid- 2019 Razer blade 15 with 2070 Max -Q
Any help would be greatly appreciated.
-
Guide for bios mods with a programmer on a Razer Blade 15 2020 Advanced.
In this guide I describe as MOD 1 how to get around the TDP restriction that comes with all Razer Blade 2020 Advanced.
MOD 2 is related to bios undervolt since undervolting through software is not possible anymore since bios 1.03.
This gave me incredible 40% speed increase in CPU performance!
My cinebench r20 score jumped up from 2900 to 4100!
The bios of the 2020 Razer Blade Advanced is locked.
The only way to modify the bios is to do it with a programmer.
These two mods are only the mods I applied.
Once you have a programmer, you can modify/unlock nearly endless bios settings.
All of this worked for me, but you do all this at your own risk!
Cost of the mod is less than 10$, financial risk of bricking your machine is 3000$!
Most of the information in this guide is combined information of these two threads and I copy pasted/modified some phrases of them:
http://forum.notebookreview.com/thr...f-your-razer-blade-w-no-pl-throttling.827919/
http://forum.notebookreview.com/threads/razer-bios-mods-potential-to-unlock-all-hidden-options.830993/
Thanks to stranula and David Kirchik who did similar mods through software with unlocked bios versions in older blades.
I recommend to read these threads.
Disable/delete ThrottleStop and/or Intel XTU before proceeding with BIOS tweaks and mods. You’ll BSOD due to lack of voltage after completing them quote from Hackness, “ThrottleStop's Core and cache's undervolt offset and the BIOS undervolt offset need to be cleared before setting the AC and DC loadline to 1, only very little undervolt is allowed on the cache with AC and DC loadline to 1, around -40, otherwise it'll crash straight away with voltage offset like -160mV on the cache.”
Your CPU will pull much more power after MOD 1.
I applied Liquid Metal Conductonaut to the CPU and GPU to lower the temperatures directly when I bought the Blade so I don’t know if temps will be ok with stock thermal paste.
Undervolting with MOD 2 is recommended in any case, with or without MOD 1.
Undervolting was the initial reason for me to dive into this after Razer locked the voltage with bios 1.03.
With liquid metal temps are absolutely ok with my Razer Blade after these 2 mods, even with a 100W vbios that I flashed in addition to the 2080 Super Max-Q.
If you want to repaste your CPU too, you can find a lot of videos how to do it on YouTube.
If you repaste, I recommend to do the same on the GPU in the same process since you removed the vaporchamber heatsink anyway you´ll get access to the GPU as well.
Lets get started.
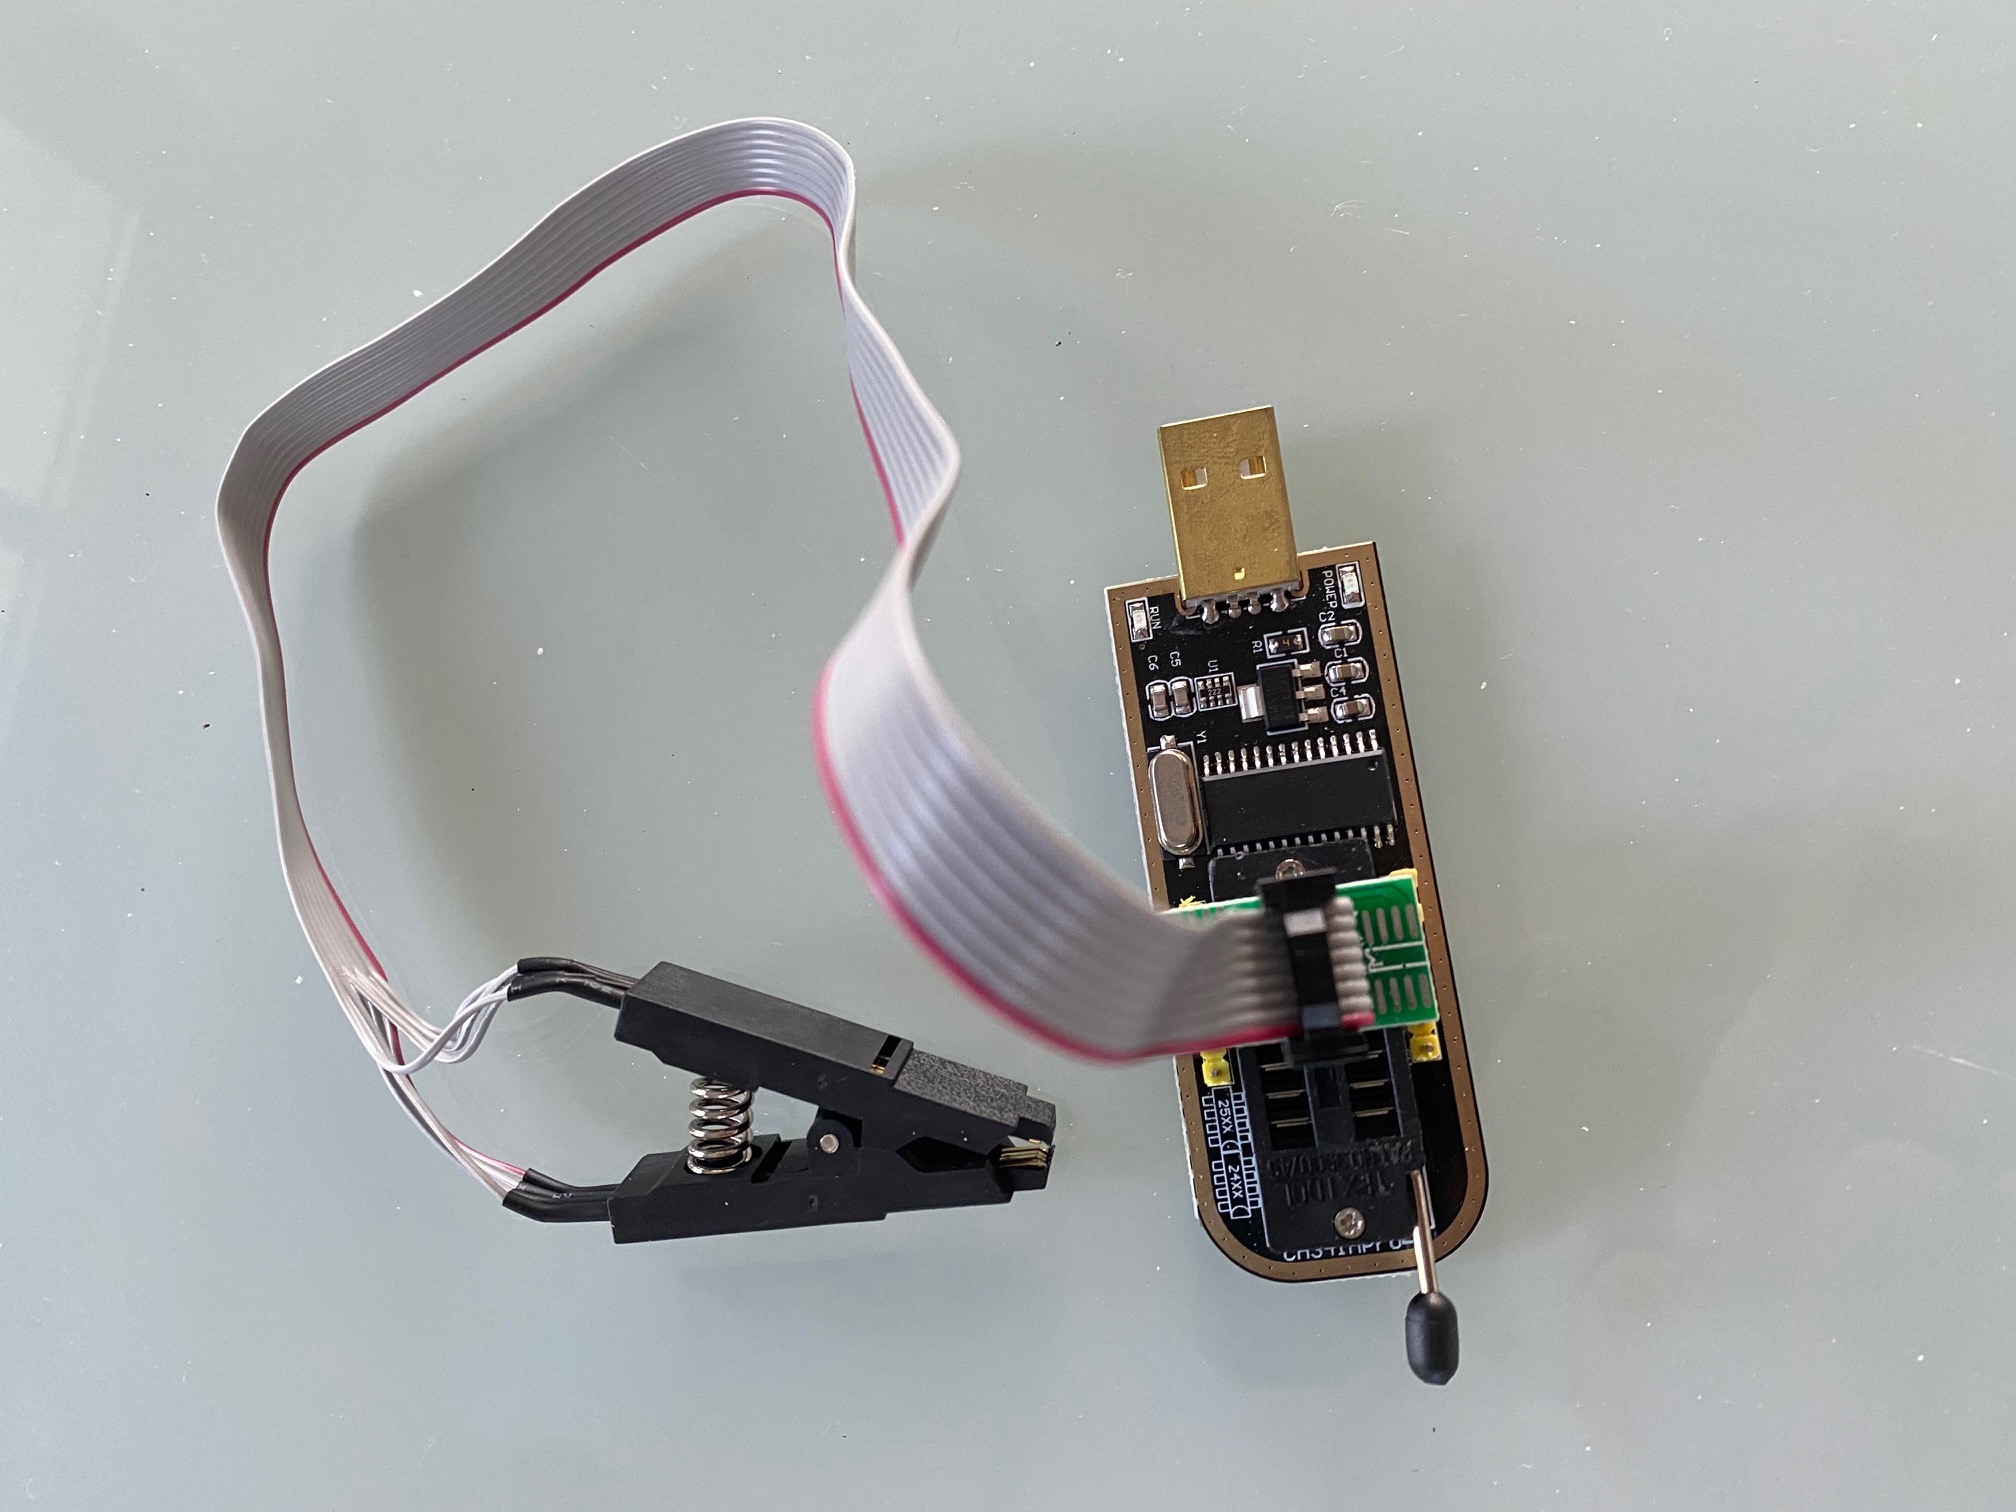
1. Buy a CH341A programmer together with a SOIC8 Clip to extract the bios directly from the bios chip and for to flash the bios to the chip after modification. You can buy such a device at ebay: https://www.ebay.com/itm/JW-USB-Pro...OP-Clip-Adapter-EEPROM-BIOS-FLAS/233635841518 . Any other CH314A programmer will work.
2. Watch some YouTube videos to learn how to use such a programmer and especially how to connect the cable from the clip to the programmer. Its not complicated, but better inform yourself in addition to this tutorial how to handle this great tiny device.
3. Connect the SOIC8 clip to the programmer.
A picture where you can see how to connect the clip to the programmer is attached with name “programmer” http://forum.notebookreview.com/attachments/programmer-jpg.187050/. The Blade 15 2020 has a W25 bios chip so this is the correct way to do it for that bios chip.
4. Buy a TX5 Torx tool for the screws of your Razer backplate.
5. Download driver and software package for the programmer. https://mega.nz/file/PkhxCQ4B#m5u-HjDf7jezczlQOL82z3T4WkXqCVpAGSpoZHP4ZTI
6. Download AMIPCP5 (needed to modify the bios file that was extracted with the programmer). https://mega.nz/file/294TnCxL#6nP9uXuaspg1ercJREvydKnbWFdc6GRIo3YFhWLRdzw
7. Get an additional PC/Notebook, install drivers for the programmer and download the AMIPCB5.exe to that device. You need this additional laptop to read and flash the bios.
Now you have to open up your Razer Blade.
1. Switch off your blade and turn it upside-down.
Remove all screws from the backside with the TX 5 screwdriver and lift of the complete cover.
This can afford some force since a thermal pad of the SSD is connected to the cover. Best method is to start pulling at an edge left or right of the touchpad. You will not destroy the thermal pad and you can still use it afterwards, don’t be afraid.
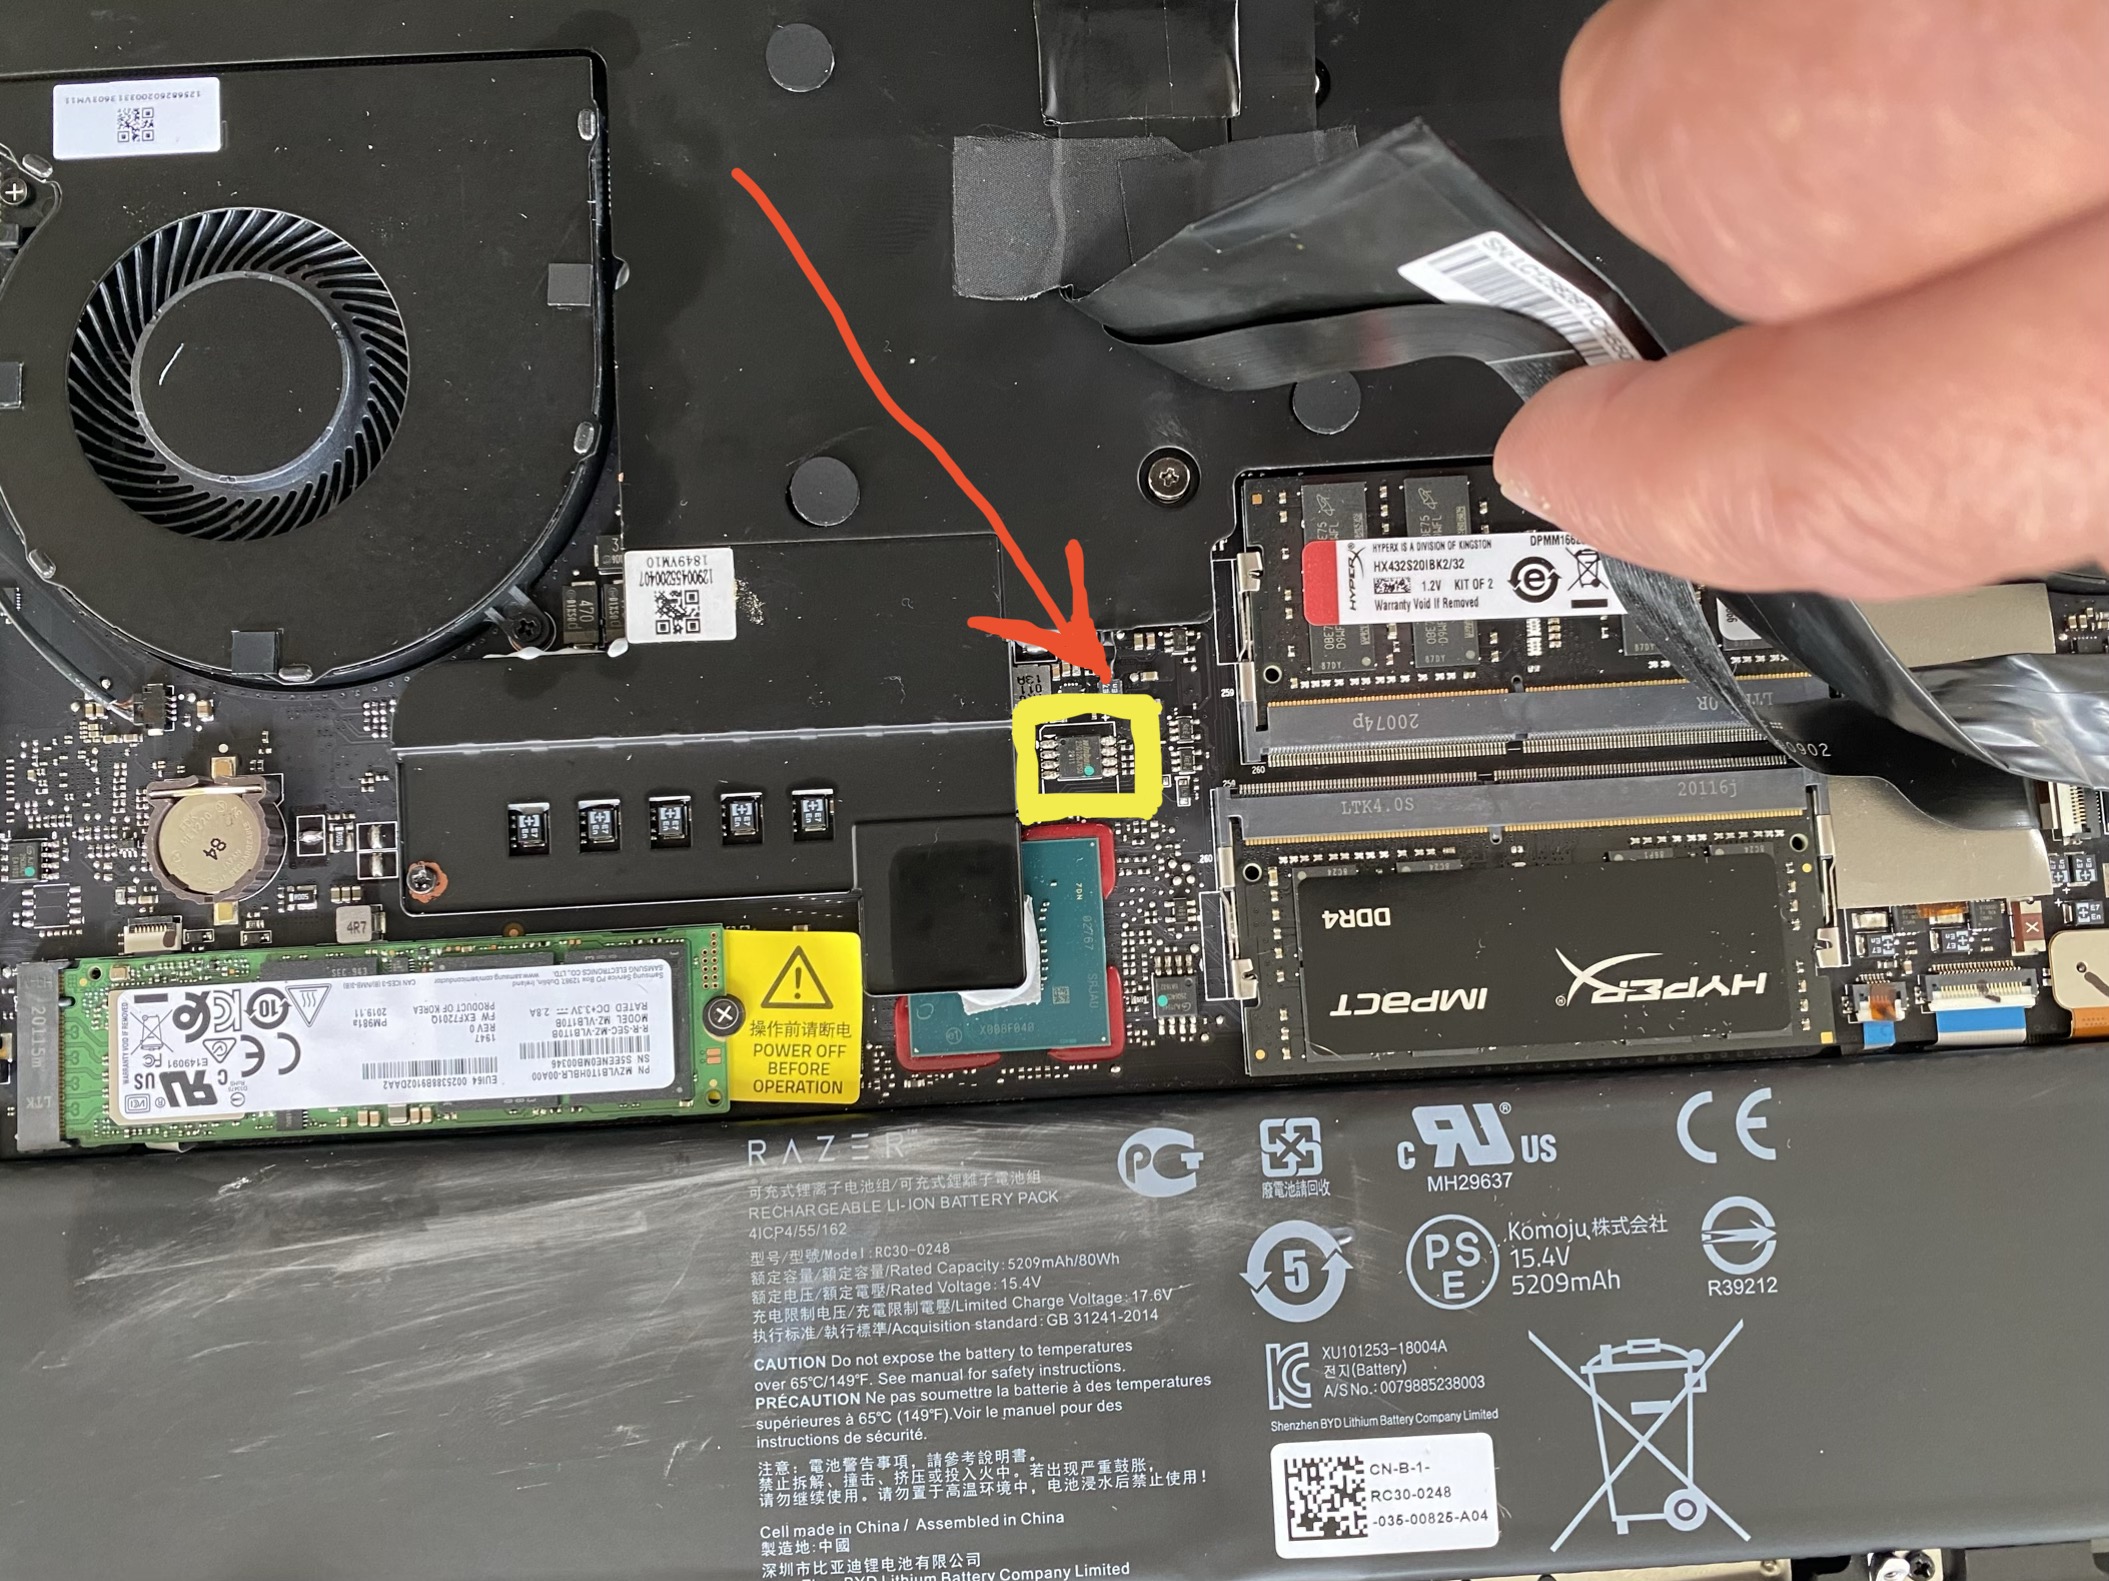
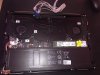
2. Once you removed the back cover you have to identify the bios chip.
It’s quite centered under the LCD flat-cable and the camera cable and you have to lift these cables to get access to the chip.
You can see the location in the picture “bios chip location” http://forum.notebookreview.com/attachments/bios-chip-location-jpg.187048/.
3. I did not disconnect the main battery for the following steps of my razer and had no issues, but you may do this if that seems right for you. This is just an option.
4. Now plug in the programmer into the USB port of your additional notebook.
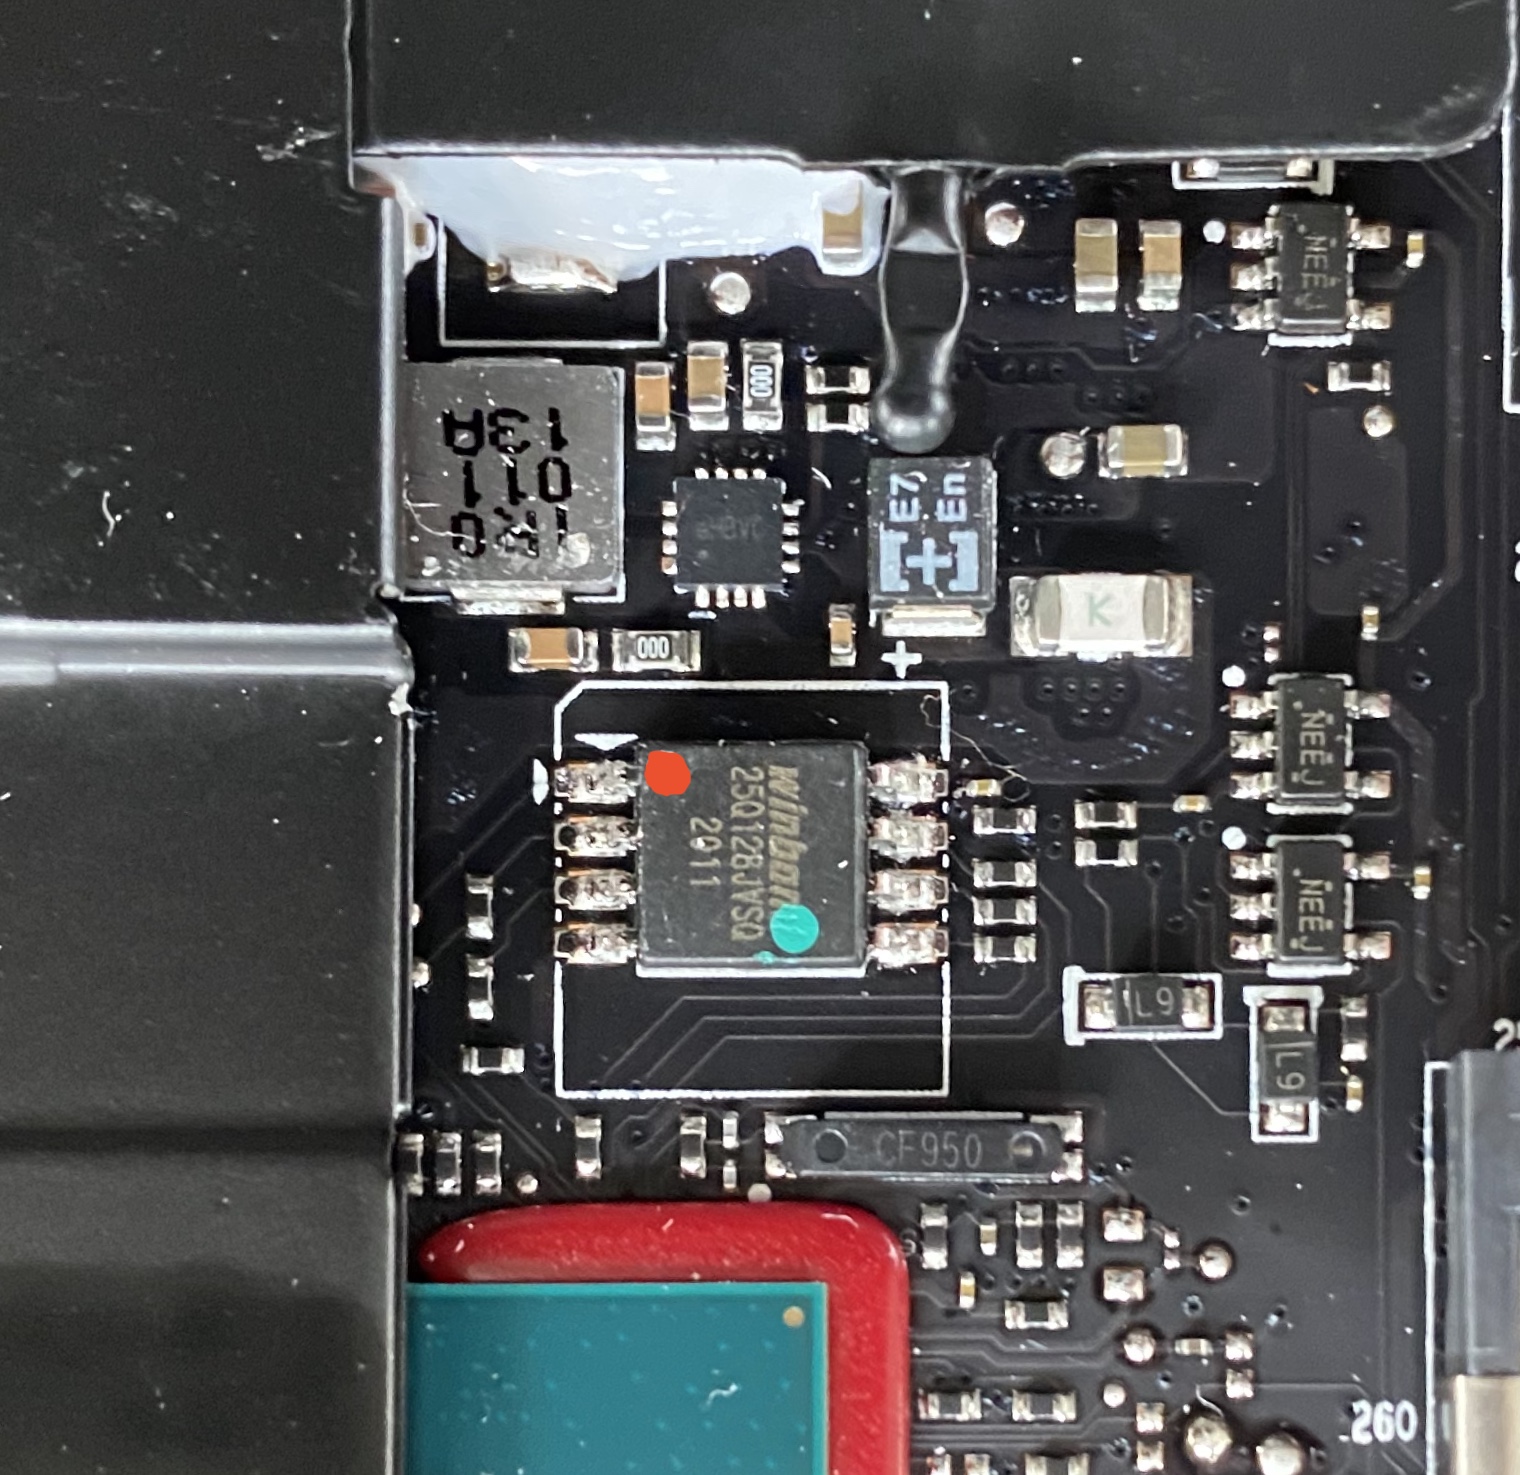
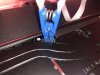
5. Connect the SOIC8 Clip to the bios chip.
Connect pin 1 of the clip to pin 1 of the bios chip.
Pin 1 on the clip is where the red cable is.
Pin 1 on the chip is where I made the red dot in the attached picture “pin 1 bios chip” http://forum.notebookreview.com/attachments/pin-1-bios-chip-jpg.187049/.
Extract the bios
1. Start CH341A.exe on your additional notebook (drivers must be already installed).
Choose the correct chip in the menu on the left side (W25Q128BV is the right one to choose).
2. Press “Read” and the software will read the bios from the chip.
3. Save the bios file and make an additional copy and store it at another place just in case you mess something.
Modify the bios
1. Open the bios file with AMIPCP5.exe you downloaded in the beginning.
2. Depending on what your goals are you may now modify the bios file.
MOD 1 (REMOVE TDP RESTRICTION)
For get around the TDP restriction do the following (can be also read in this thread:
http://forum.notebookreview.com/thr...f-your-razer-blade-w-no-pl-throttling.827919/ .
· Once your BIOS image is loaded, make sure you're in the "Setup Configuration" tab.
· In the left pane, click the '+' next to the un-name folder.
· Click the '+' for Setup -> Advanced -> Power & Performance.
· Click 'CPU - Power Management'.
· In the right pane, you'll changeable options in "Access/Use" clicking on a line will give you options to change. Copy the option changes from the screenshot to match yours. http://forum.notebookreview.com/attachments/171129/
· Click 'Power & Performance' copy the screenshot. http://forum.notebookreview.com/attachments/171130/
· Click 'CPU VR Settings' copy the screenshot. http://forum.notebookreview.com/attachments/171131/
· Click 'File' and Save.
If that is all you intended to do you may now flash the bios back to the chip.
Write the modified bios file to the bios chip:
1. Your SOIC8 clip is still or again connected to the chip on your switched off blade, programmer is plugged in your additional laptop.
2. CH341A.exe is running.
3. W25Q128BV is chosen for the chip.
4. Click “Erase” in the CH341A Software. It does not work if you do not erase the chip first.
5. Once the chip is erased, load your modified bios file.
6. Once the file is loaded, click “Program”.
7. Wait until write is finished….
8. Done!
9. Remove clip from the chip.
10. Turn your blade around and power on.
11. If you have done everything right it will start up.
Activate TDP settings in the bios.
Press F1 to enter bios and make the following changes to activate the TDP mod:
Changing the IMON settings solve automatic overvolting and also tricking the computer into thinking you're half the wattage you really are. You can do 80-90 watts while the computer thinks its really 10-20ish watts.
- Navigate to Advanced -> Power & Performance -> CPU - Power Management Control -> CPU VR Settings -> Core/IA VR Settings.
- Make a photo of your original settings in case you want to revert to these settings.
- AC and DC Loadline change value to 1.
- IMON Slope value change to 50.
- IMON Offset value change to 31999.
- IMON Prefix to [-] (negative) MUST DO.
- VR Current Limit value change to 800.
- TDC Enable set the value to Disabled.
- F4 save and restart.
MOD 2 (BIOS UNDERVOLT)
Basically the same procedure like MOD 1, we just unlock other settings in the extracted bios file.
Bios 1.03 and newer have plundervolt protection, so you can’t undervolt with Throttlestop or Intel XTU anymore.
But you can do it with a programmer and AMIPCB 5 and I would recommend to do it, especially if you made the TDP mod since your CPU will generate a lot of heat with that mod without undervolting.
1. Extract your bios as in MOD 1 or use the already extracted or modified bios you have already from the steps above.
2. Open your bios file with AMIPCP5.
3. Make the following modifications to bring up the required options in the bios.
· Once your BIOS image is loaded, make sure you're in the "Setup Configuration" tab.
· In the left pane, click the '+' next to the un-name folder.
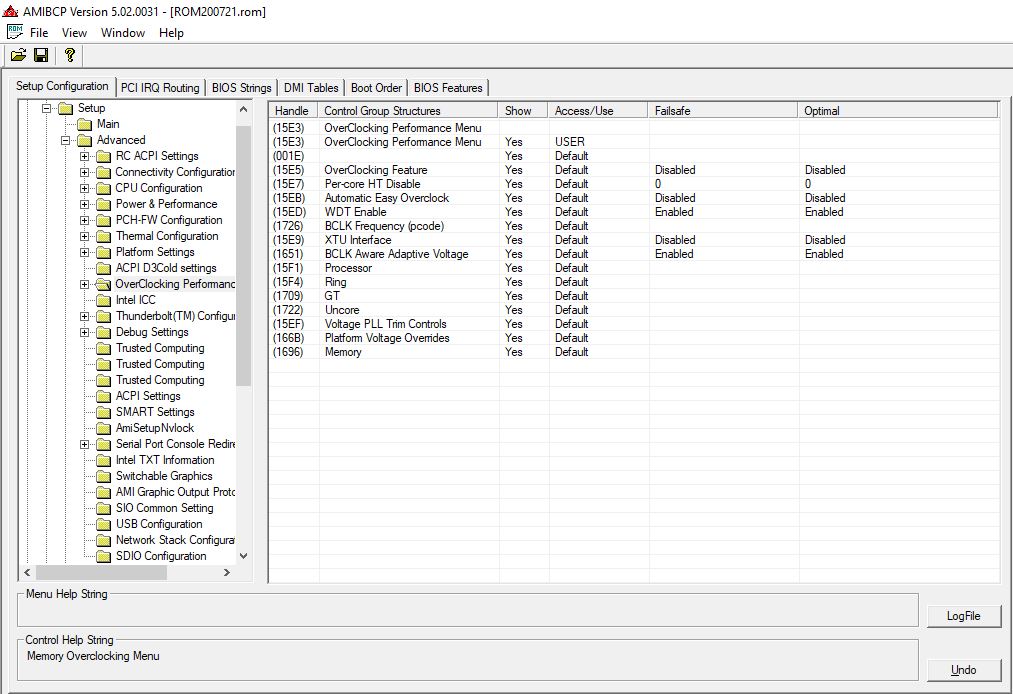
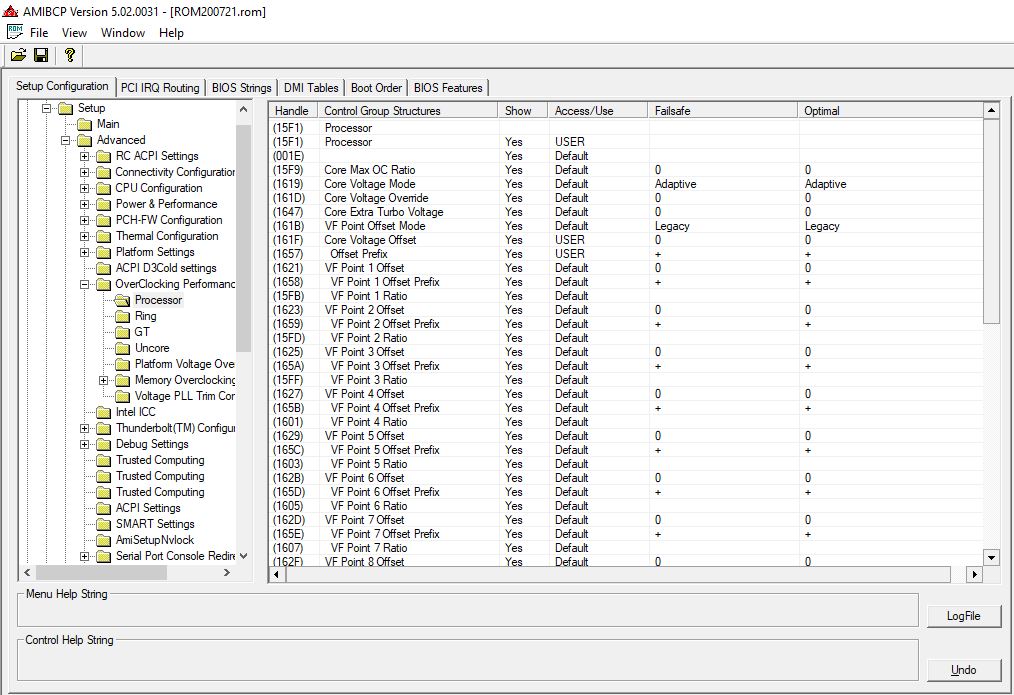
· Click the '+' for Setup -> Advanced -> OverClocking Performance Menu.
In the right pane, you'll changeable options in "Access/Use" clicking on a line will give you options to change. Copy the option changes from my screenshot
http://forum.notebookreview.com/attachments/undervolt-1-jpg.187053/
(picture “undervolt 1”) to match yours.
· Click 'Processor' in the left pane.
· In the right pane, copy the option changes from my screenshot http://forum.notebookreview.com/attachments/undervolt-2-jpg.187054/ (undervolt 2) to match yours.
· Click 'File' and Save.
If that is all you intended to do you may now flash the bios back to the chip.
4. Flash the bios back to the chip with your programmer like described in the MOD 1 section.
Don’t forget to erase the chip before flashing.
5. Turn your blade around and power on.
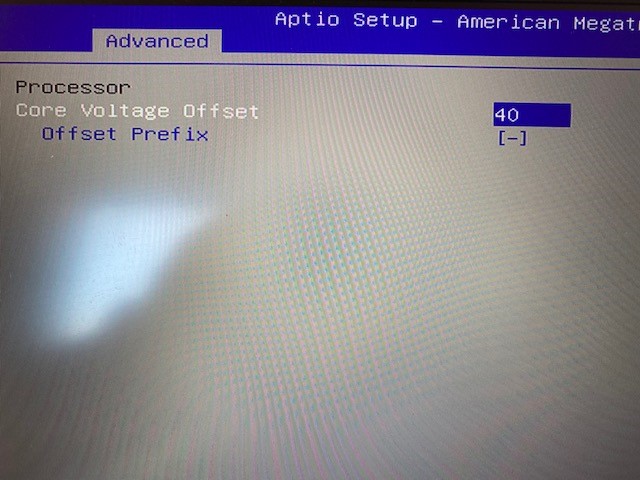
Activate undervolt in the bios settings:
Press F1 to enter bios and make the following changes to activate the undervolt:
Only very little undervolt is allowed on the cache if you already did the TDP. Around -40mV is possible with my machine, otherwise it'll crash straight away with voltage offset like -120mV on the cache since the TDP MOD already applied some undervoling automatically.
Lower the Core voltage in 10mV increments and bench in windows with Throttlestops TS Bench every time you lowered the voltage. TS Bench will give you errors if you lowered too much.
- Navigate to Advanced -> Overclocking Performance Menu -> Processor.
- Change Core Voltage Offset to the desired value
- Offstet Prefix to [-] (negative) MUST DO.
- F4 save and restart.
Attention, -40mV is the value that works for me.
You have to test and find your own value.
That’s it, enjoy.
I could upload only few pictures per post, so I upload the remaining undervolt pictures in the next post.Attached Files:
Last edited: Jul 31, 2020Qwaarjet, Springcourt, zxseason and 6 others like this. -
Remaining pictures for bios undervolt
Attached Files:
mehtenj94 and dark_skeleton like this. -
-
Nice, thanks for sharing, so basically the same 2 procedures. BTW Razer has just released a new EC firmware update which unlocks a 4th "Boost" mode (90W short, 55W normal) for the CPU: https://support.razer.com/gaming-laptops/razer-blade-15-advanced-2020-software-updates
-
I just updated, and I don't see any new options in synapse. Just the same three dots along the CPU and GPU performance bars. Do you have to be on the later bios to get this option? I'm still on 1.01, never updated because I wanted to undervolt.
-
The fact that this exists in EC firmware means it can (and will?) be hackable, hopefully somebody in the community can take a closer look.

-
Hi,
I restored the latest original bios 1.03, checked for updates, did the EC updade and cant see any improvements.
The TPD limit still throttles the CPU to 45W after a few seconds under load and frequency drops to 2.7GHz in Prime95.
Same like before.
I restored the modded bios again.
That gives me permanently 3.4GHz on all cores under full load. -
That's more or less what I'm seeing too. There must be a synapse update or something that needs to happen to give us the 4th position on the slider like in the pictures through the link.
-
Yes, as noted in photos and text on the release page you need a Synapse update for that. Apparently it's a staged rollout (country-based whitelist). What worked for me was connecting to a Japanese VPN node, then Synapse found an update and I got the new option in Synapse
Still, even with the 90W/55W I only maxed out at about 3070 points Cinebench which is still less than 80/45 with UV back when I had 1.01 BIOS (~3200)Last edited: Jul 30, 2020 -
Strange. Undervolted and in the "old" high performance CPU mode, I'm getting like, 3200. My all core turbo is about 30-31 during the run. I'm at a -.125 UV.
-
Thats a really good score.
You seem to have a good CPU.
I cannot go further than -110mV.
Maybe that makes the difference. -
Nothing strange, just forgot to add the fact that I'm on stock 1.03 now so I'm not undervolted.
I was also getting 3200-ish on -120mV with the old 45W profile on v1.01. Sadly I updated the BIOS and my programmer hasn't arrived yet
When CPU runs at higher voltage, it reaches max TDP earlier (power = current * voltage after all) -
Something I posted over on the AW forum, but is equally applicable here, is if you're not, make sure you're undervolting the core and the cache by the same amount. I was at like, -140 or something on just the core at one point (didn't test for long term stability but it worked for cinebench) and I would top out around 2.7Ghz all core turbo. Undervolting the cache and the core together, even though the overall UV was less, is what gave me the other 300-400Mhz.
-
Yes thats right,
with Throttlestop you can go as deep as you want with the core voltage but as long as you don't lower the cache voltage there is no effect at all.
Only cache voltage in Throttlestop activates the undervolt, at least that is the case with my blade. -
Intel XTU adjusts both automatically when you change core voltage
-
Still no luck here getting that Synapse update. I tried setting my VPN to japan, but still nada.
-
I logged out from Synapse and just kept retrying update checks in Razer Central under different countries lol. Worked with Japan for me but it did require like 5-7 different tries and countries. Just try another country I guess. Either way it's gonna roll out soon for everyone
-
Awesome! Really appreciate the write up and the help to the community! Can’t believe Razer has crippled it’s potential with the new BIOS update. I’ll be performing this when I get back from vacay. I wonder if we should sticky this for our wonderful members here.
-
Today I was able to update Synapse through a Japanese VPN location.
Performance is much better now.
Cinebench score is 3800 with the updated Synapse + bios undervolt at -110mV.
With TDP bios mod + undervolt the score is 4100 which is still a little bit more but I think I run the Blade only with the undervolt from now on after the Synapse update.dark_skeleton likes this. -
Great writeup, thanks! Did you require to keep the power plug attached to the laptop at any time during flash? Looks like the only chip I found was the 'w25q80dv' winbond, which is only 8Mbit so way too small. Maybe on my 2020 Stealth its hidden somewhere or maybe I'll have to take the whole board out for this ._.
On another note, I wonder why my 2020 Stealth doesnt have the plundervolt bios patch, or does it come with microcode from windows update? (I skip those)
I also wonder if there's anything I can do to fix C10 cstate package residency (bugged after S3 standby), and Razer refuses to fix it. -
What config do you have for your blade? I'm curious if that's what synapse is gating releases by.
-
Razer Blade Advanced 2020 RTX 2080 Super MQ with 1080p 300Hz screen.
I dont think its because of the configuration.
Only the screen is different from yours.
I tried different VPN locations, but only when I was conneted through a Japanese VPN server it worked.
I did exactly this:
I did not check for updates throgh my installed Synapse software.
I downloaded the Synapse Installer from Razer website.
http://rzr.to/synapse-3-pc-download
When I started the Installer while beeing connected to German or US VPN locations the installer indicated that I had already installed the latest Version.
Only when I was connected to a Tokio VPN and started the installer a newer version than mine was offered.
Maybe you try these steps (if you habe a VPN software). -
Tried that, and it does install synapse again, but it appears to install the same version. The only reason I wonder if they're gating it by model or something (at least as part of the initial rollout) is that as far as I know only the people with the 300hz screens have gotten the upgrade/prompt. I have the OLED. I'm also mad you guys get the mux switch and for some reason we don't, but that's another issue lol.
-
Since the last windows update its not possible anymore to use the dedicated GPU with the 300Hz model (and also other Razer models).
If you activate that in the bios or Synapse there is only a black screen.
Razer is working on that issue they say.
Only Optimus is working right now.Last edited: Aug 5, 2020 -
Regarding the Boost / 55W performance mode: You don't need to run the installer or whatever. That's a waste of time (10 minutes+ for me as I have a few devices connected). All that's needed is to use VPN to connect to a region that's whitelisted (as I said, Japan from my experience) and check for updates from Synapse itself. Maaybe log out and restart Synapse (not sure if that was relevant). Don't waste time reinstalling, it will take ages. See https://www.reddit.com/r/razer/comments/i0k3pa/new_cpu_boost_performance_mode_firmware_update/
Regarding the screen going black - it's a GeForce driver issue linked with the new Windows GPU scheduling. You're correct that Razer is aware but incorrect about "only optimus" working. All it takes to fix it is to roll back GPU drivers to pre-451.48 . See https://www.reddit.com/r/razer/comments/hjmm3k/razer_blade_15_psa_if_you_update_to_windows_v2004/
Good results, nice. I've been waiting for my programmer for a month now. Tracking has been saying "Arrived in local post office for delivery" for the past 2 weeks. Ugh.
They said it's just a country/region whitelist to limit servers' load -
I was finally able to update through the japanese VPN as well. My results don't seem as good as others though, I'm still around 3500 points even in the new mode with a -.120uv. What sustained clocks are you all seeing once you hit the 55w threshold? I'm at like, 3.3Ghz.
Last edited: Aug 6, 2020 -
Success so far on my Razer Blade Stealth 13” (2020) | RZ09-0310, managed to brick it at least (So writing works hehe) and managed to reflash the original bios I fetched beforehand. (Pfew)
Haven't actually done any modding yet but will do soon.
Edit1: Managed to flash modded bios with lot of unhidden options, overclocking menu not working out of the box. So gotta do more for that.
Edit2: Takes like 7 attempts with SOIC clamp before proper flash so its a bit tedious also less than <1mm of clearance until it hits unibody (ordered a better quality one but not sure when it arrives) Used some alcohol on the clamp and it seem to work better now. Also small SMD's very close to it so gotta watch out.
Managed to unlock overclocking menu! Now I will attempt to unhide everything else that is mostly relevant to unlock. Soon Synapse / ThrottleStop is no longer relevant (I hope). Just gotta see if adjusting fan stuff in BIOS has any effect (More aggressive)
Edit3: The mod is complete, all bios settings tweaked as well so I can close the laptop down. I'll do a writeup in case it might help anyone else soon.Last edited: Aug 8, 2020 -
If anyone can upload me the original bios 1.01 for 2020 Razer Blade 15 Advanced Super 2070 would be appreciated.
After updating to 1.03 and did the Bios Mod still could not get undervolting back.
-
Could it be intel microcode through MS updates?
-
You will not get the undervolt back through XTU or Throttlestop after the bios mod with a programmer.
But you can unlock undervolt settings in the bios and modify these settings when your computer starts up and you boot into the modified bios.Last edited: Aug 17, 2020SUADE8880 likes this. -
For some reason, I followed your instructions to the tee and like another poster here, the settings were not available via BIOS. I appreciate the PM for your modded BIOS. I will tinker with it and perhaps make it work with my laptop. I'll report back. Thanks a bunch!
-
Hi Gibber75, the reason you needed to use an external, secondary laptop, is to get around some kind of security protocol that disallows flashing of unsigned bioses? I was able to copy and edit my bios of my 2020 Razer similar to the original post about modding a 2019 Razer, but it won't let me flash it...and this is because I don't have an external laptop to do so and the 2020 models somehow prevent this unlike 2019 models? How then does Razer itself update Bioses? Would there be a way to trick Razer's own software into using a modded bios instead of their official one, within their flashing software?
-
Sorry for the second reply, but Gibber75, does this link: https://www.win-raid.com/t4909f16-R...-verify-on-Gigabyte-AMI-BIOS-Serverboard.html not discuss your same physical process, but through software? On comment #9, he seems to go about it via software? I have no clue about this stuff, so I'm kinda just guessing, but it seems like that's what he did from my lack of knowledge?
To other readers, do you know how to use/get to/download FPT? Intel Flash Programming Tool? Is it somehow through a download here: https://downloadcenter.intel.com/product/69368/Intel-Management-Engine-Firmware-Intel-ME-FW- ?Last edited: Aug 20, 2020 -
On my Razer Blade 2019 base with 1660 ti, running bios v1.03. The only way for the modified bios to show the menus is to either have no nvme drive or have the nvme drive that came with the laptop. I took it out when i first got it for a bigger dirve. It just has the OS out of the box.
I cannot figure out how the bios checks that theres either no nvme or the drive is original to laptop. I've search entire menubinary file and rom image in AMIBCP, all there is is how it displays hardware info of attach nvme i think. None of the options did anything when changed. I was thinking it locks it by vendor id of the nvme, but could not find vendor id logic anywhere.
I played around with modifying suppress if's and dealing with 0x1, 0x2 etc, but nothing. -
The only way to flash the bios on the 2020 Razer laptops without using the official bios updates Razer provides is an external bios chip programmer like this one: https://www.ebay.com/itm/233635841518
Sent from my Phone 2 using Tapatalk -
Oh goodie, this looks like a fun thread
.
Honestly, I am surprised there isn't a hidden keystroke or something that unlocks more settings in the BIOS. I'm sure there has to be an easier away besides flashing. I'm not opposed to it though. -
Not sure but when I first started on my RBS 20202, I fetched the BIOS image through the software tool and ended up with a 10MB file.
Before I started programming, I made another dump just to be sure and its 16MB now, so I'm not even sure if the READING of the 2020 models is flawless, or the flash chip just contains 6MB of nothing at the end..?
Just some thoughts, safe to say that software bios flashing/dumping is often unreliable anyhow, safest to just use programmer!wireproof likes this. -
I got it to work after reading over and over and just pounding it out. I essentially did what Thysanoptera and stranula did with changing a whole lot of variable names for the "Suppress if" and "Grayout if".
But to summarize I have the Razer Blade 2019 base with 1660 ti, running bios v1.03. With non stock NVMe drive and have unlock menus.
Following is step by step of what I did. I copy some instruction lines from the two threads on this, so sorry for the plagiarizing, was just lazy
For where to get programs please refer to original post on this thread or search for them on line by name.
1. Open AFUWINGUIx64
2. Select "Save" and name your rom "Razer_Mod.rom"
![[IMG]](images/storyImages/9ej4ZPs.png)
3. Make a copy of Razer_Mod.rom, name it "Original_BIOS.rom". Copy this file some where safe in case you need to use it as original back up.
4. Open UEFITool
5. Select File>Open Image File
6. Select “Razer_Mod.rom”
7. Select File>Search>Text Tab
![[IMG]](images/storyImages/WZ6MB6g.png)
8. Search for "key management" with unicode checked
9. In the bottom "messages box" you should see something like "Unicode test "key management' found in PE32 image..."
10. Double click this line
![[IMG]](images/storyImages/cUaQkEY.png)
11. Right click “PE32 image section” and select "Extract Body" and save it as "MenuBinary"
![[IMG]](images/storyImages/1EDmPnw.png)
12. Open Universal IFR Extractor
13. Point it to MenuBinary.bin and select extract
14. You will now have a text file called "MenuBinary IFR.txt", open this ( I highly suggest use Notepad++, regular notepad is super slow)
Credit to Thysanoptera and stranula as they found and mentioned this. I will try to explain what they found.
This part is what took me most of my time to understand. It’s complex. So apologies if it’s still confusing. But be warn, at least even for me, it took a long bit to get my head around to explain it.
So Thysanoptera said that the “variable 0x3DC somehow was set to 0x0. I've changed all the “Suppress If” with it to 0xff00 and I'm good, got it all back.”
He goes on further to elaborate that “Pretty much all primary forms inside “Advanced” were suppressed with it. I just replaced them all in bulk (it was used 127 times) and this made options visible that still had “Default” as user access. But I had 0x3DC explicitly defined as variable suppressing all those options in original bios dump.”
The Advanced he is referring to is the section in the bios code (?) or whatever it’s called, that shows you the “Advanced” tab in your bios. Below is one with factory bios settings, unmodified.
![[IMG]](images/storyImages/s4nCpSV.png)
In the MenuBinary IFR text file you have open is the extraction of all the code (?) or whatever it’s called that make up the bios menu.
When Thysanoptera looked at the portion where it seems to define the “Advanced” tab he saw something like this
Here in this example is from my Bios.
0x2F09E Form: Advanced, Form ID: 0x2712 {01 86 12 27 1A 00}
0x2F0A4 Suppress If: {0A 82}
0x2F0A6 Variable 0x 3FC equals 0x0 {12 06 FC 03 00 00}
Here it is saying that if the variable is 0x3FC equals 0x0 corresponding to {12 06 FC 03 00 00}, suppress it, or don’t show.
Mine is 0x3FC, Thysanoptera’s is 0x3DC, yours will be something different.
If you want to find yours here is just search for “Supress if” phrase and follow down where it says “Variable 0x3FC equals 0x0 {12 06 FC 03 00 00}” (obvious the hex on yours will be different). Look at a bunch of them and you'll see things repeat.
We want to make this statement NOT TRUE. So we need to change the variable name.
Stranula found that if he changed variable name to 0xF or FF 00 it makes it NOT TRUE. That means that I have to change 0x3FC to 0xF. To do that I have to change {12 06 FC 03 00 00} to {12 06 FF 00 00 00}.
Stranula came up with 0xF because he saw that menus that were visible had that. I thought why not just try Stranula’s 0xF, I honestly think you just need to change it to anything like 11 11 or 00 00 probably works. I just used Stranula’s because was easy than to think something lol.
Now if you go through the MenuBinary IFR text you’ll see that “Suppress if” statements will have different variable values, there’s a lot here but I am only going to use 0x0, 0x1, 0x2 and 0x4 because that’s what Stranula used and wanted to keep it simple as it worked for him.
Stranula mentioned that for “Suprress if” and “Grayout if” he deduce two recurring strings.
For the “Supress if’ looking up each variable you will see a pattern. Here I am going to show mine first before stranula's. I brought them all together so you can see it.
Note the variable names have their hex flip when it's blown out into whatever that format is called. So variable 0xD38 gets expanded out to 38 0D, variable 0xDCB is CB 0D, etc etc.
![[IMG]](images/storyImages/BlaJ2xv.png)
For mine the two the showed up most (if not all? didnt really check entire file) were
12 06 and 12 86
For Stranula he found the following recurring number sets. He has two sets of patterns 0A 87 and 19 82 each one the 3rd set of numbers increases 00, 01, 02, 04.
![[IMG]](images/storyImages/GGHoxYV.png)
I am not sure why Stranula only chose these four (00, 01, 02, 04), when looking at my file, there were way more (example there is a 12 06 ? ? 0 5 00). BUT keeping it simple and not wanting to go too far off, I copied Stranula with sticking to 00, 01, 02, 04 for the 3rd set of numbers in each string.
Again yours will be different, just look at your “Supress if” and “Grayout if” lines and see what they have for their variables, you’ll see that there’s parts that are same, repeating.
So for me this is what I ended up using.
12 06 ? ? 00 00
12 06 ? ? 01 00
12 06 ? ? 02 00
12 06 ? ? 04 00
12 86 ? ? 00 00
12 86 ? ? 01 00
12 86 ? ? 02 00
12 86 ? ? 04 00
We need to change every the ? ? to FF 00.
That means
12 06 ? ? 00 00 --> 12 06 FF 00 00 00
12 06 ? ? 01 00 --> 12 06 FF 00 01 00
12 06 ? ? 02 00 --> 12 06 FF 00 02 00
12 06 ? ? 04 00 --> 12 06 FF 00 04 00
12 86 ? ? 00 00 --> 12 86 FF 00 00 00
12 86 ? ? 01 00 --> 12 86 FF 00 01 00
12 86 ? ? 02 00 --> 12 86 FF 00 02 00
12 86 ? ? 04 00 --> 12 86 FF 00 04 00
To replace those values in the bin file I used “010 Editor” that Stranula suggested.
So in 010 Editor: File > Open File > MenuBinary.bin
With MenuBinary.bin open
Go to Search > Replace
By the “Find” and “Replace” section click “Options” and select “Search with Wildcards”.
010 Editor uses the question mark (?) as a wild card, now you know why I used them in examples before this
![[IMG]](images/storyImages/2EQprat.png)
Here I put the following.
Find: 12 06 ? ? 00 00
Replace: 12 06 FF 00 00 00
![[IMG]](images/storyImages/8u3hGvR.png)
Click “Replace All”. It will display how many instances that it replaced.
I then went back to Search > Replace and did same thing for the remaining lines. After each line having to go back to Search > Replace, etc.
12 06 ? ? 00 00 --> 12 06 FF 00 00 00
12 06 ? ? 01 00 --> 12 06 FF 00 01 00
12 06 ? ? 02 00 --> 12 06 FF 00 02 00
12 06 ? ? 04 00 --> 12 06 FF 00 04 00
12 86 ? ? 00 00 --> 12 86 FF 00 00 00
12 86 ? ? 01 00 --> 12 86 FF 00 01 00
12 86 ? ? 02 00 --> 12 86 FF 00 02 00
12 86 ? ? 04 00 --> 12 86 FF 00 04 00
Mine replaces several hundred instances. Yes several hundred. I am sure we probably unlock a portal to an alternative dimension with the unlocks we did. Time will tell.
Maybe when I am totally bored I'll go back and turn on only the ones I need.
When done. I did File > Save As
Save file name as “MenuBinary_Mod.bin”
Now back to UEFITool
1. Open UEFITool
2. Select File>Open Image File
3. Select “Razer_Mod.rom”
4. Select File>Search>Text Tab
5. Search for "key management" with unicode checked
6. In the bottom "messages box" you should see something like "Unicode test "key management' found in PE32 image..."
7. Double click this line
8. Right click “PE32 image section” and select “Replace body…” with your “MenuBinary_Mod.bin” file.
![[IMG]](images/storyImages/WiM6ld5.png)
9. File > Save Image file. Save it as "Razer_Mod_Final.rom"
Now we flash the bios.
1. Open AFUWINGUIx64
2. Select Open and open Razer_Mod_Final.rom
3. This should open your rom in the Setup tab and only have Main BIOS Image checked. No other options should be selected.
4. Click Flash
![[IMG]](images/storyImages/ePf1YU6.png)
When it's done. Exit and restart your computer.
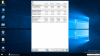
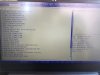
Go into Bios and check under "Advanced" tab. You should see all the great new menus.
![[IMG]](images/storyImages/bTPNs2Q.jpg)
![[IMG]](images/storyImages/9MZoRMj.jpg) Last edited: Aug 21, 2020Maleko48, TiToMoskito, Amhblin and 1 other person like this.
Last edited: Aug 21, 2020Maleko48, TiToMoskito, Amhblin and 1 other person like this. -
Heh, your unlocked entries are the same as my bios!
Anyhow, since there is already so much how-to's I'll keep it short for anyone trying this on a (Stealth) 2020:
- Location of chip in attachment.
- Used CH341A Programmer version 1.19, battery connected, powered down. Will auto pick right chip (ends with BV). (Ps. the new SOIC clip works way better than the one that came with the programmer, but costly), Need to do full erase, program, verify routine.
- If keyboard lights up: Bios flash success/intact (Most likely), possibly reinitializing bios settings/change (Sometimes need a full minute before it auto power cycles again), or BIOS setting failed and CMOS requires a reset. There are loads of options in BIOS that can make it unbootable. Or sometimes it simply needs to wait or a manual power cycle and it will work eventually.
Result:
- Decluttered device manager, disable driver complication.
- Intel DPTF throttling mechanism disabled, there are better ways to throttle (Intel Speedshift EEP, frame limiting).
- USB: Camera/IR hardware disabled.
- Undervolt and TDP unlock through BIOS, no longer Razer Bloatnapse/ThrottleStop dependent. (Keyboard can be controlled with very light third party software)
- Cinebench R15 score higher than with Synapse on 'Gaming' profile. 650cb~ without Synapse, 800cb~ with synapse, 886cb with modified BIOS (All on AC)
- Battery life reaching 21+ hours on pure idle, Package C-state residency improved.
I haven't managed to actually adjust the memory clock speed although I exposed the XMP profiles, no matter what I do the laptop no longer wants to boot. Most software also has issues reading the memory timings or any info for that matter. But if anyone can make it work, the settings are there!
Original and unlocked ROM's can be found here, 99% of options unlocked:
http://89.39.105.32:8080/
(Small warning: Lot of exposed options can make the laptop unbootable (or worse), even after waiting / power cycle so a CMOS reset is required. I would tweak the bios until satisfaction before closing the laptop back down.)
Thanks everyone for the info to make this work!
____________________________________________
Doesn't look like fans can be controlled through BIOS or DPTF (If enabled) settings, sadly need another solution for this (Can't make much sense of the embedded controller readings yet, or any luck manually changing fan speed, gotta disable auto fan speed for that)Attached Files:
Last edited: Aug 26, 2020Diversion likes this. -
-
Hi all/Stranula I too am trying to add memory xmp settings and over lock capabilities. I’ve got as for as the following step:
10. in Your hex editor, search for this hex code in AMITSE.sct
11. You should find several references, the first one is unrelated, we are looking for the block with several in a row. As such:
![[IMG]](images/storyImages/n4JR7h4.png)
But my AMITSE.sct only shows 1 entry for exact hex and no more and has no spaces to add.
And my overclocking menu has a form id of 27AA so becomes AA27
I’m trying to mod a ASUS rog strix g17 laptop G712LW model -
Friendly reminder that if you're using one of those black/gold hardware programmers they send out 5V (instead of 3.3V) on data lines which is way outside technical specs for the BIOS chip. People seem to be having no problems on Blades so far so that's good but if you want to make absolutely sure nothing will die in the process, there's a simple fix that requires some soldering: https://www.chucknemeth.com/usb-devices/ch341a/3v-ch341a-mod
Emtee_ likes this. -
Thanks for this.. I just ordered this: https://www.amazon.com/Organizer-So...words=CH341A+programmer&qid=1598404565&sr=8-1
Hopefully that's good enough to do this bios flash for my 2020 Stealth? Anything else I need?Emtee_ likes this. -
Should be enough! You only need another computer and a good toolkit with Torx T5. I bought some cheapos at first and they broke easily, afterwards I opted for an iFixit set and those are incredibly solid. Was time I bought a new good screwdriver toolkit anyhow.
Good purchase that will probably last me for years.
But please mind the post of @dark_skeleton
I opted to just try it with 5v and luckily no problem.Last edited: Aug 25, 2020Diversion likes this. -
I already opened her up and liquid metal'd the crap out of it.. dropped an average of 15c off the CPU.. Just don't like it still runs into PL even though my temps never exceed 70c now lol. Thank you muchly, sir! I'm assuming I can't use your dumped, modified BIOS because it has your Windows keys in it or something, I dunno how that works or if it's even a problem at all.. you did all the hard work, i'd prefer just to flash your modified BIOS.
Emtee_ likes this.
-
Would like to say thank you, this step by step worked great on a Razer Blade Pro 17 model, Fall 2019.
I did encounter issues using the latest version of AFUWINGUI downloaded directly from the AMI website, 5.13.00.05. Kept throwing "Failed!" when ever I tried to Flash. Scrounging around on the internet I found an older version of the program, 5.11.01.1745 which worked fine. -
Not too knowledged about TPM (I think you mean this), but I think this would be stored on the TPM circuitry.
You should be able to flash the modified bios without a prob, but there is no risk really you can just reflash your own bios even if it wouldn't work (Assuming you dumped it!)
Btw, curious about the metal liquid approach, i was contemplating this as well but I'm kinda put off about the potential damage that it might cause on the heatspreader. I know it is fine for some materials but not all?Last edited: Aug 25, 2020Diversion likes this. -
It's all copper where the heatsink touches the CPU and GPU die.. you just coat the cpu die and gpu die (you don't have to liquid the gpu, it's been proven that it's kind of useless) and coat the area on the heatsink copper side where it touches so you have two layers of liquid matching up and you're done.. it's really easy on Ice Lake CPUs since there's no transitors/resistors around the die so it's highly unlikely you'll arc something. Hope that makes sense/helps - I should have taken pics but I didn't :/Emtee_ likes this.
-
Nice! Yea I actually delidded my desktop 9900K and used liquid silver I think it mustve gotten me another 15c headroom at least.
If its copper then I dont see much of a problem, will order some now!Diversion likes this. -
I have a 9900k desktop as well.. I thought Intel used better TIM/soldered these? Lol. Guess I better delid it too!Emtee_ likes this.
-
It's better than the old days, but the IHS and mediocre solder they use is quite thick so this was a great improvement! With AVX workloads that tiny chip is sucking close to 200 watts!
Had to reach 5GHz all core comfortably, could do 5.1GHz even but the extra temps/volt ain't worth it for me
Diversion likes this.
Razer BIOS Mods - Potential to Unlock All Hidden Options
Discussion in 'Razer' started by stranula, Nov 10, 2019.