Edit: %100 fan function is now available in custom BIOS for any P150/P170 (and many other Clevo models) thanks to Prema's BIOS mod! http://forum.techinferno.com/clevo-sager/3119-premas-mod-bios-latest-stock-bios.html
For all those with Clevo 150s and 170s that have heat issues, Clevo has somewhat neglected their customers by calling them high performance gaming notebooks, then completely slacking on their cooling system installations and designs. These issues are all discussed on many separate threads, but I've consolidated them here for ease of research since it took me quite awhile to piece this all together for my own solutions. With no exaggeration, models affected by poorly installed systems result in unnecessary 15-30C gains on various P150 and P170 models. It is a lottery of which machine gets bad installations. For me it was poorly installed on the 7970M GPU I ordered with it. I've been told this has can be a problem with the CPU as well from other owners, but in my case, the CPU cooling system was well installed and wouldn't benefit from any pipe modification. I am using a P150EM + AMD 7970M, and guess what? But, who am I to complain without offering solutions? I'll list the issues then address or link to each one.
If this guide ends up helping you please +repthanks
Index of issues:
1 - The CPU and/or GPU heatsink can be improperly pressured. This results from improperly installed pipes that add leverage to the block, or the block itself doesn't have enough pressure on it because the metal mount tabs are too flexible; EVEN WITH SCREWS %100 TIGHTENED. Solutions below!
2 - Poor alignment between pipes and/or fins to the fan which leaves air gaps. Tape can be used to fix this. Solved in this thread: Seal air leaks with tape
3 - The plastic shell cover on the bottom of the notebook restricts airflow throughput by an unacceptable margin of at least %50.
4 - Custom
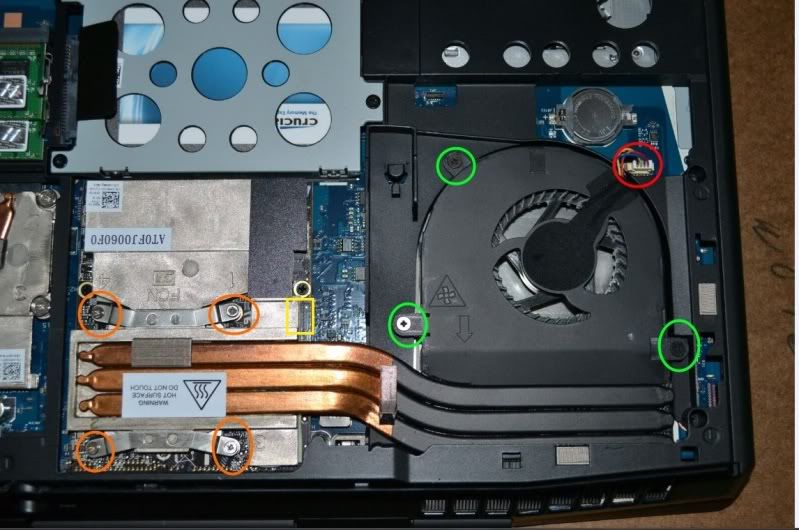
First, a big diagram of all the inner problems: (the red text 1,2,3 is step 1,2,3 for issue #1) I must mention the testing of uneven pressure is with this notebook is upside down. The adjustments you make may shift around when you flip the notebook back over, but, it still should be improved if you had alignment issues to behind with. While you will be using the notebook right side up, it is much easier to test for the pressure problems upside down. The final washer/support fix should be done right side up, and with much more patience than upside down since it takes more coordination to do it right side up. I got underneath it like you would a car and had it sitting on an opened elevated platform while I tightened screws and read the heat measurements.
![[IMG]](images/storyImages/79968d1342076021-clevo-p150-p170-cooling-systems-neglected-clevo-solutions-here-please-sticky-fulldiagram.jpg)
TESTING IF YOU NEED SOLUTIONS TO ISSUE 1: Before you try either, you must test and find out where the pressure needs to be applied first. Temperature reduction is instantly noticeable doing this test. The easiest way to figure out if the GPU heatsink is loose even after the screws are all the way in, and to avoid airflow restriction while running, is by having the notebook upside down with lid closed, back plastic cover off, and connected to an external monitor while running Kombustor. I first let Kombustor run at 1920x1080 for 4-5 minutes to let the heat levels to stabilize. Then, as it was running I pressed on the GPU block very gently with pencil eraser at different points while monitoring the temperature changes with each press. I got up to -8C drops immediately, so this let me know that my GPU was not flush with the heatsink. Doing this upside down first allows you to take your time slowly and methodically. I personally find it best to take it easy first so you can draw an accurate conclusion. Then when you know its not like it should be, do it right side up. When its right side up it will need a better prop of the notebook in order to allow you to press on the GPU and avoid blocking the fan intake, so make sure you prop the notebook firmly first. I'd advise not to use a metal object to do any of this poking around. Use something like the plastic head of a screwdriver or a pencil eraser to apply pressure to the heat blocks.
![[IMG]](images/storyImages/79898d1341897183-clevo-p150-p170-cooling-systems-neglected-clevo-solutions-here-please-sticky-gpu_pressure_test.jpg)
The first big photo was -8C while running hot for the first time on a fresh application of IC Diamond compound. The compound cured a bit after several runs of Kombustor, and I was able to sustain -10C as shown in the next photo.
SOLUTIONS IF THE TEST REDUCED TEMPS:
Solution 1A - The metal strip mounts dont apply enough pressure because the screw shaft sockets limit how far the screws can go down. Design flaw (erhm, Clevo oversight) In addition to these shaft sockets which limit how deep the screws can go, there are 2 additional ring tabs underneath the main metal tabs, sticking out of opposite corners of the GPU heatstink. They are hard to notice at first, but these can be used to add pressure with the existing screws. They go around the socket shafts instead of resting on them like the main tabs do, so you can use washers as spacers to push down on them and add more pressure! Use washers small enough to avoid touching any outside circuits, but large enough in the center to slide over the shaft. Acting the same as if I leveraged the pipe assembly in solution 1A, I got -8C after putting in two 1mm thick washers and screwing them down. If you are going to install washers under certain screws, fully tighten the screws that you are not going to use washers on, first, but Don't tighten the screw with the washer underneath it as hard as you can. Take small incremented steps tightening the screw with the washer underneath it and check your temps each time you tighten. Once the temp stops dropping and teeters between 1 or 2 degrees, then you don't need to tighten anymore.
![[IMG]](images/storyImages/79937d1341961207-clevo-p150-p170-cooling-systems-neglected-clevo-solutions-here-please-sticky-gpumodel.jpg)
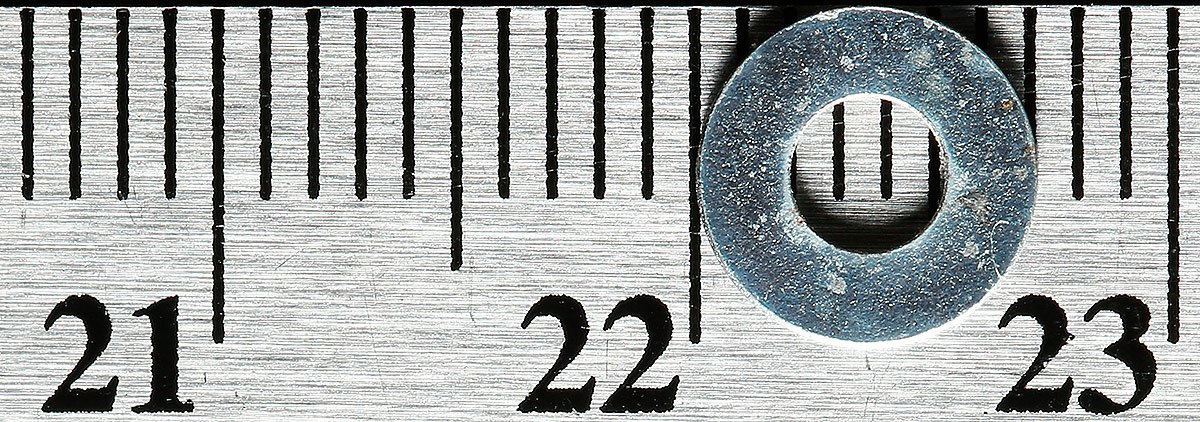
EDIT: Was asked for washer size. I didn't buy anything since I have a drawer full of random tiny washers, but I measured it: 3mm inner, 7mm outer, and like 8/10 a MM thick:
![[IMG]](images/storyImages/79929d1341942848-clevo-p150-p170-cooling-systems-neglected-clevo-solutions-here-please-sticky-washer.jpg)
![[IMG]](images/storyImages/image1319)
Solution 1B The heat pipe assembly has nothing firmly supporting it at the opposite end of the GPU where the copper fins are. This uneven weight acts like a lever on the heatstink, pulling or pushing it away from the GPU die surface. To find out if this is a problem for you, once your GPU is cooking at normal max temp, put gentle pressure on the copper fins. If the pressure reduces temps from normal, you have the weight of the pipe assembly leveraging your GPU heatstink and something needs to be stuffed somewhere to support it. Also do this procedure in the opposite direction to check both ways. I got an instant -6C to -8C change when I pushed the fin end up properly, and instant +8C when let go. Supporting the pipes will cool your GPU without even making anything tighter. You may only need a sliver of something to push on it, or way more. It depends how bad your copy is bent out of alignment. Reference the big diagram above for this solution. Solution 1A was better for me since solution 1B enhanced the air leak gap problem that the tape fixes in issue #2. Yours might be bent differently and actually improve the gap and GPU pressure if you're lucky. YMMV!
Solution 2:
Tape! Shown above and first fixed here:
Seal air leaks with tape
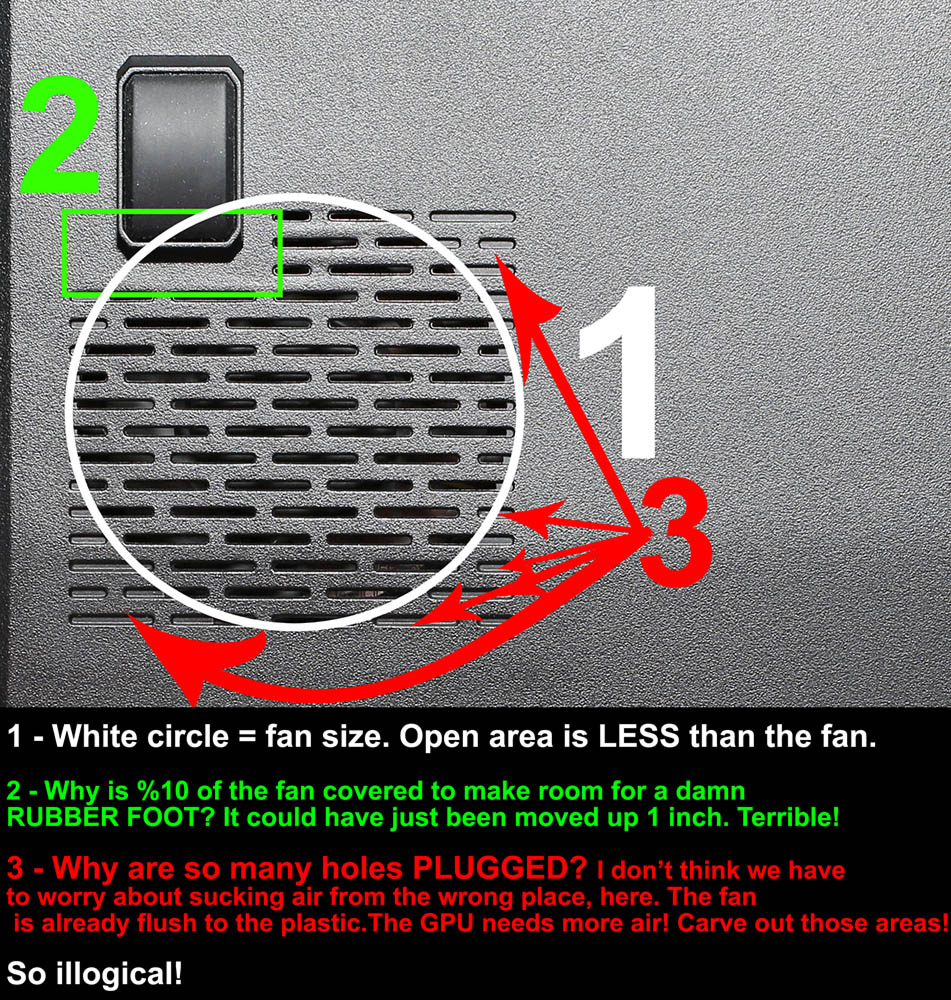
Issue 3:
Solution? A newly designed fan port. This one really ticks me off unlike any of the other issues. I can understand the other ones, but this one is just from an epic failure in thinking it out: A cover that blocks airflow more than it allows. This is by far the biggest issue for all %100 of our notebooks. Mine personally runs at 94C with the cover, and 80C without. Clevo should know that cooling doesn't work by restricting the air feed, which is exactly what they did here with their design to a surprising extent. I mean really, you can just look at other notebooks and you'll see much better port designs that makes the fan the only major limiting factor in CFM capacity. I'd really love to cut out the plastic port grate entirely and maybe add some type of thin aluminum plate with a more flow-friendly design. And why the hell is %10 of the fans airflow space blocked for a rubber foot? This just tipped it over into the realm of stupidity. You can move the foot 1/2 an inch over and give the fan %10 more airflow, can'tcha? So, solution please, Clevo? Please offer a replacement cover with better vent port design! And move that damned rubber foot and open up some space.
And the epic fail:
![[IMG]](images/storyImages/79899d1341897742-clevo-p150-p170-cooling-systems-neglected-clevo-solutions-here-please-sticky-fan-port.jpg)
Issue 4:
This issue really blows. We need custom fan policies! Please give us a program with the ability to create and manage our own fan policies as well as some default profiles with options on how aggressive you want the cooling to be. Also, FN+Key for %100 fan would be a great addition as well:
Edit: %100 fan function is now available in custom BIOS for any P150/P170, thanks to Premas BIOS mod! http://forum.techinferno.com/clevo-sager/3119-premas-mod-bios-latest-stock-bios.html
So to sum it up, with the bottom plastic cover on I was maxing at 97C before addressing any issues and 94C after taping the leaks and fixing the GPU pressure. With the lid off, I run 80C even 26 minutes into Kombustor. Yep, plastic cover, you suck! I also suspect I can gain -2c to -4c with a more generous application of IC Diamond since the application I paid for still wasn't enough to fill the gap with all the screws to maximum tightness.
-
Attached Files:
-
-
Interesting write-up, thanks for that.
What a mess though, $2000 to DIY a cooling solution.
Can others test this out and see if you're getting similar results? -
wait,if U put washer the shim will seat higher ?
also it all depend how metal spring are shaped,up or down
maybe bending springs will help -
No basically you add the washer to the screw. So it shortens the length on the spring increasing pressure between the heat sink and the gpu. Should be more effective than shims, and less of a pain. You dont even need to repaste.
Sent from my DROID RAZR using Tapatalk 2 -
I've done that and it does help..
-
So the washers go inbetween the screw head and the sprung arm thingy (ie on top of the metal arm)? Can't see how this gives more pressure, I can see it might bend the arms a touch more if it allowed you to screw into the screw holes the same as before.... would it not be better to get 2 solid metal arms going over the 2 sides and screw that in to generate loads more pressure without any flex in it?
-
Great write-up, I think you've done a great job covering all of the relevant flaws, now I just hope Clevo listens.
Would it be fair to say that those who already have their laptops are S.O.L. in terms of Clevo fixing this? Or can we expect Clevo to provide replacement bottom covers and/or a heatsink fix at no cost? -
i did quick test
i dont have washer at home so i just bend UP springs (same result as washer)
and my temps is exactly same
maybe these 2 piecesused for centering atached to shim blocking shim to go down all the way
![[IMG]](images/storyImages/IMG_0062.jpg)
-
I don't think it needs to go that far, I'm not pissed off or anything I'm wanting to cool it so I can overclock and purely out of interest, as a stock standard machine I don't think it matters at all based on the fan profiles it's meant to run at around 90 to 100c I would say... so far the mods and research have kept it down to the low end of that which is great... If they released an aftermarket heatsink for it that performed better then I'd buy it.
-
Interesting read,
Honestly, though one would have to argue here that do you have enough thermal paste to transfer the heat correctly across to the copper cooler so it is correctly dissipated and transferred away from GPU/CPU?
The fact that you are pressing down on cooler and getting instant results tells me a thermal paste issue - perhaps not enough thermal paste to transfer and conduct the heat away from the CPU/GPU.
These mods are TBH ridiculous when possibly all that is required is a simple reapplication of thermal paste with proper cleaning. If and only if after thermal paste there is no reduction and pressing down on cooler continues to reduce CPU/GPU temps then you should contact your reseller advising of the issue, perhaps requesting a new CPU/GPU cooler.
I did my own reapplication with IC7 diamond on my P170HM after purchase and temperatures never go above 85C for GPU and 62C for CPU and have never had a BSOD or crash. I am not sure though to what extent the 7970m is the issue here but nevertheless I am sure a correct reapplication of good quality thermal paste should solve the issue for OP without the need for all these modification which TBH are ridiculous for something costing well over $2K -
Have u tried pushing on the heatsink (quite hard) whilst running kombuster? That's where you notice that increasing the pressure would drop temps, but if that doesn't work for you then maybe yours is already against it enough.
-
no i did not try
pushin by hand make a lot of pressure,You cant duplicate that pressure with this cooling system -
Nice info, +rep
-
another solution is to remove sticker fom gpu and place some additional cooling pieces
-
This is a very interesting and helpful post!
As a future 7990M owner, I'm a bit nervous after having read all these posts, but I'm going to stand firm on my decision to get the 7990M (as opposed to the 680M) because I don't consider myself a hardcore gamer.
However, I did get the IC Diamond Thermal compound paste on the CPU and GPU. If for whatever reason my GPU/CPU temps are very high, I can always re-do this on my own, right? Sorry for the noobish question. I'm actually almost interested in doing it on my own purely because I'm starting to find this stuff interesting lol -
You're meant to use as little paste as possible since you want the heatsink to actually touch the die. The paste is there to fill in the imperfections.
If you splat on the paste heavy then the heat transfer is being reduced by the paste itself (especially if you got thick stuff). Hence pressing down on the heatsink improves the temp.
Anyway, the foil tape is definitely a good idea. -
this is a very interesting read Beefsticks! you should forward to Clevo designers lol
rep+ -
wouldnt you want the washers between the arm and the screw head to push down ON TOP of the heatsink arms to generate more pressure?
-
The biggest problem to me seems to be the inconsistencies. You have several people having cooling problems and then you have many that are not. That usually points to either a quality control of the parts or of the build lines. I would love to hear from a rep from Sager, Mythlogic, etc. explain what they consider "within range" and why.
My system really does not have a cooling problem. I have OC'd id burn in test with all the usual tools and played several high end games. The hottest the 7970m has gotten in any of them is 85C and at the time the room was 26C. I am not using external cooler other than I have the back propped up. I had the ICD7 put on during the build.
Yet I most definately do not question others having problems, whether they are with in what ever acceptable range set my Clevo or builder or not, including one of my friends whose 7970m goes straight to 90C under load. -
+1
very interesting to read and true too lol -
!!!!Respect beefsticks!!!! +rep
-
i think another thing that they can do is give clevos beefier heatpipes...
here are the alienware heatpipes...we have 3 fat pipes right on top of the GPu, while the clevos have 2 wimpy heatpipes over the GPU
Here is something to compare against beefstick's picks:
oh PS...after 15 mins, I run 65c with my 7970m on furmark burn in test
On Alienware:
On Clevo:
-
looks like gpu is combined with ram,on clevo is separate
-
true, but your pipes are still thinner and wimpier...they won't transfer heat as well
Clevo can keep the current design of seperating the gpu pipes from the single ram pipe...but they can make the pipes thicker.
Thicker pipes = more cost, so Clevo has probably put in a *just good enough pipe design...but we are seeing a 10-15c difference in temps between Alienware and Clevo which is purely attributed to the cooling system -
Slick turn on your enduro and see what your temps are. I have confirmed that enduro increases the temp in AW so id be interested to see what you get on your burn in then
-
if i turn on enduro, i get the other bsod, i.e., black screen of death lol
Enduro enabled will not account for low to mid 80's in temps that many are getting in their clevo's. Even if my temps go up 5c in furmark, i'm still at 70c
It is purely heatpipe and heatisnk design imo -
i completly agree slick. I know AW has better cooling and i would love to have one (i have to take my machine to work on occassion and i need something a tad less.... flashy during meetings). I just think that mayybe clevo temps will go down if we get some better drivers
-
Just so everyone who is reading this knows, i'm not trying to turn this into an alienware vs clevo cooling thread...i'm just pointing out what i think accounts for the difference in temps between the two systems.
Clevo can do better if they wanted to. The clevo heatsink can't cost much less or more compared to the alienware design
it's very possible. If the efficiencies in the driver are optimized, the temps may be better...however, from what i have seen in 12.7...gpu utilization is up, meaning higher temps...but at the same time, better fps -
Where would one do this? Or maybe someone can just link it to them. Might be easier.
Between the between the main tab and the tab ring sticking out of the heatsink, not directly under the screw head. The main metal tab is what touches the washers down and the screw pushes on the main tab. I really should have taken side pictures when I was installing it, it would be much easier just to see it.
No, washers go down 1 more level, between the main tab and the tab ring sticking out of the heatsink
I've complained to Malibal that they didn't apply enough even after the screws were %100 tight that full contact wasn't being made. I thought I paid $35 so that professionals would do it perfectly and I wouldn't have to worry about it. (wrong )However, with the washers it works. I think mine suffers from the pipe weight leveraging on my GPU and those metal tabs just aren't strong enough to hold all the extra weight since they flex too far. IMHO I think its a Clevo design flaw more than Malibal, but Malibal claiming to be notebook professionals should indicate that paying them $35 to apply 75 cents in TIM that they would add extra to make it work past the flaw. Checking whether your heatstink properly seats after the screws are %100 tightened is most definitely the responsibility of the notebook designer. Malibal oversighted that the heatsink wasn't pressing hard enough even at maximum screw tightness, but then that flaw originated from Clevos design.
And this is the problem. I think a revised bottom cover is the biggest problem and the rest is easy to fix in a few minutes by the user. Really, the lid is just an atrocity.
Oh and like 4 people have said +rep but I only see 1 rep point... does it take time to update that? -
I think they are trying to keep the weight down. And making a separate pipe for the vRAM is very smart.
My 280M has 2 thick pipes coming out of it. So I reckon they also had the Alienware design on the table put opted for this one.
Also the Alienware is larger which does make a difference in cooling. Remember that the Alienware design can also take two GPU cards as far as I know. -
beef you didnt happen to write down the size of the washers you purchased by chance? maybe you have a receipt you can get the size off of? that would be very helpful!
-
No, but I have my 'Tiny washer drawer' with 100s of random tiny washers next to me, I'll measure one for you
EDIT: Here you go!: Looks like 3mm inner, 7mm outer
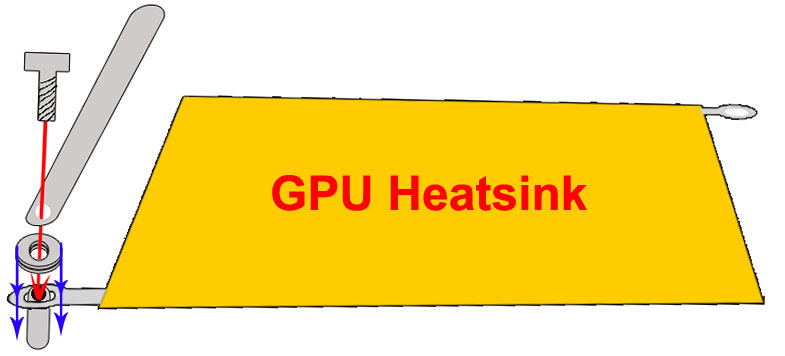
Also, I drew up an illustration and instead replaced the photo of the washer fix so you all can see exactly how it works. Check back to solution 1A! See how the washers can be pushed past the shaft:
![[IMG]](images/storyImages/79926d1341941771-clevo-p150-p170-cooling-systems-neglected-clevo-solutions-here-please-sticky-gpumodel.jpg)
-
For comparison's sake, you could try doing the push down test that is mentioned in the OP. If you don't notice a significant temperature drop, then that would be extremely indicative of build inconsistencies.
Which reminds me. Maybe the laptops without cooling issues are newer and Clevo already identified the problem? Sager (and presumably Malibal) do build the laptops in batches, so maybe they made one batch, someone noticed the flaw, and Clevo fixed it for the next batch. I don't know how old everyone's laptop is here to be able to see a correlation. -
Click on UserCP in top left corner...you will see who gave you rep. You need 100 rep points for it to reach a rank of 2...you gained 23 rep points from me, so it can't be long now lol
-
Ok so I went ahead and tried this to see if I could get any difference. I was able to see a very small drop in the neighborhood of 1-2C. Nothing drastic though. Seemed very firm on mine.
-
Looks to me like the Alienware ones are flatter, ie similar volume, but squished more than the clevo ones.
-
Interesting. Definitely shows that they are being built differently. I will have my laptop Thursday and this will be one of the first things I will try.
-
I want some fat heatpipes in the Clevo..
Edit: so the inner circle of the washer has to be at least 3mm width? -
Pushing on X1 causes the big temp drop, so you put the washer on X3, is this correct?
-
He removed the original picture that showed it with washers but I believe the washers were on X1.
-
how this washer fix is working? i dont undersand.
when U place washer under screw U decrease spring bend which make less pressure -
It just needs to be big enough to slide over the shaft. 3mm is a good size to use, since it fits well enough not to move around when you tighten them down.
No... X1. Putting a washer on X3 would make it worse by pulling X1 up more
If the heatsink needs pressure on X2 or X4, you'll have to install washers on both X1 and X3 so the weight is pushed evenly downward on all 4 sides. I got lucky and happened to need pressure in one of the corners that the ring tabs exist.
Its not under the screw, its under the main metal tab. Check the revised diagram I put up, it shows the layers -
Ok I have the 3mm hole washers ordered, gonna see how cool the GTX680M can run
-
Here are my fans installed, i need to add cooling fins to the cpu, and then make a shroud to direct the air correctly. Im not modding the case at all other than the hdd caddy and the bottom cover.
Sent from my DROID RAZR using Tapatalk 2
![[IMG]](images/storyImages/a6fa46d2-0297-1c48.jpg)
-
How much air do these fans move?
-
haha none haha the extra heatsink and fans have done nothing because i need to add proper venitaltion and shafts for the air to travel through. also im waiting for my extra thick copper tape and the hdd caddy so that i can repaste again and add all of the stuff i need to make this work properly. but they blow pretty hard, considering how small they are. and in total i could fit up to five if needed, although that would be difficult to route the air properly. also i need to make cpu heatsink.
-
hi so i placed an order for a p170em with 7970 from malibal and this whole temp thing is kinda worrying me. kinda glad i didnt get the IC dianomd upgrade if i'll have to end up repasting.
Is there a way to kick the fans to 100%? maybe you can pwm mod the fans? -
Those little fans are only going to move already heated stagnant air around. This design is not new to Clevo, my 8150 has the exact same setup with a similar 100W TDP card and I have no issues with heat, I suspect this is likely due to the thermal pads and paste used in the default install. I would be extremely hesitant to increase the pressure on those clips as this is a direct on die heat sink and could cause serious issues if done incorrectly.
If such a modification is required to correct this, this is clearly a defect and should be corrected by RMA. The heat sink design has not changed in at least 4 generations of these machines. Clevo is known to have some of the best cooling in the industry, and I highly doubt this would be considered normal by them.
Also, the default paste is terrible and known to be caked on like cement. A simple re-paste should resolve 99% of these concerns.
Edit: Also, I have no idea why we would be pushing down on a corner of the HS in order to test this, in addition to the possibility of causing enough shear force to crack the GPU or damage the card, this area is extremely stiff and you would NEVER see any kind of force on the HS in that corner unless you just outright abused it. This test seems to be rather invalid.
Further Edit: The previous edit is even more true than I first thought, how often do you use your laptop upside down? If the weight was an issue, based on the leverage points and simple physics, the heat sink would be pulling away from the side closest to the heat sink and the largest temp decreases would be seen there instead. This reinforces my previous point about paste fail, as when the laptop is right side up gravity is forcing the heat sink down, so pushing on the HS is in fact doing the opposite of what is actually happening real world. -
For the GPU's extra fan you can look into this: DC BLOWER 3V - 15x15x3mm - SUNON - UB3F3-500 - UB3F3-500 - Thermaco Ltd
It's thin (3mm) enough to stick on the backplate just above the GPU vrams and blow it to the front also only uses 0.1W and 3V. You can try this splitter:
Akasa AK-FY320 3 Pin Fan cable splitter (AK-FY320) [AK-FY320]. Fan doesn't come with a connector so you'll need to mod the cable of the splitter.
-
"Size / Dimension: Square - 15mm L x 15mm H x 3mm W ; Air Flow: 0.160 CFM (0.004m³/min) ; Features: Speed Sensor (Tach) ; Termination: 3 Wire Leads ; Fan Type: Blower ; Noise: 34.1 dB(A)"
That's not very much air for a fair bit of noise. I still think this is unnecessary.
Clevo P150 and P170 cooling systems neglected by Clevo! (solutions here)
Discussion in 'Sager and Clevo' started by Beefsticks, Jul 10, 2012.