
Toshiba is the best laptop company. I have Toshiba Qosmio X505 gaming laptop. It's processer is very well. I like this very much...
-
Do you possibly have the instructions for dissemblying a Toshiba Satellite L645D-S4040? My niece has one with a broken DC jack, and I'd love to replace it for her. Her laptop doesn't charge anymore, and she just got it for Christmas last year. Pretty sure it's not the battery.
-
hello, i got intel Core2 Duo Processor T5550 (2M Cache, 1.83 GHz, 667 MHz FSB) express chipset gm950.
Can i upgrade it to Intel Core2 Duo Processor T7800 (4M Cache, 2.60 GHz, 800 MHz FSB)
the difference was 133mhz and 2 bus ratio ! would it work fine.
help ? -
Hi, does anyone have a disassemble guide for Toshiba NB550D?
-
can someone make a disassembly guide for toshiba satellite L510-S4314?
-
I have managed to replace video cable in a Toshiba Satellite M300 with the help of your instructions for M305, it was very easy following your instructions and was very productive. In M300 model there's a couple of cables needed disconnecting before removing top cover to access video cable from motherboard. However, Thanks again for your guides, repped.
I think you can use the guide for L505 with a small variation in your L515, there may be a couple of extra cables need disconnecting, I'm sure most of the procedure should be same.
How to take apart and remove motherboard from a Toshiba Satellite L505 or Satellite L505D laptop
EDIT: Pay attention to some cables need unlocking the tabs, some can be pulled out, make sure you identify them before pulling the cables, take care not to break any locking tabs. -
Hello everybody, I'd like to repair my old Toshiba 1640 but can't find the relative instructions on Disassemble, repair, take apart, upgrade, clean Toshiba laptop or notebook yourself. ; anybody knows which is the model listed there more similar to mine?
-
I'm guessing you mean Satellite L640?
This will probably work: How to disassemble Toshiba Satellite L645/L645D and L640/L640D laptops -
Hi alexUW, thanks for reply
No, I really meant 1640 cdt, it's an old laptop from year 98-99, I think. Anyway, I've managed to disassemble it, following instructions found here Satellite 1605, 1620, 1625, 1640 Series , if someone should need it... -
Does anyone have disassembly instructions for a Satellite L875-S7208? Thanks.
-
Thank you very much cj2600. All your work is appreciated.
-
Toshiba tend to use the same size screws on most new l350's etc throughout the body. Just take note of what screws go where, and keep them seperate... and you'll have a good idea of what goes where afterwards... and if you have any left over, then you know you've missed one
") .
.
-
disassemble instructions for a Oosmio X505-830?
-
Scanner - sorry for reviving an old post. Unfortunately, the venerable Tim, in whom we all trust, disabled the links to access these manuals. Do you know of any other resources where I can find this manual? Or could we find a way for you to email / cloud it to me? Many thanks in advance!
-
Actually, I have a copy of that manual. Here is a link to it.
https://www.box.com/s/btk0qlxlo3drrfnws53d -
[h=1] Can anyone provide a tutorial on how to access the hidden RAM slots on the Qosmio X870-BT3G23? I just found out I'll have to do this if I want to install my 32GB of RAM without paying a "service provider" to do it. [/h]
-
They're not hidden, they are under the keyboard.
-
Thanks for the picture! Is it easy to get to? Is there any thing I should know first?
-
Can anyone please send me some instructions on how to get under the keyboard without damaging anything? Video, photo, or text would be great.
-
These videos may prove useful; they show you can access the ram from the bottom.
Last edited by a moderator: May 12, 2015 -
Thanks. But I actually need to know how to pop off the keyboard so I can access the two RAM slots underneath.
-
I need to know how to replace the keyboard on a Toshiba Satellite P775-S7215. It looks like you have to take the entire back off....can't find information anywhere. I have the new keyboard, just am afraid of taking the laptop "more apart" than I need to. HELP!!
-
I have completely taken apart (and put together) a Toshiba Satellite P505D following a video on Youtube. Here is a link for the P775: TOSHIBA P775 take apart video, disassemble, how to open disassembly - YouTube
The video shows a complete take apart. I realize you just want to remove the keyboard so I might be of some additional help. Look at the video I provided and skip to the part where the keyboard is taken off. You'll notice that the keyboard is basically just pried off (after all the screws from the bottom had been removed). However, you might not need to take all those screws out. On the bottom of my Toshiba there is a screw that has a keyboard icon next to it. That is the screw that holds it down (plus, unlike yours, I have screws on the top). You might have a similar icon/screw.
I'd suggest, first try gently prying off the keyboard as in the video. If it appears screwed in, look for the icon screw on the bottom. If that doesn't exist, follow the video and take out all the screws (carefully note where they came from) and then take out the keyboard. If you follow the video, it should be really easy.
One other tip on the screws. Many are of the same size and, on mine, the bottom actually has the screw sizes stamped on the plastic. Just make sure you group the same sizes together and label where they go (like keep them in separate envelopes and write on the envelope their locations). -
In reference to the Qosmio X870. I don't own this laptop but I'm familiar with it (a friend has one). The best references I found were at the Toshiba website, Nexicore and YouTube. The links are: Qosmio X870 memory upgrades - TOSHIBA FORUMS, http://tech.nexicore.com/downloads/P870-P875_X870-X875_T572-T772.PDF and Toshiba Satellite A660 A665 Laptop Keyboard Installation Replacement Guide Replace Install R850 - YouTube.
The Toshiba website gives two different ways, both of which have "proof". One guy says to just use a credit card, pop the catches around the keyboard and take it out. The proof of this is found in the Nexicore link that goes to the X870 Maintenance Manual. The two other guys say they removed it by taking 3 screws out of the bottom and then removing the keyboard. Their proof is a picture of the removal (link on the Toshiba site) and the YouTube video.
I'd say to first look to see if there are three screws that match the video. If so take them out. Then go and try to take the keyboard out per the video. If it won't come out, revert to the credit card method.
Good luck. -
Does any expert out there have disassembly instructions for the Satellite P70?
-
Hi folks,
Great thread. Has anyone tried taking a Satellite E55D apart? I just bought one and I want to upgrade the memory to 16GB. There's no removable battery, and no ports on the bottom for accessing components. Based on info from irisvista, I figured out how to remove the keyboard (remove the 2 middle screws on the bottom, then pry the keyboard up carefully). No luck - there's no accessible components via that path.
The only remaining option is to unscrew all the remaining bottom screws and remove the entire bottom. Does anyone have advice on how to pry it off without breaking any of the tabs holding it in place?
FYI - there are no hidden screws - only plastic rivets under the rubber feet and the 2 large stickers.
Cheers. -
Update - After removing all the bottom screws (12 total), I used my fingernails to press under the front edge of the bottom piece, and popped it up. I have managed to pry up the bottom 3/4 of the way, but I'm running into resistance near the back by the USB ports. I can see the HDD and the SODIMMs - I just can't access them yet.
I'll send pics when I get the chance.
Cheers. -
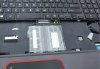
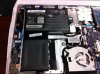
Hi folks. Finished disassembling E55D laptop. Resistance was futile - it just took a little more pressure to pop the remaining plastic tabs. See attached pics - I hope you find them useful:
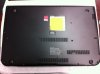
Note orientation: Hinges are at the bottom of the picture. Use a guitar pick or your fingernails to pry up the cover, starting at the top of the picture. -
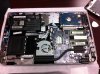
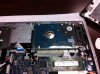
Next Pic: overall layout of interior components
-
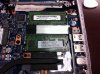
Closeup of SODIMM slots. FYI - one of the 2 SODIMMs on my laptop was not properly latched down during factory assembly (!)
Closeup of hard drive
Closeup of battery.
Cheers! -
I was hoping to find a guide for a Slickdeals hot deal, el-cheapo laptop I bought for $229. It's a Toshiba Satellite C55-A5300. Added another 2GB stick I already had for a total of 6GB, installed a Samsung 840 Pro SSD and did a clean install of Windows 8. I need to replace the really poor Realtek wireless card. Does the guide include something comparable I could use?
-
Hello, can someone make a dissasembly guide for the toshiba satellite P875-S7200 please?
-
I've a playlist on my Youtube channel that describes how to take apart different Toshiba laptops.
There's currently 15 different models with new videos being added regularly.
Toshiba Teardowns / Take Aparts / Opening - YouTube
Let me know what you think.
We also have videos of other brands here:
Computer Teardowns / Openings / Take Apart / How to Videos - YouTube -
can someone help me. I have a Toshiba P50T-A with the high def screen and had the misfortune in getting a colony of ants move into the area between the touchscreen glass and the display OVERNIGHT! Little ****s had eggs and everything on the screen . Coaxed them out by placing the laptop on some small tiers over a tray of water and left them a land bridge to escape in the form of a wood stick. Ants are gone now but have still got a lot of waste still trapped between the screen and the display.
I see a pair of screws covered by two plugs at the bottom left and right of the screen but am unsure how to remove the outer glass once they are removed . . . I am keen not to stuff it / break it. Does anyone have a link to info on this please.
Regards Bob -
hello I need a guide on how to disassemble a toshiba satellite s845-sp4336tl especificaly findinding the mini pci-e port
-
did you ever get a guide
How to disassemble Toshiba Laptops.
Discussion in 'Toshiba' started by cj2600, Oct 9, 2005.


