
Have a look here:
SONY vaio No Backlight PCG-6121M - YouTube
Also, the new fuse you will buy, another solution is to solder it on the burnt one.
-
for those of you wanting to replace the fuse, I think i have found where one can be obtained. if you look on the broken LCD, around the connector socket you will see a small chip marked F1 in my case the chip matches exactly the fuse blown on the motherboard. I am going to remove this fuse from the lcd and solder it to the motherboard. I will post my results once i have done this,
")
-
i can now post my result of using the fuse from the old lcd.
SUCESSS. ALL WORKING PERFECTLY AGAIN WITH NO BRIDGING DONE
-
Of course, replacing fuse is way more difficult than bridging the fuse, but it is the right way to do.
Sent from my LT30at using Tapatalk 2 -
Hi ngvuanh i'm a new user. I saw that here on the forum you could lend a hand to many users and I wanted to ask help for a Sony Vaio SVE151D11M.
I changed the display but I did not backlight.
I could only find 4 fuses on the mainboard and I bridged one (F4) but I still have no backlight.
Can you help me?
Thanks in advance.
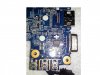
I am attaching pictures link of the mainboard.
Forgive my English, I'm using google translator.
http://imageshack.us/a/img545/3162/img1693kl.jpg
http://imageshack.us/a/img27/5125/img1692lk.jpg -
@liberty, I am sorry for a bad news, but it could be another issue with your board because F4 is the right one for backlight.
You should have a voltmeter to measure voltage on that fuse. It should read 19.5V, otherwise, it could be something else. -
Hello. I have similar problem that all above. I have sony vaio vpceb2m0e with blacklid problem. I took photos of my motherboard because I cannot locate the fuse. I found the part pointed on other pictures but on mine motherboard there is no fuse on the keyboard side. (this is actually the place were the LVCD connector is.)
Thanks for help!
http://oi48.tinypic.com/2vmyick.jpg
http://oi48.tinypic.com/eook3.jpg -
Your motherboard doesn't have F16 fuse which means the LCD is a regular CCFL back light, not Led one. To confirm it, check if you have two connectors at the end of lcd cable.
Sent from my LT30at using Tapatalk 2 -
Is it the one that goes to the LCD screen? It splits into 2 cables. 1 goes to the inverter the other directly to the screen. What it then may be the reason of very dim screen?
Thanks. -
Because your laptop has inverter, which means the LCD has normal CCFL backlight, not a LED backlight, so either inverter failed or the CCFL backlight broken.
If inverter failed, you can replace it with a new one. It costs not much. However, if CCFL backlight broken, you almost have to replace whole screen unless you know how to replace the CCFL back light which it is a pain in a**. Anyway, I am sorry that I have to say this. -
Hi all
PLease ngvuanh, i have successfully repaired my sony laptop several months ago with the help of forumers on this thread.
But now i have a compaq cq57 with the same problem could you help me solve this issue cause i don't know the fuse out of service ? -
There is a fuse named FBB4. Find it around LCD cable both side and check if it is blown.
-
Hi thank you very much
edit: it was the correct one. Once bridged the screen enlighted again. -
I have a Sony Vaio VPCCW17FX with the same backlight issue. I can see the screen very faintly, and if I use a flashlight I can see the screen better. An external monitor works just fine as well. The model number is PCG-61112L. I do not have the ability to post pictures right now, but can later if needed. I'm also a novice at soldering and was wondering exactly what is meant by a "solder bridge"? Thanks in advance for any help given.
-
Image - TinyPic - Free Image Hosting, Photo Sharing & Video Hosting
Image - TinyPic - Free Image Hosting, Photo Sharing & Video Hosting
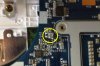
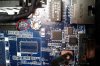
Here are the pics of the front and back of the motherboard around the LVDS connector. Is fuse f10, the one with the K on it, the correct fuse? -
Fuse F17 located on the other side of LCD connector and next to L43.
I circled it yellow.
-
I was hopeless about this issue with my Sony Vaio but you guys have just give me a light
I'll take a picture on monday and post it here, I hope you can help me. Thanks in advance
-
 hi same problem after replacing cracked led screen now no back light thanks if anybody can help
-
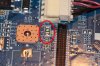
I believe it is F2 on the first picture (other size of LCD connector)
See attached picture (red circled)
-
YES IT WAS!!!!! THANKS A LOT "ngvuanh" I CAN'T BELIEVE I WAS NOT ABLE TO SEE IT BEFORE UNTILL YOU CIRCLED IT FOR ME IT'S A LOT SMALLER THEN WHAT I WAS SPECTING TO SEE AND IT IS THE ONE WITH THE "N" "GOT LIGHT AGAIN" THANKS AGAIN
-
Hi, I'm from Argentina, I could help? I have the same board, my question is, f4 is a fuse of LED lighting? should measure continuity? Amp is how many? Thank you thank you very much
-
Sorry, I can't answer your question because I don't remember which laptop my previous answer was for.
If you currently have backlight problem, you should take a picture and post it here because sooner or later, you have to open your laptop to get to the fuse. -
Hi guys!!
New user in the forum!!
You really helped me on this.
** ( Sony Vaio VPCCW1S1E )
I used my soldering station and bridged both ends of the fuse.
Never the less I would like to point out the following:
*** Soldering OVER it will not work... you need to clean the part in between and then perform the "bridge".
Maybe a noob notice but I believe it's worth mentioning.
Cheers all ! ! ! ! -
I need help also have a Sony Vaio E series model Sve14118fxw does anybody know what fuse it is on that model I came across an f4 and f5 fuse...
-
You should be better post some pictures here as others did.
Sent from my SGPT12 using Tapatalk 2 -
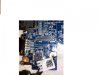
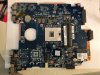
thanks ngvunh here are some pics i did notice an F1 fuse on the otherside of the motherboard where the keyboard side is


-
Hello DimitrisGR when you say bridged both ends of the fuse you mean adding solder over the ends? thanks
-
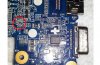
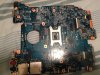
I have your photo here. The fuse I circled red.
-
thank you ngvuanh do i bridge solder from one end to the other on that fuse or just add some solder on each end of the fuse?
thank you in advance -
Hi I have SONY VPCSB19GG and having a backlight problem. Can anyone help me where to locate the fuse please?
-
I posted a picture with the fuse I circled RED
-
"bridge" means you connect both ends of the fuse together.
-
Thanks for posting the photo. It's a great help. Another question if you don't mind.
Do we need to melt and take out the fuse first to bridge both ends? -
ngvuanh,
Client gave me his PCG-71913L laptop to fix. It slightly fell off the bed onto his book bag and since then he has had no backlight on his laptop. At first I thought it was dead but if I got a flashlight I could see an image. Then I hooked up a monitor to it and it appeared.
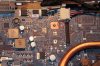
After reading online I desided to re-solder all the so called looking fuses that are on this motherboard. I have attached pictures of what I am working with but I am sorry but my camera cannot focus so closely to the motherboard.
There is a chip near where the monitor plugs into the system board. It's brown looking with and H in the middle and it says F4 next to it.
Then there is green looking chip near where the external VGA connector is. that says TN right on it and looks like F5 next too it.
Then on the other side of the system board under the area where the power wire plugs into the system board/ video connector is another green chip that says TN with F1 next to it.
I have already resolidered all these suspected fuses in case one had cold solider joint. But no luck.
Should I try bridging one of these?

-
Yes conscious, **(Sorry for my delayed reply), that's correct.
As a process.
1. Heated each end.
2. Use tweezers to slowly move the fuze while heating ---- gently----.
3. Removed the fuse.
4. Cleansed the area between the two ends with isopropyl alcohol.
5. Solder the ends (bridge them).
-
The fuse is marked F4.
-
hello , i have Sony Vaio PCG-71811M.
I have the same problem with others. please tell me the must do????
-
Check that fuse, if it's blown, then bridge or replace if you can.
Sent from my LT30at using Tapatalk 2 -
thank you for the reply.
I can not find away to replace it.
when you say to bridging, what material do you mean??? -
thank you for the reply.
I can not find away to replace it.
when you say to bridging, what material do you mean??? -
You need solder rosin, solder iron and lead.
Sent from my LT30at using Tapatalk 2 -
my friend, I have soldering.
the bridge with what I would do???
I can with a very thin copper wire???? -
If the fuse blown, then the connection between 2 ends is broken.
"bridging" means you use lead to connect fuse ends together.
You can't melt copper with soldering iron. You need soldering lead. -
ok my friend. okay. works fine. thank you for everything.
:hi2::hi2::hi2: -
I have the same problem with others
. please tell me if i am right,if i had the good fuse,
i have a sony model :SVE151D11L or product name :SVE15111FDW
thx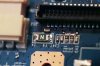
-
It is F4 fuse as you already circled it.
If you don't have backlight, F4 is probably blown.
-
ok i will check later tonight,thx
thx to you all,everything is fine now :thumbsup: -
This entire thread has been incredibly helpful so thank you in advance.
Like many others, I had a faulty screen and attempted to replace it, however was sent a LCD instead of an LED screen and now I have no backlight on any screen.
I have ordered a multimeter and will sort be taking part my laptop to examine, can anyone tell me where I should be look on my laptop?
Its a Vaio VPCEC2C5E.
I will post pictures tomorrow if possible.
Furthermore, I've noticed alot of people have repair this by simply soldering a new connection. Is there any risk of doing this? -
I have a Sony Vaio, model SVE151D11M, Product name SVE1511P1EW. I have attempted two different screens both compatible with the laptop one for the model and one specifically for this laptop both work but do not light up. I'm not sure what's wrong with the laptop can anyone help please?
-
This is a great thread. There is so little help out there, so complete, regarding this issue.
If someone can help, I too have the same issue... Old screen cracked but worked fine otherwise. Replaced screen and no backlight. Put old screen back in and it also now has no backlight.
I think I have found the fuse but would like to get a second opinion. The part is labeled "F16" and the part is marked with "N." I have a Sony VPCEB35FX. Pictures are attached of the top and bottom side of the fuse's location. Any help would be appreciated.
Thanks!

No Backlight on LED screen
Discussion in 'VAIO / Sony' started by nebage, Sep 27, 2011.


