
Hi, I have a S13 regular with the 720p screen and am looking to upgrade to 900p screen. However, I am wondering - as previous sony models have had a dip switch to control the screen resolution, I find such a switch missing on my system. From the pictures you have posted it looks identical to mine internally. Could it be that this model has done away with the dip switch completely?
There is however a dip switch on the underside of the motherboard near the ram modules, but I don't believe it is anything to do with the display. In any case, could you tell the switch positions in case they are different to my system? Or perhaps another picture if it actually part of the display portion of the board. Many thanks.
-
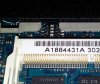
Here is the DIP switch config on my motherboard:
![[IMG]](images/storyImages/DIP_1024.jpg)
As you can see, it has a "0111" config for my 1600x900 display, if that is what it is actually for.
I have never seen the backside of my motherboard as I have never fully disassembled it from the case. There is a post here that has a full picture of the S13A motherboard. I can't seem to find any other DIP switches. -
Even if the DIP switch you found are the correct ones, finding the 40-pins LVDS video cable won't be easy. Some user tried to get the cable from Sony dirrectly on the main S13 thread, and Sony wouldn't want to sell them the cable, since their S13 model number matches a 720p model instead of a 900p model.
Your best bet would be to get someone with a 900p S13 to get the cable for you and then ship it to you *if Sony does sell it to the 900p owner still*.
Have you looked at the DIP switch settings prone posted ? If yours are different, then it is safe to assume that those DIP switches are for video signal.
To my knowledge there's no difference between 720p and 900p models apart from the screen and the LVDS cable. And I don't think chosing a different CPU or HDD would require different DIP settings.
I can confirm that the DIP switchs have nothing to do with the RAM, since I've upgraded my stock onboard 4GB configuration with a SODIMM 8GB from Crucial without having to change anything. All you have to do in this case is to make sure you can the correct low voltage RAM and same CAS latency and speed. -
Are you running Windows 7 or Windows 8 ?
I've got a Win8 model, but I "downgraded" (we all know Win7 is an upgrade over Win8 lol) to Win7. To get all this stuff working, I had to use the Firmware Extender Parser driver for Win7. The Win8 Parser drivers wouldn't work. But since this driver is working specific with the BIOS of your computer, the Win7 Parser drivers does not enable all the features on my Win8 model. I can get most of them, but not brigthness functions keys. For those, I had to rely on third party application called ScreenBrightness.exe .
If you're running Win7, since you've got a Win7 model, I would simply look at the drivers you've installed. Make sure you're using all the correct Win7 drivers, and not Win8 drivers. If you are using the Win8 version of the Sony notebook utilities, this can lead to problem like you're getting with the adaptative brightness. Win8 version of the Sony notebook utilities are newer, but are not really compatible with pre-Win8 machines.
Edit: I would also re-open the display assembly if I were you, unplug the power supply and remove the battery, and check that the LVDS cable is correctly plugued it. Sometimes those connector seems ok, but they are not enough entered into the socket. -
Thanks for the pic! I just checked mine, and it is indeed different (in pic below). It's set to "0001" so perhaps it might actually have to do with the LCD settings. As mentioned in my other post, I couldn't see other DIP switches either. My system has been disassembled and sitting in a box since October!
Only recently I've seen an influx of parts for the SVS13 series become available online. I am actually kicking myself because there were two of the proper cable (part # A1881581A - exact cable that prone used) sold on ebay just a week or two before I checked. It looks like I can order from a place in France but the price is quite expensive (about 40 euro + 30 euro shipping!). I think there are other places in Europe, but with similar prices. For now, it's just a waiting game.
Thanks for the posts all around. I am feeliing a bit more reassured now that it appears there are no significant electronic differences between the normal and premium models (apart from the cable and LCD panel). I will keep you updated on the progress, but it might be a while before I get my hands on the cable and screen.
A few last questions:
1. What are the differences between the LG LP133WD2(SL)( B2) and LG LP133WD2(SL)( B1) (if any)?
2. How does the Chunghwa CLAA133UA01 compare to the LG IPS screen?
3. How is the battery drain with the LG IPS? Has it had any significant/noticeable effect? -
Looking at your photo, I think the DIP settings are "0001", no? Anyways, you are right, they are different!
As for your questions:
1. No difference between the two screen electrically. I think they just have different metal brackets from the pictures I've seen.
2. The CLAA133UA01 is a TN display vs. the LG's IPS display. It is probably as inferior as the stock display.
3. I haven't really noticed much battery drain with the IPS panel. I always have the display on the highest brightness setting...lasts about 3.5 hours with the switch on STAMINA. -
Ah yes, brainfart on my part, it is indeed 0001, and different to yours
")
Thanks for the answers. I haven't seen any pictures of the LG IPS (B1) model but if it requires less chassis and PCB modification maybe that would be a good choice. It seems more readily available to me over the (B2) model.
So unfortunately, this mod basically depends on when I can get the LVDS cable (hopefully soon). -
I just saw my VAIOS SVS13A290X custom and was thinking of doing this mod, but with another screen.
I have a 30pin LCD IPS panel laying around (from my old vaio z vgn 690) and was wondering if I could connect it to replace this crappy screen .
1) Are there any converter/adapter cables?
2) Do all laptop motherboard LCD connectors have the same LVDS pinout & therefore use a 30pin or 40pin cable?. -
I vaguely remember reading somewhere that the Z series screens are interfaced with eDP rather than low voltage differential signaling. That would mean they are not interchangeable at all.
Even if it is LVDS, the cables are highly customized for each model, meaning that if a screen was never meant for a specific series, it's highly unlikely the cable with appropriate connectors exists.
Your best bet would be the LG IPS screen the TC used in the mod I'm afraid. -
Hello everyone,
First of all, excellent walk through on the mod installation by OP. I can confirm that LG LP133WD2(SL)(B1) works on 720p Vaio S13 (2012 model). You need to set correct DIP switch settings, or otherwise the screen will be black. Correct settings are 0111 as prone suggested. I might also recommend getting model B1 instead of B2, as it doesn't require nearly as much case modification as B2 does: I only cut off the unused parts of LCD circuit board, so that it would fit between the hinges, and then flattened some of the supports on the cover near the hinges, so that the circuit board would slide between the cover and the hinges. Other option would be to cut off the topmost part of the hinges, but it would probably loosen the laptop cover too much.
-X -
Great news, looks to be the model to get. Might I ask where you got it from?
-
Nice to hear that another B1 installation is successful (as I'm getting that model due to limited options here), but could you please post your experiences regarding the brightness change and the BIOS screen? IIRC, some people reported that they couldn't use the BIOS with the B1 screen (or maybe B2, as well, if it's related to a firmware problem on the Win 7 machines) or change the brightness via the function keys.
-
BIOS works with B1 model. First boot after the DIP switch change Windows started, but did not show anything on screen, which probably happened because of incorrect monitor settings. After couple of reboots/'assist' key whooping it started to work, without me actually doing anything. I have to check the brightness keys later when I get back home.
I bought it from Ebay seller Ugooole ( Original 13.3" LCD Screen LG LP133WD2(SL)(B1) 1600x900 LED Display Exact Model | eBay). So far I haven't noticed any dead pixels.
Forgot to mention that I bought 2CH LVDS cable also from Ebay. Correct part number for the cable is A1881581A. For the B1 screen, I did not have any problems with the cable length. Have fun modding!
-X -
So it was you who got the cable
Thanks for the link, funnily enough I already had that saved to my list. Looks like the route I will take. -
Yeah, that might have been me. Don't worry though! Even if Sony won't sell directly, the cables should be easily available via laptop repair shops who get their parts from wholesalers. I asked around for the cable and one local shop would have provided the part for about 50 euros + couple euros for postage. Maybe you'll find one in your country as well. Good luck!
-X -
Hey guys I need some help. So I have an sbl2 installed and today I decided to flash my bios to amal's 35 bios. Flash went fine, but the problem is nothing shows up on the display any more. No bios, no Windows. I can still log in to Windows fine and I can adjust the brightness of the backlight using the function keys but the display remains completely black. Any ideas for how I can fix this?
Sent from my Nexus 4 using Tapatalk 2 -
Hi guys,
I kind of want to see this display in person before I go into this. Do you know what laptops currently have this IPS screen? (so I'll try checking them out in a store).
Thanks! -
Can you flash back to the original BIOS and see if that solves the problem?
-
No such luck. Anyways dropped off my laptop at the repair shop. Hopefully they can do something
Sent from my Nexus 4 using Tapatalk 2 -
while i have not actually purchased it, it seems that you can purchase parts direct from sony here https://www.servicesplus.sel.sony.com/sony-part-number-A1881581A.aspx#
as for the registration, i simply put "None" for business name, registration completed, and i could add items and proceed to checkout. -
I had the same problem with BIOS flashing the SVS13A (win7) version. You have to plug the original LCD and allow windows to boot up once after every BIOS flash.
-
Thanks OP for the post. Love the new screen even though it cost me about half of what I paid for the S13.
I have finally completed this mod after trying 5 LP133WD2(SL)(B2) screens. Here is a list of the screens and where I got it from.
1. Laptopscreens.com - $160 Exchanged due to a single back lighting diode being too bright. Fast shipping but might involve foreign transaction fee for buyers outside of Canada.
2. Laptopscreens.com - $0 No defects but cracked due to pressing the bezel clips down too hard.
3. Laptopscreens.com - $150 Had same back lighting defect as #1 and waiting on refund. Thought they sent me the same screen but they assured me it was a different one.
4. Ebay (brandnewlcds) - $160 No defects but slow free shipping that took over a week. Cracked forcing the bezel down with the shaved clips.
5. Aliexpress (International Department Store N0.1) - $106 No defects but the screen protector seem to have been taken off and reapplied. Delivered in one week from China. Completely removed bezel clips for this one and used electrical tape. -
It appears the price of this screen has dramatically dropped recently.
https://www.laptopscreen.com/English/screen-part-number/LP133WD2(SL)(B1)/
I think i am going to attempt this mod, have a few questions beforehand though.
with prolonged use, how is it holding up? I see one of you had to use electrical tape externally to hold it together but i understand that this is due to a mistake you made with popping off all the tabs that hold the screen together. With prolonged use, is the screen still stable?
How is the battery life? panelook.com clocks this screen at nearly twice the power consumption as the original screen, but I assume this is at max brightness. WIth your day to day use, do you still get 5 hours of use out of the battery on stamina mode with a comfortable screen brightness?
Do the brightness controls still work? I saw someone could not get them to work. -
went ahead and ordered the display. Can't wait to try it, just hope i dont screw things up and it doesn't kill my battery life too bad..
-
Hello everyone,
I just want to report another successful mod on a 2012 SVS13A190X, and to thank the OP (prone), and everyone else for taking time to post their experiences. The following is a short rundown of my experience.
1. Ordered the screen from laptopscreen.com (the SLB2 variant). Was sent a non-LG compatible. No dead pixel/s but the panel had a bright spot on upper right near the center. Arranged for a return/exchange right away.
2. Thanks to ctenc001, I was able to make the best of an unfortunate situation. With the SLB1 being offered at a considerably lower price, I cancelled the exchange and just purchased the B1 instead. This time I received an actual LG panel with zero defects.
3. Having seen both B1 and B2 versions of the panel, I could confirm that the B1 is the slimmer of the two (width and height-wise). I was able to fit the panel into the laptop's back cover with very minimal modification to the plastic (I just needed to remove small portions of the bottom borders).
4. Like the other modders in this thread, I am also unable to access the BIOS screen at startup. When starting the machine, pressing F2, assist, web, or vaio buttons yield no results. I am just taken straight to the windows 7 startup screen.
Overall very happy with the results. Many thanks again to all of you for sharing your skills and experiences. -
hows your battery life with compare before and after the mod?
And how stable is the screen?
You did not need any electrical tape or anything externally to hold the display panel together afterwards did you? -
So far, battery life seems similar to prior performance (around 4hrs on an 80% charge). This is running at half brightness most of the time.
The screen is stable on the frame. I only had to remove two tabs/clips from the bottom portion of the bezel, and very minimal plastic on the bottom portion of the back cover. As far as the actual panel, all I did was dremel off the protruding metal tabs. I don't need electrical tape to secure the bezel against the back cover.
Bottom line, the B1 panel provides a much better fit than the B2 panel.
Happy modding! -
sounds great!
I should have everything by Monday to perform this myself! =) I'm debating on making a video for others to see as well as getting a $20 refund from laptopscreen.com but i need to find a camera.. -
You don't have a smartphone? If you have some kind of suction-cup bracket (for the car) you can set it up in a window and film it that way.
-
have a smartphone but no holder for it; ill try and figure something out with it =)
-
Thanks for sharing the eBay link to get the B1 screen. Just received it today, but I think I broke the cable when removing it from the old screen - nothing on the new screen and the old screen is very very very very dark. Could you share the eBay link where you go the cable?
-
That's not the cable. You fried a fuse that's connected to the backlight. You'll need to either replace it or solder over it.
Sent from my Nexus 4 using Tapatalk 2 -
Argh. Thanks for the response. I did forget to remove the battery. Where can I buy/search the type of fuse it uses? Also would soldering over it cause future issues? Do I replace/solder both fuses?
Update: Found out that only one of the fuse is fried. Soldered over it and got backlight to work again. But the B1 i got had a cluster of dead/stuck pixels.
 Otherwise the screen is beautiful.
-
First, any advice on how to cut the metal clips, like where the board screws on to the bottom of the display without damaging the screen? Or should i just fold those back next time? I busted the screen trying to shorten those so that there is room.
Also, could anyone take some pictures of the cables going to the web cam and antenna? I can't seem to get my back into the right position to allow me to lock the left side of the display cover back into place.
Going to place another order for a screen *sighs* haha -
Hi alektoro. I saw that cluster too. Don't worry, those aren't dead pixels. They're just on the screen protector, peel off and see
-
OMG haha. Do I feel foolish.
-
alektoro, how did you go about cutting down the circuit board and the metal tabs that it screws into? Or did you just bend them backwards or leave them there? I broke mine without even realizing it trying to cut them off.
-
Hi ctenc001,
Sorry to here about the busted screen. But I'm afraid those cuts are necessary. Otherwise the new panel's circuitboard will overlap on the hinges and will make the bezel bulge too much. I used a Dremel with a cutting disc. It took a while, but I feel that I got good results. About the metal tabs on the sides, I also tried folding them, but the panel was flexing too much that I thought it was going to snap, so I decided to cut them as well. Besides, folding those tabs would probably make the panel too wide to fit in the inner frame of the back cover.
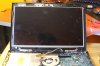
Here's a pic of my S13 as I was dry-fitting the B1 and rewiring the cables. Hope it helps. Best of luck!:
)
-
I haven't started on cutting it yet. It took me 5 hours trying to solder lol.
-
Hi manialboy,
How much LCD circuit board can I cut off? Can I cut into this? . Did you sand off any of the hinges near the bottom?
-
alektoro,
No don't cut that portion. That looks like active circuitry. I started out with OP's (prone's) guide on the front page. I basically used the hinges as a guide to draw the line on the circuit board. I cut just enough so that the board doesn't overlap the hinges. The only difference between my approach is - instead of doing an "inverted v" cut like prone, I cut the board diagonally all the way.
As far as the hinges go, I didn't do any sanding/modifications.
I also had to trim the lower portion of the inner border of the back cover.
Sorry I should have taken more pics. Disassembling the bezel would be too difficult at this point because I used strong double-sided tape on the bottom portion of the front bezel. But prone's pics (despite being on a B2 panel) is very similar to the cuts needed for the B1 panel. Just make sure to avoid the surface-mounted components. -
how have you progressed? Solding over those fuses is a pain lol. gj if you got it working again!
-
I broke the screen trying to cut the extra circuit board and stuff. sighhh. Another one is on its way. Also getting the proper tools this time.
-
This is...absolutely mental! Insane work!
Mate...you've just created the perfect laptop!!
Do you have any idea about the aRGB or at leat the sRGB color gammut cover of that IPS screen?
Again...insane work, congratulation! -
Don't think this was ever mentioned, but its the same screen thats used in the yoga 13 if you wanna go to a best buy and check it out.
heres a link to a review Review Lenovo IdeaPad Yoga 13 Ultrabook - NotebookCheck.net Reviews
according to it, the sRGB is 64%. Better than most TN but not as good as some other Ips displays. Way above average still though =) -
Cheers for that dude!
Well... I'm now seriously thinking about giving a shot too... Problem is, I'm a totally noob in this... How difficult will it be for a noob to realise this tremendous work? Is this doable just following the first post?
Btw, don't know if this video has been posted previously, but here is a good comparaison of the stock screen and the IPS mod screen:
http://www.youtube.com/watch?v=j4aOkEbtcx0 -
Its doable as long as you go slow and are careful. If even recommend taking pictures to keep track of wire placement. You also need a dremel. Any other way you try to trim the display will most likely break it, its extremely easy to break when not seated within the laptop bezel. Also buy the display I posted a few links back, not the one on the first page, its smaller and requires less cutting
-
Awesome job! Looks like the SLB1 really fits well into the original frame cavity.
-
Is this the same quality/color space coverage than the Lenovo review you've posted?
Here is the most recent video tutorial I've found on youtube: https://www.youtube.com/watch?v=i67m1qRsJsg
it is about the old version (The SA or SB version I guess....)...is this pretty similar to the SVS version or am I wrong? -
This is an awesome thread! I've got a VPC SB2C5E (2011 model) with a terrible 1366x768 screen. It would be great if I could replace it with a LP133WD2(SL)(B1) screen
. There is are only things I hesitate about: Which 2CHANNEL cable should I buy? Since I saw the "V030 LVDS 2CH CABLE (A1841202A)" as the "A1881581A (V120 LVDS 2CH CABLE) " on this thread.
Second thing is that everybody here has a 2012 model and I've got the 2011 version. I don't think Sony changed the connector but I'd like to be 100% sure. As my laptop is 2 years old, the sticker with my S/N en service tag are faded, so I can't contact sony for partnumbers (?).
Thanks! If this works I would be very happy
Sony Vaio S13 IPS Display Mod
Discussion in 'VAIO / Sony' started by prone, Feb 17, 2013.


