
Hello to everyone! I have a HUGE problem:
Bricked Lappy... Some Help?
I tryed with recovery instructions (Fn+esc and power on ) many times... at the beginning the lights flash...but no recovery even leaving it stay 1 hour ... last time light start to flash and then it remain fixed but after many minutes nothing happened
so i unplugged power cord again but now it doesn't on... pushing power button nothing ,and i mean nothing, happens...
Some suggestion? i was trying to upgrading to v3311 bios from acer original page
-
-
BIOS corrupted, so probably best bet is to remove the BIOS chip from the motherboard and have it flashed/buy another chip pre flashed. But, someone else might have some help for you. This is why people don't like flashing BIOS from windows.
Sent from my HTC One using Tapatalk 2 -
I tried TPFanControl by troubadix new ACFanControl_setup.zip v0.72ti built 20101004 (ACFanControl_setup.exe, 818 kByte) version and it could only get it to turn the fan on/off. Then I downloaded an .ini from German forum and it started working and controlling itself the fan properly, even has 2 smart modes included in .ini. Acer-Userforum.de - Einzelnen Beitrag anzeigen - Aspire 5739G Lüfter läuft ständig
All the credit for the .ini config goes to the guy in the link or whoever created it.
Oh man I love Germans, they make stuff happen.Code:// // ----------------------------------------------------------------------- // A C E R - E x p e r t S e t t i n g s - v.71b for Aspire 5739G // ----------------------------------------------------------------------- // Window---------------------------------------------------------- // Set to 1 for slim window // Schmales Programmfenster bei SlimWindow=1, ansonsten =0 SlimWindow=0 SecsAfterSleep=2 //Sleep for secs after returning from standby or hibernate //------------------------------------------------------------------------------------------- // I C O N - Options // free ColourPicker http://www.iconico.com/colorpic/ // // C(elsius)-Icon-Option(s): CIconOption=2 // 0 autotransparent (default, nonantialiasing) // // 1 with background (nonantialiasing,lightblue, yellow, orange, red, autochanging at // IconLevels RGB0->RGB4 =s.below) // 2 with background (antialiasing, lightblue, yellow, orange, red, autochanging at // IconLevels RGB0->RGB4 =s.below) // 3 small font with background (nonantialiasing, lightblue, yellow, orange, red, // autochanging at IconLevels RGB0->RGB4 =s.below, esp. for Fahrenheit 3 digits) // RGB0 245 245 245 //grey -> BIOS // RGB1 191 238 255 //lightblue // RGB1alt 212 208 200 //winxp-grey // RGB2 255 255 0 //yellow // RGB3 255 165 0 //orange // RGB4 255 69 0 //red // T_RGB0 0 0 0 //black -> BIOS // T_RGB1 0 0 255 //blue // T_RGB2 0 255 0 //green // T_RGB3 255 0 0 //red // T_RGB4 255 255 255 //white // Background RGB Input RGB0=0 0 0 //BIOS RGB1=191 238 255 //Level 1 RGB2=255 255 0 //Level 2 RGB3=255 164 0 //Level 3 RGB4=255 50 0 //Level 4 TextColor=0 // 0:T_RGB 1:red 2:green 3:blue (default) 4:yellow 5:turquise 6:violet 7:black 8:white // TextColor RGB Input T_RGB0=255 255 255 //BIOS T_RGB1=0 0 0 //Level 1 T_RGB2=0 0 0 //Level 2 T_RGB3=0 0 0 //Level 3 T_RGB4=0 0 0 //Level 4 // ----------------------------------------------------------------- // ENGL: Temperature thresholds for turning the taskbar icon // yellow orange red (Smart and Manual mode only and // only together with MinimizeToTray=1) // DE: Temperaturgrenzwerte, die das Symbol in der Taskbar gelb, // orange bzw. rot färben. (Nur im "Smart"- und "Manual"-Modus // in Kombination mit "MinimizeToTray=1" verfügbar.) // L1<L2 L2 L3 L4 IconLevels=50 55 60 // Fahrenheit: IconLevels=131 149 158 // FahrenheitTextIcon use small digits, nonantialiasing // Temperatures-------------------------------------------------------- // Primary name and EC-offset location of temp register(s) // containing temperature information Sensor=GPU 89 // GPU temp (offset 0 to 255 depending on model*) Sensor=CP1 88 sENSOR=CP2 90 // CPU temp (offset 0 to 255 depending on model*) DeltaMaxTemp=5 // Temps can only change in one step DeltaMaxTemp degrees Cycle=2000 // check temperatures every x milliseconds (default 5000) // Controlling-------------------------------------------------------- // ControlByte(s) are EC-offset locations of registers // which are to be set by program //BiosControlByte=85 // offset of byte controlling fan regulation by active BIOS BiosControlOn=5 // Oder "0" //value to switch BIOS control to activated BiosControlOff=128 // troubadix Wert: 27 // 32 = slow // value to switch BIOS control to deactivated //RangeBiosOnLow=0 // lowest Bios-active value //RangeBiosOnHigh=11 // highest Bios-active value //FanControlByte=94 // offset of byte controlling fan speed by BIOS deactivated //AfterWriteDelay=500 // millisec delay after writing an ec byte //SwitchWOCheck=0 // write anytime, without checking if neccessary // FanSpeeddisplay------------------------------------------------------- // FanSpeedByte & FanSpeedCalib if FanSpeed is a single byte integer // (depending on model*) FanSpeedByte=92 // (offset 0 to 255 depending on model) def: 92 // or Low and High Byte if FanSpeed is a double byte integer FanSpeedCalib=100000 // try to get right rpm values.. FanSpeedAdd=0 // FanSpeedByte + FanSpeedAdd resp. zero-crossing // if FanSpeedMethod=1 FanSpeedMethod=0 // 0 = Content of FanSpeedByte // 1 = FanSpeed = FanSpeedCalib // content(FanSpeedByte)+FanSpeedAdd // 2 = Lokk for matching values in table below (up to 30 pairs) FanSpeed=0 3500 // If FanSpeedMethod=2 FanSpeed=32 3000 // FanSpeedByte -> all from 0 to 255 (strictly going up !!!) FanSpeed=65 1900 // be aware of zero-crossing ! FanSpeed=100 1000 FanSpeed=125 780 FanSpeed=174 580 FanSpeed=200 500 FanSpeed=233 430 FanSpeed=255 160 // -------------------------------------------------------- // DE: Im Folgenden sind die Temperaturpegel samt den jeweils // zugeordeten Lüfterstufen aufgelistet. (Sobald die Temperatur in // den Bereich eines niedrigeren bzw. höheren Pegels wechselt, wird // die Lüfterstufe automatisch angepasst und folglich verringert bzw. // erhöht sich die Geschwindigkeit des Lüfters.) Diese Liste kann // weniger oder auch mehr Stufen (bis zu 16) beinhalten. Sinngemäß sollte die // erste Stufe die gewünschte Temperatur definieren, bei der sich // auch im Winter der Lüfter einschaltet. // // FanCtrl 0 ist an sich keine eigene // Geschwindigkeitsstufe, sondern gibt in Kombination mit 03 // die Kontrolle des Lüfters an das BIOS zurück. Der Hintergrund // dieser Einstellung ist die Möglichkeit den Lüfter beim Programmstart // von ACFC automatisch (zB. aus Stop) hochfahren zu lassen, // oder das BIOS frühzeitig wieder übernehmen zu lassen, oder // um Extemfälle wieder vom BIOS steuern zu lassen. (Sobald sich die // Temperatur wieder unterhalb des oberen 03-Levels befindet, wird // erneut der 31 Modus aktiviert und das BIOS deaktiviert.) // // Der letzte Parameter CtrlNWrite gibt vor, ob die Einstellung nur einmal // geschrieben werden soll (0) oder in jedem Cycle die Einstellung // kontrolliert und falls notwendig, weil abweichend, erneut geschrieben // werden soll (1). Wenn das BIOS aktiv ist kann CtrlNWrite=1 zu einem // andauernden Wechsel der Kontrolle zwischen ACFC und BIOS führen. // summer, room temp. >25°C // Celsius/FanCtrl/BiosCtrl/CtrlNWrite //------- 1. PROFIL ------- //Kühlgrad: ** //Level=10 0 5 0 //schnauf-schnauf (wenn gewünscht) Level=20 0 27 0 //auf 27 abbremsen, "würgt" den lüfter nicht so ab wie auf 127 Level=35 0 127 0 Level=40 0 195 0 Level=45 0 177 0 Level=50 0 169 0 Level=54 0 65 0 Level=58 0 167 0 Level=62 0 167 0 Level=66 1 128 0 Level=72 0 0 0 //------- 2. PROFIL (leiser) ------- //Kühlgrad: * //Level2=10 0 5 0 //schnauf-schnauf Level2=35 0 27 0 Level2=40 0 127 0 Level2=45 0 32 0 Level2=50 0 195 0 Level2=54 0 177 0 Level2=58 0 169 0 Level2=62 0 65 0 Level2=66 0 167 0 Level2=72 1 128 0 Level2=76 0 0 0 //------- deaktivierte Testprofile ------- //Smooth //Level=54 13 128 0 //Level=58 39 128 0 //Level=72 0 0 0 //Kühlgrad: * 1. Versuch (mit unangenehmen Stufen) //Level=40 0 27 0 //Level=50 0 32 0 //Level=54 0 62 0 //Level=58 0 26 0 //Level=62 0 36 0 //Level=66 0 65 0 //Level=72 0 0 0 //Kühlgrad: * 2. Versuch (mit unangenehmen Stufen) //Level=40 0 27 0 //Level=50 0 32 0 //Level=54 0 62 0 //Level=58 0 65 0 //Level=62 0 65 0 //Level=66 0 65 0 //Level=72 0 0 0 // ----------------------------------------------------------------- // C u s t o m S e t t i n g s // ----------------------------------------------------------------- // // ENGL: // "ActiveMode=0" program just reads config. // "ActiveMode=1" allow program to modify fan. // "ActiveMode=2" program will come up in smart mode. // "ActiveMode=3" program will come up in fan off mode. // // DE: // bei "ActiveMode=0" wird nur die Konfiguration ausgelesen. // bei "ActiveMode=1" die Veränderung des Lüfterverhaltens ist aktiviert. // bei "ActiveMode=2" startet das Programm im "Smart"-Modus. // bei "ActiveMode=3" startet das Programm im "Manual"-Modus. ActiveMode=2 ManModeControl=0 // 1 permanent control - 0 only one control in Manual Mode BiosAtManMode=128 // 31 Value for BiosControlByte to be set in Manual Mode ManFanSpeed=0 // Manual Mode Fan setting to start with // ----------------------------------------------------------------- // Safeguard: program exits manual mode and switches to smart mode with last chosen // profile, if this temp (degrees Centigrade) is achieved. // // Sicherheit: das Program verlässt den manual mode und schaltet auf smart mode mit // letztem gewähltem Profil, wenn diese Temperatur in °C erreicht ist: ManModeExit=98 // Safeguard: Program exits smart mode and switches to bios mode // if this temp (degrees Centigrade) is achieved. // // Sicherheit: Das Program verlässt den smart mode und schaltet auf Bios Modus // wenn diese Temperatur in °C erreicht ist: SmartModeExit=98 // ----------------------------------------------------------------- // Windows Priority of Process (0-5, normal=2), increase if fancontrol has // big delays in response while other processes consume performance. // // Windows-Priorität des Processes (0-5, normal=2), ggf. erhöhen, falls // Reaktion des Programms zu träge wegen Resourcenverbrauch durch andere // Anwendungen ProcessPriority=2 // ----------------------------------------------------------------- // ENGL: Minimize to systray immediately when starting // DE: Minimiert das Programm schon beim Start in die Taskleiste. StartMinimized=1 // ----------------------------------------------------------------- // ENGL: Show new icon with max. temperature / sensor name // DE: Zeige neues Icon mit Max. Temperatur / Sensorbezeichnung ShowTempIcon=1 // ----------------------------------------------------------------- // Show no icon ballons: NoBallons=1 // Show icon ballons: NoBallons=0 NoBallons=1 // IconColorFan=1 digital Icon will turn green while fan is running. // IconColorFan=1 Digitales Icon wird grün während der Lüfter läuft. IconColorFan=0 // ----------------------------------------------------------------- // ENGL: Beep frequency and duration (in ms) for successful // fan state changes. (Set either or both to zero to // disable) // // DE: Frequenz und Dauer des Piep-Signals (in ms), das eine erfolgreiche // Änderung des Lüfterzustands ankündigt. (Um den Piepton abzuschalten, // setzen Sie entweder einen oder beide Werte auf 0.) FanBeep=0 0 // -------------------------------------------------------- // ENGL: Log2File=1 enables, Log2File=0 disables // writing to TPFanControl.log // // DE: Log2File=1 aktiviert, Log2File=0 deaktiviert // Schreiben nach TPFanControl.log Log2File=1 // -------------------------------------------------------- // ENGL: Log2csv=1 enables, Log2csv=0 disables // writing to TPFanControl_csv.txt renamed to // TPFanControl_last_csv.txt after restart of TPFanControl // rename to *.csv for use with excel // DE: Log2csv=1 aktiviert, Log2csv=0 deaktiviert // Schreiben nach TPFanControl_csv.txt umbenannt in // TPFanControl_last_csv.txt nach erneutem Start von TPFanControl // nach *.csv umbenennen für Bearbeitung mit excel Log2csv=0 // --------------------------------------------------------- // ENGL: calculating Highest Temp with: // temperature of sensor no. = real temp minus SensorOffsetno. // Default SensorOffset1-12=0 , Capital O in SensorOffset, // to activate delete slashes, // Negative SensorOffsetno. values increase temperature values. // DE: Berechnung von Highest Temp mit: // Temperatur des Sensor Nr. = reale Temp minus SensorOffsetnr. // Default: SensorOffset1-12=0 , Grosses O in SensorOffsetnr. // zum Aktivieren Schrägstriche löschen, // Negative SensorOffsetnr-Werte erhöhen den Temperaturwert. //SensorOffset1=20 //SensorOffset2=20 //SensorOffset3=0 //SensorOffset4=2 //SensorOffset5=1 //SensorOffset6=5 //SensorOffset7=5 //SensorOffset8=4 //SensorOffset9=3 //SensorOffset10=2 //SensorOffset11=1 //SensorOffset12=5 //ShowBiasedTemps=1 // set to 1 to show calculated temps for sensors // // ----------------------------------------------------------------- // V E R Y E x p e r t S e t t i n g s // ----------------------------------------------------------------- // Reading Bytes From Embedded Controller TripleCheck=1 // 1 = active, read 3 times, accept value if equal only //TripleCheckTime=10 // time between reading //DoubleCheck=1 // 1 = active, if triple check is not active //DoubleCheckTime=10 // time between reading RetryReadEC=5 // after failed double/triple check //RetryTime=50 // retry after millisecs //Verbosity=0 // tell me more // -------------------------------------------------------- // ENGL: If this max number of consecutive EC read errors occur // program will switch fan back to bios mode and exit // DE: Sobald die maximale Anzahl aufeinanderfolgender EC-Lesefehler // erreicht ist, schaltet das Programm auf den BIOS-Modus um und wird beendet. MaxReadErrors= 10 //*********************************************************************** // Very important: don't change these following values unless you know what you're doing * //**************************************************************************** // Registers of the embedded controller * //EC_DATAPORT=98 // = 0x62; (default) * //EC_CTRLPORT=102 // = 0x66; (default) * // * // Embedded controller status register bits * //EC_STAT_OBF=1 // = 0x01; (default) * //EC_STAT_IBF=2 // = 0x02; (default) * //EC_STAT_CMD=8 // = 0x08; (default) * // * // Embedded controller commands * // (write to EC_CTRLPORT to initiate read/write operation) * //EC_CTRLPORT_READ=128 // = 0x80; (default) * //EC_CTRLPORT_WRITE=129 // = 0x81; (default) * //EC_CTRLPORT_QUERY=132 // = 0x84; (default) * //***********************************************************************

-
Here is mine .ini file for 5739G for the specifications, as described in my signature:
Works fine for my notebook. Cooler is working as cooler of MacBooksCode:// // ----------------------------------------------------------------------- // A C E R - E x p e r t S e t t i n g s - v.71b for Extensa // ----------------------------------------------------------------------- // Window---------------------------------------------------------- // Set to 1 for slim window // Schmales Programmfenster bei SlimWindow=1, ansonsten =0 SlimWindow=0 // Temperatures-------------------------------------------------------- // Primary name and EC-offset location of temp register(s) // containing temperature information Sensor=GPU 89 // GPU temp (offset 0 to 255 depending on model*) Sensor=CP1 88 sENSOR=CP2 90 // CPU temp (offset 0 to 255 depending on model*) DeltaMaxTemp=5 // Temps can only change in one step DeltaMaxTemp degrees Cycle=2000 // check temperatures every x milliseconds (default 5000) // Controlling-------------------------------------------------------- // ControlByte(s) are EC-offset locations of registers // which are to be set by program BiosControlByte=85 // offset of byte controlling fan regulation by active BIOS BiosControlOn=0 // value to switch BIOS control to activated BiosControlOff=128 // 32 = slow // value to switch BIOS control to deactivated RangeBiosOnLow=0 // lowest Bios-active value RangeBiosOnHigh=11 // highest Bios-active value FanControlByte=94 // offset of byte controlling fan speed by BIOS deactivated //AfterWriteDelay=500 // millisec delay after writing an ec byte //SwitchWOCheck=0 // write anytime, without checking if neccessary // FanSpeeddisplay------------------------------------------------------- // FanSpeedByte & FanSpeedCalib if FanSpeed is a single byte integer // (depending on model*) FanSpeedByte=92 // (offset 0 to 255 depending on model) // or Low and High Byte if FanSpeed is a double byte integer FanSpeedCalib=10000 // try to get right rpm values.. FanSpeedAdd=0 // FanSpeedByte + FanSpeedAdd resp. zero-crossing // if FanSpeedMethod=1 FanSpeedMethod=1 // 0 = Content of FanSpeedByte // 1 = FanSpeed = FanSpeedCalib // content(FanSpeedByte)+FanSpeedAdd // 2 = Lokk for matching values in table below (up to 30 pairs) FanSpeed=0 3500 // If FanSpeedMethod=2 FanSpeed=32 3000 // FanSpeedByte -> all from 0 to 255 (strictly going up !!!) FanSpeed=65 1900 // be aware of zero-crossing ! FanSpeed=100 1000 FanSpeed=125 780 FanSpeed=174 580 FanSpeed=200 500 FanSpeed=233 430 FanSpeed=255 160 // -------------------------------------------------------- // DE: Im Folgenden sind die Temperaturpegel samt den jeweils // zugeordeten Lьfterstufen aufgelistet. (Sobald die Temperatur in // den Bereich eines niedrigeren bzw. hцheren Pegels wechselt, wird // die Lьfterstufe automatisch angepasst und folglich verringert bzw. // erhцht sich die Geschwindigkeit des Lьfters.) Diese Liste kann // weniger oder auch mehr Stufen (bis zu 16) beinhalten. SinngemдЯ sollte die // erste Stufe die gewьnschte Temperatur definieren, bei der sich // auch im Winter der Lьfter einschaltet. // // FanCtrl 0 ist an sich keine eigene // Geschwindigkeitsstufe, sondern gibt in Kombination mit 03 // die Kontrolle des Lьfters an das BIOS zurьck. Der Hintergrund // dieser Einstellung ist die Mцglichkeit den Lьfter beim Programmstart // von ACFC automatisch (zB. aus Stop) hochfahren zu lassen, // oder das BIOS frьhzeitig wieder ьbernehmen zu lassen, oder // um Extemfдlle wieder vom BIOS steuern zu lassen. (Sobald sich die // Temperatur wieder unterhalb des oberen 03-Levels befindet, wird // erneut der 31 Modus aktiviert und das BIOS deaktiviert.) // // Der letzte Parameter CtrlNWrite gibt vor, ob die Einstellung nur einmal // geschrieben werden soll (0) oder in jedem Cycle die Einstellung // kontrolliert und falls notwendig, weil abweichend, erneut geschrieben // werden soll (1). Wenn das BIOS aktiv ist kann CtrlNWrite=1 zu einem // andauernden Wechsel der Kontrolle zwischen ACFC und BIOS fьhren. // summer, room temp. >25°C // Celsius/FanCtrl/BiosCtrl/CtrlNWrite Level=10 250 128 0 Level=40 3 128 0 level=45 4 128 0 level=50 5 128 0 level=55 39 128 0 Level=65 39 128 0 Level=75 39 128 0 Level=83 39 128 0 // optional 2nd profile // winter, room temp. <24°C // ----------------------------------------------------------------- // C u s t o m S e t t i n g s // ----------------------------------------------------------------- // // ENGL: // "ActiveMode=0" program just reads config. // "ActiveMode=1" allow program to modify fan. // "ActiveMode=2" program will come up in smart mode. // "ActiveMode=3" program will come up in fan off mode. // // DE: // bei "ActiveMode=0" wird nur die Konfiguration ausgelesen. // bei "ActiveMode=1" die Verдnderung des Lьfterverhaltens ist aktiviert. // bei "ActiveMode=2" startet das Programm im "Smart"-Modus. // bei "ActiveMode=3" startet das Programm im "Manual"-Modus. ActiveMode=2 ManModeControl=0 // 1 permanent control - 0 only one control in Manual Mode BiosAtManMode=31 // Value for BiosControlByte to be set in Manual Mode ManFanSpeed=0 // Manual Mode Fan setting to start with // ----------------------------------------------------------------- // Safeguard: program exits manual mode and switches to smart mode with last chosen // profile, if this temp (degrees Centigrade) is achieved. // // Sicherheit: das Program verlдsst den manual mode und schaltet auf smart mode mit // letztem gewдhltem Profil, wenn diese Temperatur in °C erreicht ist: ManModeExit=85 // Safeguard: Program exits smart mode and switches to bios mode // if this temp (degrees Centigrade) is achieved. // // Sicherheit: Das Program verlдsst den smart mode und schaltet auf Bios Modus // wenn diese Temperatur in °C erreicht ist: SmartModeExit=85 // ----------------------------------------------------------------- // Windows Priority of Process (0-5, normal=2), increase if fancontrol has // big delays in response while other processes consume performance. // // Windows-Prioritдt des Processes (0-5, normal=2), ggf. erhцhen, falls // Reaktion des Programms zu trдge wegen Resourcenverbrauch durch andere // Anwendungen ProcessPriority=2 // ----------------------------------------------------------------- // ENGL: Minimize to systray immediately when starting // DE: Minimiert das Programm schon beim Start in die Taskleiste. StartMinimized=1 // ----------------------------------------------------------------- // ENGL: Show new icon with max. temperature / sensor name // DE: Zeige neues Icon mit Max. Temperatur / Sensorbezeichnung ShowTempIcon=1 // ----------------------------------------------------------------- // Show no icon ballons: NoBallons=1 // Show icon ballons: NoBallons=0 NoBallons=1 // IconColorFan=1 digital Icon will turn green while fan is running. // IconColorFan=1 Digitales Icon wird grьn wдhrend der Lьfter lдuft. IconColorFan=1 // ----------------------------------------------------------------- // ENGL: Temperature thresholds for turning the taskbar icon // yellow orange red (Smart and Manual mode only and // only together with MinimizeToTray=1) // // DE: Temperaturgrenzwerte, die das Symbol in der Taskbar gelb, // orange bzw. rot fдrben. (Nur im "Smart"- und "Manual"-Modus // in Kombination mit "MinimizeToTray=1" verfьgbar.) IconLevels=50 55 60 // ----------------------------------------------------------------- // ENGL: Beep frequency and duration (in ms) for successful // fan state changes. (Set either or both to zero to // disable) // // DE: Frequenz und Dauer des Piep-Signals (in ms), das eine erfolgreiche // Дnderung des Lьfterzustands ankьndigt. (Um den Piepton abzuschalten, // setzen Sie entweder einen oder beide Werte auf 0.) FanBeep=0 0 // -------------------------------------------------------- // ENGL: Log2File=1 enables, Log2File=0 disables // writing to TPFanControl.log // // DE: Log2File=1 aktiviert, Log2File=0 deaktiviert // Schreiben nach TPFanControl.log Log2File=0 // -------------------------------------------------------- // ENGL: Log2csv=1 enables, Log2csv=0 disables // writing to TPFanControl_csv.txt renamed to // TPFanControl_last_csv.txt after restart of TPFanControl // rename to *.csv for use with excel // DE: Log2csv=1 aktiviert, Log2csv=0 deaktiviert // Schreiben nach TPFanControl_csv.txt umbenannt in // TPFanControl_last_csv.txt nach erneutem Start von TPFanControl // nach *.csv umbenennen fьr Bearbeitung mit excel Log2csv=0 // --------------------------------------------------------- // ENGL: calculating Highest Temp with: // temperature of sensor no. = real temp minus SensorOffsetno. // Default SensorOffset1-12=0 , Capital O in SensorOffset, // to activate delete slashes, // Negative SensorOffsetno. values increase temperature values. // DE: Berechnung von Highest Temp mit: // Temperatur des Sensor Nr. = reale Temp minus SensorOffsetnr. // Default: SensorOffset1-12=0 , Grosses O in SensorOffsetnr. // zum Aktivieren Schrдgstriche lцschen, // Negative SensorOffsetnr-Werte erhцhen den Temperaturwert. //SensorOffset1=20 //SensorOffset2=20 //SensorOffset3=0 //SensorOffset4=2 //SensorOffset5=1 //SensorOffset6=5 //SensorOffset7=5 //SensorOffset8=4 //SensorOffset9=3 //SensorOffset10=2 //SensorOffset11=1 //SensorOffset12=5 //ShowBiasedTemps=1 // set to 1 to show calculated temps for sensors // // ----------------------------------------------------------------- // V E R Y E x p e r t S e t t i n g s // ----------------------------------------------------------------- // Reading Bytes From Embedded Controller TripleCheck=1 // 1 = active, read 3 times, accept value if equal only //TripleCheckTime=10 // time between reading //DoubleCheck=1 // 1 = active, if triple check is not active //DoubleCheckTime=10 // time between reading RetryReadEC=5 // after failed double/triple check //RetryTime=50 // retry after millisecs //Verbosity=0 // tell me more // -------------------------------------------------------- // ENGL: If this max number of consecutive EC read errors occur // program will switch fan back to bios mode and exit // DE: Sobald die maximale Anzahl aufeinanderfolgender EC-Lesefehler // erreicht ist, schaltet das Programm auf den BIOS-Modus um und wird beendet. MaxReadErrors= 10 //*********************************************************************** // Very important: don't change these following values unless you know what you're doing * //**************************************************************************** // Registers of the embedded controller * //EC_DATAPORT=98 // = 0x62; (default) * //EC_CTRLPORT=102 // = 0x66; (default) * // * // Embedded controller status register bits * //EC_STAT_OBF=1 // = 0x01; (default) * //EC_STAT_IBF=2 // = 0x02; (default) * //EC_STAT_CMD=8 // = 0x08; (default) * // * // Embedded controller commands * // (write to EC_CTRLPORT to initiate read/write operation) * //EC_CTRLPORT_READ=128 // = 0x80; (default) * //EC_CTRLPORT_WRITE=129 // = 0x81; (default) * //EC_CTRLPORT_QUERY=132 // = 0x84; (default) * //***********************************************************************
Here is the link for the download. -
I wonder if anyone has had a similar issue to mine.
My orginal hard drive died on me last week. Thus I ordered a new one and the recovery cds for my laptop. Installed the cds just fine, restarted the computer and you get to windows setting up devices. It then fails here and restarts the computer. You then see the windows logo and after that it goes to setup is starting services.
I then get this error
Windows could not complete the installation. To install windows on this computer, restart installation. Ok maybe something went wrong during the setup, so I formatted the drive and tried again. Got the same thing so I installed Linux Mink 14 to make sure it was not the new drive. That installed just fine so im left scratching my head. Is the recovery cds not going to work without that magical partition Acer puts on its computer when you get it? Anyone else seen this error?
I could use my OEM disk and install win7 but my COA key is unreadable on the laptop, they really went with a cheap sticker since XP.
Thanks for any help/advice.
Clay -
I am not entirely sure what causes this issue, but its very likely that some driver is missing or something. Maybe that theres no acer partition, but anyway: Why would you want to install the acer OEM windows 7? Its just full of crap Acer thrash shareware and stuff. Just grab yourself an original Windows 7 install CD/DVD and make a clean Windows 7 install...All the Drivers are on the internet anyways.
Sad to hear that your sticker is unreadable, my sticker is actually also worn out and you cant read it anymore, but the windows 7 key is still perfectly readable. I think they have printed or made the key in a special way so that it does not rub off...at least for mine
nice to see this thread living again
-
@bernida
How did you overclocked your GPU ? What Software did you used for it and how are the temperatures (Idle/Load) ? -
The Software I use is an old version of EVGA Precision, namely 2.1.2
Its the final version of the 2.x series, you can download it here
I would not use the newer versions because a) they wont give you any additional functionality (they are made for the new graphics cards), b) they are not as slim and lightweight as 2.1.2 and c) because 2.1.2 is working fine with all latest drivers
So I would recommend you to use this version. The new versions have a lot of features that are for newer cards, such as power targets etc., which you dont need. You just wanna have the gpu/shader and mem clocks, so 2.1.2 is perfectly suitable for this. Maybe even a 1.x version will do (have not tested though)
Anyway, I start this program along with windows via a startscript that also runs my quietHDD (for increased drive performance and life) and ThrottleStop (for undervolting CPU)
Nice thing is, you just need to start the program, set the values (or load a profile), press apply and then you can close the program. The graphics card will keep the settings until you reboot.
Here you can see my settings and what it looks like: http://i.imgur.com/YS4jm1h.png
Note that the available increments of EVGA-P. do not exactly match the available increments or your graphics card.
Basically 643 matches, the next higher value in EVGA-Precision is 649, but GPU will go to 648. Shaders are 1431 vs.1427.
So just that you dont wonder why the shader is set to 1414 but goes to 1418.
Same with the memory. Its basically maxed out. You could actually set 948, but it will stay at 945.
I have shader and gpu clock linked (I think they should be linked, I dont know exactly though but I dont really want to twerk it to the max, I am quite satisfied with this, but feel free to try out) and this is a very stable setting for me (running this since 1.5 years and no drop-outs/crashes ever since)
Any setting 10-15MHz over this got me crashes in the first month of overclocking (when I was testing out what would be the max possible stable setting)
But the settings can be totally different for your graphics card.
Temps are around 35-40°C idle and 63-72°C on load. Depending on room temperature and surface the laptop is standing on. So I am quite satisfied with it.
kind regards
bernida -
@bernida
Alright, i had those settings some months ago, but I wanted to know, if you have used another Programm
But thanks for the nice reply
-
Hello!
Fantastic to find a forum for my old workhorse
The only upgrade I'v done so far is to switch to an 60gb SSD, as expected, it was an amazing difference. Plus I'v got 8 gigs of ram.
And Im running windows 8 (not that impressed so far), do I need any particular drivers for this? Stuff like "the green button" makes no difference,and I don't think the audio is the best anymore.
Though 60gb is to little, so I was thinking about replacing the dvd/bluray with this: SATA 2nd Hard Drive HDD SSD Caddy for Acer Aspire 5739 5739G 5739Z 5739ZG New | eBay
Will It look ok on this model, Im thinking about the shape of the outside of the dvd compared to this one?
And as I'v read through quite a lot of the treads here, I see many of you has replaced your cpu's. I'v thought about this for a while, is it worth it?
I have P8700 cpu and GT 240M gpu. Mostly for fun, I made this list of cpu's (I think) will fit the computer, and compare them with mine (and also the fastest mobile cpu's there is): Mobile Processors - Benchmarklist - NotebookCheck.net Tech the P8700 there's quite a gap, even to the cheapest T9600 Intel Core 2 Duo T9600 2 8 GHz Dual Core ZY510AV Processor | eBay. The top one's costs at least the double :S
Whats your opinion about cpu replacement?
Regards
/Alfred -
I would not recommend you to upgrade your CPU in this system
the whole Core2 platform is just too old and the bonus performance is too little to be worthwhile, as you already have a quite good CPU of the core2 series.
just save the money for a future new gen - system. even some "old" i3s perform way better than Core2Duo.
its jsut not woth the money, except you can get a cheap one (like <50$) which but is very unlikely -
Thanks for your reply!
Thats what I thought, maybe intel t9600 | eBay If I see one with a good price. But I suppose I could do some overclock on my cpu aswell.
But how about a secondary hdd? Will this one work? SATA 2nd Hard Drive HDD SSD Caddy for Acer Aspire 5739 5739G 5739Z 5739ZG New | eBay
It's said to be for this computer, but from the picture, the outside looks all flat. The dvd on the pc is not all flat on the outside, If you understand what I mean
-
I went from a p8700 to a t9600. I noticed very little difference except the cpu gets alot hotter. Even though I have undervolted very far. I have 6770m though, so naturally struggle for temperature.
Sent from my HTC One using Tapatalk 2 -
If you want real performance boost, you have to put in your notebook T9900 or X9100. These processors are not cheap at all. And, in addition you have to put good GPU and SSD. All these upgrades costs good money. Think good, if you really need these upgrades. For example, my notebook was upgraded, when X9100 was 180-200 $ in ebay. The only thing that I want to upgrade now is my GPU. I want to change it to 7770M, or M400 or 6770M
-
What do you think of this one: SATA 2nd Hard Drive HDD SSD Caddy for Acer Aspire 5739 5739G 5739Z 5739ZG New | eBay Or you suggest another one?
-
Just buy any sata 12.7mm optical Bay to hard drive converter. Mine was cheap from china. Doesn't have to say for acer 5739. Make sure it is sata to sata though not pata.
Sent from my HTC One using Tapatalk 2 -
Finally I`ve ordered M4000. At mondey it will be shipped!
Three upgrades left:
Upgrade No1, Upgrade No2 and Upgrade No3.
After all these upgrades there`ll be no need on changing the laptop for 2-3 years. -
Also ordered an M4000 should be here in the next couple weeks.
Sent from my Nexus 7 using Tapatalk 4 -
The 7770m at 950/1500 is bottlenecked with an x9100 at 3.6ghz....
-
Meaker, do you have installed X9100 E0 stepping? Overclocked X9100 - has to be very hot beast.
-
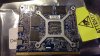
Hello guys,
2day i pulled up my old gt130m than swapped gts250m.it is really faster than old one even without driver in desktop mode.whatever..here is the problem after i swapped it windows saw GTS 250M standard vga graphic driver.Its ok cus old one was gt130m meaning i installed gforce 100m series driver.After all these i searched driver from nvidia site and dowloaded it.The DRV version is WHQL 327.23.But the driver not support it .is there anything else that i can do ?
Win7 64 bit, im sure nothng wrong with driver.
i bought new.And these are all i know about card.
View attachment 102605
View attachment 102606
the orginal bios(from gpu z)
https://hotfile.com/dl/248042150/53636fa/GT215.rar.html
"propolkin" my friend tried to helped me but we couldnt solved the problem yet :/ he also suggest "314.22-notebook-win8-win7-64bit-international-whql.exe" that driver but it didnt work too.
and the other friend from ths forum sugget thats web site LaptopVideo2Go: Drivers for find right driver.in this site u will see 2 blank box for write information about ur own card.Than i opened GPU-Z i took the hardware id " 10DE-0CA9" and wrote it the "0CA9" in first blank.i searched and found after i download i tried the install it but again i got eror " not support ".
The other think is i didnt install new notebook bios yet.it has still orginal bios since i bought.
"propolkin" told me to install the 3310 bios and also the new bios include new devices in it ? is it help in that problem ?
regards -
As I said, it possibly can help to fix your problem (updating BIOS version), but not 100%. Hope someone will help you too with that issue.
ajoleyte likes this. -
when i arrived home my first job will be install the bios "3310".
-
yo mate need help for another 2 problem and i thnk u allready known these.. 1 st the cd rom is not visible sometimes 2nd the speaker makes iritating noise :s when i using headphone.
at last i didnt install bios update yet ? -
CD-ROM is not visible? It is not visible at Device Manager or where? About speakers - what kind of noise? Are you voice-chatting with someone (by skype, for example), when you are using headphone?
-
I used to get headphone noise because of the Realtek HD drivers. I found I had set the audio quality to a high frequency (in the hope of improved sound) Once I dropped this to standard 44Khz or something it was fine again. Alternatively you may not have the latest speaker driver.
propolkin likes this. -
sometimes its not visible in device manager(IN MY COMPUTER ALSO) when i restart again its ok :s
the voice problem is not according to som program its always like that when i jacked headphone its allways coming noisy sound :s but in notebook speakers nothing wrong the voice is good.it starts when i jacked headphone or speaker"4+1 or smt else" -
thnx mate, im gonna try latest driver.. than i ll write result here.
do u remember which version drv u installed ?
regards -
Always the latest. Should be 2.71 I think? I'd recommend downloading from CNET servers because realteks website is super slow at downloading.
Sent from my HTC One using Tapatalk 2 -
About CD-ROM, maybe it is not fully attached to a notebook. Maybe it is faulty. Try to swap it by another, if you have such possibility. About sound - Avora is right, at most cases it is outdated or bad driver, try to update it.
For example my CD-ROM always is correctly recognized by notebook, but it can`t read almost all CD`s. It is related to UDMA Mode 4 that can be enabled or disabled through device manager. -
Can`t wait arrival anymore of my M4000.
-
You will never guess what I have just received today.


-
Hey Avora,
I purchased AMD's m4000 and installed it in my 5739g and it black screened. I reinstalled my 240m I updated the bios to 3310 and disabled my 240m Drivers. Did you have to mod the bios for this?
During my install I messed something up because now my computer wont even show the screen when I put the 240m back in.
I also tried the hold the power button to let out any power and also tried the external monitor. -
The card is actually fitted to my 5935g. Not my 5739g. But there shouldn't be a problem. I did not modify the BIOS for the video card or the laptop. Could it be that something has been damaged/shorted during installation?
In other news I scored a P2340 in 3dmark11 with the bog standard clocks.
Sent from my HTC One using Tapatalk now Free -
Congrats, Avora!
One thing - I don`t understand, why did you get it faster, than me?
I`ve ordered mine at 27, and it is only at DUESSELDORF at that moment
. Damn, damn, damn. Can`t wait, I want this card!
-
Awesome Score! Looking forward to being there soon myself.
Yeah I think something did short. battery was in it and my screw driver slipped and fell into the bottom of the exposed laptop and touched the motherboard near the wifi card and it sparked. lol Diagnostic time.
I'll probably have to replace the mobo
thanks for the info.
Enjoy the m4000! -
I ordered on the 24th. It also didn't have as far to go.
One word of warning though is it comes with a bracket attached. This needs to be removed, and to do it safely you need to heat the sticky tape they use on it. Wasn't a job I enjoyed.
Schoolboy error bluecapt74. Always remove any power from electronics before you go anywhere near them. Lesson learned I hope. ;-)
Sent from my HTC One using Tapatalk now Free -
Haha, Schoolboy error for sure!
Yeah the bracket came off easily for me, luckily.
thanks for the help!
Hopefully I'll have good news soon! -
About which bracket you are talking about? Can you post photos of it? And this card as I know has to be with 2 Gb of GDDR5, no?
Avora, does this card heats strongly or it can be compared with gt240m in that point? -
You have to remember two basic, an most important of course, rules - first, remove the battery, second, when it is possible, remove BIOS battery. Third - be always grounded. But, anybody can make a mistake, that`s okay.
-
Some of the PR80c cards are 2GB some are 1GB. This one is a 1GB. Which lets face it for a laptop is more than sufficient.
This is the bracket you will have to remove.
The card seems to be warm indeed, mid 70's full load. But I haven't tested enough. I couldn't compare to the GT240m as I have never had one. -
But this is some kind heatsink, no?
-
It's a mounting plate. Designed for the Dell the card came from. It won't fit the 5739g with this in place. As it doesn't need one. My 5935g needed a longer thread. It may spread some heat. But not what it is designed for.
Sent from my HTC One using Tapatalk now Free -
Damn. And what if I use longer screws? It can be removed just by heating with heat-gun?
-
With the back of a screwdriver. Press each corner gently and repeat until it pops on the other side. If nothing happens, press it more firmly... until it breaks, kidding
It's much safer than any heat applying trick.
@Avora - congrats for the new monster GPU
-
Make sure you don't use a heat gun. I lightly heated with a normal hair dryer. Not a sustained blast.
The screwdriver and a gentle push works every time. May need a tooth pick to loosen some of the sticky pad as well. I did.
Yes it is a bit of a beast to say the least.
Sent from my HTC One using Tapatalk now Free -
Today my card must be delivered!
Updated: My card is delivered to me! at evening I`ll check it, when I`ll be at home. By now I can say, that at the connector I can see some scratches. Hope it will not affect on the functionality.
-
Finaly I got my M4000 installed on the notebook. But there is two problems: 1. the GPU is not fully fit to heatsink, I have had to spread lot of thermal paste to ensure the contact of GPU and heatsing. 2. Drivers, downloaded from amd site are not correctly installing. I installed drivers, but at device manager I still can see "Standard VGA adapter". What could be the problem?
-
You'll probably need a square of copper. I did. My drivers were already installed from my 6770m. So had no issues. But you'll probably have to search for whql drivers and directly download and install them. Amd have a weird detection problem with mobile cards for some reason.
Sent from my HTC One using Tapatalk now Free -
I have whql drivers. strange... What thiknes is your copper square? It is dangerous, as I understand, because the GPU can be damagedby it.
Official Acer Aspire 5739G Owner's Lounge
Discussion in 'Acer' started by tuηay, Jun 21, 2011.


