i would use thermal glue. If one of those coppersinks gets loose and fall over some components on the mobo, it will kill you M11x. Wouldt risk that as most of the thermal tapes on the marked are known for poor adhesion..
-
sorry for the late reply.
1. i used the thermal tape linked in the first post.
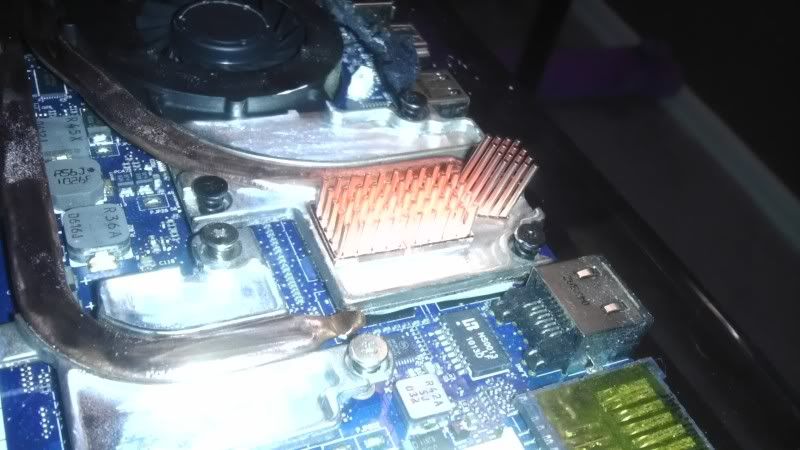
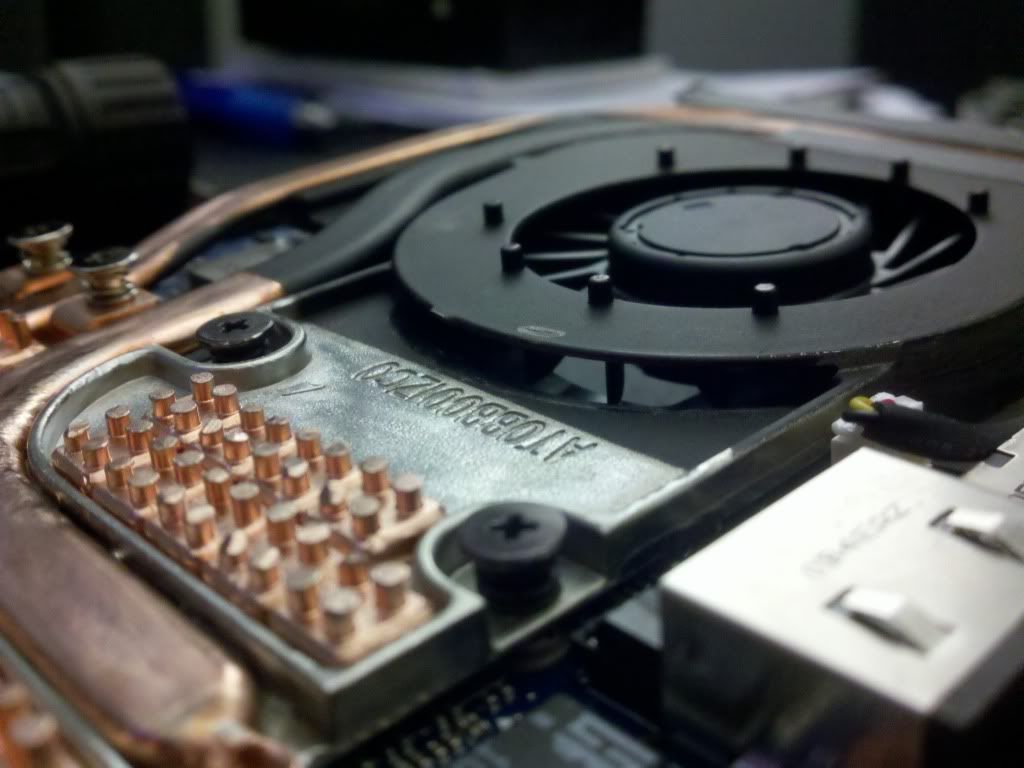
2. your just adding to the heat sink here. so just make sure the sock heatsink is nice and clean. un-mount it, i used a wire wheel to clean mine, and attach the new copper to the top side of the heat sink with the double sided thermal tape. then attach the new copper to the tape.
3. huh?
4. i didnt use any on the GPU just on top of the area above the north bridge.
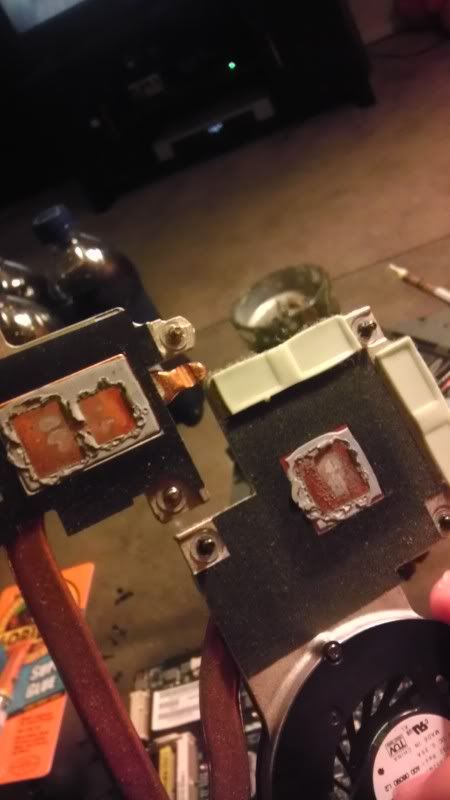
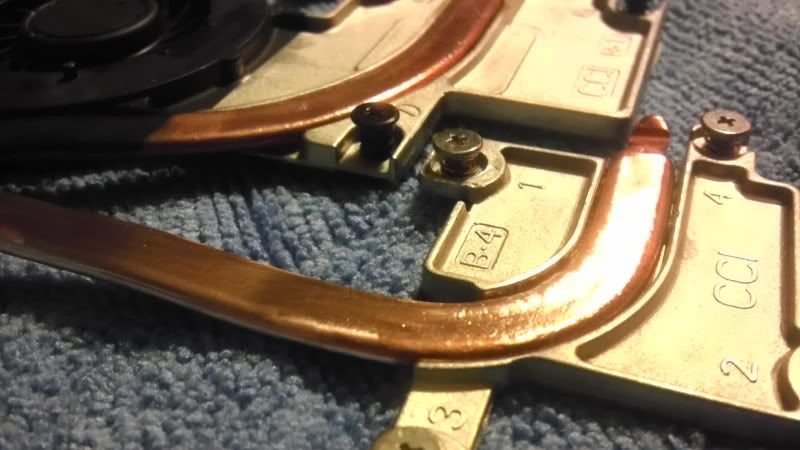
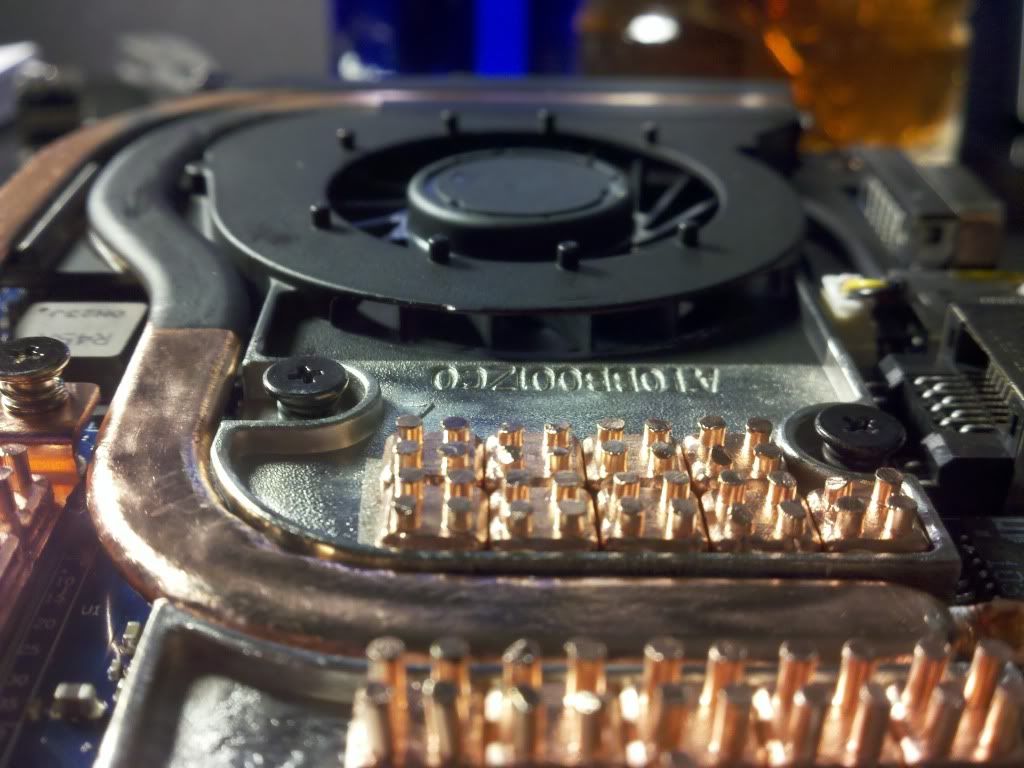
5. yea those 2 squares are the shims.
6. no. uea thermal paste as normal. then us the tape on the top side to mount the new copper.
7. i only used thermal tape in the areas that i added new copper. -
So I was thinking today at work that maybe we can find someone that can CNC us the bottom plate (not the customizable silver tag). This way we can replace the current plate with a copper based one, and maybe even make space for the additional fan placement near the useless 3g/wwan card slot.
Someguy, I appreciate the information youve provided, however I have some more questions for ya lol
Is the m11x fan physically attached to the heat sink? Is it possible to try and fit in a larger fan? I see from your pictures youve provided that it looks to be a 3 pin fan, so at least its not a proprietary design.
is the useless 3g/wwan slot at least powered? If it is then their is a multitude of things we can do, but the main possibility that im sure we all would like is to add an additional fan to help airflow to the exhaust fan.
Now it may be necessary to allow more space for the additional fan by expanding on the bottom of the laptop with the potential of the copper bottom, just might need to get some bigger rubber feet to allow for clearance. -
FYI: the base-plate is copper, there is just the once aluminum piece thats soldered to the base-plate for the GFX RAM cooling. changing the whole assembly to copper would barley be noticeable, maybe 1-3c at best. changing the shape/surface area however, would make a huge difference.
im sure you could grab power for a second fan just about any ware on the mobo so that wouldnt be an issue. piggy backing off the existing fan header would be more ideal as long as its not over loaded. doing it this way would keep the same fan profiles and speed settings as the OG fan. the fan assembly is just held on to the heat sink by a few small screws if i remember correctly.
my thinking is if you have easy access to any type of shop equipment that can make a custom heatsink id just map out a new shape altogether with as much surface area as possible. if done right you wouldnt even really need to worry about a second fan to be honest. -
My laptop is all teardown , waiting for the tape and enzotech.
I was really surprised to see the Bluetooth module installed on the mobo. My invoice does'nt mention bluetooth. I ordered 1 for nothing :O
Why not use shim on the gpu ?
Did you used thermal paste on the CPU at all? Only tape both side right? -
the only reason i got the shims was for low profile copper material. i used the shims to make custom heatsinks to fit in small spaces.
the shims were not used on the under side of the heatsink. on the underside i only replaced the thermal paste. all else remained stock on the underside.
i did use thermal tape on the topside to attach the new heatsink material to the stock assembly. but not on the bottom side. -
I though you were using shim on the GPU/CPU Core <<
Like on this video
HP DV9000 Series Heatsink Mod - YouTube
Look at 6min
What you guys think of doing this? -
NO.
please go back and look at the pics. i only used 2 shims and you can CLEARLY see were i put them. (the 2 square copper things on top of the heatsink... cant miss em)
I DID NOT MOD ANYTHING UNDER THE HEATSINK.....
im not trying to be a jerk, im trying to help you here... but i dont think your even reading what i type.
the pics them selves are pretty much self explanatory of how the mod works. if you cant follow that please just stop now. i dont want you to brick your laptop for a mod thats basically not even needed. -
Umad? Mr Attitude<<
I was just pointing that people use shims straight on the core <<
like on the video youtube i linked << -
Did the guy in that video really just use a penny as a heatsink?
-
yeah, but its cool. He used the more "flat" side
-
Mod done, idle temps seems pretty much the same. But max temp at full load lowered maybe 5C+-
I have'nt cut the fan and i won't, i need more copper on the CPU
I had to remove those 2 enzotech on the far right.


-
Nice, load up more copper on the heatsinks and it will drop even more!
-
You'd probably have better results from loading more copper to the gpu side since the sandybridge architecture cant overclock with the m11x, as far as a lot of review sites have a opinion that the m11x is more gpu bound than cpu
In place of the copper shims, I was looking at this alternative, but I just dont see it fitting, I'd have to take some measurements, but for now im ordering two sets of copper
http://www.newegg.com/Product/Product.aspx?Item=N82E16835708148 -
Looks good. Do you have a guide on how to get this mod?
I plan to do it on Precision. I know it's got good cooling on this machine by itself already.
Thanks.Last edited by a moderator: May 6, 2015 -
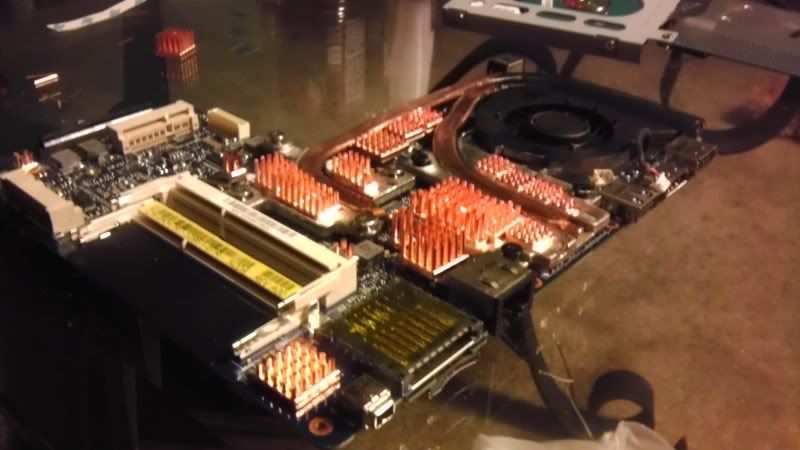
ok ordered three different sets of copper, and a 6x set of 1.2mm copper shims, I also still have some shin-etsu for the actual heatsink. All thats with is to pick up a wire brush for my dremel and wait for the thermal tape to come in and its moddin time for my i7 R2
-
On the picture , its 3 .55mm copper shim stacked. Yeah 1.2mm will be better.
you pretty much can stack 2 near the cpu. I'm waiting 10 X 1.2mm this week. I'll post picture later this week -
Ah. It's just sticking copper into every possible metal area near the CPU/GPU's existing heat spreader.
-
Just finished my version of this mod, I can already tell the difference and im not even gaming yet, still warm to the touch on the bottom but is cool on the palmrest. I will try a game or two tomorrow as Im very tired from this ordeal and got school in a few hours
-
nice work!
if you where to rough up the surface of the copper shims you would basically double or triple the surface area. making the heat more easy to be removed from the copper.")
thats why mine look all scratched up in my pics. i took a really rough dremel bit to them and scratched the crap out of them. then i finished it off with a wire-wheel to remove any loose pieces of copper, so no lil pieces would fall off into the laptop.
if you don't have a dremel 200 grit sand paper would work just as well. -
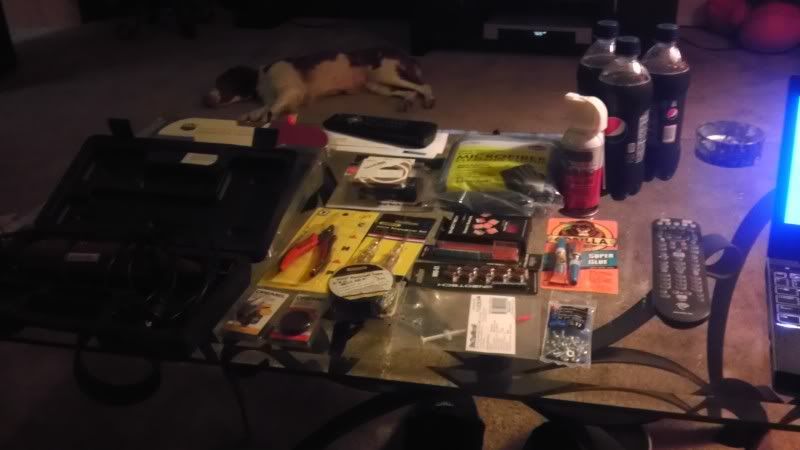
Everything used
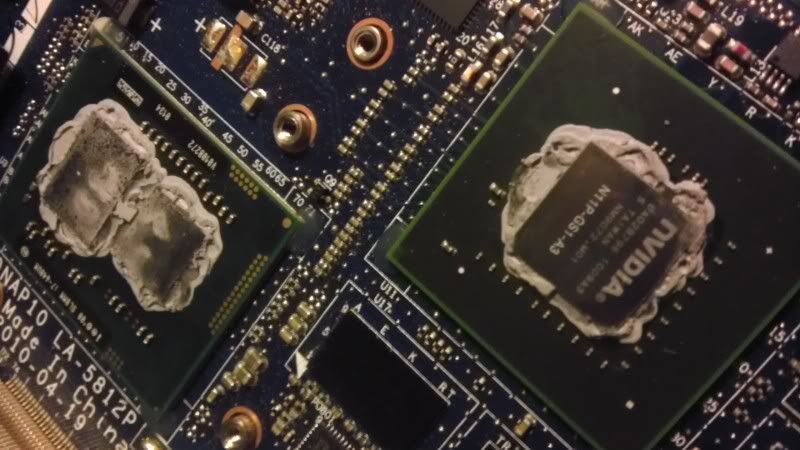
A classic example of an OEM using too much damned Thermal Grease.
You can see that the thremal Grease on the cpu/NB was dried out, a part of the reason why I was constantly overheating.
Hit the copper with a wire brush
its a bad flash, but if you look closely I smoothed out the aluminum spreader so that it make the most contact.
Time for a pizza break!

Just about finished!

Finished product!
Ive also used an air can to blow out the dust/dirt in the exhaust.
My copper shims just arrived today, im going to wait for my vacation to run the second portion, hopefully the thermal tape arrives by then, but who knows. Til then, Ive applied the copper shims to my Dell Mini 9.
result, I dont have too much data as of yet, but I do know that I have dropped from 105C (which was the point of overheat I believe) to now a nice 45C GPU idle and a 55GPU load, and with IBT I have a 66C CPU max temp with my fsb at 160, I want to push further but I bsod at 164 so I may just have a dud cpu but my temps are very nice. All in all a 50-60C drop in temps -
I was also thinking of testing out how the laptop would react when the m11x nameplate is removed when in use with a cooling pad, name the cooler master U1 I think. I bought 2 since they were on sale with frys not long ago and now I have 2 fans for one pad, also, I can cut the rubber feet from the pad I dont use to apply to the m11x since there IS a bottleneck as far as air demand and what actually is circulated...
Ive already applied this mod in minor reference to another laptop from a friend, it was a sony vaio that only have about 3 inches of copper length and was an exhaust only design, now it runs IBT with no issue at all. Great knowledge here, thansk again Someguy!
Oh btw this mod was carried out with an i7 R2, just for clarification -
How is your temp TheReciever?
After added even more copper. When its cool in my room. When i play a game for like 20min i hit 85C 85C 74C at fan med speed.
I'm kinda mad right now.
here my temp after like 30min of gaming <<
I use fan grid , so fan never kick max speed
With this setting noise don't annoy me.
You think i can let computer like this 24/7 np?

-
What program is that? Im going to look into that program and see what kind of results I get
-
pretty sweet man. glad some R2/R3s are using this mod. technically there are the ones that really need it.
-
It's HwInfo64.
Install it, open it and click the Sensors tab. Near the Logging Start you will see a small brown fan icon (on supported systems; the M11x is one of them thanks to Mumak, the developer). There you can create custom profiles for your fans based on temperatures.
Use the program at your own risk. -
ok ive installed it, very nice program cant believe I havent come across it earlier. with the custom fan profile I get 45-48 load and idle. I run some more test to confirm
-
I have been a lurker on the m11x forums for some time now, but I have also done a variation of the heatsink mod and I can attest to the wonderful temps you get out of it. I bought my r1 second hand and it was immaculate except for the fan making awkward noise so i figured id have to tear it apart anyways- mind as well do everything i can while im in there. After all was said and done my r1 runs amazingly well, last night while playing an almost two hour match on SC2 and overclocking my nvidia335m with MSI afterburner my max temp was 54C. I also had the pinmod in effect with an OC of 1.9GHZ- the heatsink mod is truly amazing!
-
Great post OP.
I was wondering how good the thermal adhesive is on these copper Enzotech copper pegs, with time does it give away and start falling off?
I am going to put all of these in my M11x R1 just so the fan stays off most of the time..... I wanna be cool. -
im using the tape i listed in the OP. not the tape that came with the Enzotech heatsinks.
main reason was the enzotech tape was really spongy and thick. the stuff i got off ebay is strong as F**K. i cut a 1"square off and attached a old heatsink i had laying around to my glass table to test the bond strenght. well i picked up the 2'x4' piece of glass right off the table with it. the bond is crazy.
i carry my laptop EVERY-WARE in my padded backpack that gets thrown around daily and all my lil heat sinks are still attached where they i put them. just make sure to clean both surfaces and you should be good to go!
-
Removing the Battery and the undertrap ( not sure how to call this ) its seems temp went down of like 7C. need more testing
-
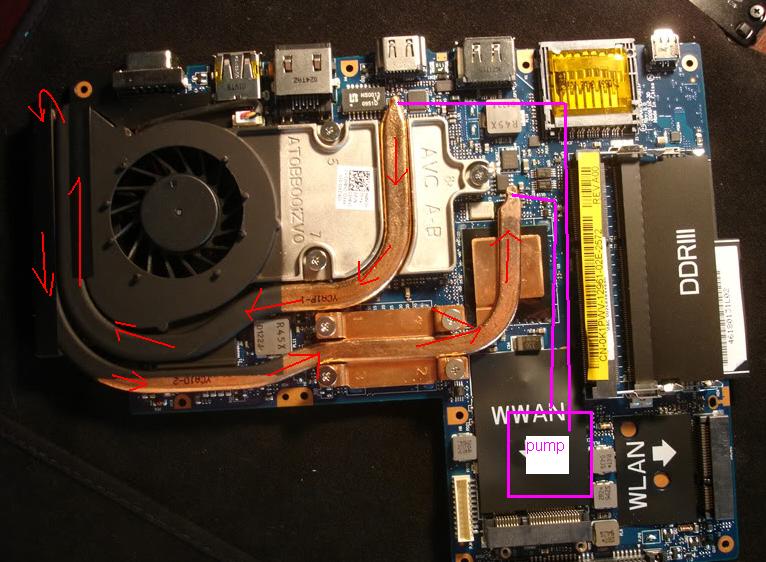
Just spit balling here.... but with the intro of the m18x liquid cooling system I got to thinking.
The system they have uses copper heat pipes, and a pump to send the liquid into it. There is no radiator, just copper fins on the outlet of the fan.
So, lets say we take the m11x heat pipes, cut off the ends of each pipe, then link them together. Now we hook up a micro water pump to the pipes with some hose. The pump could probably be put where the right speaker is. Tap power from the stock fan to run the pump, or just set it to run when the computer is on.
The base for a water cooling system is there already, we just need to install the rest of the plumbing.
Its a idea, and it may be something that could work. But we need to find a small waterpump/tank that could either fit near the speakers, or in the unused mpcie slot.
My ms paint skillz at work here.
aseteks system
http://www.geek.com/wp-content/uploads/2012/03/asetek_liquidcooling.jpgAttached Files:
-
-
I think I might explore this idea a little tonight. I have a spare heatsink with a bad fan on it. Going to look into trimming the tubes and installing some barbed fittings.
-
What kind of tubing? Not that I would EVER try this.
-
Not sure yet, probably a silicone tube for now till I could find something better.
-
Will silicone or plastic or whatever get too hot? How about that copper tubing they used to hook up my fridge to the faucet?
-
Silicone is used on high heat engines, its used on oven mitts, you can buy cupcake trays that are made of it too.
Its pretty much impervious to any temperature. Hot or cold, it stays the same.
I would use the silicone because it is easy to route through the m11x case. Its very flexable. -
Oh, cool. I guess I never thought about all the different uses for silicone.
-
That is a very cool idea ejohnson, keep us posted and take some pics if you can.
-
if there is no radiator wouldn't you end up with would be pipes full of recirculating hot water? unless there was some way to bleed the heat i dont think it would work at all
if its the same system as here they have like 3 radiators on them

and 3 fan assemblies

-
The m11x has a heat sink at the end of the pipes that the fan blows accross, the same at the asetek system does.
You dont need a radiator, just something to remove the heat from the pipe. In this case there are tons of coppper fins on the heat pipes at the recieving end of the fan. -
this is a awesome idea. and ive done it before on a laptop Frankenstein. it kinda works...
but this is the problem. if you dont have more surface area or more air removing the heat all you end up having is a system that has a temp that spikes less.
under idle or load you will eventually reach a equilibrium between ambient temp & water (coolant) temp. the the only way to drop temp further will be having more air (faster fan speed) removing the heat from the heatsinks.
the moving water thru the pipes does make the temps much lower at start up but they soon will reach heat soak and then temps will slowly rise till they level out.
the only way to make adding the pump and coolant to the M11x really use full would be to some how add a small secondary radiator. possibly go with a micro SSD and use the extra space for the RAD and drill holes in the bottom panel to vent the hot air out.
this would really be awesome to do on a laptop with a CDrom. then you could take the CDrom out and use that space for the RAD. -
Could you not explain what exactly us less educated folk actually have to do to achieve this mod? All I see are pictures I can make very little sense of.
-
Pretty much what the heatsink mod does is:
Larger heat sinks pull heat away from the heat pipes before it has a chance to get to the stock heat sink.
This allows the fan to run less while on the intel gpu chip. For gaming, it makes the computer run a little cooler.
Your biggest gains are going to be on the running on the intel gpu for web browsing, light tasks (non-gaming)
Think of it like this.
Your sitting in a hot room, and all you have is a fan blowing on you to keep cool. But after awhile your battery is going to die and the fan will shut off. The heat sink mod is like adding a bowl of ice to the room.
You can use the ice to cool yourself down, conserving power that the fan would need to use later on. -
I think he was after more of a step-by-step guide or tutorial.
Do all of those fins fit in the chassis though? it just looks like most of them would be getting in the way and preventing it from being re-assembled correctly... Is there really that much empty space in the chassis? -
Ah, I missed the "to do" in there
Alright, well I can do that too.
Steps may vary from model to model, but here is a rough outline.
Take off bottom cover
Remove hdd, battery, ram, wifi card, wwan card.
Under battery are 5 little screws. remove them.
Along the outside edge there are screws holding the case halves together, they are long screws, 6 I think. Remove them.
Flip computer over
Remove power button cover, on right side there is a little area to get a finger nail under. Pull it up, its held in place with little clips.
Remove 2 screws for keyboard.
Pull keyboard up slow, the sides snap into place, there are 2 short cables for the keyboard on the left side.
Lift ribbon cable latch up (its on a little hinge)
Remove keyboard.
There are 2 ribbon cables that connect the trackpad and pwoer button to the motherboard, unhook these (center and left)
Remove remaining 4 screws. 2 center, one on each side.
Lift Palm rest up, lifting from the front lights. There is a small cable at the back right of the palm rest, it controls the "alienware" light on the lcd.
Now you can start taking out the motherboard.
Remove the usb/audio card. 2 screws and then pull up.
Remove all screws holding motherboard down.
Remove 4 screws that hold LCD hinge to chassis (needed for clearance of getting motherboard out)
Lift out motherboard!
Now you get to install heatsinks.
Place the heat sinks on there and test fit motherboard. Do them one by one to make sure your clearance is still good. Trim them to fit.
Then you need to cut the fan, you have to open it up a little so it pulls air from the heat sinks, see pictures in this thread for that.
Now, install the heatsinks with the heatsink tape, reverse order to rebuild system. Put battery in last. Test system. If something doesnt work, check your cables! -
And all of those sinks are installed via tape? And how do you exactly pull the fan out? Some of the pictures and posts aren't entirely clear for a complete noob such as myself.
-
You will leave the fan in the heat sink. Just remove the heat sink from the motherboard. Its held on with some screws that you will see right away. I recommend installing all the heatsinks with it still connected to the motherboard so you can get your clearance right with the bottom of the chassis. then when you have them on there. take it off the motherboard to cut your fan housing to adjust the airflow.
he heatsinks are held on with thermal tape. the first page should show whats needed to complete the job. -
Some guy, do you think you could include a picture or explain how you cut the fan shroud? It would be appreciated.
-
You can see it here.
M11x R1 Heatsink Mod
Discussion in 'Alienware M11x' started by some guy, Jun 12, 2011.