
Update: Tried installing this version of ATI drivers and still get BSOD with dell VBios at the end of the windows experience index assessment. The assessment starts ok, then when in the media decoding and tuning section the screen goes bezerk, then after a while the BSOD happens. Problem still seems to be the atikmpag.sys.
Problem Event Name: BlueScreen
OS Version: 6.1.7601.2.1.0.768.3
Locale ID: 1033
Additional information about the problem:
BCCode: 116
BCP1: FFFFFA8007EC7320
BCP2: FFFFF880044A69A0
BCP3: 0000000000000000
BCP4: 000000000000000D
OS Version: 6_1_7601
Service Pack: 1_0
Product: 768_1
Will try using Prince Black's posted Vbios.
-
-
Update: With this catalyst driver, both the Sosa and Prince Black Vbios versions will BSOD upon booting into windows. This time the faulty file seems to be atikmdag.sys... Argg what is going on here? It seems like this Clevo card does not accept any clevo vbios + CCC.catalysit drivers (only works with Clevo vbios when using default windows drivers with clocks at 300/150).
Any ideas? -
Seems like there is something damaged on Your gpu . Ask those guys what bios Version they have on their machines.
-
Maybe so, but I find it strange that the card works perfectly well a low clocks (450/300 core/memory): no artifacts or any abnormality. If it were a hardware issue, wouldn't this be apparent at low clocks? Is there any part of the gpu hardware that is inactive at low clocks and only kicks in at higher core/memory clocks?
-
Here are a few pictures to show everyone what I am getting with the dell Vbios running the Windows Experience Index Assessment:
Before screen goes berserk everything is normal:

Then the screen goes nuts as clocks are increased to 850/1200 during assessment

Screen returns to normal after gpu assessment finished in WEI:

And a print screen showing max clocks and temps after WEI assessment is finished. Note that graphics performance is only rated 7.1 in WEI for this card...

So do I ask for an RMA (bought on ebay, not sure how that works)? Is it a software issue? Any thoughts or suggestions?
Thanks -
You could try undervolting it using the tool over at tech inferno.
-
Are you referring to the modded vbios set found here: AMD 7970m - modified VBIOS
Otherwise, could you be more specific please.
Thanks. -
No this:
Vbios Patcher - releases & changelog
For dell vbios files only. -
I think that your card is broken....
I card came with the dell vbios but the clock never got higher than 450mhz so I flashed with Sosa vbios and
Everything worked great
Trying to change your card
I think it has a problem
Good lucky
Sent from my iPad using Tapatalk -
Yes it probably is broken.
-
Ok thanks for the feedback guys, I guess it must be hardware malfunction of some sort. For now I have removed the hd7970m and put my hd5870m back in. Everything is fine with my old card so at least I know the fault lies with the hd7970m. I'm in contact with the sbay seller to have it RMA'd as I have received a defective card. I'll keep you posted on the developments.
-
I'm in the mist of doing this mod I have almost everything purchased besides the washers and waiting on the fan also thermal pads from fujipoly. I hit up f9zslavick waiting on his response on what size paper washers he used to stand the card up. I purchased the Machine screws and bolt 3/4 4x40 going on the reference of cuban11182. Hopefully everything will workout. As of today I just dremeled the plate where the heat sink and fans sit.
-
Hi FlowCpu,
I found that the 4x40 3/4 screws were a little long for attaching the 5870m heatsink to the GPU die and VRAMS. I had to cut the tops off those 4 screws. Final length was around 1/2 inch, though it could probably go as low as 3/8. The 3/4 length machine screw was just perfect for fixing the GPU PCB to the motherboard (just enough length to go though the motherboard, the gpu board and the heatsink with a spacer between GPU and motherboard PCBs). I used a small rubber isolator as spacer: it has just enough give to provide a nice support for the card,
I assume you are going to modify the 7970m heatsink to fit around the 5870m heatsink as Prince Black and I did? If so there is another detail that wasn't explained: how to fix the gpu pcb to the motherboard on the right side of the card. Just to clarify: the hd7970m is not as wide as the 5870, so only the right side of the card will align with the existing motherboard attachment used to secure the 5870m. The left side of the 7970m will align with a through hole in the motherboard (the left anchor point used for the 5870m is too far to use for the 7970m). You need something to secure the lower heatsink and the gpu card on the right side. What I found to work well is to use the 5870 heatsink screws without the springs. They screw right into the motherboard anchor points, however, you need to modify the lower 7970m heatsink to install them. The lower heatsink comes with two holes to secure it to the card. You'll notice the holes are elevated w.r.t. the heatsink, i.e. forming little bumps. If you cut the right hole elevation flush to the heatsink plane, you will widen the hole enough for the 5870m screws as well as lower the high required for the screw. You can then use a 5870m screw to secure the right side of heatsink and gpu card at the same time. If you have widened the hole too much, just use a small washer and you are set.
Hope this helps. Good luck with the mod. -
I did not get the 7970m heatsink I just purchased the card itself I guess I'll be making a trip to RadioShack tomorow morning since they have a 4x40 1/2 1/4 and 3/4 pack of 40. Thank you.
-
When going into bios is there a vbios with question marks?
Ran gpu-z Read my card is a dell whom else here who has done this mod reads dell vbios? Should I flash and risk bricking like Cuban did or keep it with the dell vbios? My card is clocked at 647 still not done with the mod waiting on shorter screws and anti static fiber washers plus fan blower. I also I ordered notepal x3. I did the psu mod with a 240w delta I also added arctic silver adhesive my thermal paste is shin-etsu. Card I purchased from was http://www.ebay.com/itm/CLEVO-P150H...0M-2GB-MXM-3-0b-ENDURO-DISABLED-/110998486092
Here is vbios version 015.017.000.001.042717 -
I had the same vbios (dell) as you on my card. It also showed up in bios as ??. I had no problem flashing different vbioses on my card, only the card was defective so none of the clevo vbioses worked (instant bsod in windows with any CCC drivers installed). The original dell vbios did work with the CCC drivers, only screen output was noise when the gpu was under load.
In any case I strongly recommend you save your original vbios to the thumbdrive before flashing. If anything goes wrong with the clevo bios you will be glad you did.
My vbios had the clocks to 450/300 core/memory on idle. Opening any video made the core/memory clocks rise to the nominal 850/1000 with noise on the screen. Have you tried running any vids? Any issue with clocks on your card using dell vbios?
I am sending the card back for a replacement. Will attempt again once I receive my new card. -
That step is true for flashing anything ever. Backuo your original!
-
hehe thanks fellas for the update I was reading the thread again I'm at page 11 where Sosa is trying to figure out what vbios works on his Dell 790m card, I haven't tried anything I just installed the card after doing some mods I also added the adhesive so I don't think I would be getting a rma for this card if i I brick it it will be a lost, and I'll have to try again in the future. Thanks for the heads up I will save the vbios. Trying to get my gf to bring her laptop just in case. I know on my first initial boot I got a framebuf bsod then restarted and windows normally came up I haven't installed video drivers yet just waiting on a few things to come in before I go ahead and install the card again just wanted to see if I was going to get any problems with this card just a test run.
-
everything seems to be running beautiful so far, at first i was getting artifacts with the dell vbios after I flashed the clevo everything seems to be working in order, going to run some tests later today see how everything goes.
-
Yeah the card needs the right bios on it to function, they don't like running with another brand vbios.
-
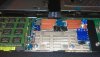
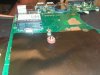
Awwww man my card burnt out
![[IMG]](images/storyImages/25qqd5w.jpg)
![[IMG]](images/storyImages/lgm86.jpg)
Any wsy to send this out for repairs suggestions holy shmidts wdf happen here
-
Sorry for the late response! Thought this thread was dead for a while there lol. I know the answer is nor of no use but I used enough washers to = the space of the regular nut that I couldn't desodder
HAPPENED THERE?
Looks like a nasty short of some sort.
It's possible you might of bridged 2 contact points with the thermal paste causing a short. Could be heat related.
I just realized I don't have a picture up of my card after gluing the rest of the copper shims. I will upload it sometime today for future reference. I was really careful in the way I added my copper heatsinks as some of the chips are not completely even. -
Is there a possible fix for this? Or is the card literally toast?
-
With that level of blackened parts I would say dead
-
Ouch, sorry to hear that. It does seem like a localized burn, I would suspect an electrical short causing arcing. I also think any chips in that area are fried beyond repair: they would have to be desoldered and replaced. Maybe those copper heatsinks made contact with some Vcc pins...
I guess that's another avantage to the Prince-Black method: using the modified 7970m heatsink as one giant block with proper thermal paste (non-electrically-conductive) there are no risks of shorting any components. It is definately more work on install, but seems to be the safer bet.
I should be getting my replacement card sometime this week. I'll keep you updated with results soon. -
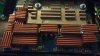
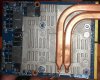
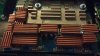
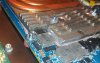
This is the end result of my mod. I never posted it so here it is. I made sure that the thermal adhesive paste didn't touch anything but the space between the chips and copper heatsink. I even added extra heatsinks to areas that didn't need it to bring down the temps even further. As you can see I also tried to made the heatsink as big as possible and made sure none of the heatsinks touched each other. -
For others using a single plate with thermal tape at different heights might be a better option if you have the time. A bit like the way the MSI heatsinks work, it helps to spread the temperatures and lets them all share the thermal mass.
Those chips with the tiny piece of copper on the left of the card can actually get hotter than the core which is why you have to be careful. -
Heh you guys should get yourselves IR temp guns so you can tell what's truly hot in there. The voltage regulator FETs are likely the hottest and they are tiny.
-
I hope I can fix my 5870....cuz change 7970 is more difficult for me......
-
It is a tricky mod for a beginner, you baking your card?
-
Sorry double post . Please remove this.
-
I have been following your posts regarding the 7970M upgrade in g73. I have managed to get a clevo 7970m card. The vBIOS is BR43595.003 . Can you please point me in the right direction. I am not afraid to mod and flash. Just not sure how to start. I have some questions.
I found the Vbios that I need to turn enduro off..
Can I use an Alienware M17X R3 Processor CPU GPU heatsink. Anyone with a 7970m changed the stock heatsink with m17x R3 one or does only fit the 6970?
Already got Delta Genuine PA-9E 240W Power AC Adapter psu. Do I just cut the end and solder a 5.5mm connector to the end?
Does anyone know of a (non conductiver) thermal putty (paste) that can be molded (spread)all over the vrams (lower part of the gpu that's exposed) to allow even heat dispersal.? Then the copper heatsinks can be placed directly on that material (to disperse heat with the help of a small 3" fan mod as chlieton has already done.
Any other suggestions would be appreaciated.
Thanks -
Is this thread dead. .Does anyone come here anymore??
-
I posted a guide on modding power supplies, notebook heatsinks are all custom and wont work between models. Thermal pads are used to connect everything but the core to the heatsink.
-
There is a well documented page showing how in the 6970m clevo works with two heatsinks . The stock one with some modding or an Alienware m17x R3 gpu heatsink (AT0fj0060C0) also with more modding. The question is will the m17x card work with the clevo hd79m gpu? And which m17x card.to be exact will work? to answer this i need to know if the footprint (form factor)of the clevo 6970m and cleco 7970m are the same.? May be someone could help me if they have both cards avail to compare.
Thanks -
Clevo always uses the standard PCB layout so if you look at pictures of the MXM on google images you will see. IIRC they are close but not identical in layout.
-
so the AT0fj0060C0 heatsink will not work with Clevo HD7970m (even with some modding)??
-
If you mean just the contact plate, and intend to desolder that from the heatpipes and copper fins then yes that would fit, but the shape of the entire heatsinks (heatpipes and fins) wont.
-
Just use the stock heatsink why complicate the process
-
My first post!
I have a G73 JH, it's getting rough around the edges, and I was *just* about to sell it. I stumbled across this thread while looking for benchmarks, and now I want to stuff a 7970m into her.
I see this card on the bay: Clevo P150HM P151HM VGA Upgrade KIT HD7970M 2GB MXM 3 0B With Enduro Disabled | eBay
Will this work? Is this the correct card to use?
Many thanks, you fine fellows. -
BTW hope someone is still watching this thread
-
I think that's the right card. The HM version with disabled enduro bios.
-
I think so too. Turns out it shipped from Ontario, and I received it in 2 days.
It has 2 separate heatsinks. So I'm going to cut the original G73 sink so it fits over the GPU and vents as it should. The second sink, I'm going to cut the fins off, and either route the copper beside it and to a fan, or something creative like Prince Black did.
Black's solution was good, but he doesn't have the nice clean 2nd heatsink like I do.
I originally wanted to build a slide in fan setup through the optical bay (because I hate optical drives, and especially when you hit the side button and whole thing comes flopping out). I just can't find a SATA slimline connector anywhere. I have access to dozens of dead laptops here at work, but nothing with a slimline in it, except for my own Lenovo which I am not hacking apart.
Hopefully I can get the machine up and running this weekend, I've scavenged a bunch of internal fans to try in the spot where Prince put it.
I was literally hours away from selling my G73 before I saw this thread. You guys are awesome! -
You do not need extra cooling or fans. Just use the original heat sink, mod it correctly, add some copper heatsinks to the copper heat pipes if you must, dont over do it.
It's important you mtach up every little heatsink according to the size of the ic chip your trying to cool.
I started out with double sided thermal tape to make sure I had all the correct sizes before using thermal adhesive. Also, don't be shy the bigger the heatsink the better even slap on a heatsinks on ic chips that dont need it. Physics 101, heat will always travel to the coolest area.
My soldering skills are terrible so I used a machine screw and nut lol. It worked out awesome. Just careful not to apply too much pressure, I turn turned it til I couldnt turn it with 2 fingers on the screw driver.
I had originally wanted to make a video but meh ;/
-
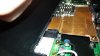
-preview.jpg)
I thought to show my cooling mod on asus G73sw
On other close up picture you can see small 5v fan that I soldered to 3v trace on motherboard. It works miracles
PS. It does not produce any more noise with extra fan than originaly. -
The advantage of the kit I ordered is that the heatsink for the VRM's and such was already pre-made. It just needs to be clamped a bit better on the bottom of the card, but seems to work like a charm otherwise.
Everything is up and running, however I've come across two things.
First is that I get flickering and crazy distortion when running any kind of benchmark. For example 3dmark11 will get it, and if I try to update my windows experience I get it. Gaming does ot set it off, very odd.
Second, is that the clock seems stuck at 450Mhz. in afterburner it reads min300, max450. I read about that earlier in the thread, so I'll try to slog through it and see why. -
Ok,
Flashed the vbios with the 7970m file provided here (thank you)
Clock is up to 850mhz now, and everything runs like a charm. I feel like I get to re-enjoy my games all over again Highest temp I've had is 78 degrees, and that was with about an hour of gaming on full. I haven't trying running 3dmark11 again, because of the scary distortion, but everything seems ok so far.
-
It's amazing the lead these top tier cards have over the others at the moment.
-
Machine is all put together in one piece again! You're right Meaker, for whatever reason, 3dmark isn't posting my score, just a blank screen after running it
But in the extreme test, where my 5870 was scoring <1 FPS, this thing is now running at 5-8.
The difference in my games is intense, it really makes everything look brand new.
Temps have not exceeded 75 degrees.
There we go, in another window, I had X715 score with the 5870, now X1842 with the new card. Woohoo! -
Enjoy your now up to date gaming rig!
ATI HD 7970M ON ASUS G73Jh
Discussion in 'ASUS Gaming Notebook Forum' started by new2019, Apr 19, 2012.


